
You Don’t Need a Workshop — You Just Need to Start
You don’t need a fancy workshop or years of experience to create something beautiful out of wood. Seriously. Some of my favorite projects came together on a kitchen table with a basic hand saw and sandpaper. No CNC machine, no expensive router — just a bit of patience and a willingness to try.
Woodworking has exploded on Pinterest lately, and honestly? It makes total sense. There’s something deeply satisfying about turning a rough piece of pine into something you’d actually put in your home. And with so many beginner-friendly projects out there, the barrier to entry has never been lower.
In this post, I’m sharing 15 easy wooden projects — complete with step-by-step instructions, materials lists, and pro tips — that anyone can pull off. Whether you’re a total beginner, a weekend hobbyist, or someone looking for handmade gift ideas, there’s something here for you.
These 15 Easy Wooden Projects are perfect for anyone looking to dive into woodworking.
Pin this post so you can come back to it later! Trust me, you’ll want to reference this more than once.
What You Need to Get Started
Before we jump into the projects, let’s talk setup. Don’t worry — I’m not about to tell you to go spend $500 at the hardware store. Here’s the honest, no-fluff version of what you actually need.
Basic Tools
- Hand saw or jigsaw — for cutting wood to size
- Hammer and nails — for basic assembly
- Cordless drill — a game-changer for speed and precision
- Sandpaper (80, 120, 220 grit) — the secret to a smooth finish
- Measuring tape and pencil — measure twice, cut once (seriously)
- Wood glue — your best friend for joints that hold
Best Woods for Beginners
Not all wood is created equal — especially when you’re just starting out. Here are three that I always recommend:
- Pine — affordable, widely available, and easy to cut. Perfect for most of these projects.
- Plywood — great for flat panels, shelves, and trays. Holds screws well.
- Balsa — ultra-light and ideal for small decorative projects like keychains and signs.
Still not sure which wood to grab off the shelf? I put together a full comparison that covers everything from texture to budget — head over to 7 Best Woods for Beginner Woodworking Projects and you’ll know exactly what to buy before you even leave the house.
With these 15 Easy Wooden Projects, you’ll be amazed at what you can create.
Safety Tips
- Always wear safety glasses — sawdust is no joke.
- Keep your workspace clear of clutter and good lighting.
- Never rush a cut. Slow and steady beats a trip to urgent care.
- Keep fingers away from saw blades — use a guide or clamp when possible.
Where to Buy Affordable Wood
Your local hardware store (Home Depot, Lowe’s) is the easiest option. For smaller or specialty pieces, check online retailers like Amazon or local lumber yards. FYI — buying in bulk and cutting down yourself is almost always cheaper than buying pre-cut pieces.
One thing beginners often overlook is workspace setup — and it makes a bigger difference than you’d think. If you’re starting from scratch, don’t miss my post How to Set Up a Small Woodworking Shop (Beginner’s Guide) — it covers everything from tool storage to lighting so you can work safely and efficiently from day one.
The 15 Easy Wooden Projects
Category 1: Home Decor Projects
Explore these 15 Easy Wooden Projects that are fun and rewarding.
Project 1 — Wooden Picture Frame
Credit : Instructables
Difficulty: ⭐☆☆ (Easy)
Time: 1 hour
Materials: 4 pieces of pine (2x measured to your photo size), wood glue, sandpaper, stain or paint, hanging hardware.
Steps:
- Measure your photo and cut four pine pieces — two for top/bottom, two for sides.
- Sand all pieces smooth with 120-grit, then finish with 220-grit.
- Glue the corners together at 45-degree angles and let dry for at least 2 hours.
- Add a backing piece of thin plywood or cardboard cut to size.
- Stain or paint, attach hanging hardware, and you’re done.
Pro tip: Miter cuts at the corners give a more polished, professional look — even if your angles aren’t perfect, wood filler hides a lot.
Project 2 — Floating Wooden Shelf
This Floating Wooden Shelf is one of the best 15 Easy Wooden Projects you’ll enjoy making.
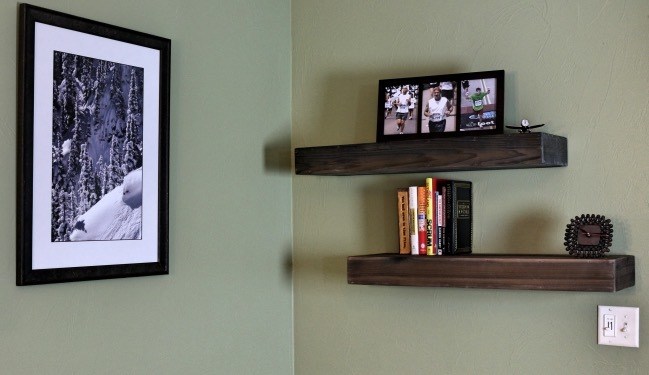
Credit : diypete
Difficulty: ⭐⭐☆ (Intermediate)
Time: 2 hours
Materials: 1×6 or 1×8 pine board, L-brackets or floating shelf hardware, screws, sandpaper, stain or paint.
Creating this Wooden Candle Holder is part of the 15 Easy Wooden Projects in this guide.
Steps:
- Cut your board to the desired length (24–36 inches works great for most walls).
- Sand thoroughly — start with 120-grit, finish with 220-grit for a silky surface.
- Apply your stain, paint, or varnish. Two coats always look better than one.
- Locate wall studs and mark mounting positions.
- Attach L-brackets to studs, then secure the shelf on top.
Pro tip: Use a level religiously. There is nothing more noticeable than a slightly crooked shelf — trust me, I learned this the hard way .
Each of these 15 Easy Wooden Projects can help you refine your skills.
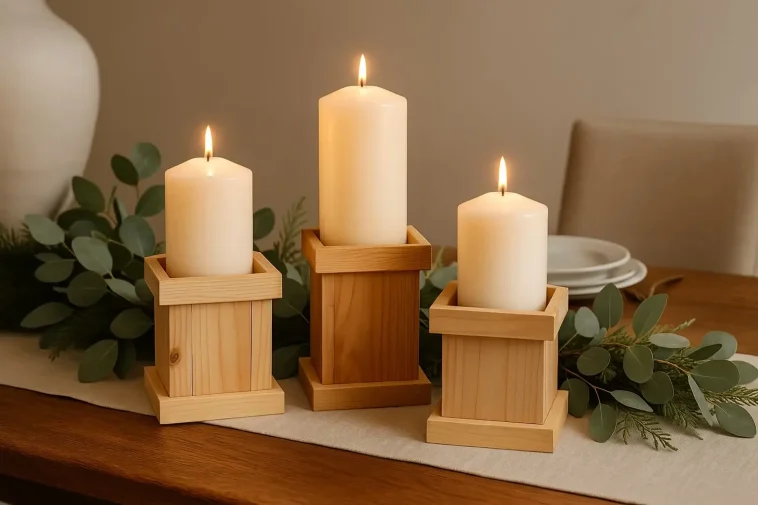
Project 3 — Wooden Candle Holder

Credit : ana-white
Difficulty: ⭐☆☆ (Easy)
Time: 45 minutes
Materials: Small wood block or scrap wood, drill with spade bit, sandpaper, tea light candles, wood finish.
Steps:
-
- Cut your wood block to size — cube shapes (3x3x3 inches) look great.
These steps are part of the 15 Easy Wooden Projects you’ll love.
- Use a spade bit to drill a shallow hole slightly smaller than your tea light.
- Sand all surfaces smooth and round off the edges slightly.
- Apply a natural finish or leave it raw for a rustic look.
- Drop in a tea light and enjoy the vibe.
Pro tip: Make a set of three in different heights — it’s way more visually interesting than a single candle holder.
Speaking of quick wins — if you’ve got offcuts piling up in the corner, don’t throw them away. I wrote a whole post on exactly what to do with them: 25 Scrap Wood Projects That Sell (Low-Cost & Beginner-Friendly) — you’ll be surprised how much money those scraps are actually worth.
Project 4 — Rustic Wooden Tray
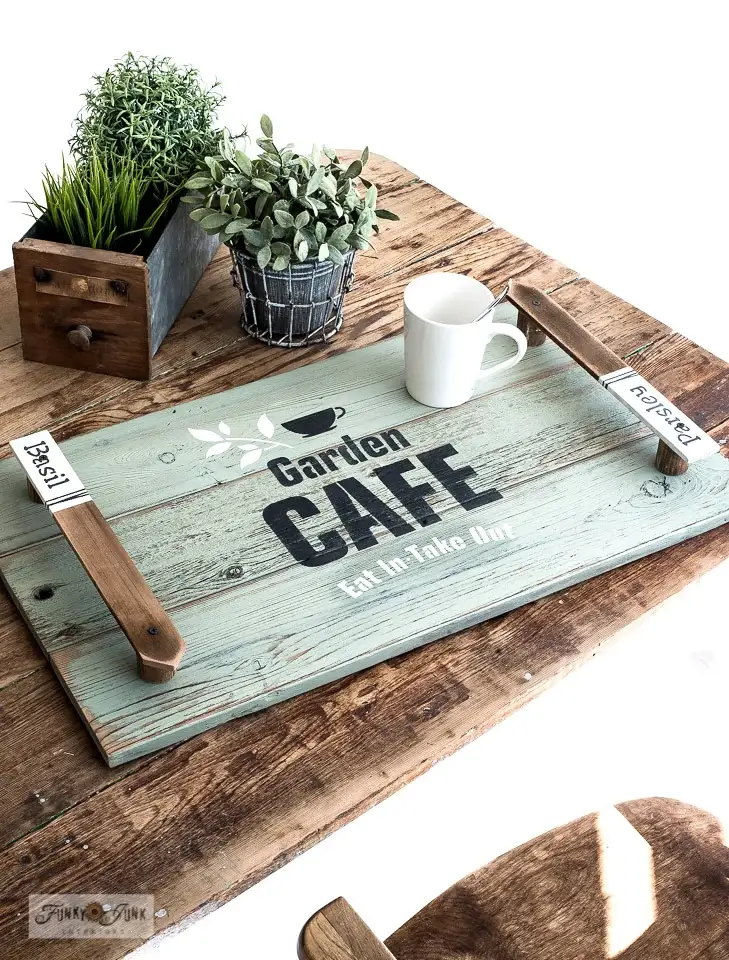
Credit : funky junk interiors
Difficulty: ⭐☆☆ (Easy)
Time: 1–2 hours
Materials: 1×6 pine board, 1×2 pine strips (for sides), screws or nails, sandpaper, stain or paint, optional handles.
Steps:
-
- Cut your base board to desired size (12×18 inches is a popular dimension).
- Cut side pieces from 1×2 strips and attach them around the perimeter of the base.
- Sand the entire piece — pay extra attention to corners and edges.
- Stain with a dark walnut or white-wash finish for that classic rustic look.
- Attach metal drawer pulls as handles on the short ends.
Follow these steps to create one of the 15 Easy Wooden Projects.
Pro tip: Distress the surface slightly with a chain or sandpaper before staining — it adds instant character.
Category 2: Kitchen & Dining Projects
Project 5 —Wooden Cutting Board

Credit : rockler
Difficulty: ⭐☆☆ (Easy)
Time: 1–2 hours
Materials: Hardwood board (maple or walnut), sandpaper, food-safe mineral oil, optional router for edge detail.
Steps:
- Choose a hardwood — maple is affordable, walnut looks stunning.
- Cut to desired size (9×12 inches is a great all-purpose board).
- Sand progressively: 80, 120, then 220-grit until silky smooth.
- Round off the edges slightly with sandpaper or a router.
- Apply generous coats of food-safe mineral oil, letting each coat soak in fully.
Pro tip: Never put your cutting board in the dishwasher — it will warp and crack. Hand wash only, dry immediately, and re-oil every few months.
Choosing the wrong wood for a cutting board can actually be a food safety issue, not just an aesthetic one. To get it right, swing by my post 7 Best Woods for Beginner Woodworking Projects — I cover exactly which hardwoods are safe for food contact and which ones to avoid.
Project 6 — Wooden Spoon Rest
This Wooden Spoon Rest is an example of the 15 Easy Wooden Projects to try.
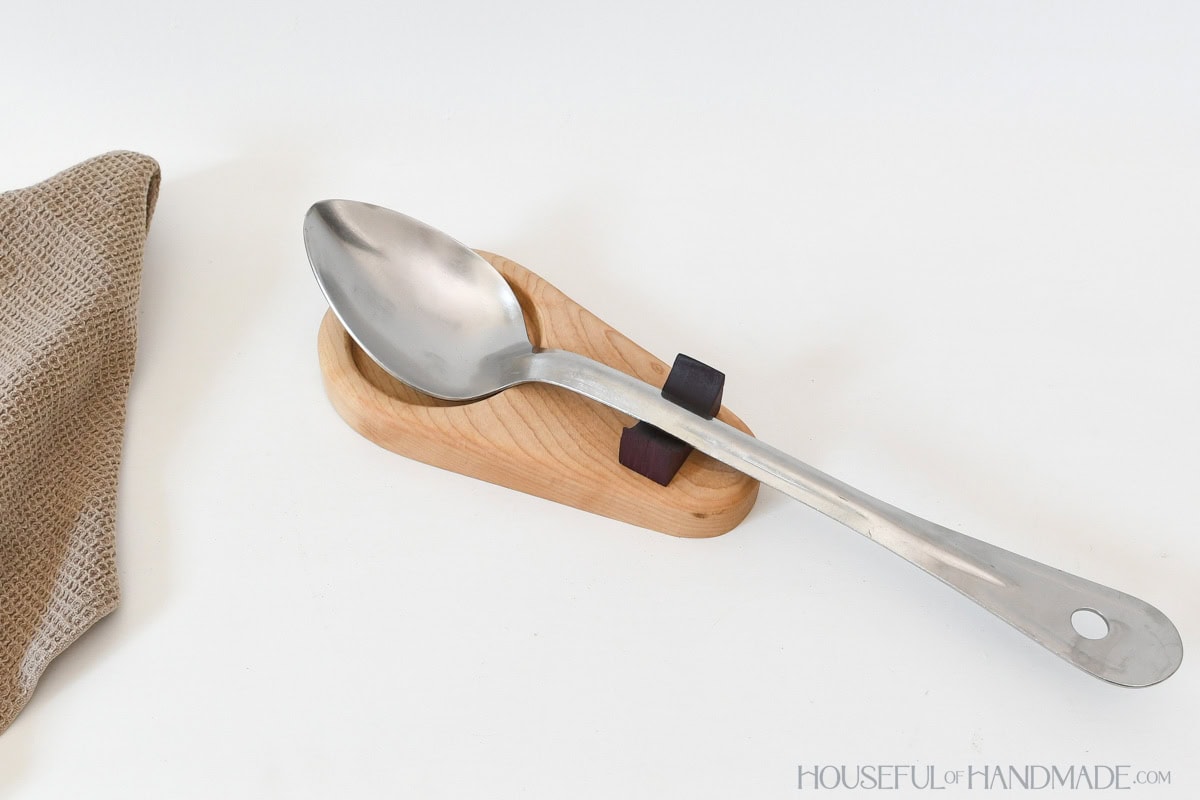
Credit : houseful of handmade
Difficulty: ⭐☆☆ (Easy)
Time: 30 minutes
Materials: Small scrap piece of hardwood or pine, sandpaper, food-safe finish.
Steps:
- Cut a rectangular piece about 5×2 inches — scrap wood works perfectly here.
- Round the corners with sandpaper to avoid any sharp edges.
- Sand smooth through the grits, finishing at 220.
- Apply a food-safe oil or beeswax finish.
- Let it cure overnight before using.
Pro tip: Engrave or wood-burn a small design on the surface — a leaf, a herb, or your kitchen’s name. It makes a great gift too.
Project 7 — Wooden Recipe Card Holder
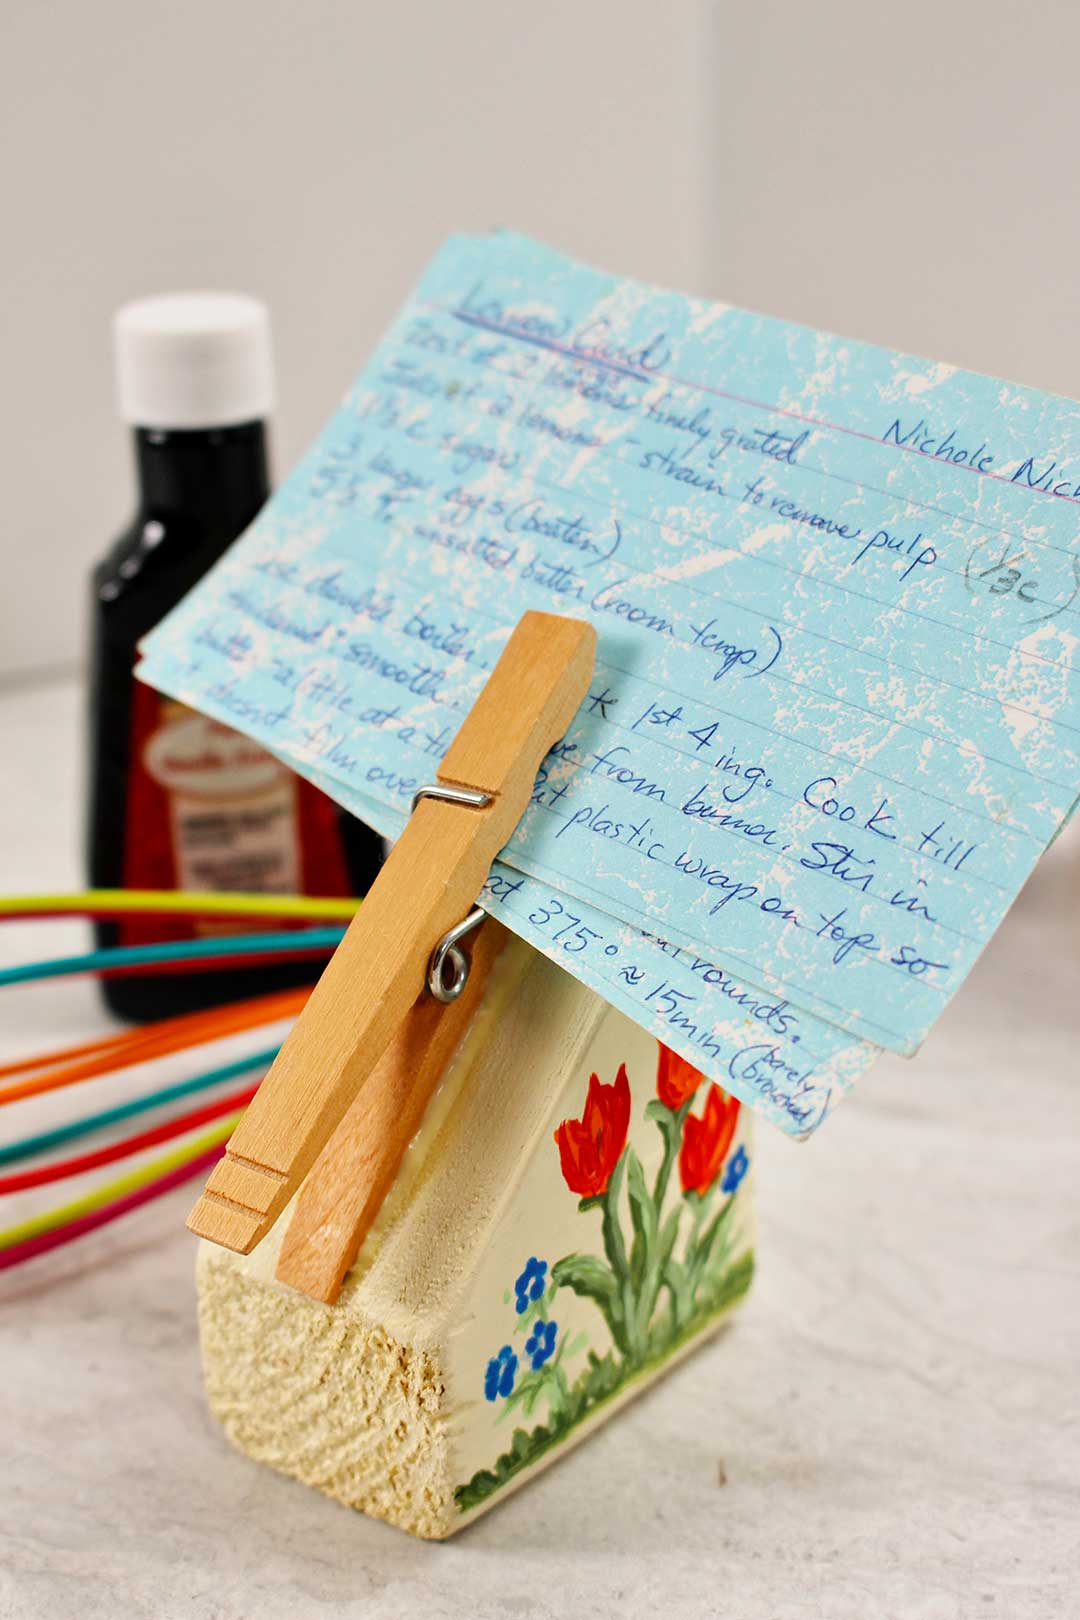
Credit : welcome to nana’s
Difficulty: ⭐⭐☆ (Intermediate)
The Wooden Recipe Card Holder is another of the 15 Easy Wooden Projects featured here.
Time: 1 hour
Materials: Small pine board, thin plywood backing, small saw, drill, sandpaper, wood glue, finish.
Steps:
- Cut a base piece about 4×3 inches for stability.
- Cut a thin slot in the center of the base using a hand saw or table saw.
- Sand all surfaces smooth — this one will live on your counter, so make it pretty.
- Optionally add a small wall bracket to the back for hanging.
- Finish with stain or paint to match your kitchen aesthetic.
Pro tip: Make the slot just wide enough for a standard index card — that way it doubles as a phone holder. Practical and stylish.
Category 3: Outdoor & Garden Projects
Project 8 — Wooden Planter Box
Credit :pine and poplar
Difficulty: ⭐⭐☆ (Intermediate)
Time: 2–3 hours
Materials: Cedar or pressure-treated pine boards, screws, drill, sandpaper, optional liner or plastic sheeting.
One of the most rewarding 15 Easy Wooden Projects is the Wooden Planter Box.
Steps:
- Cut four side pieces and a bottom panel to your desired dimensions.
- Drill drainage holes in the bottom panel — at least four.
- Assemble the sides using screws (not nails — they’ll work loose outdoors).
- Attach the bottom and add internal liner if desired.
- Sand and seal with an outdoor-rated finish or leave cedar natural.
Pro tip: Cedar is naturally rot-resistant — it’s worth the slightly higher price for an outdoor planter that’ll last years.
Project 9 — Garden Stake Signs
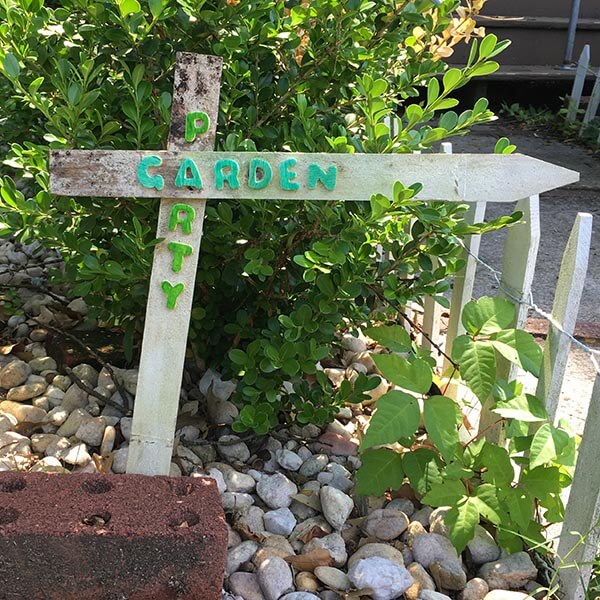
Credit : crafting a green world
Difficulty: ⭐☆☆ (Easy)
Time: 30–45 minutes
Materials: Thin pine boards or scrap wood, pointed wooden dowel, sandpaper, outdoor paint or wood burner.
Steps:
-
- Cut small rectangular pieces for the sign faces (about 4×6 inches).
- Sand smooth and paint white or a light base color.
Garden Stake Signs are included in the 15 Easy Wooden Projects that you can tackle.
- Write herb names, vegetable labels, or inspirational words with outdoor paint.
- Alternatively, use wood burning for a more permanent, rustic look.
- Attach to sharpened dowels using glue and a small screw.
Pro tip: Use a wood burner for labels instead of paint — it’s more durable outdoors and looks incredibly charming.
If you’ve never tried wood burning before, it’s way easier than it looks — and honestly quite addictive. I wrote a full beginner guide that covers every tool, technique, and safety tip you need: How to Start Wood Burning: The Complete Beginner’s Guide. Read it before you grab a burner — you’ll thank yourself later.
Project 10 — Wooden Birdhouse
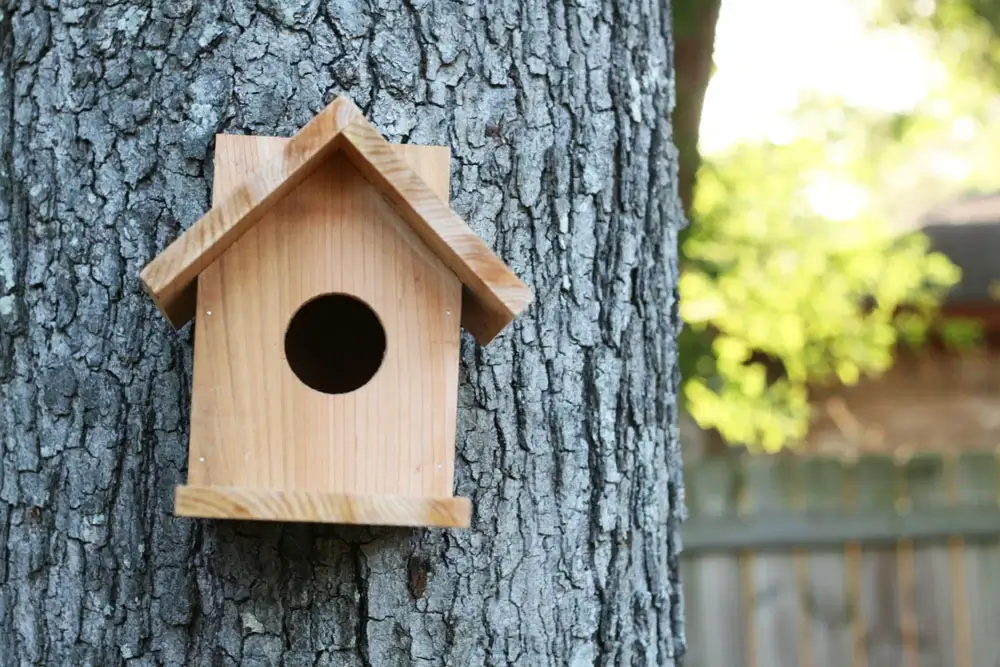
Credit : ana-white
Difficulty: ⭐⭐☆ (Intermediate)
Time: 2–3 hours
Materials: Cedar boards (1×6), screws, drill with 1.5-inch hole bit, sandpaper, exterior paint or stain, hanging hardware.
Steps:
-
- Cut all panels: front, back, two sides, floor, and two roof pieces.
- Drill the entry hole in the front panel — 1.5 inches for small birds.
- Assemble sides, front, and back with screws.
- Attach the floor and roof panels last.
The Wooden Birdhouse is another fun project from the 15 Easy Wooden Projects list.
- Sand, paint or stain, and add a screw at the top for hanging.
Pro tip: Skip the perch — birds don’t actually need them, and they make it easier for predators to access the nest.
A birdhouse also happens to be one of those projects where having the right tools makes a noticeable difference in the final result. If you’re not sure what’s worth buying yet, my post 16 Best Woodworking Tools for Beginners breaks down exactly what to buy first — and what you can skip until later.
And if you want to go beyond these 15 projects and access step-by-step plans for over 16,000 woodworking builds, Ted’s Woodworking Plans is one of the most popular resources in the beginner woodworking community. Every plan comes with a cut list, materials list, and detailed diagrams — so you never have to guess.
Category 4: Gift & Sellable Projects
IMO, handmade wooden gifts hit different. They’re thoughtful, beautiful, and people genuinely treasure them. And if you catch the selling bug — which happens faster than you’d think — head over to my post 25 Small Wood Projects You Can Sell as a Beginner — it’s packed with ideas that are genuinely profitable without needing a full workshop or expensive equipment.
Project 11 — Personalized Wooden Keychain
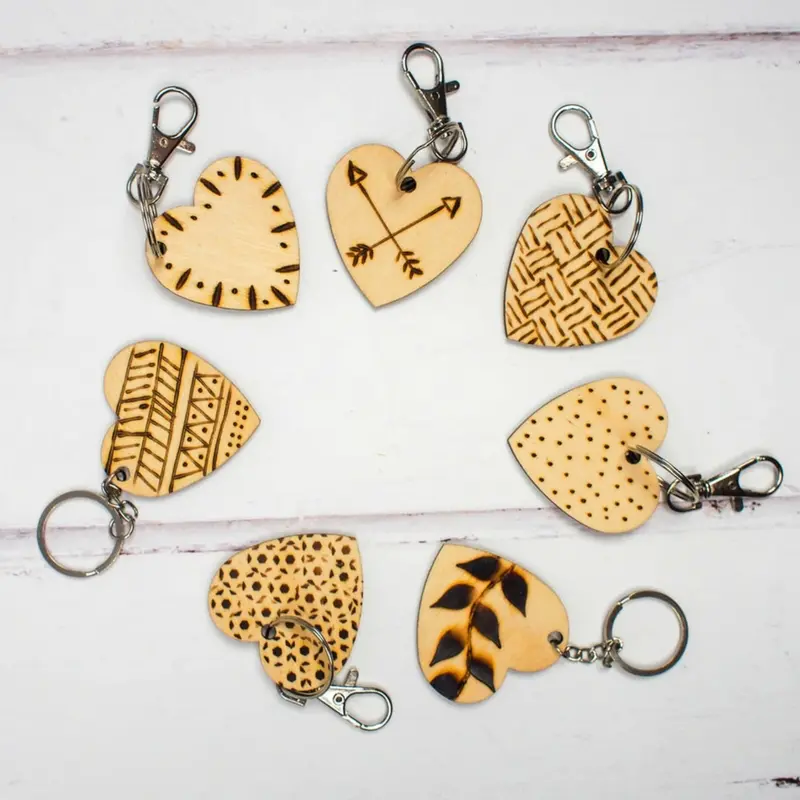
Credit : mum in the madhouse
Difficulty: ⭐☆☆ (Easy)
Time: 30 minutes
Materials: Thin balsa or hardwood, keychain ring hardware, sandpaper, drill, wood burner or engraver.
Steps:
-
- Cut small shapes: rectangles, circles, or custom shapes with a scroll saw.
- Sand all edges until perfectly smooth — this goes in someone’s pocket daily.
- Drill a small hole at the top for the keychain ring.
Creating personalized keychains is among the 15 Easy Wooden Projects you’ll enjoy.
- Personalize with a name, date, or design using a wood burner.
- Apply a light coat of clear finish to protect the surface.
Pro tip: Personalized keychains sell really well at craft fairs and on Etsy — simple designs with names are the most popular.
The secret weapon for making keychains look truly custom? A wood burner. If you’ve never used one, it’s much easier to learn than you’d expect. My guide How to Start Wood Burning: The Complete Beginner’s Guide walks you through your first session step by step — from choosing a burner to your first design.
Project 12 — Wooden Jewelry Box
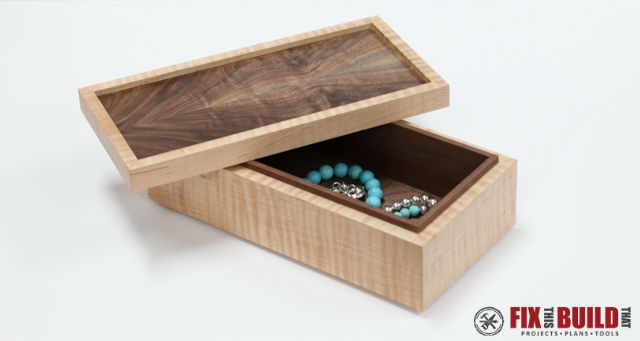
Credit : fix this build that
Difficulty: ⭐⭐☆ (Intermediate)
Time: 3–4 hours
Materials: Thin plywood or pine boards, small hinges, sandpaper, wood glue, screws, felt lining, stain or paint.
Steps:
-
- Cut panels for all six sides of the box.
- Glue and clamp the bottom and four sides together — let dry fully.
- Sand all surfaces, inside and out.
- Attach the lid with two small hinges.
- Line the interior with felt cut to size and glued down.
The Wooden Jewelry Box is a beautiful addition to the 15 Easy Wooden Projects featured.
Pro tip: Add a small magnetic clasp to keep the lid closed — it adds a polished, store-bought feel to a handmade piece.
Want to keep material costs low on this one? A jewelry box is a perfect candidate for leftover wood. If you need more ideas on how to use up every last piece, my post 25 Scrap Wood Projects That Sell is exactly what you need. And if you want a detailed plan with exact dimensions and diagrams, Ted’s Woodworking Plans has multiple jewelry box plans for different skill levels — all with full cut lists included.
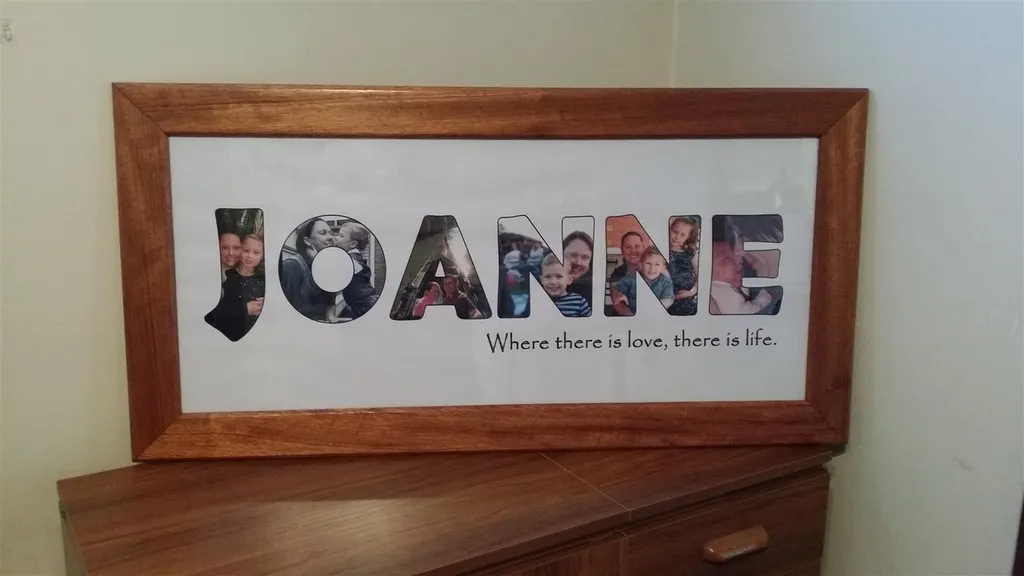
Project 13 — Wooden Name Sign
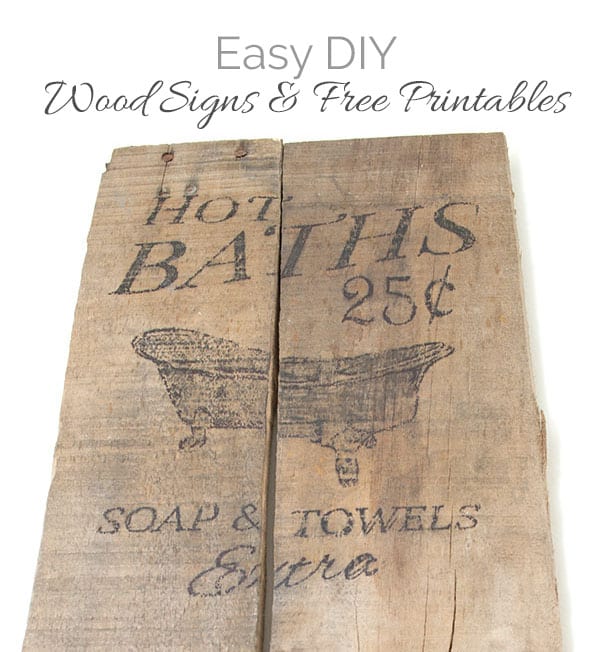
Credit : salvaged inspirations
Difficulty: ⭐☆☆ (Easy)
Time: 1 hour
Materials: Pine board (1×6), sandpaper, wood burner or stencils and paint, optional wall mounting hardware.
Steps:
- Cut your board to the desired length based on the name or word.
- Sand smooth — both faces and all edges.
- Use a stencil and paint, or a wood burner, to add the name or message.
- Apply a clear coat for durability and a finished look.
- Add sawtooth hanging hardware to the back.
Pro tip: Nursery name signs are a perennially popular Etsy item. Natural wood with a simple font and a touch of color works beautifully for baby rooms.
Don’t forget to try the Wooden Name Sign from the 15 Easy Wooden Projects guide.
If you’re thinking about turning your signs into a side income, you’re already closer than you think. My post 25 Small Wood Projects You Can Sell as a Beginner shows you exactly which projects sell best, where to list them, and how to price them so you actually make a profit.
Category 5: Kids & Family Projects
Project 14 — Wooden Toy Car
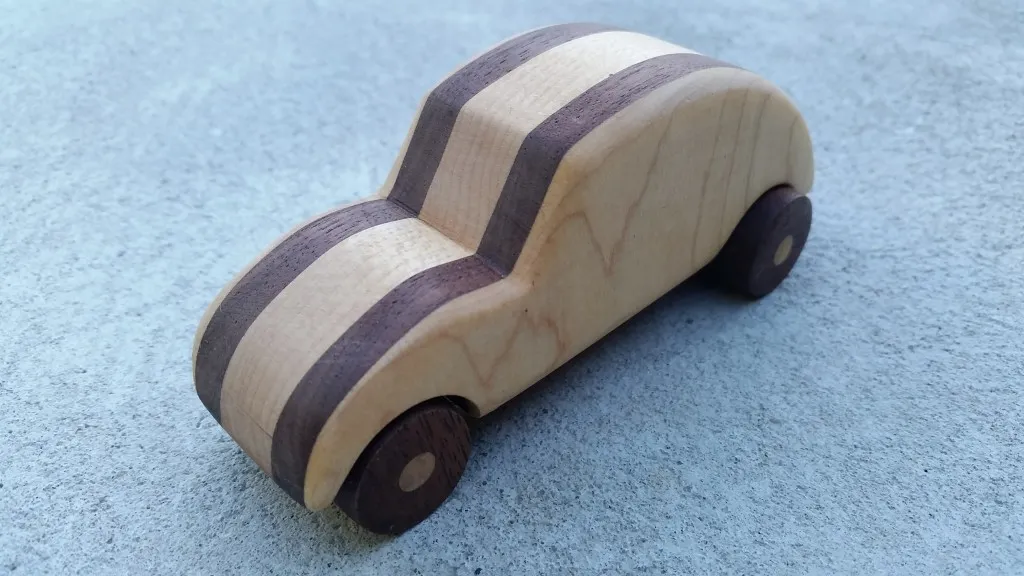
Credit : Instructables
Difficulty: ⭐⭐☆ (Intermediate)
Time: 2 hours
Materials: Pine blocks, wooden dowels (for axles), pre-made wooden wheels or cut your own, sandpaper, non-toxic paint.
Steps:
- Cut or shape the car body from a pine block — simple rectangles work great.
- Drill axle holes through the body at front and rear.
- Cut dowels slightly wider than the car body for axles.
- Glue wheels onto the ends of the dowels.
- Sand thoroughly — especially all edges — and paint with non-toxic colors.
Pro tip: Make sure the wheels spin freely before the glue fully sets. Test the fit first, then glue.
Since this is going in a child’s hands, wood choice really matters here — you want something smooth, splinter-resistant, and non-toxic.
This Wooden Photo Puzzle is one of the 15 Easy Wooden Projects that is fun for all ages.
Project 15 — Wooden Photo Puzzle
Credit : Instructables
Difficulty: ⭐⭐☆ (Intermediate)
Time: 2–3 hours
Materials: Thin plywood (1/4 inch), printed photo (laser printed works best), Mod Podge, scroll saw or jigsaw, sandpaper, sealant.
Steps:
- Cut your plywood to your desired puzzle size (8×10 inches is popular).
- Adhere your printed photo to the wood surface using Mod Podge — apply a coat, press the photo, then seal on top.
- Let dry completely (overnight if possible).
- Draw your puzzle piece shapes on the back with pencil.
- Cut carefully with a scroll saw and sand any rough edges.
Pro tip: Simpler puzzle shapes are easier to cut cleanly. Start with fewer, larger pieces before attempting intricate designs.
A project like this really highlights why having a proper workspace matters. A scroll saw and a stable bench make all the difference. If you’re still working off a wobbly kitchen table, it might be time to read How to Set Up a Small Woodworking Shop (Beginner’s Guide) — it’ll show you how to set up a safe, functional shop even in a small apartment or garage. And once your space is ready, Ted’s Woodworking Plans gives you an almost unlimited library of projects to tackle next — from beginner toys to advanced furniture builds, all with blueprints and material lists.
Remember, these skills will help you with the 15 Easy Wooden Projects you want to create.
Tips to Make Your Projects Look Professional
Want to know the difference between a project that looks handmade and one that looks hand-crafted? Usually it comes down to finishing — not skill level. Here are the techniques that genuinely make the biggest difference.
Sand between every coat. Whether you’re applying stain, paint, or varnish — lightly sand with 220-grit between each coat. It removes bubbles and brush marks and creates an incredibly smooth final surface.
Choose the right finish for the job. Stain enhances natural wood grain (great for decor), paint covers imperfections (great for kids’ projects), and varnish or polyurethane protects surfaces that need durability (cutting boards, outdoor items). Pick based on function, not just looks.
Measure twice, cut once. I know you’ve heard this a thousand times, but it’s a thousand times true. Most beginner mistakes happen at the measuring stage, not the cutting stage.
Fix gaps with wood filler. Even experienced woodworkers use wood filler. Don’t feel like imperfect joints ruin a project — fill, sand, and finish, and most people will never notice.
Best Places to Find Supplies and Inspiration
You don’t need to hunt far for wood and supplies — here’s where I go:
- Home Depot / Lowe’s — best for dimensional lumber, plywood sheets, and finishing supplies. Ask the staff to make cuts for you — most stores offer this service.
- Amazon — great for tools, hardware, and specialty finishes delivered to your door.
- Etsy — surprisingly good for specialty woods, pre-made parts (like wheels and hinges), and unique supplies.
- Pinterest — the absolute best source of visual inspiration. Search ‘easy wooden projects’ and you’ll fall down a glorious rabbit hole. Save boards as you go!
- YouTube — channels like Woodworking for Mere Mortals, Steve Ramsey, and April Wilkerson are genuinely fantastic for visual learners.
Your First Chip of Wood Awaits
There you have it — 15 easy wooden projects, from simple picture frames and candle holders to personalized gifts and fun family crafts. Every single one of these projects is doable for a beginner, and every single one produces something genuinely beautiful.
These 15 Easy Wooden Projects are just the beginning of your woodworking journey.
Here’s the honest advice: don’t try to do all 15 at once. Pick one — just one — that excites you right now. Get the materials, clear some table space, and make something. The first project is always the hardest because you’re figuring everything out for the first time. After that? It gets addictive in the best possible way.
Every master woodworker started exactly where you are — with one simple project and a will to create.