
🎁 Free PDF at the end! Download your complete step-by-step cheat sheet — cut list, tool checklist, and drilling guide.
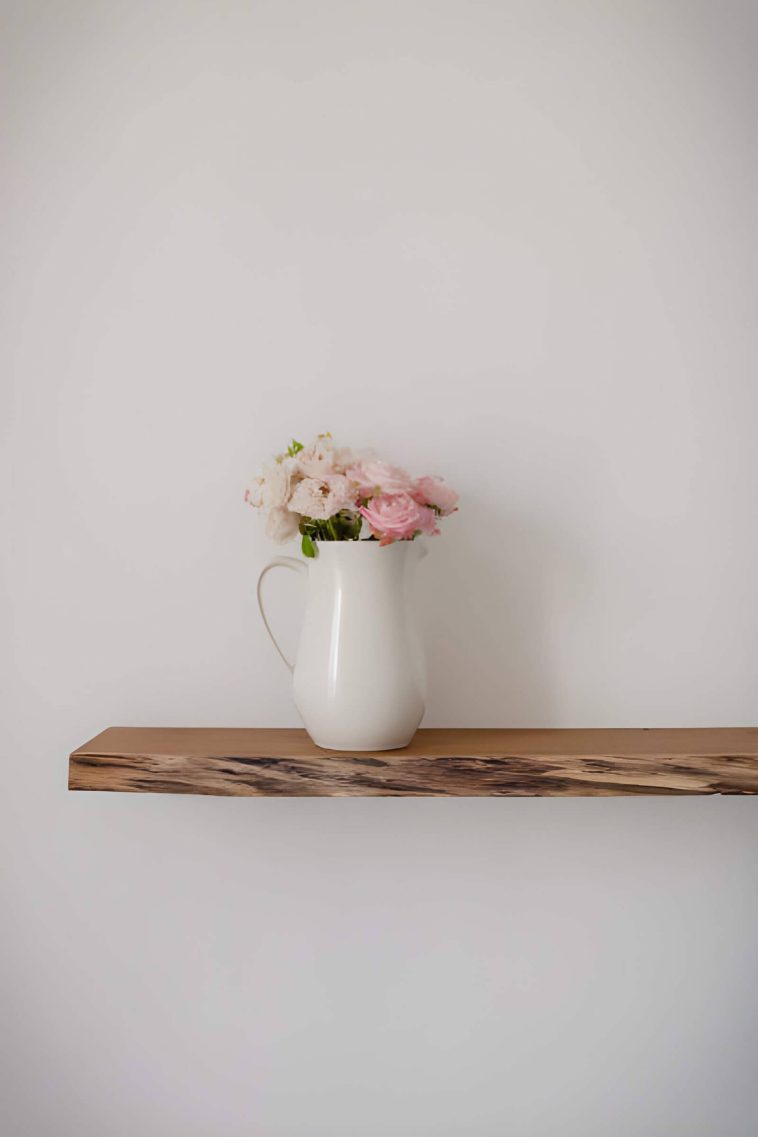
Floating shelves look impossible — like the wood is hanging in mid-air by magic. The secret? A cleverly hidden bracket that disappears completely inside the shelf. And the best part: you can build the entire thing from wood, without a single piece of metal hardware.
In this guide, you’ll learn how to build a beautiful floating shelf using an all-wood hidden bracket system — a wall-mounted plywood backplate with solid oak dowels that slide right into the shelf. No welding. No expensive hardware. No complicated joinery.
Whether you’re making a statement piece from a live-edge slab or keeping it simple with dimensional lumber, this method is surprisingly beginner-friendly. By the end, you’ll have a shelf strong enough to hold 16+ pounds that looks like it grew straight out of the wall.
What Makes a Hidden Bracket Different?

Most floating shelves you see at home improvement stores use a metal rail or L-bracket bolted to the wall, then the shelf fits over it. It works, but the hardware is often visible — or it limits your shelf thickness and style.
This all-wood method uses a completely different approach: a plywood backplate is mounted directly to the wall studs, with solid oak dowels glued into it and projecting outward. The shelf has matching holes routed into its back face, so it simply slides over the dowels and sits flush against the wall. The bracket is fully enclosed — invisible from every angle.
💡 Pro Tip: This design is incredibly scalable. Build a tiny 12″ display shelf or a massive 6-foot live-edge slab — the method works the same way.
New to woodworking? Start here first: Guide to Woodworking: Essential Tips for Beginners · 7 Best Woods for Beginner Woodworking Projects
Materials You’ll Need
One of the best things about this project: the material list is short, affordable, and easy to find anywhere.
- Wood Slab or Board — Live edge, pine, oak, or any board at least 1½” thick. The thicker the better for hiding the bracket.
- ¾” Sanded Plywood — Stable, strong, and won’t warp. Used for the wall bracket/backplate.
- 1″ Red Oak Dowel Rod — Solid oak for maximum strength. 2–3 per shelf depending on length.
- Titebond III Wood Glue — Waterproof and extremely strong. Permanently bonds dowels to the bracket.
- 2″ Wood Screws — For mounting the bracket to wall studs. Space them 16″ apart.
- Mineral Oil + Paste Wax — For a natural, durable finish. Or use stain + polyurethane for a traditional look.
Tools You’ll Need
You don’t need a full cabinet shop for this build. Here’s what’s actually required — with affiliate links to grab them on Amazon.
- Table Saw or Circular Saw — Shop on Amazon →
- Drill Press — For perfectly square, deep holes. Shop on Amazon →
- 1″ Forstner Bit — For clean flat-bottomed dowel holes. Shop on Amazon →
- 1″ Spade Bit — To chase holes deeper after the Forstner. Shop on Amazon →
- Router + ¾” Pattern Bit — For routing the slot in the shelf back. Shop on Amazon →
- Orbital Sander — Shop on Amazon →
- Miter Saw — For final cross-cuts on the shelf. Shop on Amazon →
- Stud Finder + Level — Shop on Amazon →
- Bar or F-Style Clamps — Shop on Amazon →
💡 No drill press? You can use a handheld drill with scrap guides clamped to both sides of the shelf. It takes more care, but it works for a first build.
Looking for beginner-friendly projects to practice first? 15 Woodworking Projects Using Basic Tools for Beginners · 25 Small Wood Projects You Can Sell as a Beginner
Step-by-Step: How to Build the Floating Shelf

Credit : instructables
Step 1 — Select & Square Up Your Shelf Material
Start by choosing your shelf material. A live-edge beech or walnut slab makes a dramatic statement piece, but pine or poplar boards work just as well for a cleaner, painted look. Your shelf should be at least 1½” thick — ideally 2″ or more — so there’s enough depth to hide the bracket inside.
The back edge of your shelf must be perfectly flat and straight to sit flush against the wall. Use a sacrificial straight board brad-nailed to the front face of the slab as a fence, then run it through the table saw to create a clean, flat back edge.
💡 Wood choice matters: Denser hardwoods like beech, oak, or maple give better dowel-hole integrity than soft pine.
Step 2 — Cut the Wall Bracket to Size
From your ¾” plywood, cut the wall bracket (backplate). It must fit inside the routed slot in the shelf — so size it slightly narrower than your shelf’s depth. A width of 1⅝” works well for most builds — wide enough to anchor the dowels firmly, narrow enough to hide completely inside the shelf.
Step 3 — Drill the Dowel Holes (The Key Step — Do Both at Once)
This is the most critical step — and the smartest trick of the design. Instead of measuring and drilling the bracket and shelf separately, you drill them both at the same time.
Screw the bracket directly to the back face of the shelf temporarily. Clamp two pieces of ¾” scrap wood to both sides to create a stable, square drilling surface. On the drill press, use a 1″ Forstner bit to drill straight through the bracket and deep into the shelf in one pass. This guarantees perfect alignment every time.
Use a “peck and jog” motion — pull the bit out periodically to clear chips and prevent binding. Then switch to a 1″ spade bit to chase the holes even deeper.
⚠️ Important: Space your dowel holes 16″ apart — this matches standard wall stud spacing so you can screw through the bracket directly into studs.
Step 4 — Size Down the Dowels for a Smooth Fit
Store-bought 1″ oak dowels are almost always very slightly oversized. Wrap blue painter’s tape around the back ½” of each dowel to protect the end that sits inside the bracket. Then run the exposed portion lightly against your orbital sander, rotating it evenly, until the fit improves. Test often — you want smooth but snug.
Step 5 — Build a Router Jig & Route the Shelf Slot
Build a simple frame from scrap wood around the backplate, screwed directly to the back of the shelf. Remove the backplate, and you have a perfect router jig. Run a ¾” pattern bit inside the frame in two passes to reach your target depth.
Critical detail: make the slot slightly deeper than the plywood is thick. This gives you forgiveness if your wall isn’t perfectly flat.
💡 Save the jig! Once built, this router jig is reusable. If you make more shelves of the same depth, you’ve already done the hard part.
Step 6 — Fit the Backplate into the Slot
A router leaves rounded corners in the slot, but your plywood backplate has square corners. Round over the corners of the backplate with the orbital sander until they fit. Test-fit and make sure the backplate sits fully flush or slightly below the back surface.
Step 7 — Glue the Dowels into the Bracket
Cut each dowel to the right length — they should not bottom out in the shelf holes. Leave about ¼” of clearance at the tip. Apply Titebond III to the holes in the bracket and press each dowel in. Place the bracket back into the shelf slot with spacers between them so they don’t accidentally bond together. Let the glue cure overnight.
Step 8 — Trim, Wax & Test-Fit
Use a flush-cut hand saw to trim the back of the dowels flat with the backplate, then sand them flush. Apply paste wax to the exposed portion of all dowels. Do a full dry test-fit before touching the wall — the shelf should slide on with light pressure and sit completely flat.
Step 9 — Sand & Finish the Shelf
Sand through the grits — start at 80, work up through 120, 180, and finish at 320 grit for a glass-smooth surface. Sand all faces including the bottom.
For a natural look: mineral oil + paste wax. For a traditional look: wood conditioner → stain → 2–3 coats of polyurethane, sanding lightly between coats.
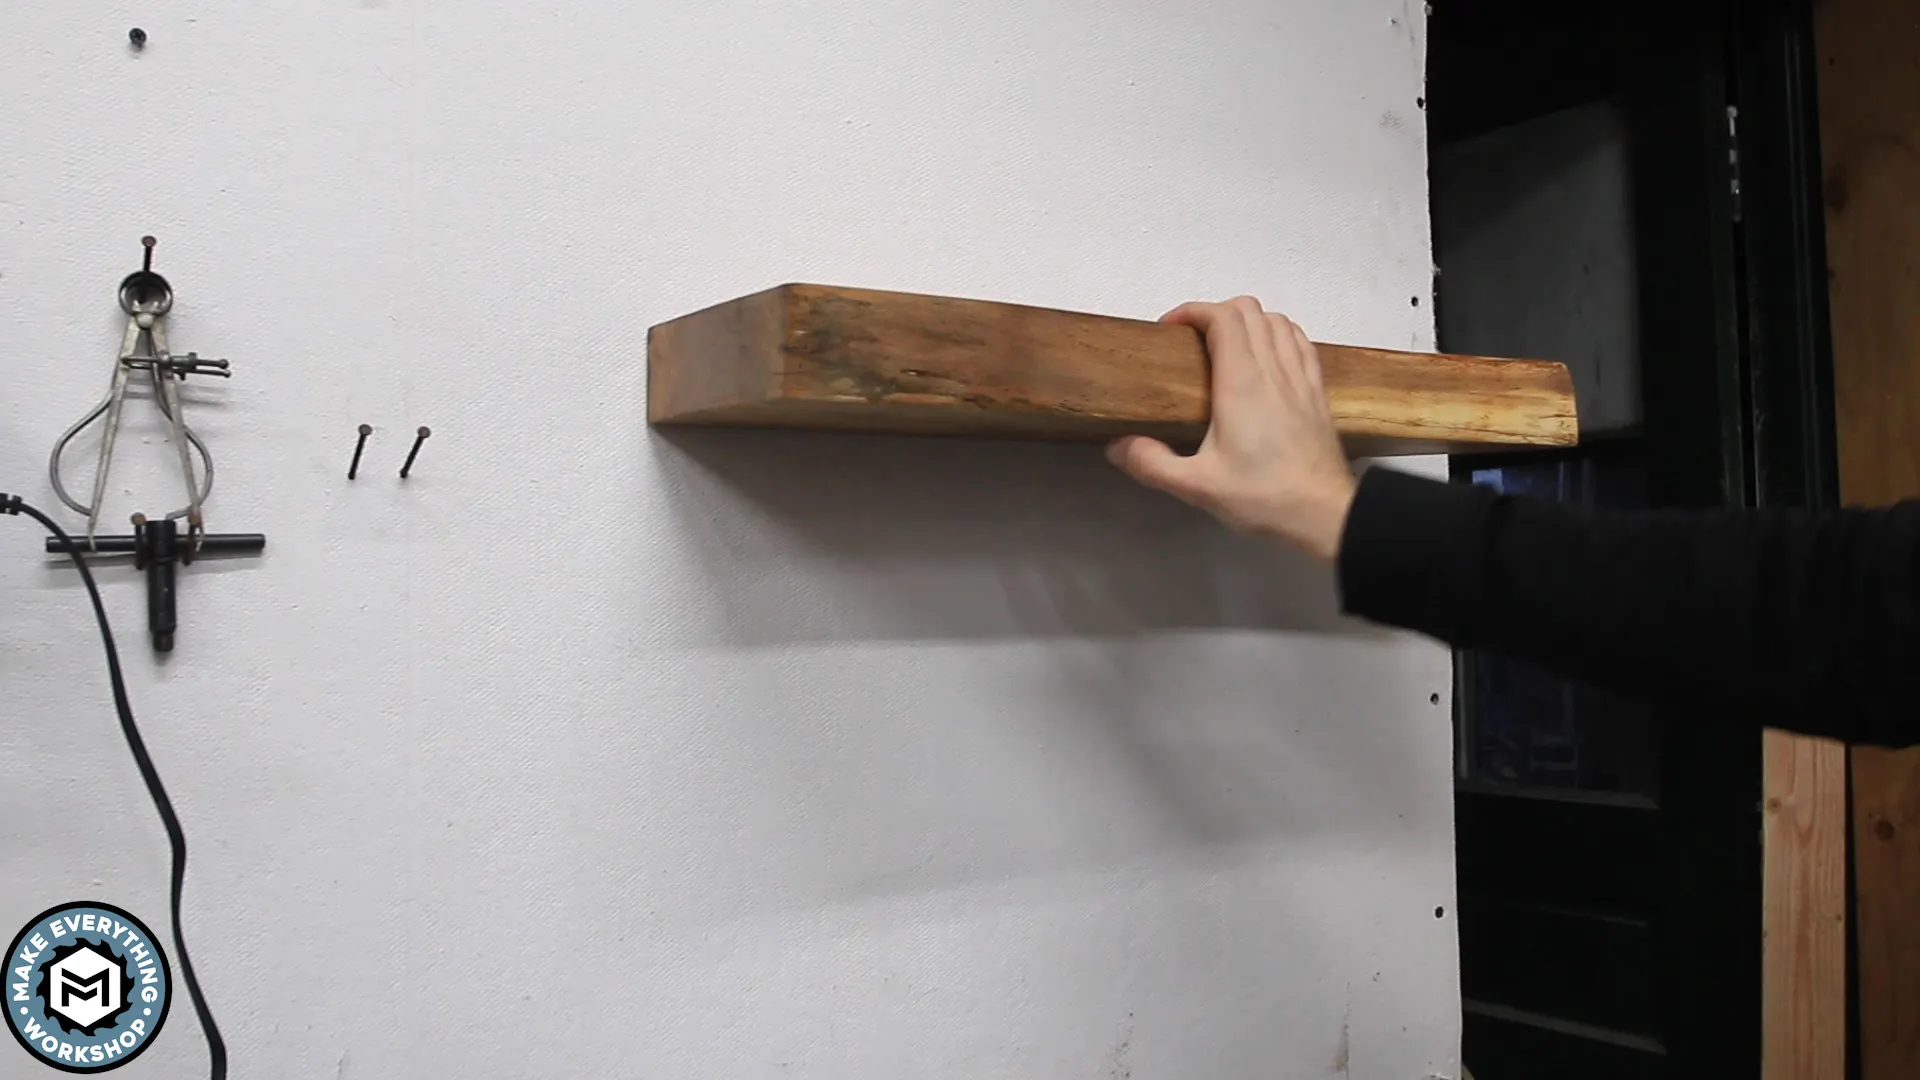
Step 10 — Mount the Bracket & Install the Shelf
Locate your wall studs with a stud finder and mark them. Pre-drill countersunk holes in your bracket spaced 16″ apart to land on studs. Drive 2″ screws through the bracket and into the studs. Check level before fully tightening. Slide the shelf onto the dowels — you may need to flex them slightly. For a permanent install, drive a single screw through the bottom face into the center dowel to lock it in place.
⚠️ Always hit studs. Drywall anchors alone are not sufficient for shelves holding books, plants, or other heavy objects. Use heavy-duty toggle bolts if studs don’t cooperate.
Common Mistakes to Avoid
| ❌ Mistake | ✅ The Fix |
| Drilling bracket and shelf separately | Always drill both at the same time for perfect alignment |
| Dowels too tight in the shelf | Sand lightly with orbital sander, test often, apply paste wax |
| Router slot not deep enough | Make it 1–2mm deeper than plywood thickness for wall-variance room |
| Bracket mounted into drywall only | Always drive screws into wall studs or use rated toggle bolts |
| Skipping the level check at install | Use a level during mounting — a crooked bracket is permanent |
| Dowels bottoming out in shelf holes | Cut them short so shelf contacts the bracket face, not the dowel tips |
How Strong Is This Shelf, Really?
Credit : instructables
A properly built shelf using this bracket system with two dowels driven into wall studs easily holds 16–20+ pounds without any flex or movement. The strength comes from the dowels distributing the load across the bracket, and the bracket being anchored directly into the structural framing of the wall.
For shelves over 36″ wide, add a third dowel in the center and make sure all three hit studs. For very deep shelves (12″+ deep), consider two parallel rows of dowels for extra tipping resistance.
Ready to build and sell? 32 Profitable Woodworking Projects to Build & Sell from Your Home Workshop · 25 Scrap Wood Projects That Sell
Styling Ideas: Where to Use Your Floating Shelf
Living Room
Group three shelves in a vertical cluster for a gallery-wall effect. Style with trailing plants, small framed art, and candles. Vary the shelf lengths for visual interest.
Kitchen
Replace upper cabinets with open floating shelves for a modern farmhouse look. Use polyurethane over mineral oil here for better moisture resistance.
Home Office
A deep floating shelf (12″–14″) above the desk becomes a functional monitor riser and display surface. Pair it with cable management clips underneath for a clean look.
Bedroom
Install two shelves at nightstand height on either side of the bed — an elegant alternative to traditional bedside tables that frees up floor space entirely.
🎁 Free PDF: Your Complete Floating Shelf Guide
Download the printable cheat sheet to take straight to the workshop.
- Full materials & cut list with exact dimensions
- Tools checklist (essential + optional)
- 10-step visual summary
- Drilling reference: bit sizes, hole depths, spacing
- Finishing options quick-guide
- Wall mounting tips & weight guidelines
Final Thoughts
What makes this build so satisfying isn’t just the finished shelf — it’s the look on people’s faces when they try to figure out how it’s attached to the wall. The all-wood hidden bracket system is one of those clever solutions that feels almost too simple once you understand it.
With a free afternoon and a short list of materials, you can create something that looks like it came from a high-end furniture store. Scale it up, make a matching set, or experiment with different wood species — this method handles all of it.
And if this project sparked something in you — that itch to keep building — you’re not alone. One shelf tends to turn into two, then a full room makeover, then a proper workshop habit. If you’re looking for a deep library of plans to fuel that momentum, I’ve personally found Ted’s Woodworking Plans to be an incredibly useful resource. It covers everything from simple beginner builds like this one all the way up to full furniture pieces, with clear diagrams and cut lists that take the guesswork out of the planning stage. Worth a look if you want your next project to be just as rewarding as this one.
If you give this project a try, share your results in the comments below — we’d love to see what you build!