
These scrap wood kitchen projects turn leftover boards into things you can use every day: a stand for your cutting boards, a place for an open cookbook, or an organizer that finally fits your utensils.
You do not need a kitchen renovation to make a useful improvement. Start with one cluttered drawer or a crowded corner of the counter, then choose a project that suits the wood and tools you already have.
Below are 21 real builds with links to their original plans or tutorials. Some offer paid printable plans alongside a public walkthrough, and several need extra hardware. For more ideas beyond the kitchen, explore these easy scrap wood crafts.
Affiliate disclosure: This article includes an affiliate link. If you purchase through it, we may earn a commission at no additional cost to you.
Quick Picks: Find a Project for Your Kitchen
| Your goal | Projects to compare | Start here |
|---|---|---|
| Clear countertop clutter | Cutting board stand, spice rack, cubby organizer | Cutting board stand |
| Organize drawers | Dividers, knife block, kitchen-wrap organizer | In-drawer knife organizer |
| Make a useful gift | Cookbook stand, coasters, napkin holder | Cookbook stand |
| Use small pieces | Coasters, bottle opener, trivet | Mini cutting board coasters |
| Use larger plywood remnants | Under-sink organizers, dinnerware caddy base | Under-sink organizer |
| Try moving parts | Folding pasta rack, lazy Susan | Folding pasta rack |
Before you choose: Compare your usable offcuts with the original material list. A short board, a wide panel remnant, and a narrow hardwood strip suit different builds. The descriptions below identify the type of resource; they do not promise a free PDF for every project.
21 Useful Scrap Wood Kitchen Projects
1. Wooden Cutting Board Stand
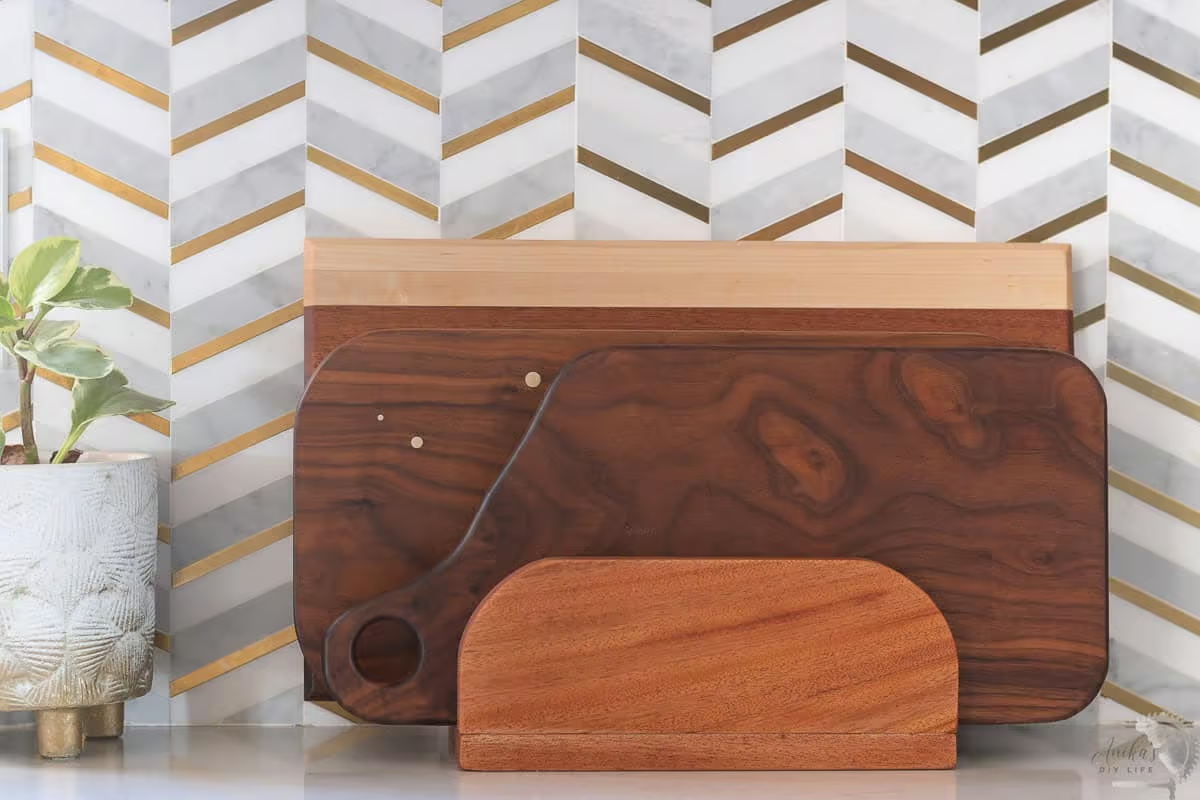
Cutting boards look better when each one has a place. This stand keeps them upright and easy to reach, while letting attractive hardwood boards become part of the kitchen instead of a pile against the wall. It is especially useful when your boards come in different thicknesses.
Anika’s example uses leftover mahogany, shaped dividers, glue, and screws driven through the base. The curved tops are optional, so the appearance can be simpler if you prefer straight edges. Lay out your actual boards before deciding the divider spacing. A snug-looking photo is less useful than slots that let you lift a board out comfortably.
Best for: Displaying several cutting boards
Materials to check: Solid wood offcuts; screws and glue
Resource: Illustrated tutorial and linked printable plans
See the tutorial at Anika’s DIY Life →
2. Scrap Wood Cookbook Stand
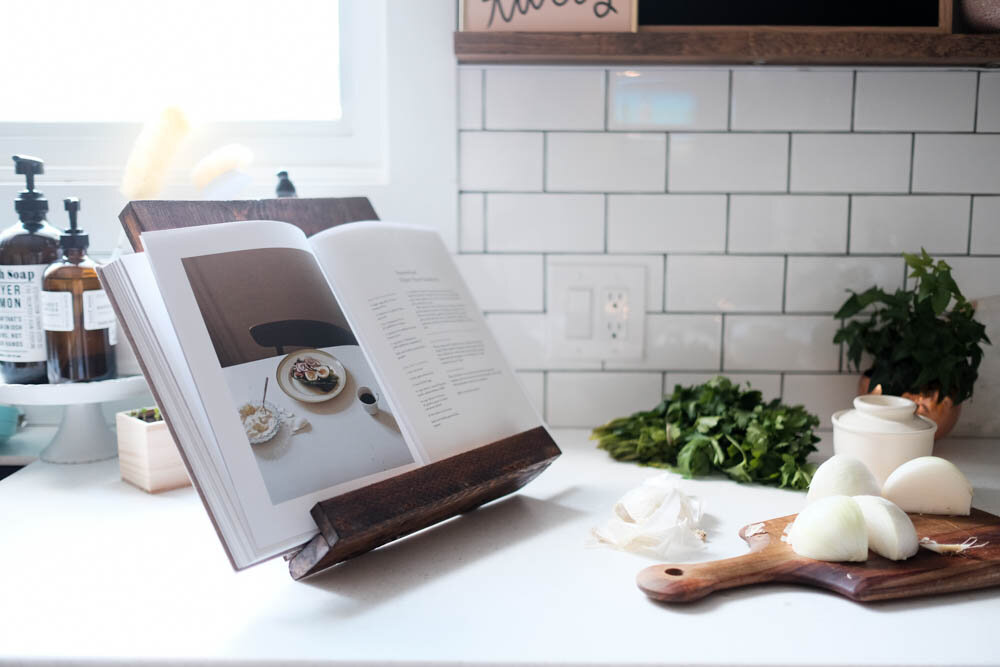
A cookbook propped against a jar never seems to stay at the right angle. A dedicated wooden stand gives an open recipe a more useful position and adds a warm detail to a kitchen counter. This version has a broad back, a front ledge, and supports behind it.
The Learner Observer builds it from leftover pieces of several board sizes using a brad nailer. That makes it a good example of combining unlike offcuts rather than waiting for a matching set. Check the width against your largest cookbook and leave enough ledge depth for its pages. Finish the back too if the stand will sit on an island.
Best for: Following recipes from a cookbook
Materials to check: Mixed board offcuts; brad nails
Resource: Photo tutorial with cutting measurements
See the tutorial at The Learner Observer →
3. Weighted Wooden Napkin Holder
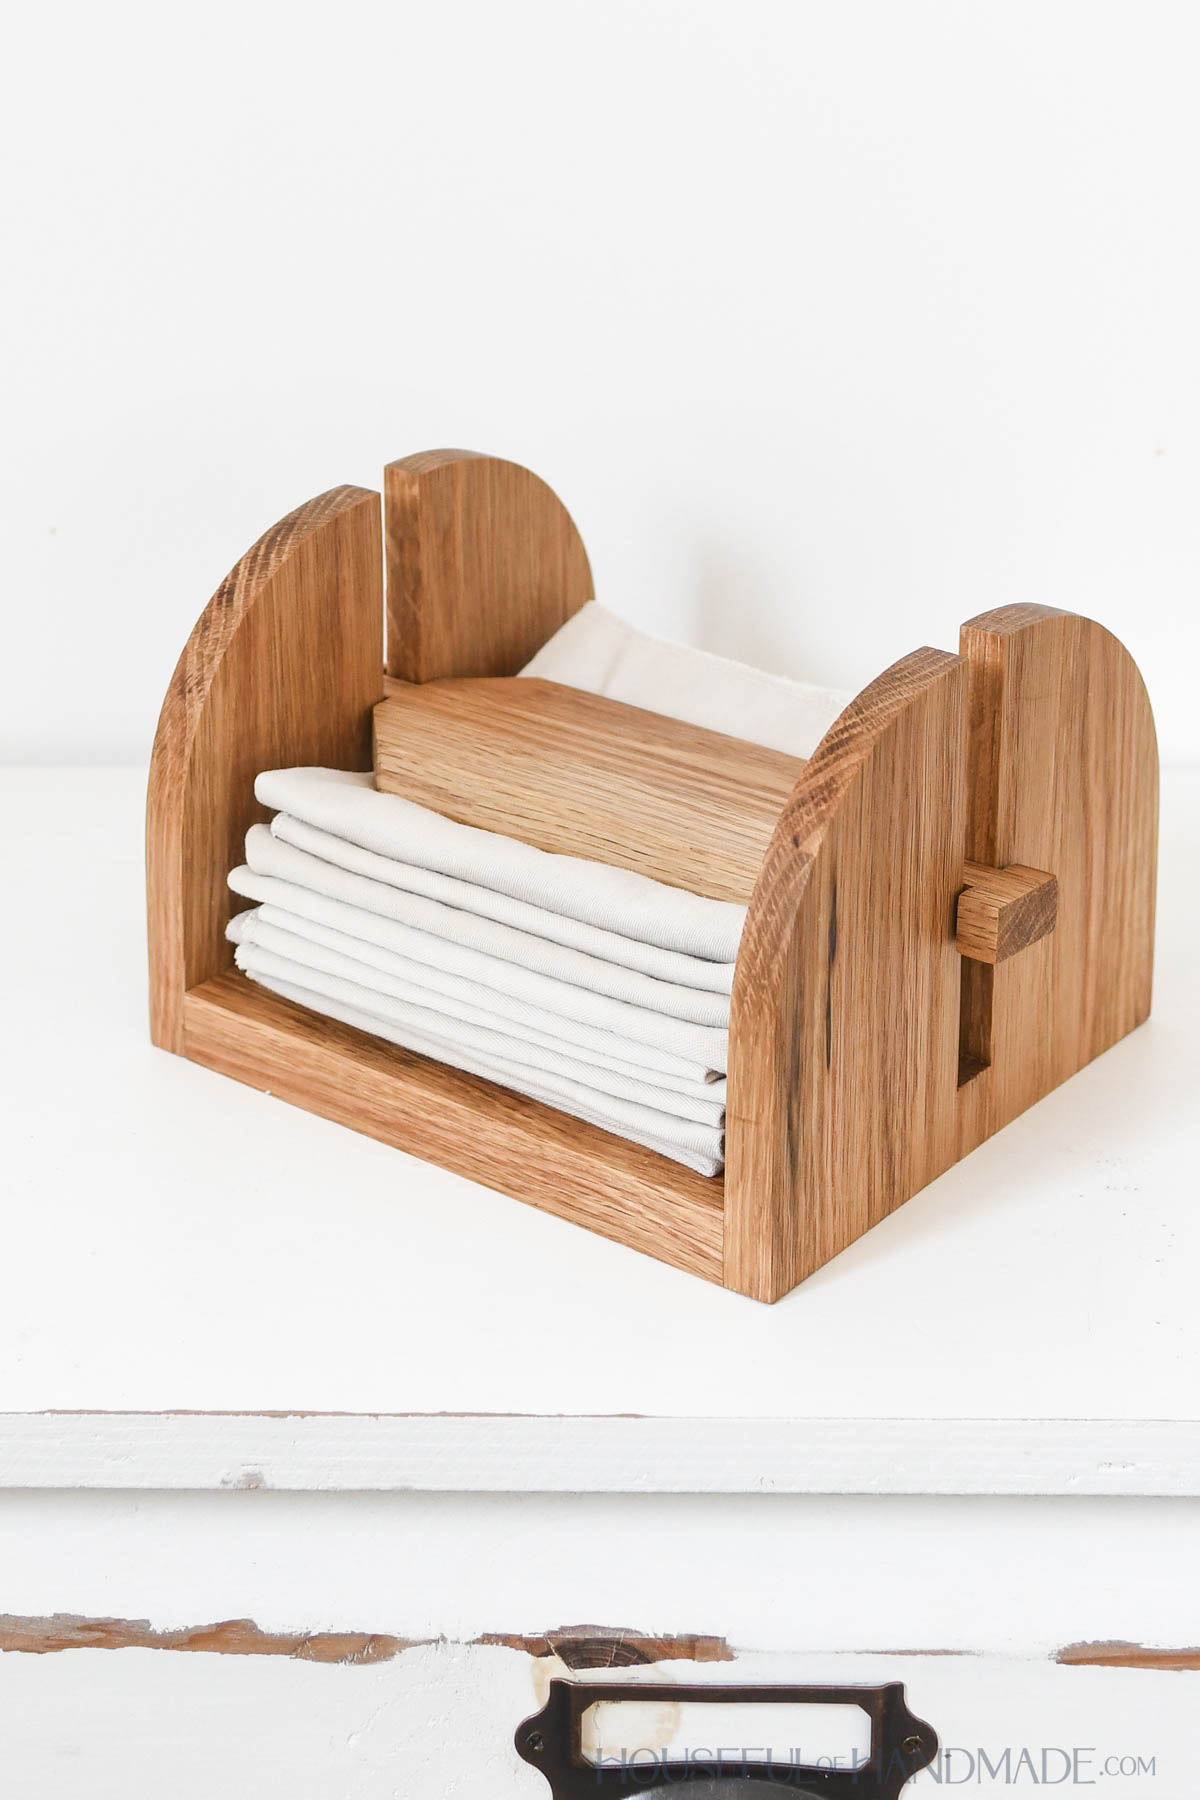
This napkin holder has a useful extra detail: a separate wooden weight that slides into slots in the sides. It keeps the stack tidy without enclosing it in a tall box. The shaped sides also make it attractive enough to leave beside the salt and pepper.
Houseful of Handmade uses short lengths of 1×8 and 1×3 stock for the design. The finished example is 8 inches wide and 5 inches tall, with an interior sized for a basic square napkin. The cutting and shaping deserve care even though the project is small. Its illustrated online walkthrough links to a premium PDF containing the cut list and diagrams.
Best for: Keeping paper or cloth napkins together
Materials to check: Short 1×8 and 1×3 pieces; glue
Resource: Online walkthrough; paid printable plans
See the tutorial at Houseful of Handmade →
4. Countertop Spice Rack
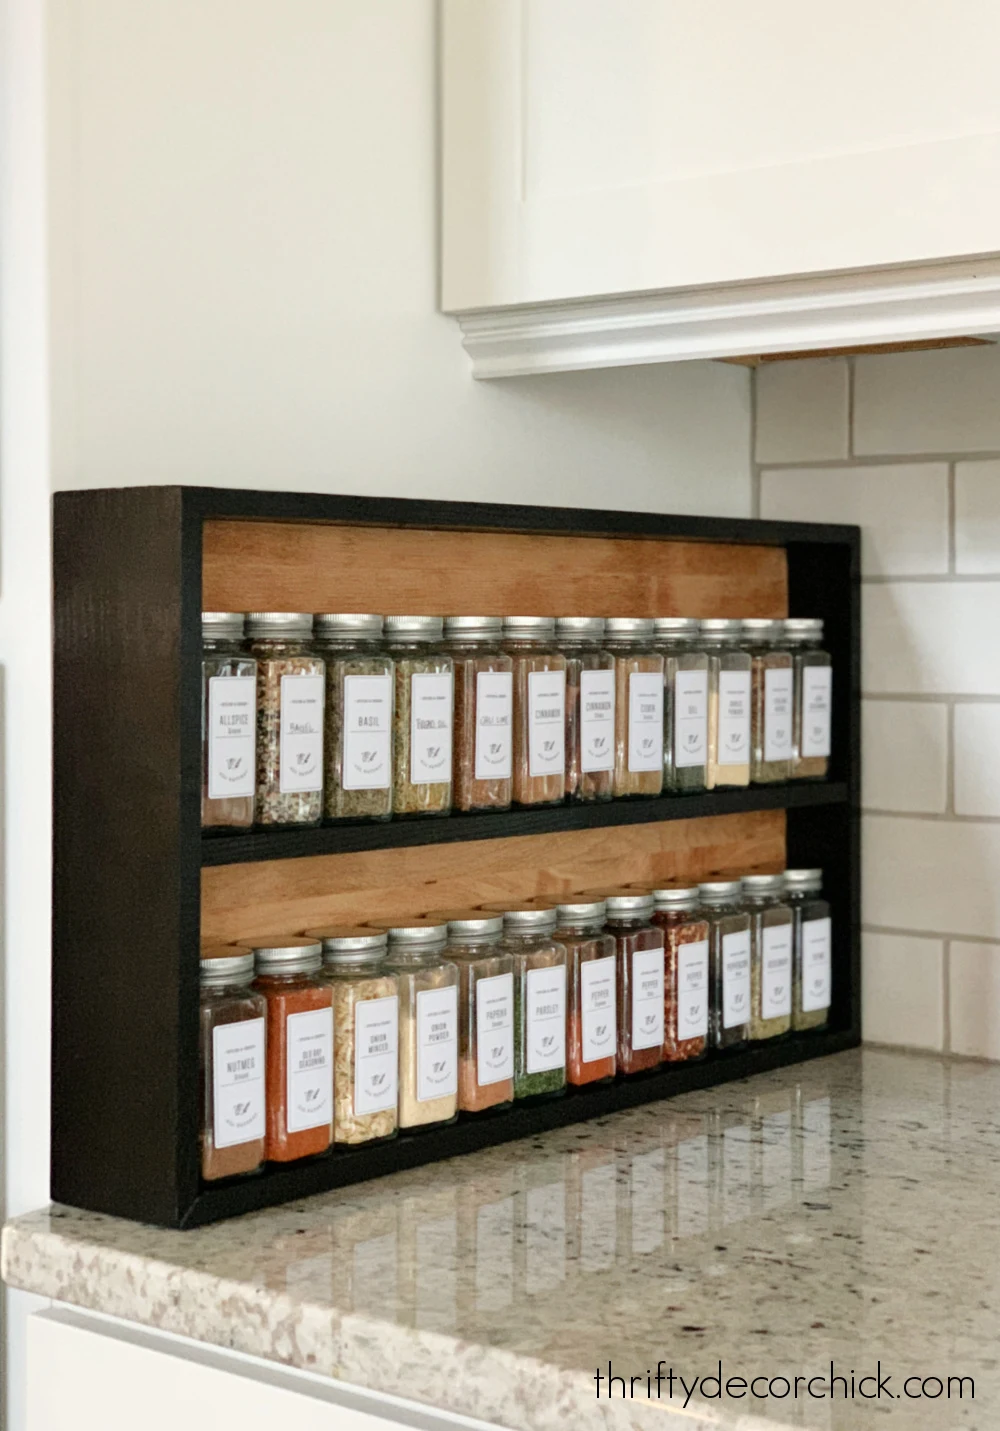
A small countertop spice rack brings frequently used jars into one neat group. This version combines a substantial wood base with a surrounding frame, making it a good direction when your scrap pile includes a piece left from a countertop or another thicker board project.
The Thrifty Decor Chick tutorial shows how the maker worked around the available offcut and the jars she wanted to store. Start with the same useful question: what needs to fit? Arrange the jars first, then compare the dimensions with your available space. The dark frame and natural wood offer a decorative contrast without requiring an entire wall of shelving.
Best for: Grouping everyday spice jars
Materials to check: Suitable thick offcut and framing strips
Resource: Illustrated build tutorial
See the tutorial at Thrifty Decor Chick →
Want more spice storage options? Compare these 15 DIY wooden spice rack ideas for small kitchens.
5. Countertop or Cabinet Shelf Riser

Sometimes the missing storage is simply another level. A shelf riser lets you place shorter items underneath and keep a second group above them. Try the idea inside a cabinet for cups or on a counter for containers you use every morning.
Ana White provides this design in 18-inch and 25-inch versions. Compare both with your shelves before selecting one: cupboard doors, shelf supports, and the height of the items underneath all affect the fit. This is a project for adequately sized board remnants, rather than tiny scraps. The plain shape also leaves plenty of choice in the final color or finish.
Best for: Adding a second storage level
Materials to check: Board remnants sized to the selected plan
Resource: Online plans with size-specific cut lists
See the tutorial at Ana White →
6. Tea Station Tray with Mug Storage
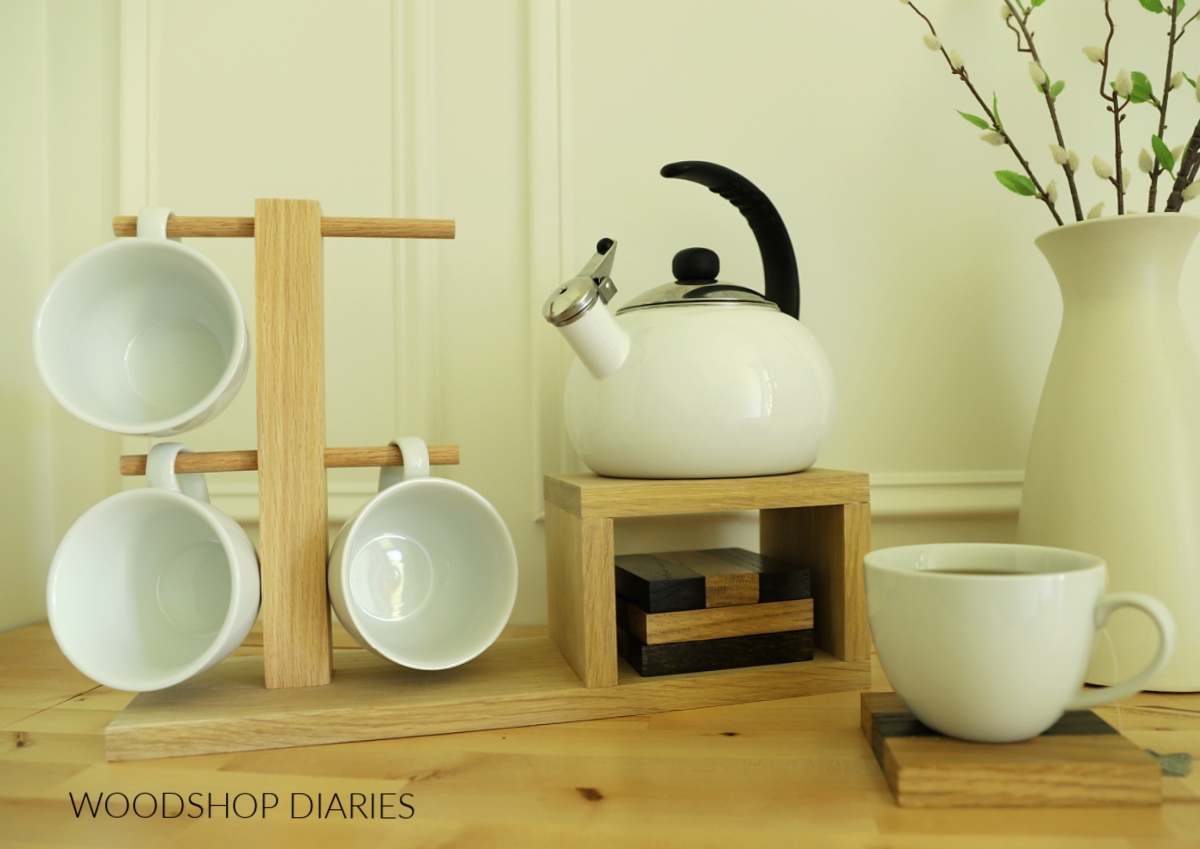
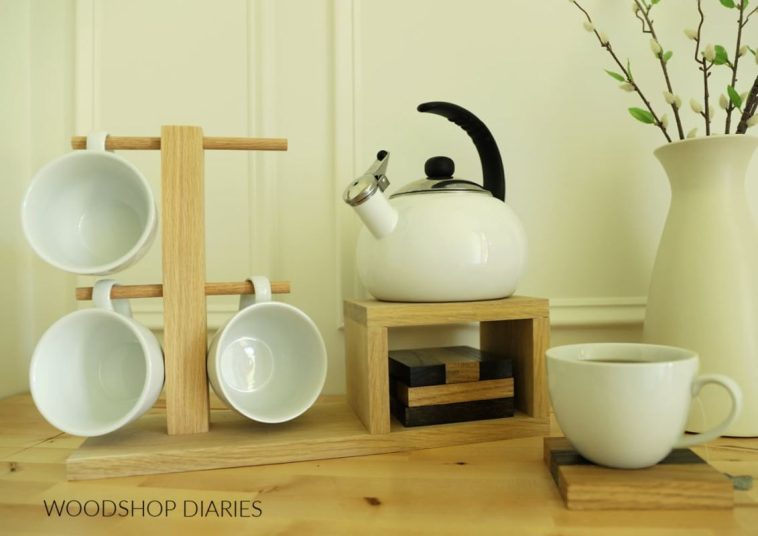
Give tea-making supplies a home without building a whole coffee bar. This compact station combines a raised platform, a post for hanging mugs, and space underneath for coasters. The different functions make a small amount of wood do more than one job.
Woodshop Diaries builds the example from oak scraps and a dowel. Check the proportions against the kettle and mugs you intend to store, especially the hanging clearance. It is a useful gift idea for someone who enjoys an organized beverage corner. Follow the source’s intended use for the platform rather than assuming any wooden surface can accept a hot pan or an operating appliance.
Best for: Organizing a small tea station
Materials to check: Board and post offcuts; dowel
Resource: Online tutorial with diagrams
See the tutorial at Woodshop Diaries →
7. Mini Cutting Board Drink Coasters
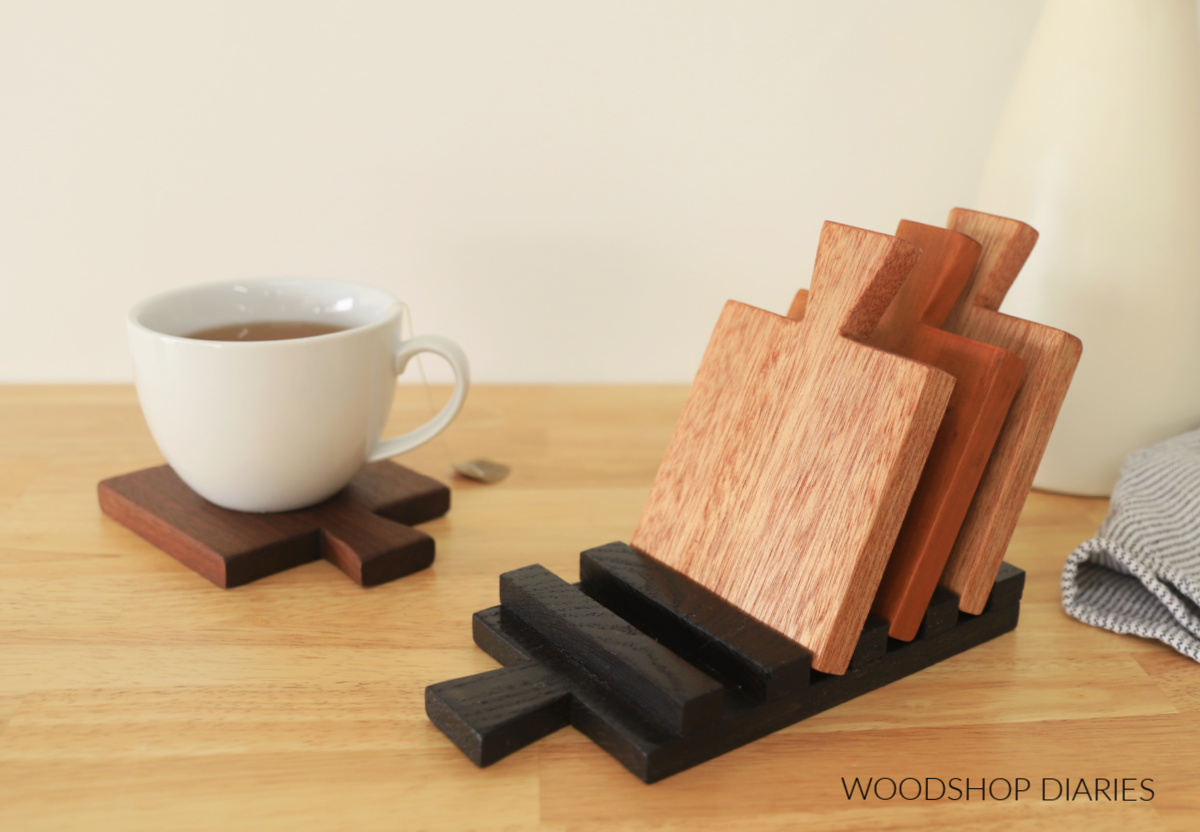
These little coasters borrow the outline of a cutting board, including its handle. Mixed wood species become part of the appeal, so a handful of different hardwood offcuts can look intentional as a set. A matching tray keeps the pieces together between drinks.
The creator recommends solid wood for this project and discusses sizing the coasters around your favorite mugs. That is a better starting point than picking the smallest scrap and hoping it works. Make one shape you like, then use it to keep the remaining pieces consistent. The handles provide a small detail that makes the set feel like a handmade gift.
Best for: Using small solid wood offcuts
Materials to check: Small solid wood pieces; finishing supplies
Resource: Illustrated tutorial
See the tutorial at Woodshop Diaries →
8. Dinnerware and Utensil Caddy
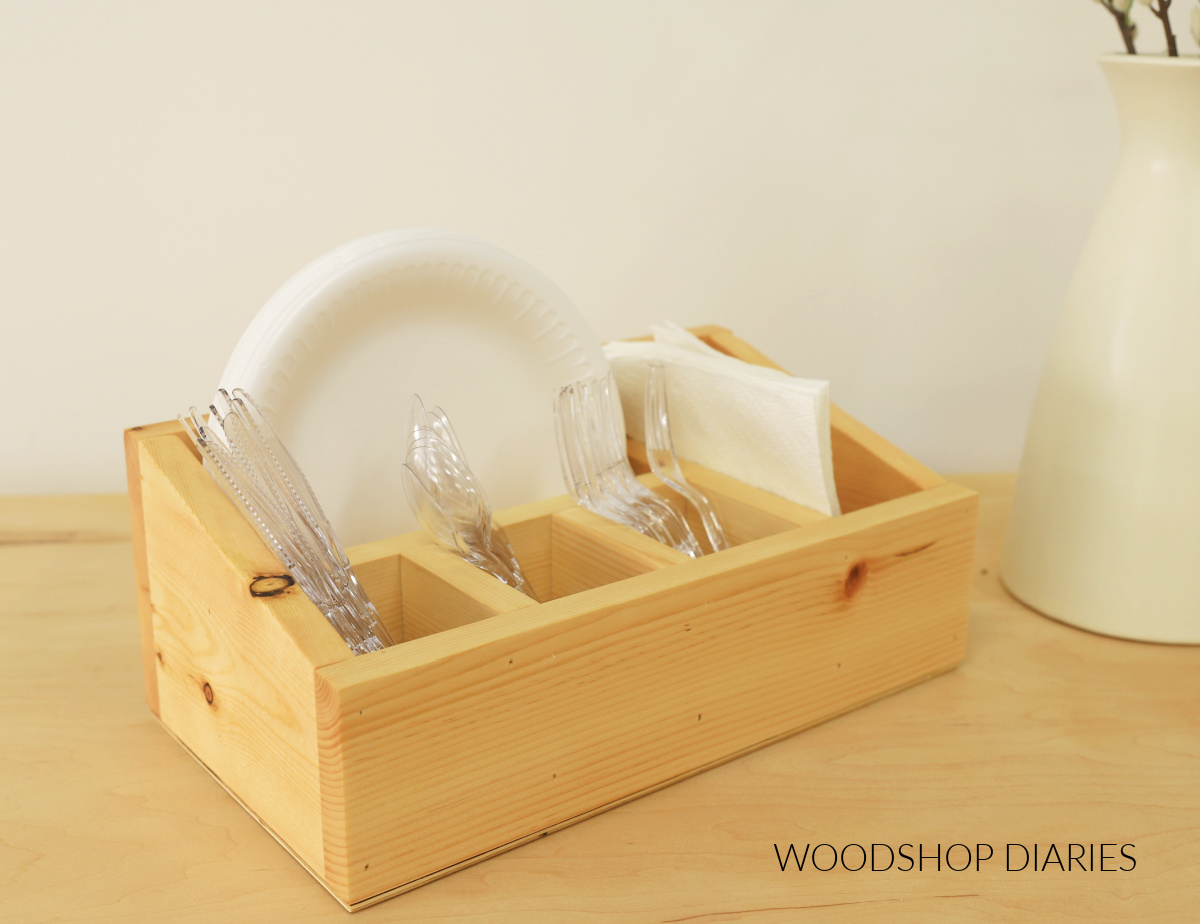
If plates, napkins, and cutlery live in different cupboards, getting ready for a casual meal can take several trips. A divided caddy brings them together in a compact unit that can be set out when needed and stored afterward.
Woodshop Diaries uses short board lengths and a small plywood piece for the base. The completed design measures approximately 14 inches wide, 8 inches deep, and 5¾ inches tall. Arrange your intended dinnerware before selecting the project, since oversized plates or a different napkin format may need a different layout. The sloping sides keep the contents visible and easy to reach.
Best for: Setting out dinnerware for casual meals
Materials to check: 1×6 and 1×4 remnants; thin plywood
Resource: Online build tutorial and dimension diagram
See the tutorial at Woodshop Diaries →
9. Cabinet-Door Paper Towel Organizer

The back of a cabinet door is easy to overlook. This organizer combines a paper towel holder with a small storage shelf, giving everyday cleaning supplies a dedicated spot without taking over the countertop.
Ana White’s plan is particularly relevant beneath a sink, but placement matters more than the photograph. Check the organizer’s full depth with the door closed and make sure the mounting method suits the door construction. Keep it clear of pipes and anything stored behind it. A paper towel roll also needs enough room to rotate and be replaced, so include the actual roll in your measurements.
Best for: Using otherwise empty cabinet-door space
Materials to check: Board offcuts; specified mounting and holder hardware
Resource: Online plan and assembly guidance
See the tutorial at Ana White →
10. Under-Sink Shelf Organizer
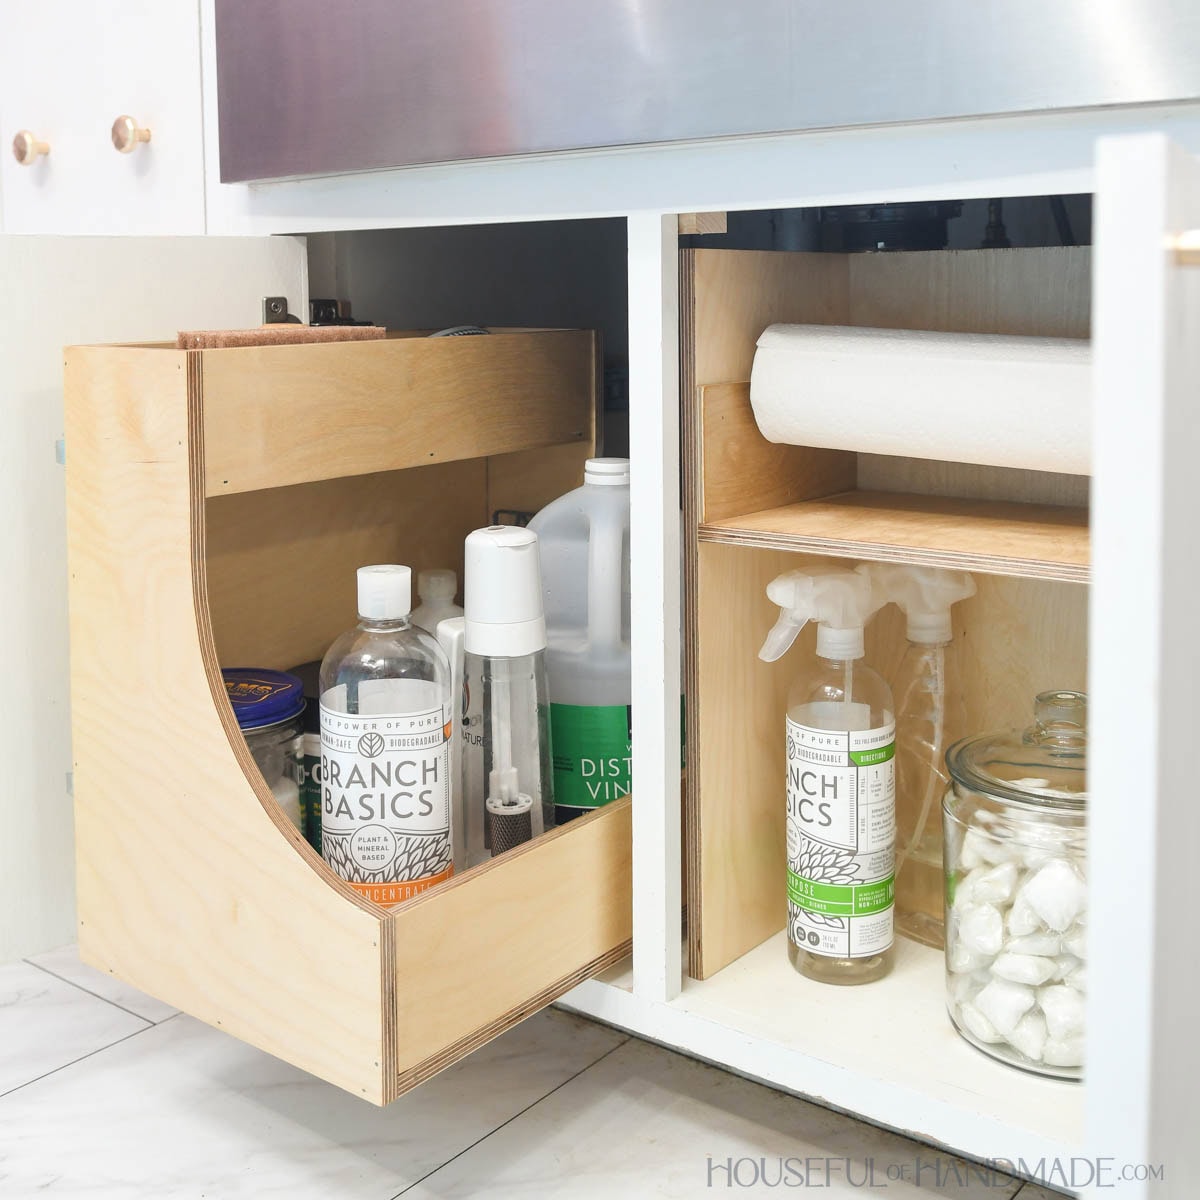
The space beneath a sink often becomes a jumble because the plumbing interrupts an ordinary shelf. Houseful of Handmade approaches it with purpose-built shelf and drawer organizers, giving cleaning supplies a more accessible arrangement.
This project comes from a scrap plywood challenge, so it is a useful option when you have larger panel remnants left from furniture or cabinets. It is more substantial than a coaster or napkin holder. Map the pipes, shutoff access, and cabinet opening before choosing which organizer to build. A useful layout should let you retrieve what you need without having to dismantle the storage around it.
Best for: Organizing larger under-sink spaces
Materials to check: Larger plywood remnants; hardware for selected version
Resource: Online shelf and drawer organizer tutorial
See the tutorial at Houseful of Handmade →
11. Custom Wooden Drawer Dividers
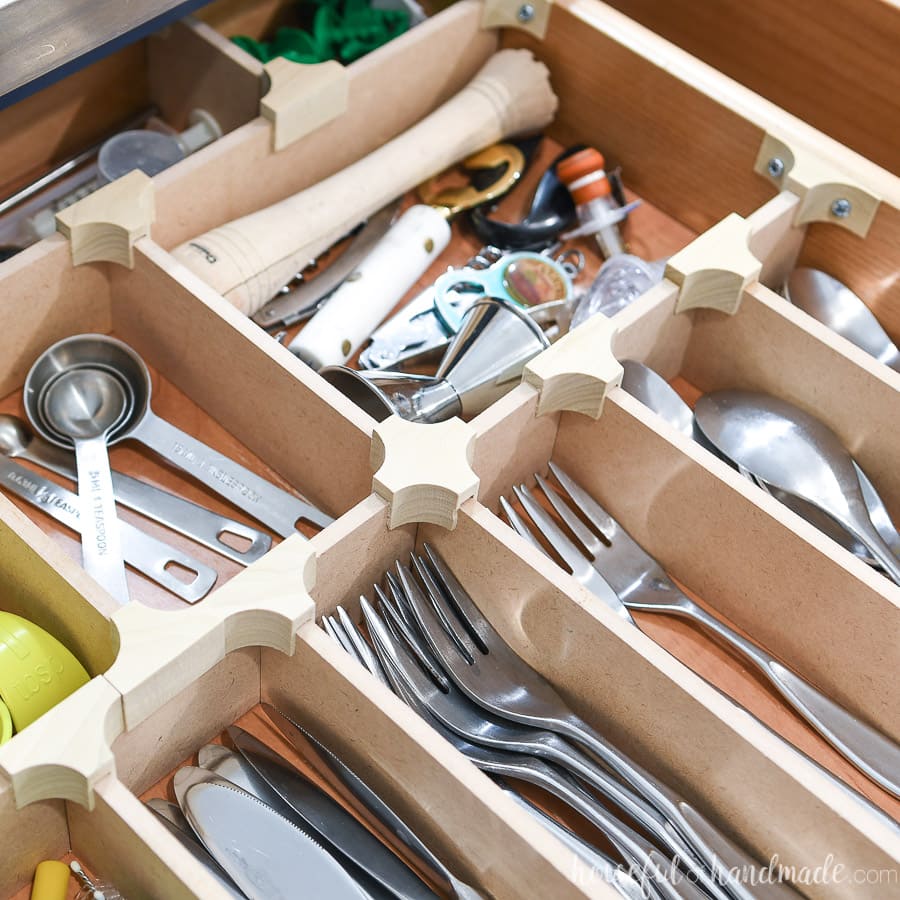
Custom dividers make more sense than a ready-made insert when your utensils never fit standard compartments. This system uses narrow divider strips connected by shaped wooden clips, allowing the layout to follow the contents of the drawer.
There is an important equipment detail: Houseful of Handmade makes the clips on an X-Carve CNC machine. The illustrated version uses ¼-inch MDF strips and hardwood scraps for the clips. Include it if you have access to that equipment or a suitable makerspace. It should not be mistaken for a basic hand-tool assembly simply because the parts are small. The payoff is a very tailored arrangement.
Best for: A custom layout with CNC access
Materials to check: Thin MDF strips and wood for clips
Resource: Tutorial and linked Easel design; CNC required for clips
See the tutorial at Houseful of Handmade →
12. In-Drawer Knife Organizer

A large countertop knife block is not the only storage option. This wooden organizer sits inside a drawer and gives knives a defined position, leaving more of the worktop available for cooking.
Ana White’s design was made from scrap wood and is intended to hold five standard-sized knives. Measure your own knives and drawer before selecting it; blade lengths and handles vary. The article also shows how the organizer can share a drawer with cutting boards. That makes it a useful idea for keeping related tools together, provided the complete arrangement fits and allows the drawer to close freely.
Best for: Moving knife storage off the counter
Materials to check: Solid wood remnants sized to the plan
Resource: Online plan with diagrams
See the tutorial at Ana White →
13. Kitchen-Wrap Drawer Organizer
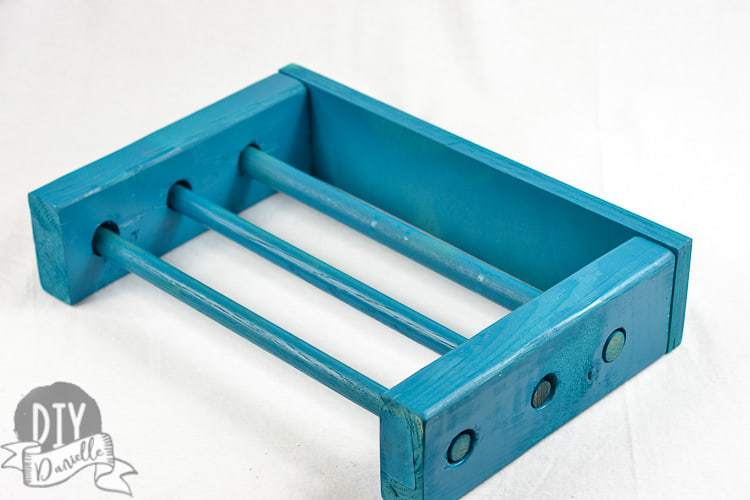
This organizer stores kitchen-wrap rolls on dowels inside a wide drawer. Unlike a simple divider for cardboard boxes, it lets the rolls come out of their original packaging and gives each one a place.
DIY Danielle’s version measures 15½ inches wide, so drawer width is the first thing to check. The build combines scrap lumber, plywood, and dowels. Lay out your own foil and wrap rolls before buying materials, including the room needed to lift them out. The result is most useful when you are comfortable with the source’s dispensing arrangement and can still identify each roll easily.
Best for: Organizing wrap rolls in a wide drawer
Materials to check: Scrap lumber, plywood, and dowels
Resource: Illustrated tutorial with example measurements
See the tutorial at DIY Danielle →
14. Folding Pasta Drying Rack
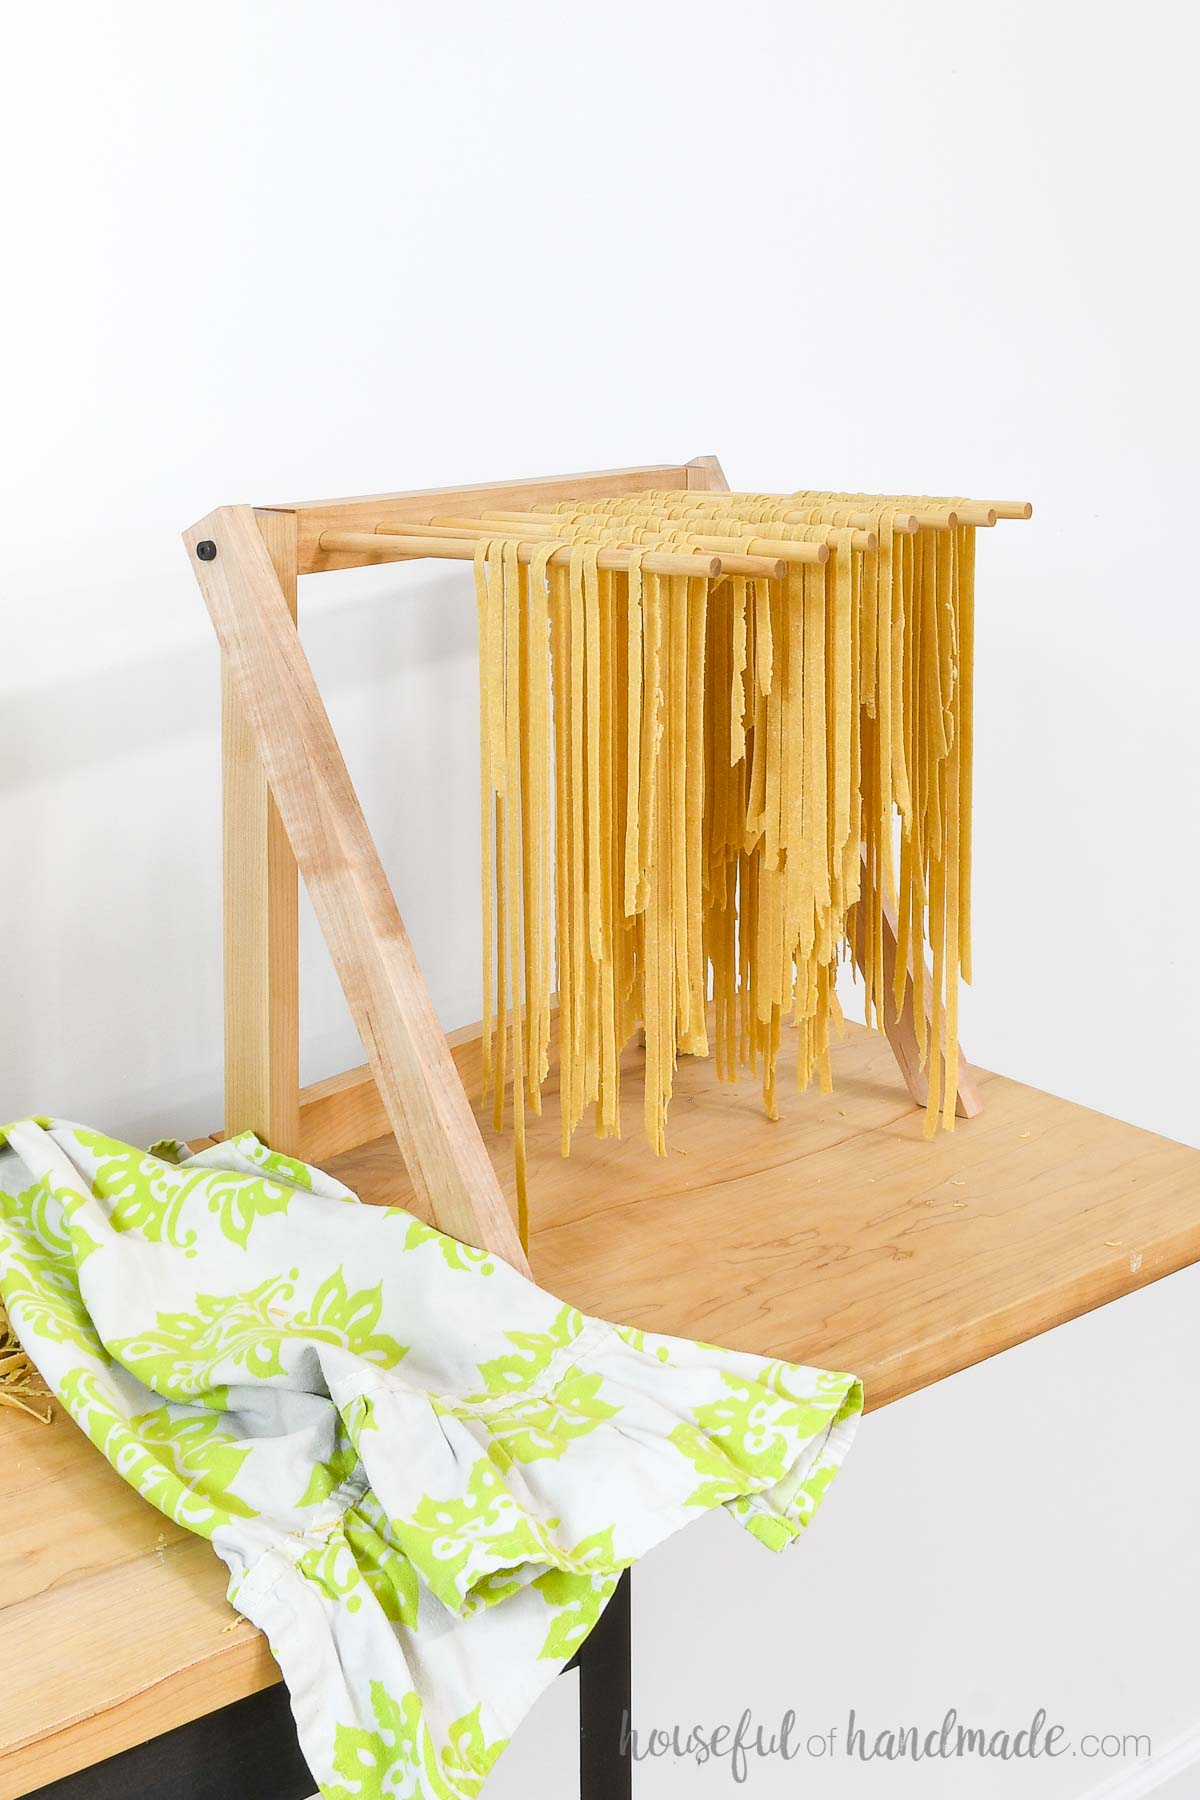
A pasta drying rack earns its space when you regularly make noodles, but storing a rigid rack can be awkward. This design folds flat while keeping its main parts together, so there are fewer loose pieces to put away.
Houseful of Handmade uses maple scraps, purchased dowels, shoulder screws, and threaded inserts. The tutorial includes an important later addition: a barrel bolt that locks the top in position during use. Follow the updated design. This is a more detailed build than its small size suggests, and the complete cut list is part of the paid PDF. The public article explains the construction and folding mechanism.
Best for: Pasta makers who need compact storage
Materials to check: Small solid wood pieces; dowels and pivot hardware
Resource: Online walkthrough; paid printable plans
See the tutorial at Houseful of Handmade →
15. Wooden Lazy Susan
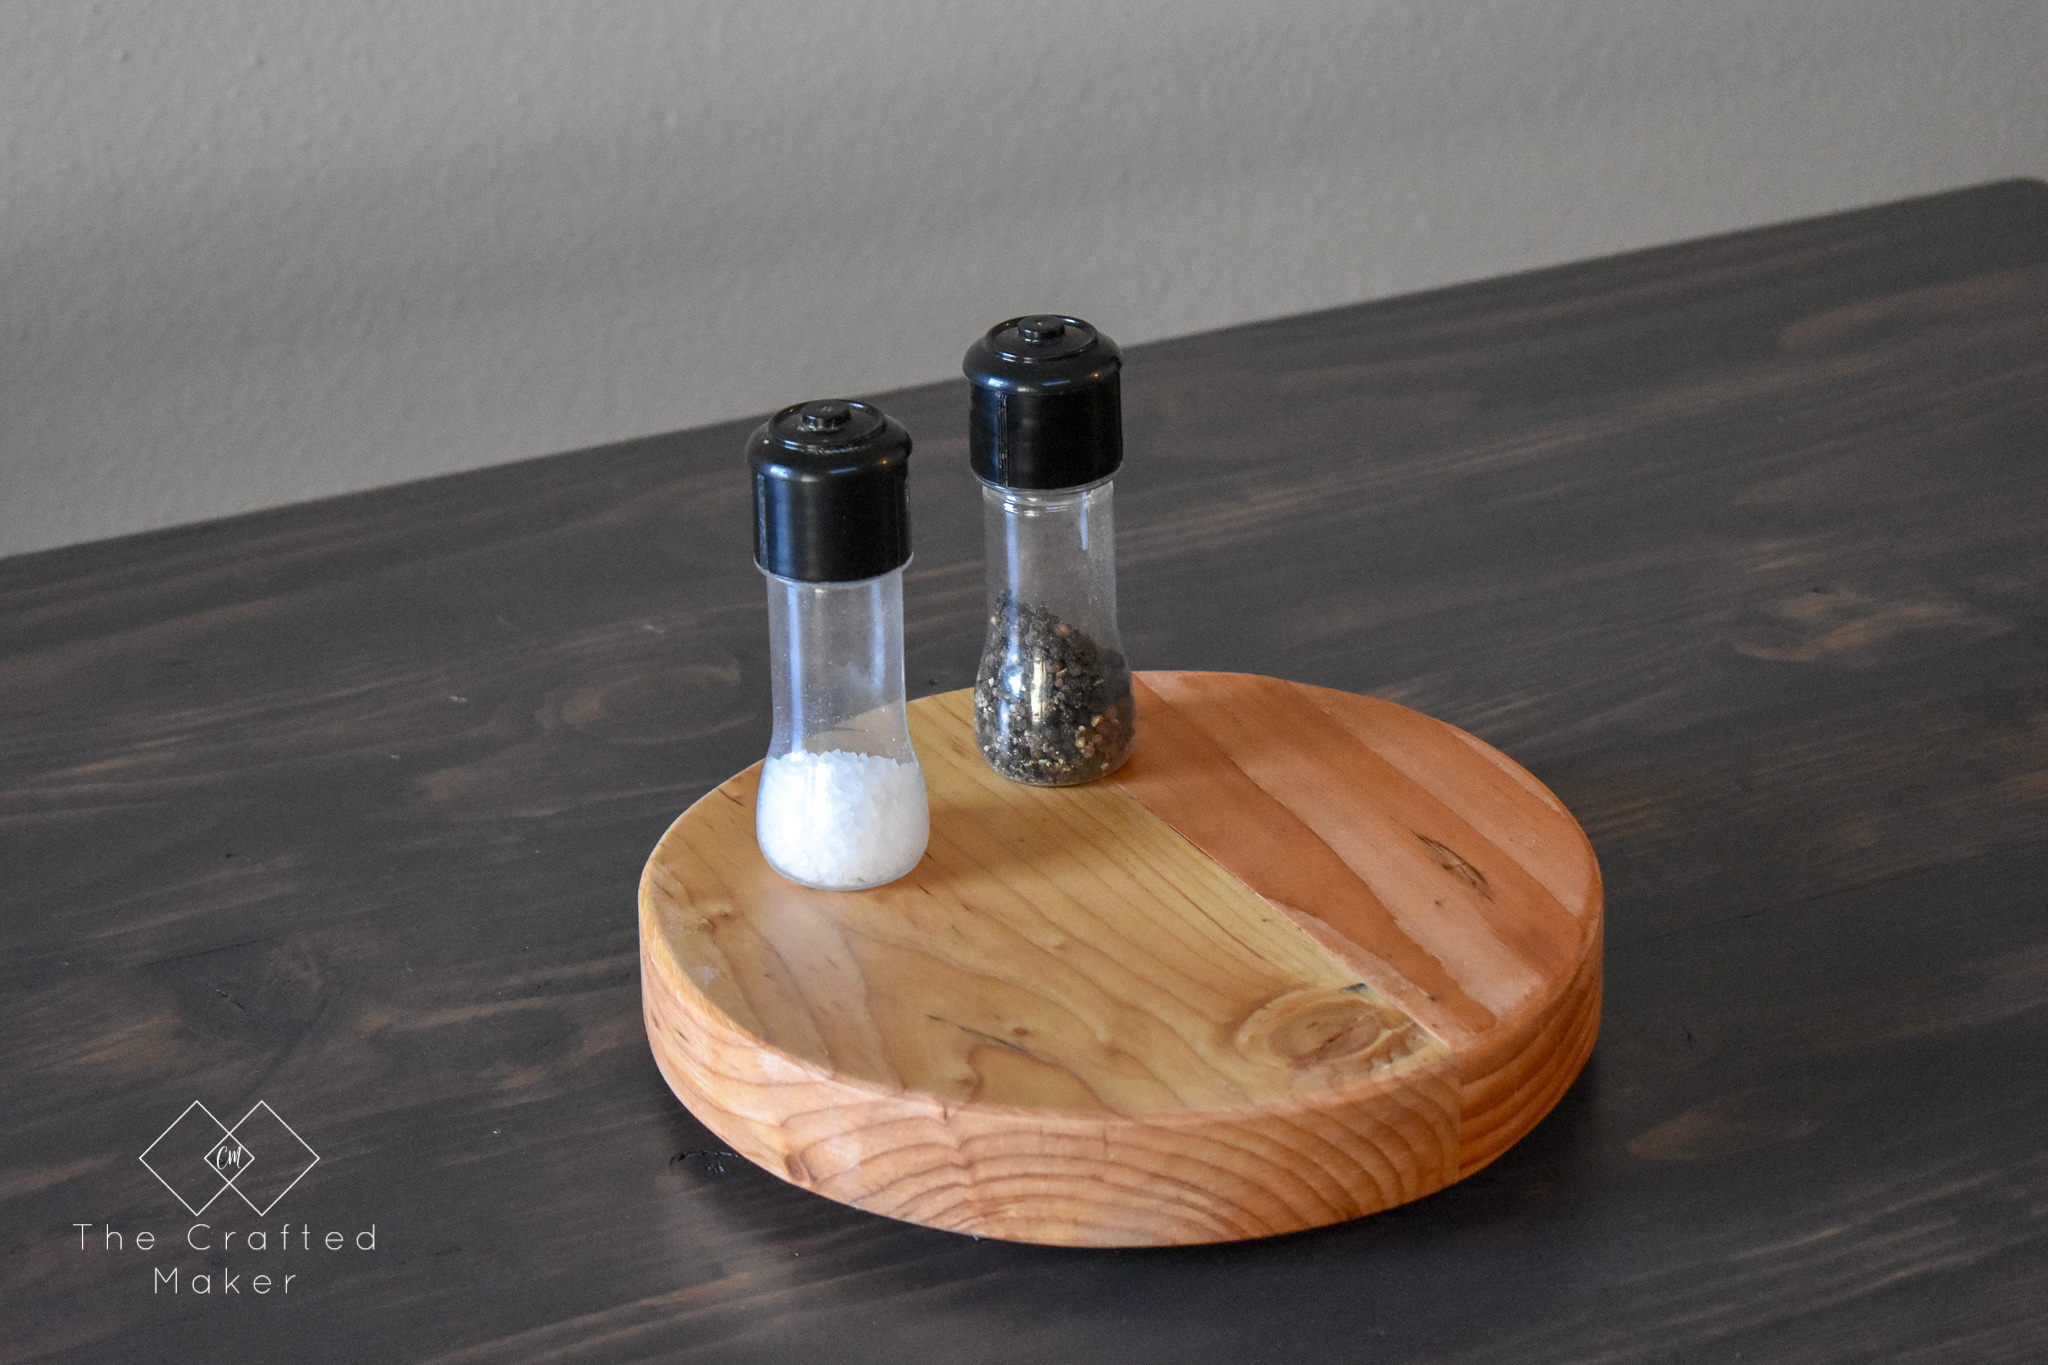
A rotating platform makes it easier to reach the jar at the back of a group. This wooden lazy Susan can organize packaged condiments or other containers on a counter or table, using a flat remnant and a purchased bearing.
The Crafted Maker starts with an approximately 13-inch-square piece and cuts the circular shape with a jigsaw. The hardware is the part to plan around: its size, screw positions, and installation sequence matter. Leave enough space for the loaded platform to turn without catching nearby items. A round project can also be a useful way to turn a slightly awkward rectangular offcut into a deliberate shape.
Best for: Keeping grouped containers accessible
Materials to check: Flat wood remnant; lazy Susan hardware
Resource: Illustrated tutorial
See the tutorial at The Crafted Maker →
16. Wall-Mounted Bottle Opener
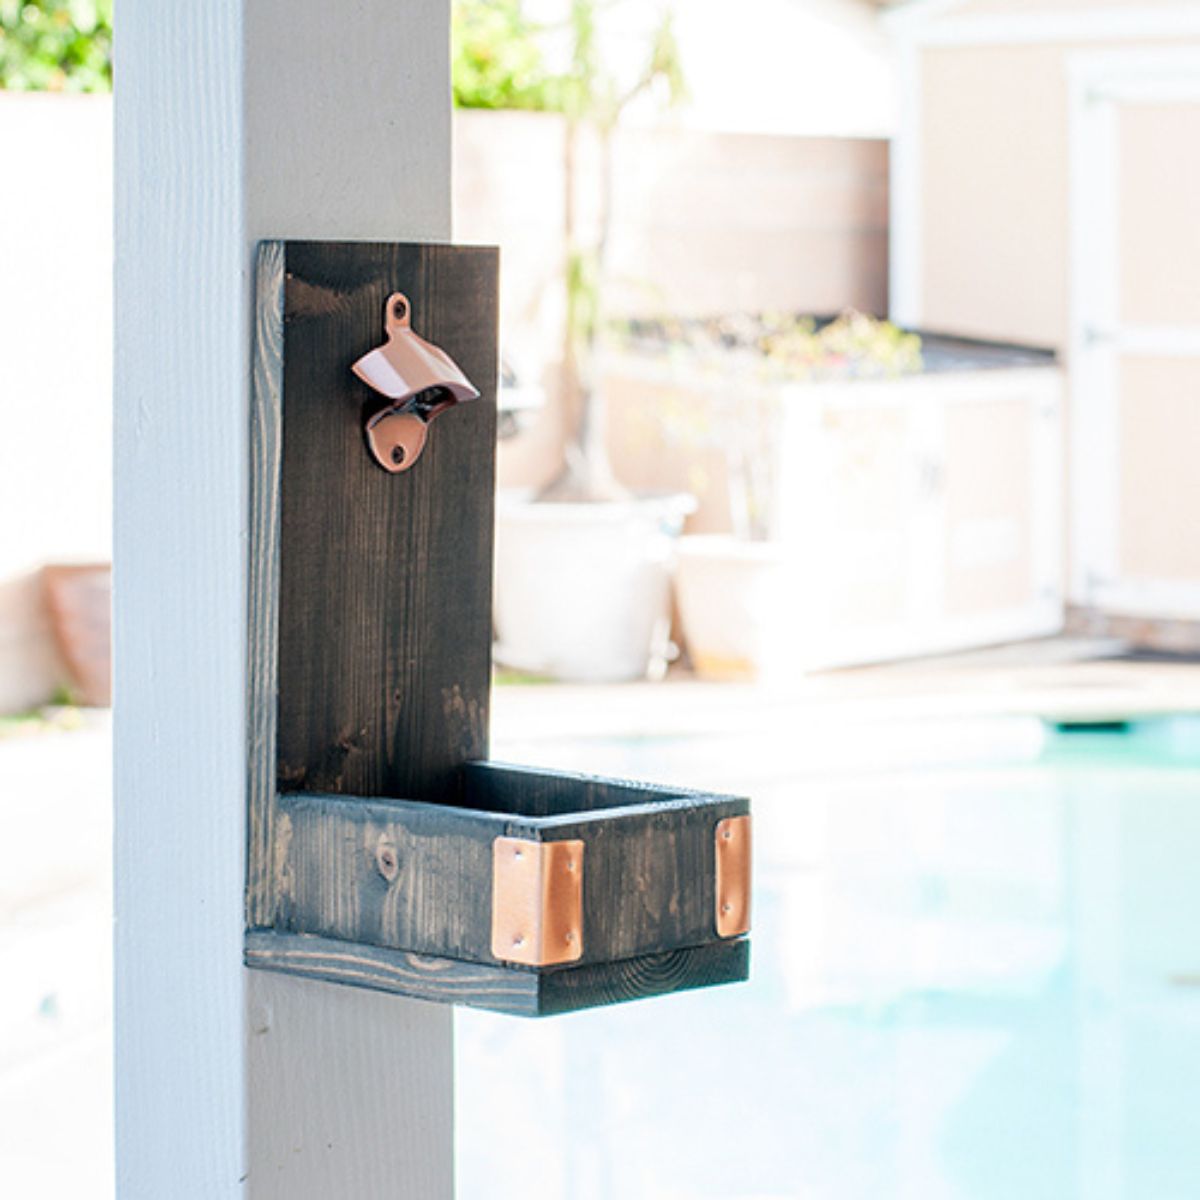
A wall-mounted opener is a small project with an obvious job. The wooden backing gives the hardware a finished appearance, while the lower collection area keeps bottle caps from becoming another item to clear off the counter.
Anika’s design uses short pieces of a 1×6 board and adds copper-toned accents. It can suit a kitchen beverage corner as well as a patio or home bar. Include the opener hardware and wall fastening in your materials list rather than treating the lumber as the entire project. The mounting needs to withstand the force of opening a bottle, so follow the source’s installation guidance.
Best for: A beverage corner or handmade gift
Materials to check: Short 1×6 pieces; opener and mounting hardware
Resource: Online tutorial and linked plans
See the tutorial at Anika’s DIY Life →
17. Chalkboard Herb Drying Rack
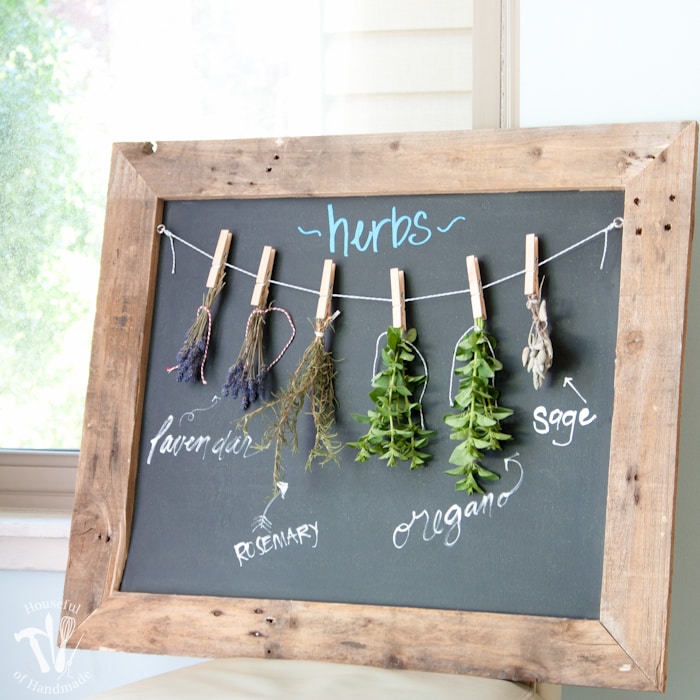
This wall rack combines hanging herb bundles with a chalkboard panel. It is a useful option if you prefer a project that becomes part of the kitchen’s appearance rather than disappearing inside a cupboard.
Houseful of Handmade builds the example with reclaimed boards and hooks. The chalkboard provides a place to label what is hanging, while the frame gives the small bundles a more organized presentation. You can take inspiration from the rustic appearance without needing to use unknown reclaimed material. Choose the location with care so the hanging space does not interfere with cooking or routine kitchen work.
Best for: A decorative place for herb bundles
Materials to check: Suitable board remnants; hooks and chalkboard materials
Resource: Illustrated tutorial
See the tutorial at Houseful of Handmade →
18. Wooden Trivet from Narrow Offcuts
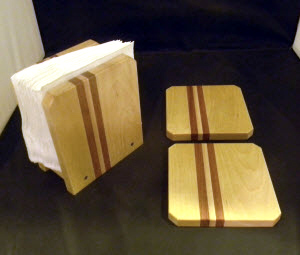
Narrow contrasting strips can become a more interesting project than a single plain board. The WoodWorkers Guild of America tutorial combines a napkin holder with matching trivets; this entry focuses on the trivets as a separate use for small stock.
The article shows the parts, layout, and assembly, making it useful to study before choosing your pieces. Coordinating a trivet with an existing wooden accessory can also turn a few scraps into a thoughtful gift set. Follow the documented construction and check the chosen finish’s suitability for the intended temperatures. A decorative surface coating alone does not establish that an item can safely take very hot cookware.
Best for: Using narrow contrasting offcuts
Materials to check: Narrow solid wood pieces; supplies in tutorial
Resource: Combined napkin-holder and trivet tutorial
See the tutorial at WoodWorkers Guild of America →
19. Countertop Cubby Organizer
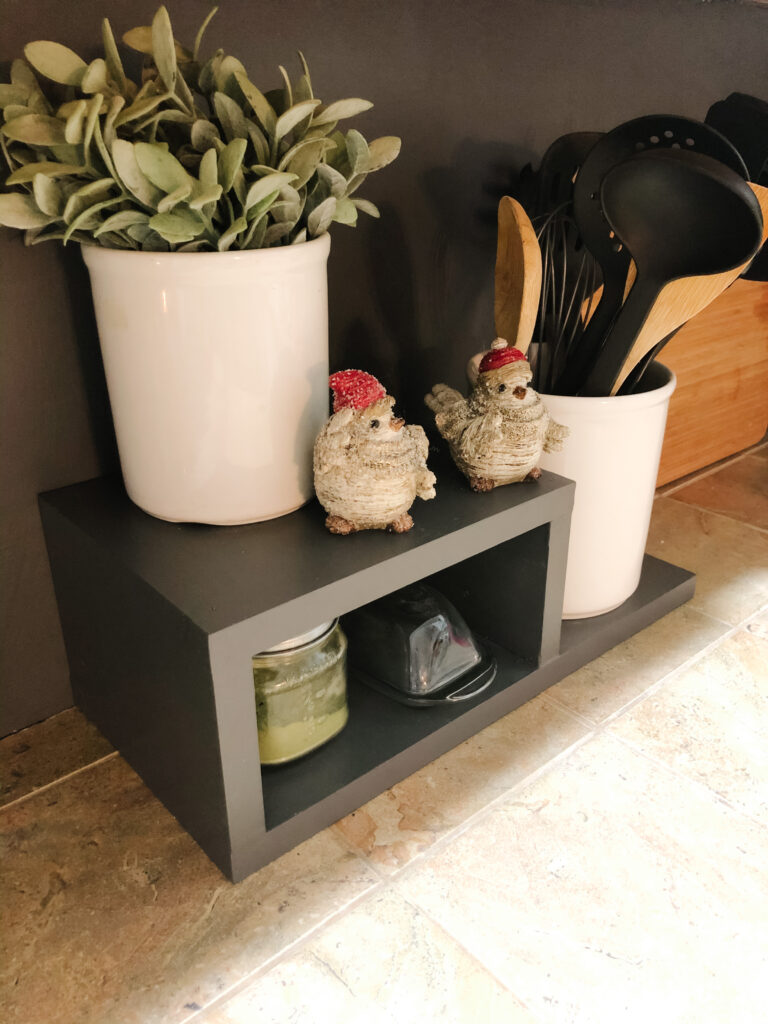
This organizer has more structure than a shallow tray. A small cubby holds everyday containers, an upper surface adds another level, and an adjoining base gives a utensil crock a landing place. It helps a group of essentials look like one deliberate arrangement.
Just Call Me Homegirl lays out the actual items first and builds around them with 1×8 scraps. That is the useful lesson to borrow: let what you store determine the shape. The source page contains two projects; look for the “Counter Top Organizer” section for this one. A matching painted finish helps the piece blend into the surrounding kitchen.
Best for: Grouping a utensil crock and small containers
Materials to check: 1×8 offcuts; finishing nails
Resource: Countertop organizer walkthrough within a two-project article
See the tutorial at Just Call Me Homegirl →
20. Stackable Wooden Egg Trays
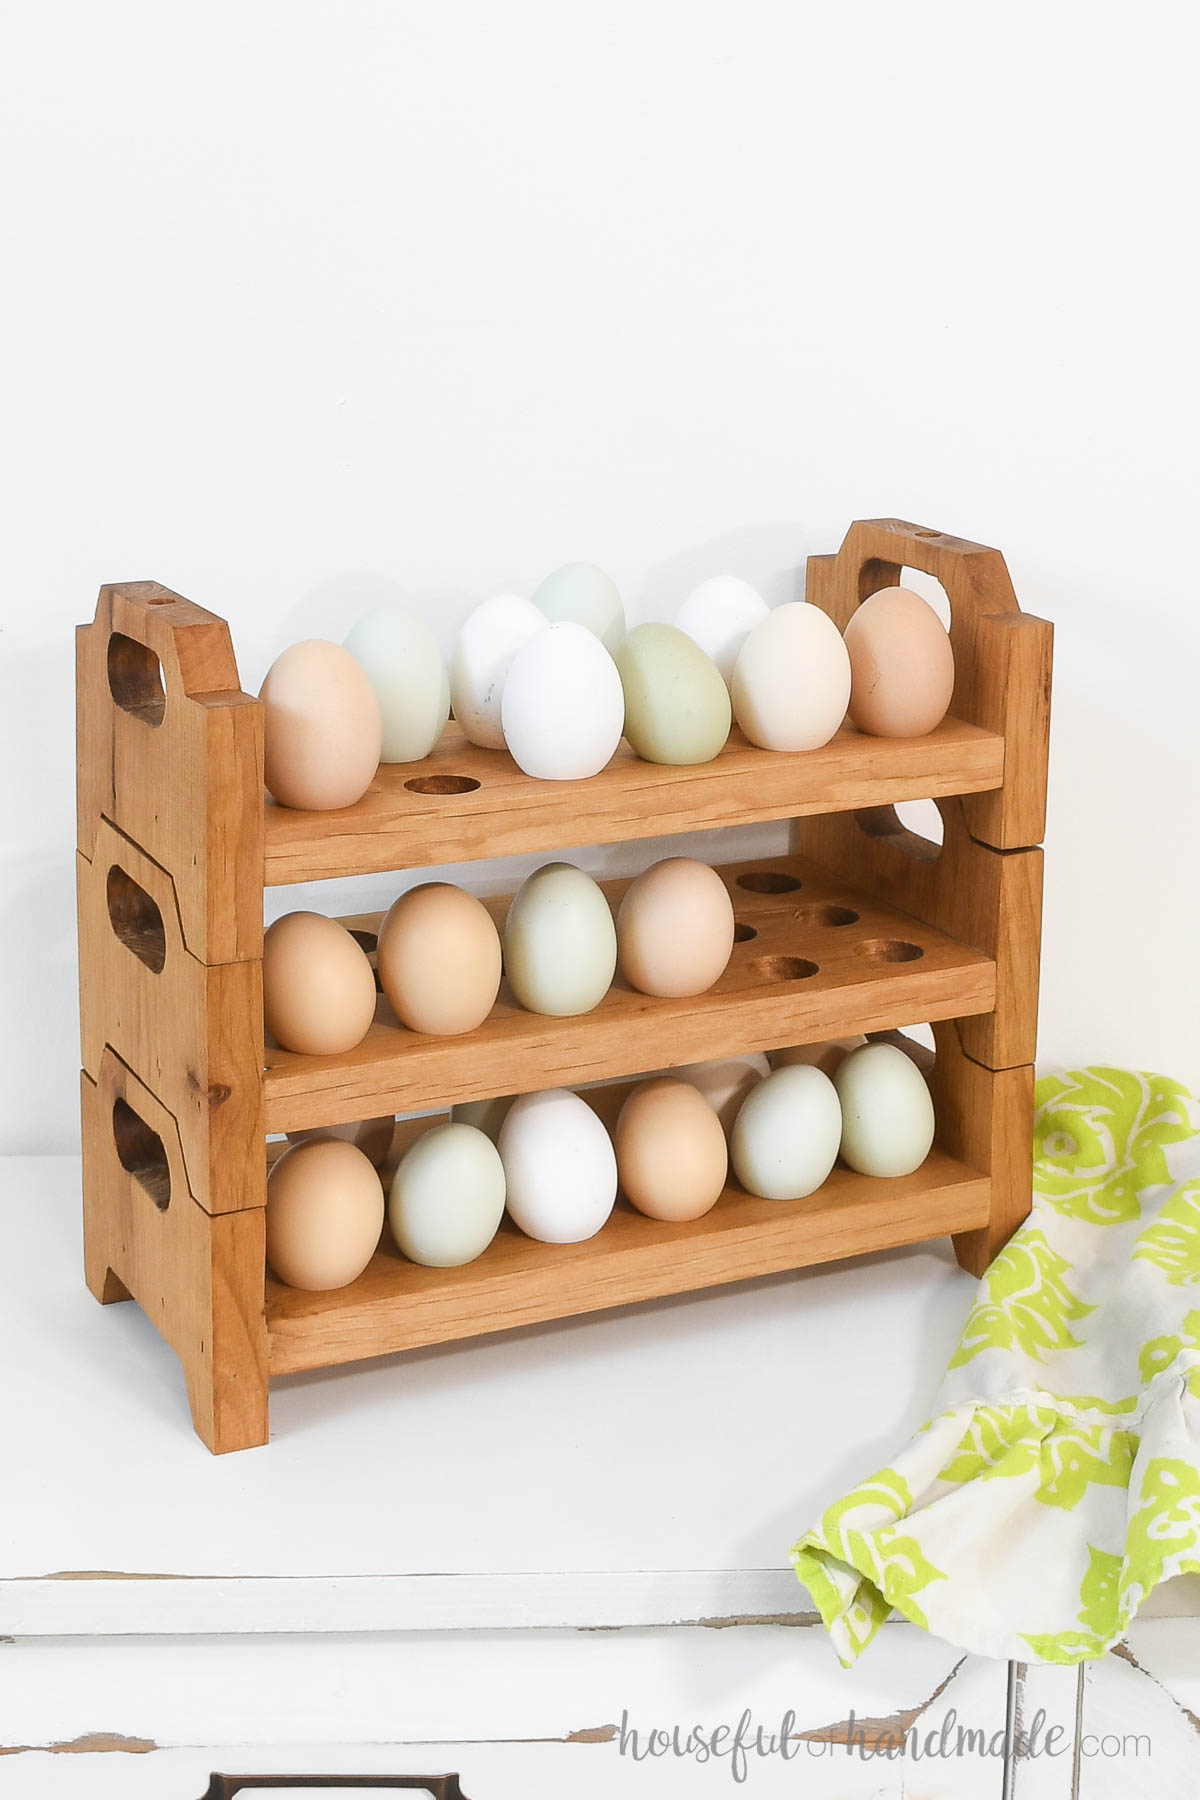
These wooden trays have shaped egg openings, side handles, and a stacking arrangement. They are a more distinctive use for short boards than another open box, especially for someone who wants to practice accurate repeated drilling.
Houseful of Handmade shares the construction process and offers printable plans separately. The appeal is in the repeatable layout and the way the trays stack, so measure and mark carefully. Treat the article as a woodworking resource for making a holder. Choose where to store eggs according to the requirements for the eggs you buy or collect; the holder itself does not change those requirements.
Best for: Making a stacking egg holder
Materials to check: 1×6 remnants; supplies specified by the creator
Resource: Online walkthrough; paid printable plans
See the tutorial at Houseful of Handmade →
21. Square Breakfast Serving Tray
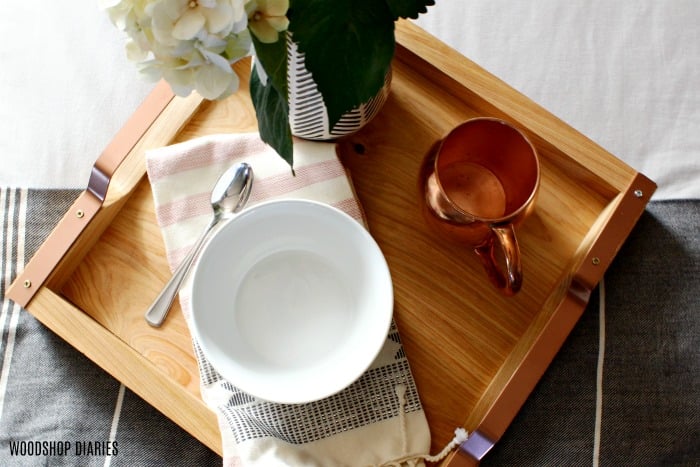
Finish the collection with a tray you can use for breakfast, drinks, or grouping items on an island. Its square shape provides a generous surface, while metal handles give the wood a contrasting detail.
Woodshop Diaries makes the example from cypress and forms the handles from steel flat stock. This is a project for wider or joined board remnants, not the smallest pieces in the scrap bin. The build uses pocket-hole joinery and includes metal cutting for the handles. Review that part of the process before choosing it. The source links to the corresponding Kreg plan for the full construction details.
Best for: Serving breakfast or grouping kitchen accessories
Materials to check: Suitable wider boards; steel handle stock and screws
Resource: Build article and linked Kreg plan
See the tutorial at Woodshop Diaries →
Before You Build: Match the Project to Your Scraps
Measure the usable wood
Sort the pile by thickness, width, and length. Measure past damaged ends and mark defects before comparing pieces with a cut list. That short inspection can reveal whether you have enough material for the entire build, rather than just its most visible part.
Keep like-thickness pieces together. Drawer dividers need consistent strips, while a tray needs a suitable flat surface. A project built around a thick countertop remnant will not necessarily work with a thin plywood panel of the same outline.
Count the supplies beyond lumber
Scrap wood reduces what you need to buy, but hardware can still determine the project. A lazy Susan needs a bearing; a bottle opener needs its opener and mounting; the pasta rack uses pivot hardware and dowels. Make a complete shopping list before deciding which build is the best use of your leftovers.
Choose materials for the intended use
A stand that holds a cookbook serves a different purpose from a rack touching fresh pasta. For food-contact projects, follow the original tutorial’s material requirements and the finish manufacturer’s directions for that specific use. Avoid unknown, treated, or contaminated reclaimed wood for food-contact parts.
For preparation and finishing supplies, our guide to wood finishing tools for beginners can help you organize your workspace. Allow the stated curing time before putting the finished piece into service.
Which Scrap Wood Kitchen Project Should You Try First?
Choose the problem you notice most often. If cutting boards slide around whenever you reach for one, the stand is a useful starting point. If you cook from books, a cookbook holder may earn its place immediately. A drawer organizer makes more sense when your worktop is clear but your utensils are difficult to find.
For a gift, think about the recipient’s habits. A tea station suits someone who uses the same kettle and mugs daily. A coaster set needs little space. A folding pasta rack is more specialized, so it is a better choice for someone who already makes pasta.
You can also select by the skill you want to practice: shaped outlines on the napkin holder, accurate repeated holes on the egg trays, or hardware installation on the lazy Susan. Keep your first project small enough to complete carefully, including the finish.
Ready to Plan Your Next Woodworking Project?
Once a few leftovers become something useful, it is easier to picture your next build: another organizer, a handmade gift, or a piece of furniture sized for your home.
The original tutorials above are the starting point for these 21 projects. If you would like to explore a broader paid collection, take a look at Teds Woodworking Plans. Review the project information and available samples to decide whether the collection suits your tools, interests, and experience.
Explore Teds Woodworking Plans →
Affiliate link: We may earn a commission if you purchase, at no extra cost to you. This is a separate resource; the projects above belong to their respective creators.
Frequently Asked Questions About Scrap Wood Kitchen Projects
What can I make with very small wood offcuts?
The mini cutting board coasters are a useful place to start. Narrow stock may also suit the trivet, while short boards can become parts of the bottle opener. Check the complete cut list before starting: a project may need a larger base even if its other parts are small.
Which projects work with leftover plywood?
The under-sink organizers are the clearest option for larger plywood remnants. The dinnerware caddy also uses a thin plywood base. Follow the source’s specified thickness, since changing it can affect assembly and the fit of adjoining pieces.
Are all the printable plans free?
No. The collection includes public tutorials, online plans, and projects with paid printable PDFs. Each entry describes the resource provided. Open the original page for current access details before purchasing supplies or a download.
Do I need expensive woodworking tools?
The tool requirements vary. Several projects use familiar cutting and drilling tools, while the drawer-divider clips use a CNC machine and the breakfast tray includes metal handle work. Read the source’s tool list and choose a build that fits your setup.
Can I make these kitchen projects as gifts?
Yes, several suit gift giving, particularly the cookbook stand, coasters, napkin holder, and bottle opener. Choose one the recipient has room to use, and allow enough time for glue and finishes to cure. Include care guidance appropriate to the materials and finish you used.
Put Your Offcuts to Work
The most useful scrap wood kitchen projects start with an everyday need. Pick one drawer, one group of utensils, or one awkward countertop corner, then find a build that suits your available material. You do not have to empty the whole scrap bin to make something worthwhile.
Which would you make first: a cookbook stand, a cutting board holder, or a drawer organizer? Share your choice in the comments, and save this collection to Pinterest for your next workshop session.