

You’re scrolling Pinterest at 11pm — as one does — and you stumble on the most gorgeous rustic wooden shelf. Perfectly stained. Beautifully styled. Absolutely chef’s kiss. Then you click the link and see it’s $189. From a “boutique artisan shop.” For a piece of wood with some brackets.
Yeah, no.
Here’s what I want you to know: most of that stunning wooden décor you’ve been pinning? You can make it yourself for under $15. No joke. These little wood projects are exactly what budget-conscious DIYers, beginners, and home décor lovers have been looking for — and they deliver results that genuinely look high-end.
If you’ve never picked up a piece of sandpaper in your life, don’t panic. These 15 little wood projects require no fancy tools, no expensive workshop, and — honestly — minimal skill. Just a little patience and a willingness to get some sawdust on your jeans. Let’s get into it.
Why Little Wood Projects Are Having a Moment
Have you noticed how wood is literally everywhere in home décor right now? Every Pinterest board, every Instagram reel, every “cozy home” aesthetic — wood is front and center. And it makes total sense.
Wood has this magical ability to make any space feel warm, intentional, and expensive — even when it absolutely wasn’t. A $4 piece of craft store wood, stained in walnut and styled on a shelf, looks like it belongs in an interior design magazine.
The best part? Little wood projects are incredibly forgiving for beginners. Scrap wood from a hardware store, pallet wood you grabbed for free off someone’s curb, or cheap craft store wood planks — all of it works beautifully. The material is affordable, widely available, and endlessly versatile.
What You’ll Need Before You Start
Before we get to the fun part, let’s talk supplies. The good news: you probably already own most of what you need.
Your basic toolkit:
- Sandpaper — 80 grit for shaping, 220 grit for finishing
- A hand saw or small jigsaw — for cutting pieces to size
- Wood glue — your best friend for no-nail projects
- A drill — optional but useful for some projects
- Wood stain or paint + a brush — for that polished, finished look
Where to find cheap or free wood:
Advertisement
- Hardware store offcut bins (often sold by the pound!)
- Pallet wood — check Facebook Marketplace or behind grocery stores
- Craft stores like Michaels or Hobby Lobby
- Thrift stores and estate sales (buy old furniture, repurpose the wood)
One quick safety note: always sand in a ventilated area and wear a dust mask. Sawdust is not a vibe. 😷
FYI — if you’re not sure which tools are actually worth buying as a beginner, we’ve done that research for you. Check out 👉 16 Best Woodworking Tools for Beginners before you spend a single dollar — it’ll save you from buying things you don’t need.
The 15 Little Wood Projects (That’ll Make People Think You Hired a Designer)
Alright, here’s what you came for. Each of these projects is beginner-friendly, budget-conscious, and genuinely beautiful. Let’s go.
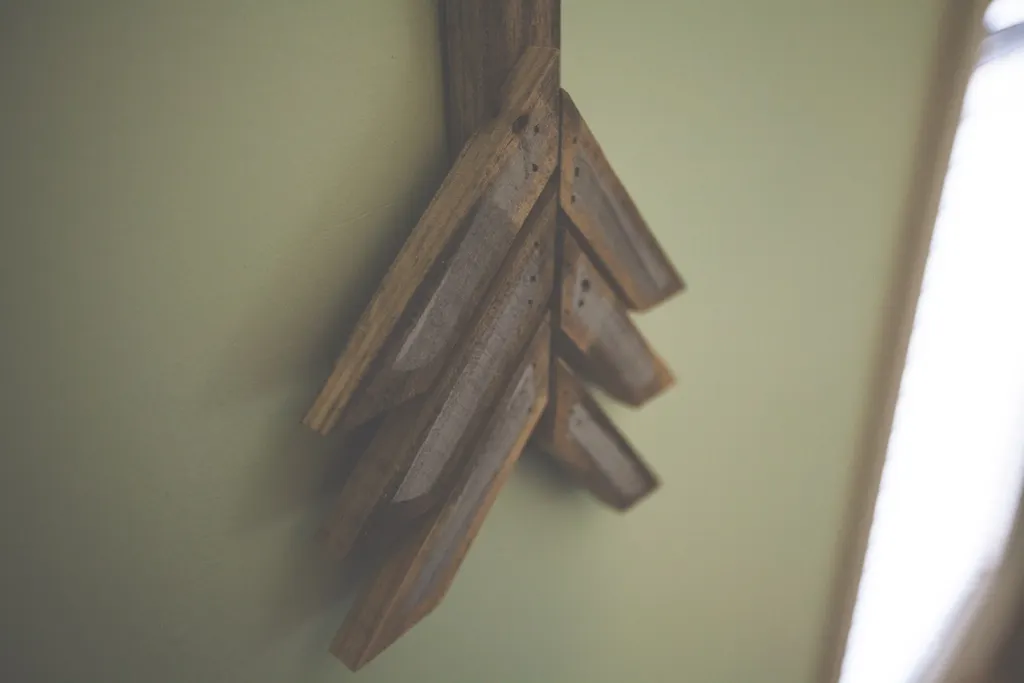
#15 Mini Floating Shelves
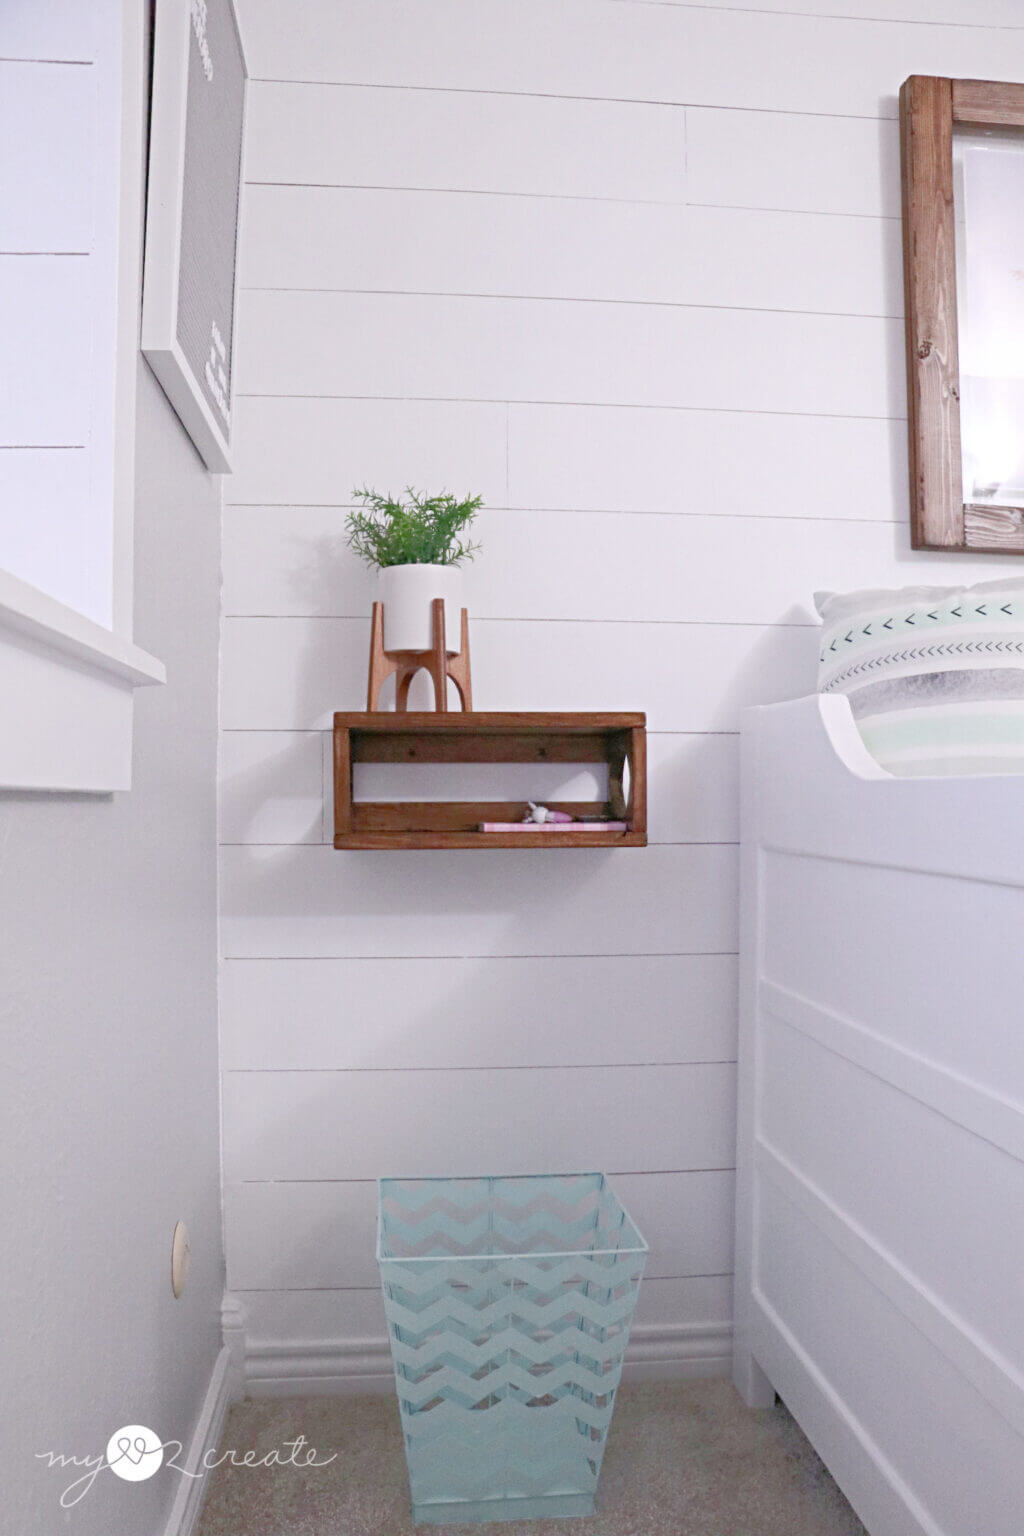
Credit : mylove2create
Difficulty: ⭐ Easy | Est. Cost: $5–$10
Floating shelves are one of the highest-impact little wood projects you can tackle on a weekend afternoon. Cut a plank to your desired length, sand it smooth, stain in walnut or white-wash it, and mount with simple hidden brackets. The result looks like something you’d find in a high-end apartment tour on YouTube — except you made it for the price of a coffee.
Pro tip: Group three shelves at staggered heights for a styled gallery wall effect.
#14 Wooden Candle Holders
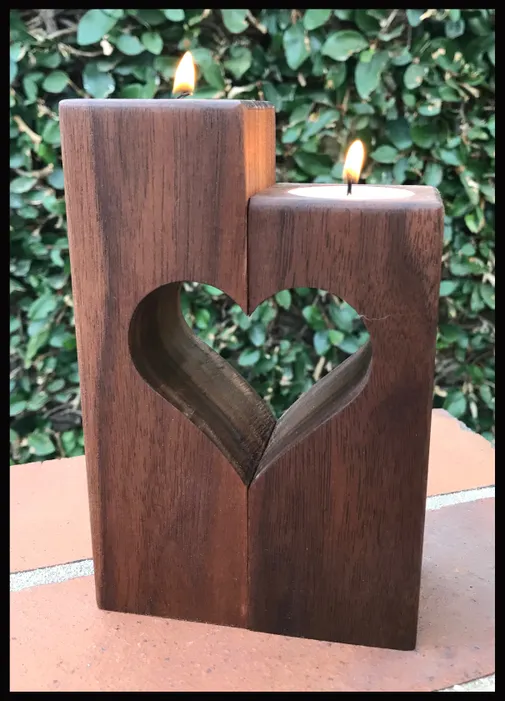
Credit : Instructables
Difficulty: ⭐ Easy | Est. Cost: $3–$8
Drill a hole into a small wood block the size of a tea light, sand the edges smooth, and apply a dark stain. Done. Seriously — that’s it. Group three holders in varying heights on a wooden tray and you’ve got a centerpiece that looks like it cost $60 at HomeGoods. The secret is in the stain color and the grouping.
#13 Rustic Picture Frame

Credit : Homedit
Difficulty: ⭐ Easy | Est. Cost: $5–$10
Cut four thin strips of wood at 45° angles, glue them into a frame shape, add a cardboard backing, and stain. The imperfections in the wood — the knots, the grain, the slight roughness — actually make this piece look more expensive, not less. Rustic is supposed to look a little rough around the edges. Lean into it.
These also make incredibly thoughtful, personalized gifts. Just saying.
#12 Small Wood Serving Tray
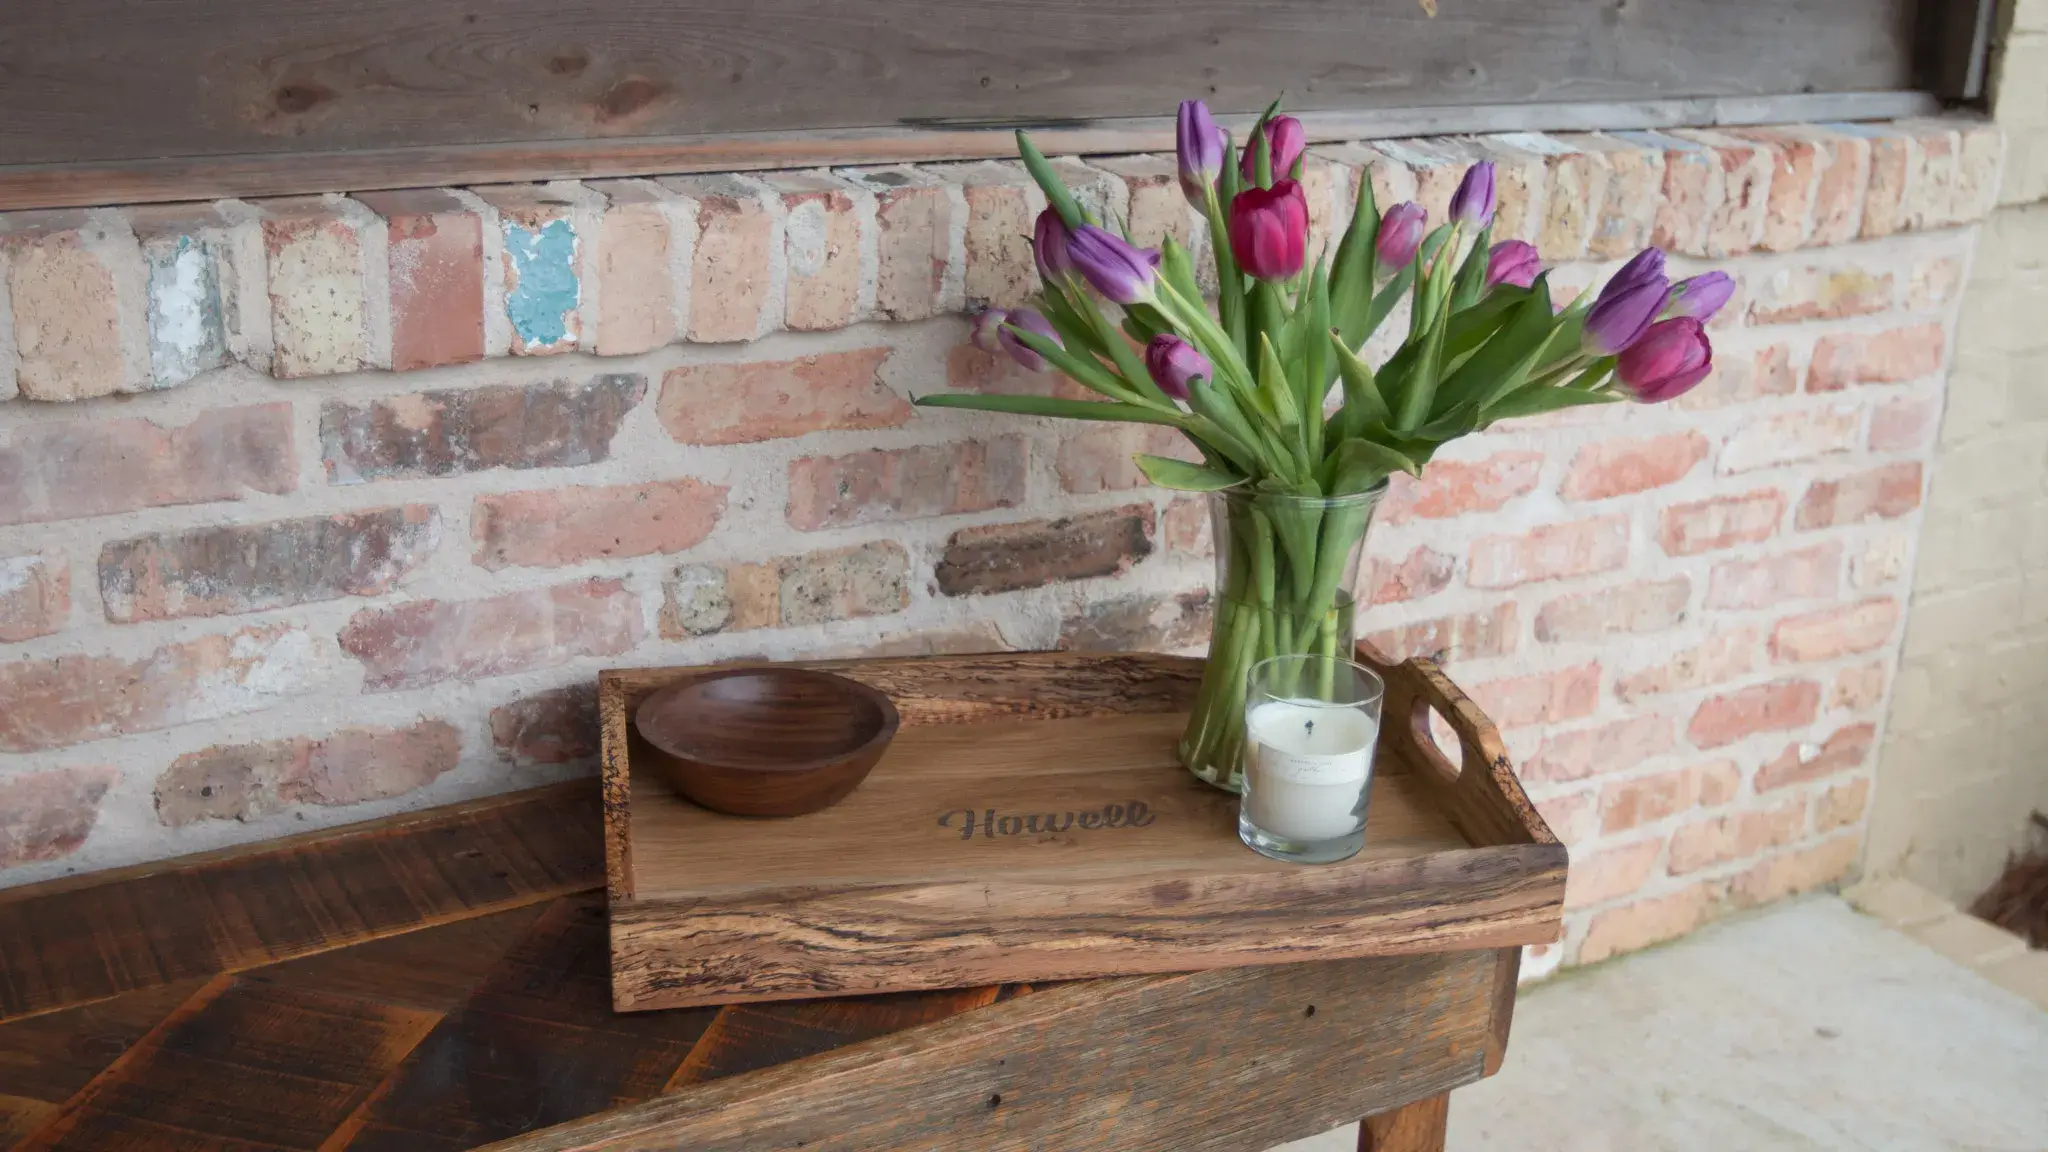
Credit : Instructables
Difficulty: ⭐⭐ Medium | Est. Cost: $8–$15
A small wooden tray with handles is one of those little wood projects that earns its place in your home every single day. Use it for breakfast in bed, as a coffee table display, or for bathroom organization. Add rope handles for a boho feel or drill leather strap handles for something more modern. Either way, the finished product looks like a $50 boutique purchase.
#11 Wooden Bead Garland
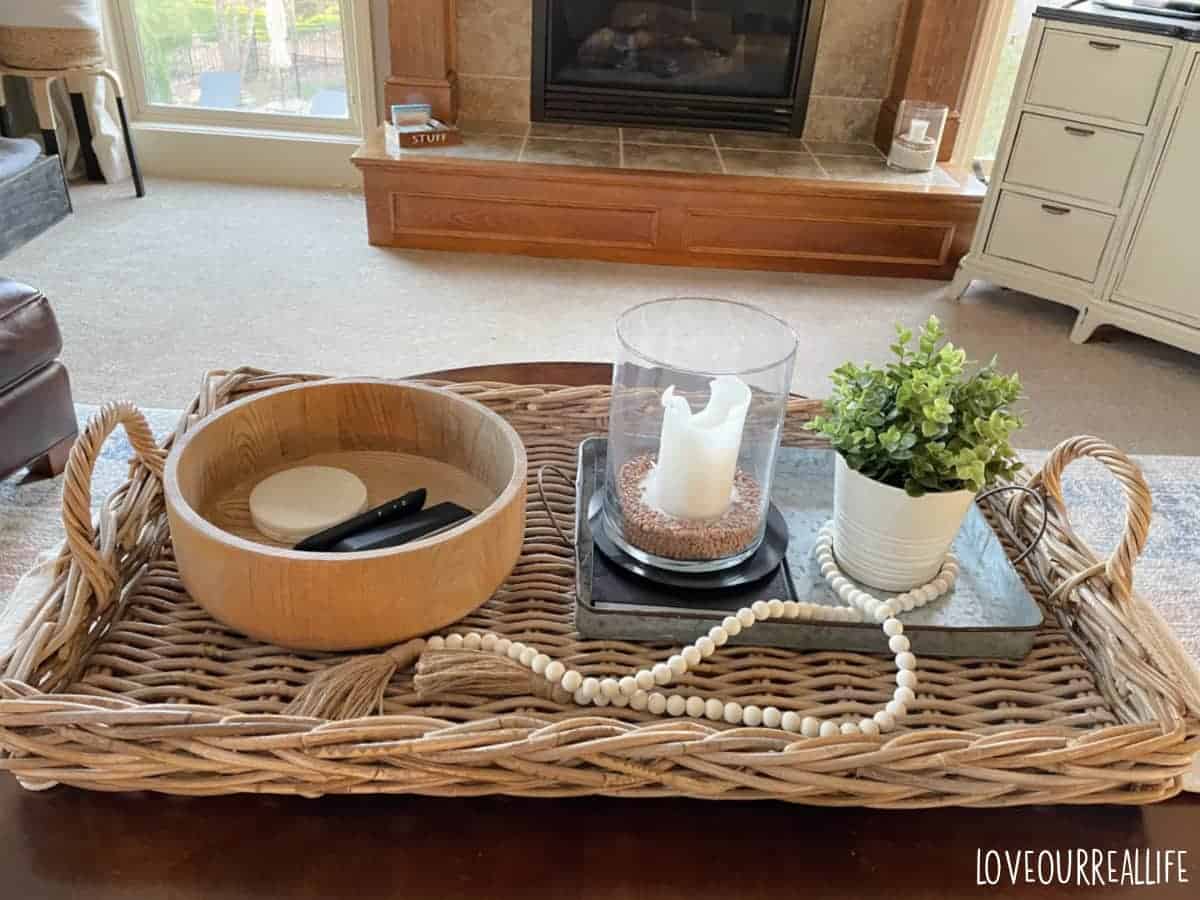
Credit : Loveourreallife
Difficulty: ⭐ Easy | Est. Cost: $4–$7
Join jute twine with wooden beads. Give some beads a darker stain than others. Hang it from a mantel, a wall hook, or a mirror. That’s the entire project, and to be honest? It looks amazing. For a layered, carefully chosen appearance, change the stain colors and bead sizes. This is one of the easiest and most visually striking small wood crafts on this list.
#10 Tiny Wooden Planter Box
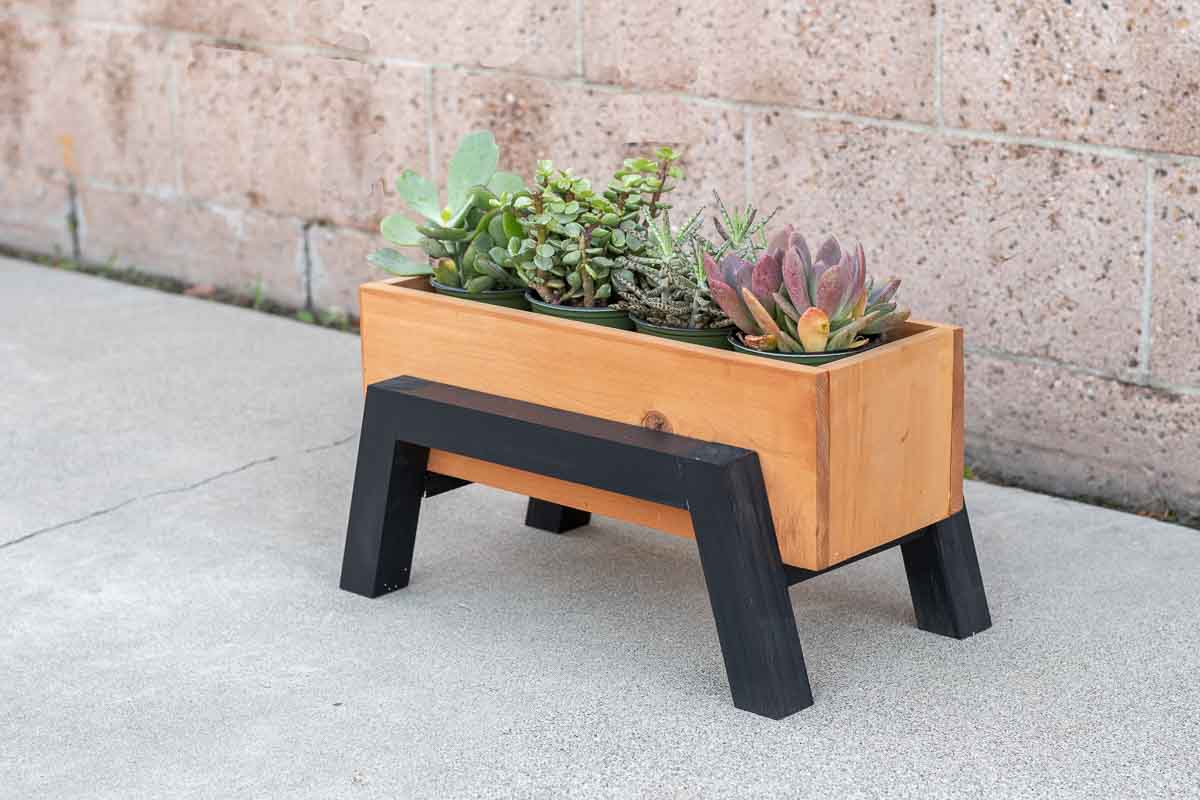
Credit : Instructables
Difficulty: ⭐⭐ Medium | Est. Cost: $10–$15
Build a small rectangular box from thin wood planks, drill drainage holes in the bottom, and line the inside with landscape fabric before adding soil. Plant herbs, succulents, or small flowers. On a windowsill or kitchen counter, this looks like something from a farmhouse lifestyle magazine. And it’s functional — fresh herbs for cooking? Yes please.
#9 Wood Slice Coasters
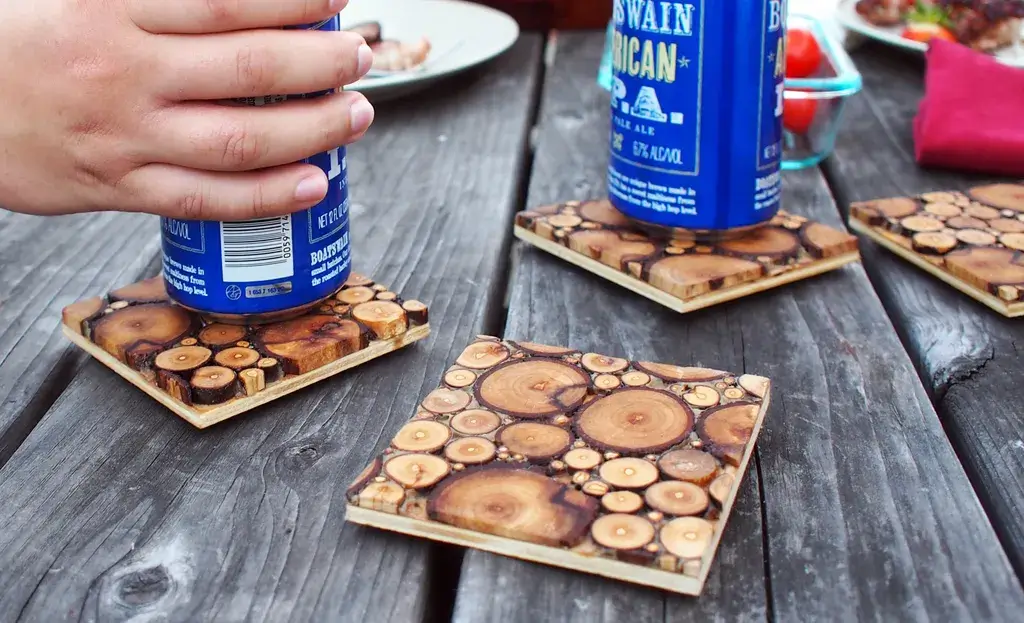
Credit : Instructables
Difficulty: ⭐ Easy | Est. Cost: $2–$6
Find a fallen branch (or buy a small log), slice it into ¾-inch rounds with a hand saw, sand the surface silky smooth, and seal with beeswax or polyurethane. Add felt pads to the bottom. These natural coasters look like $40 boutique finds — except you made a set of six for the price of one. IMO, this is the best value project on the entire list.
#8 Decorative Wooden Letters
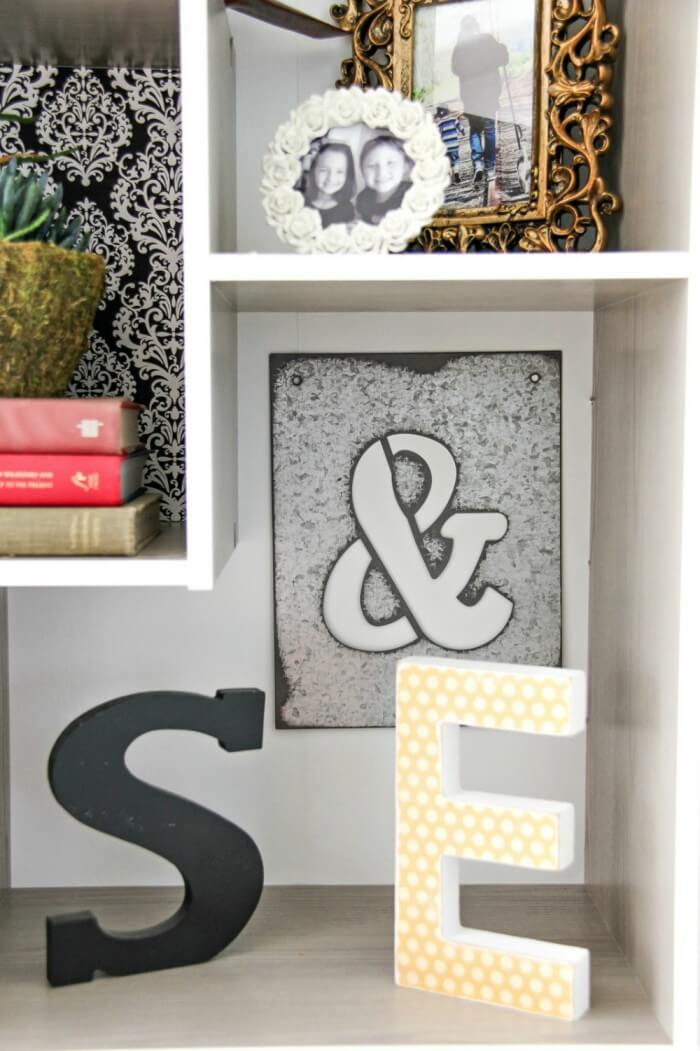
Credit : jolynneshane
Difficulty: ⭐ Easy | Est. Cost: $5–$10
Grab unfinished wood letters from your craft store (they’re usually $1–$2 each) and transform them with paint, stain, or even decoupage. Spell out a meaningful word, a family initial, or a short phrase. Lean them on a shelf, hang them on a wall, or use them as a mantel display. Simple, personal, and endlessly customizable.
#7 Hanging Wood & Rope Shelf
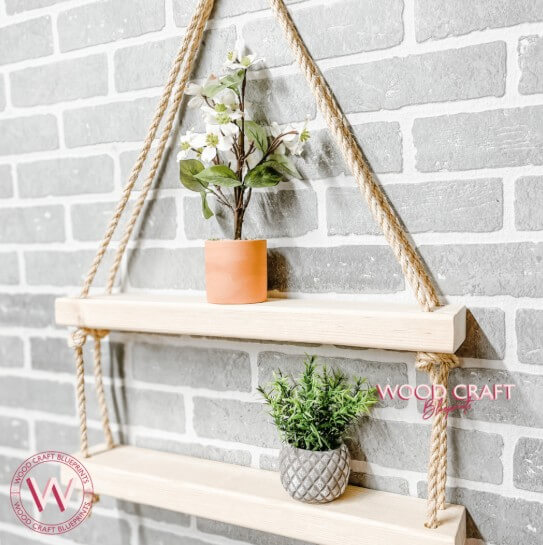
Credit : woodcraftblueprint
Difficulty: ⭐⭐ Medium | Est. Cost: $10–$20
Drill two holes in either end of a smooth wood plank, thread thick rope through each hole, and knot securely underneath. Hang from a ceiling hook or wall bracket. The combination of natural wood and rope gives an instant boho-luxe vibe that works in bedrooms, nurseries, living rooms, and kitchens. Style with a small plant and a candle for maximum Pinterest potential.
#6 Small Wooden Jewelry Stand
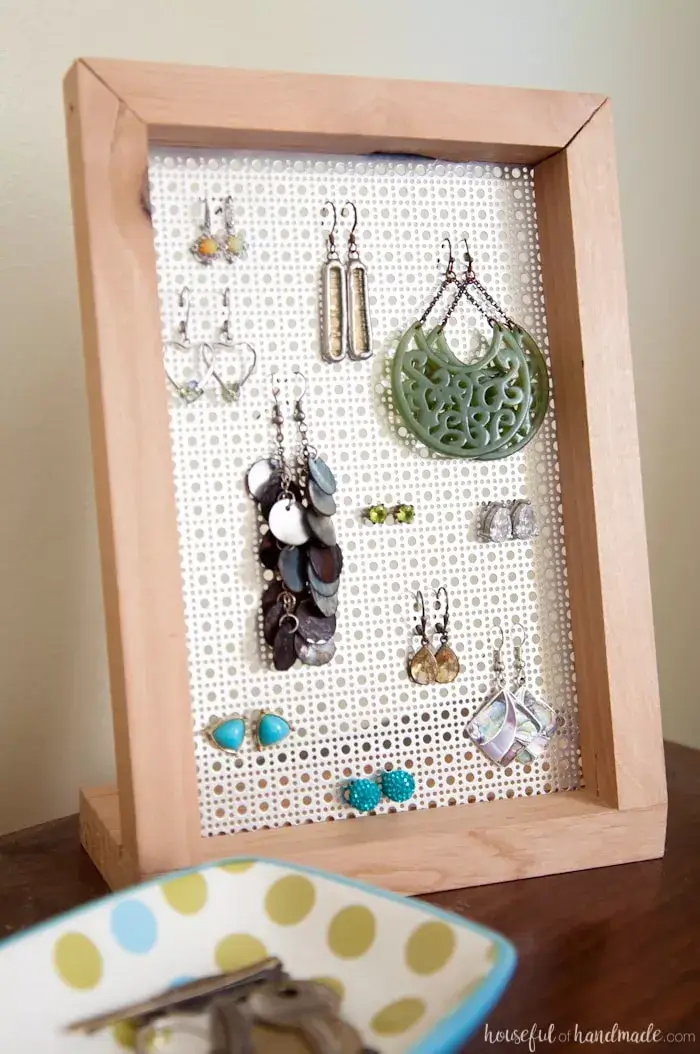
Credit: housefulofhandmade
Difficulty: ⭐⭐ Medium | Est. Cost: $8–$12
Glue two pieces of wood into a T-shape — a vertical base and a horizontal bar — sand smooth, and paint in matte white or stain in ebony. Add small cup hooks along the horizontal bar for necklaces and a few earring holes drilled into the vertical piece. Functional, beautiful, and sitting on your dresser every single day. This one genuinely sparks joy every morning.
#5 Wood Burned Cutting Board
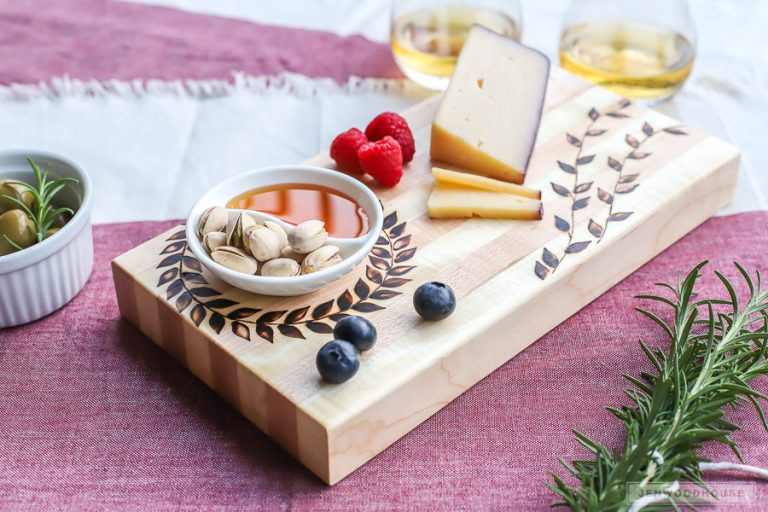
Credit : Jenwoodhouse
Difficulty: ⭐ Easy | Est. Cost: $6–$12
a wood-burning pen (they’re about $10 at craft stores). Practice your design on scrap wood first — a simple wreath, a monogram, or a short quote — then burn it into the board. Seal with food-safe mineral oil when you’re done. This is also one of the most popular little wood projects to sell, if you’re thinking about making a little side income.
#4 Mini Wooden Ladder Décor
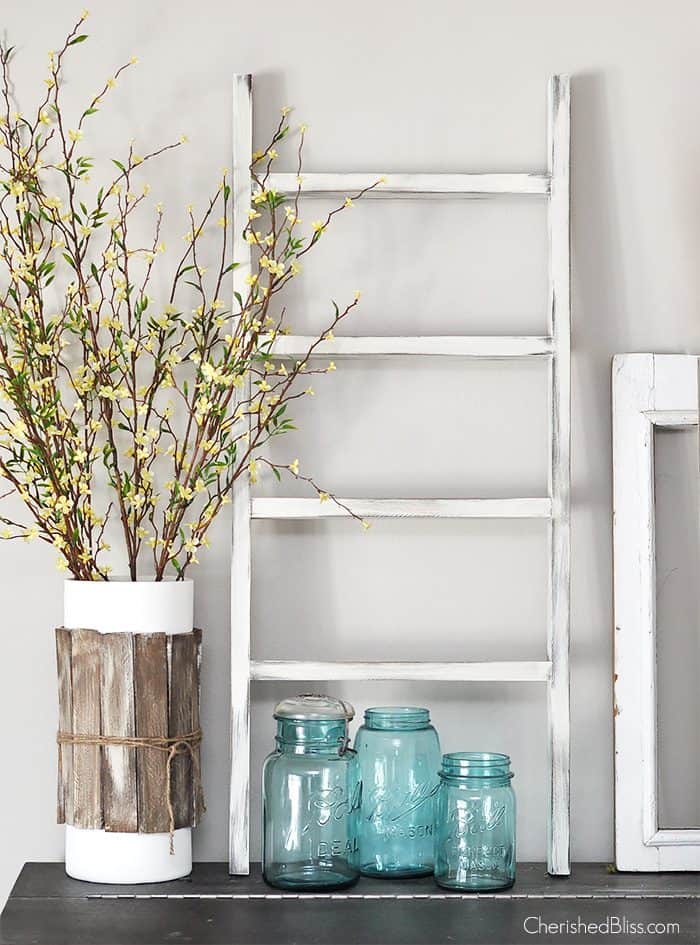
Credit : thecraftyblogstalker
Difficulty: ⭐⭐ Medium | Est. Cost: $10–$15
Two thin wood side rails and a few wooden dowels as rungs — glue, clamp, sand, and stain. Lean your mini ladder against a wall and use it to display small framed photos, fairy lights, or tiny potted plants. It photographs beautifully and looks like a thoughtful, designer-curated accent piece. Not bad for an afternoon project.
#3 Wooden Key Holder
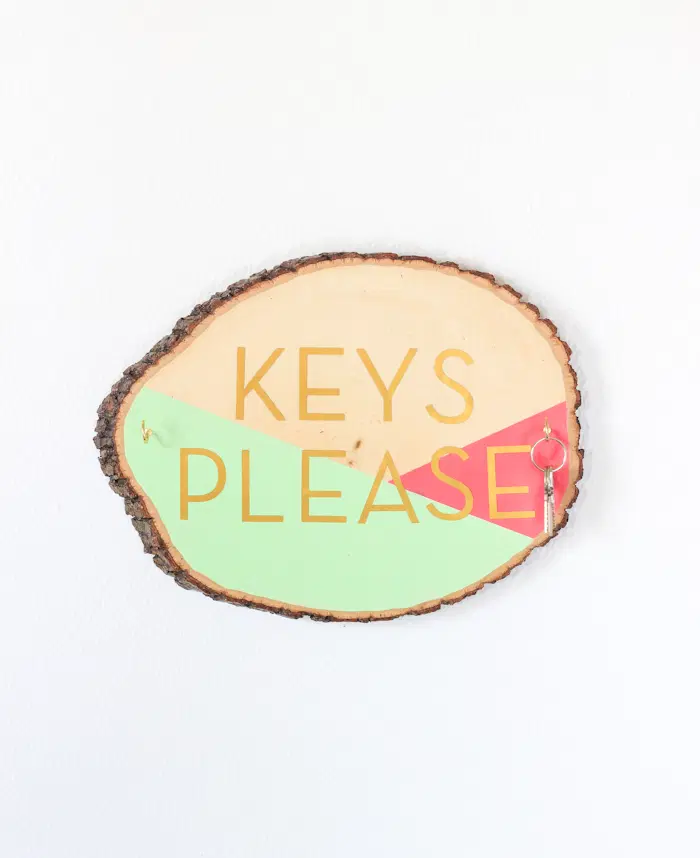
Credit : thecraftedlife
Difficulty: ⭐ Easy | Est. Cost: $5–$10
Cut a small piece of wood to your desired size, stain or paint it, and add three to five decorative knobs or cup hooks across the front. Mount it near your front door. You’ll never lose your keys again — and your entryway will look put-together while you’re at it. Add a small chalkboard section for notes or daily reminders. Bonus points for personalization.
#2 Pallet Wood Wall Art
Credit : Instructables
Difficulty: ⭐⭐ Medium | Est. Cost: $0–$10
Pallet wood is often completely free — check behind grocery stores, furniture shops, or Facebook Marketplace. Pull the planks apart, sand them down, and arrange them on your wall in a geometric pattern or herringbone design. Stain alternating planks in different shades for depth and visual texture. The result is large-scale wall art that costs next to nothing and fills an entire wall with character.
#1 Small Wooden Serving Board
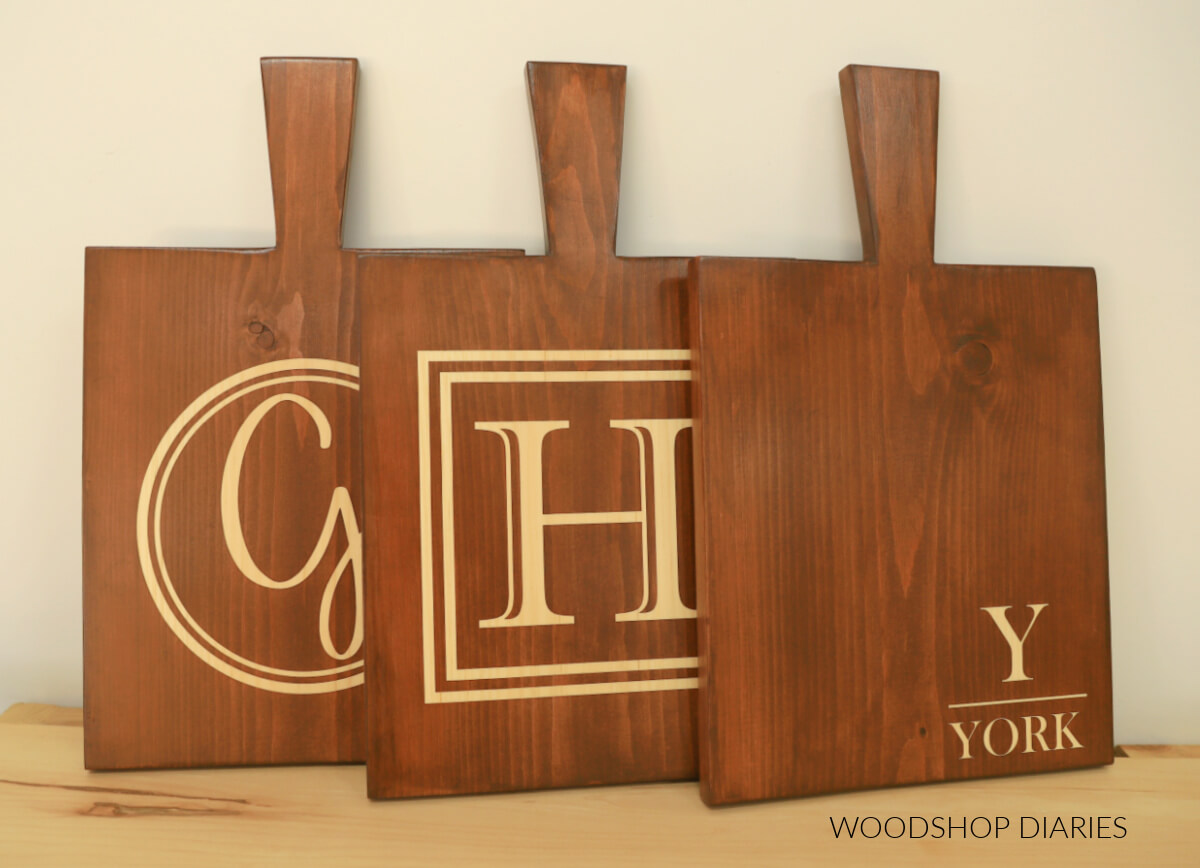
Credit : Woodshopdiaries
Difficulty: ⭐⭐ Medium | Est. Cost: $8–$15
Shape a small charcuterie or serving board with a handle, sand it until it’s silky smooth (seriously — don’t rush the sanding), and finish with food-safe mineral oil or beeswax. The smoother the finish, the more expensive it looks. These boards are perfect for hosting, gifting, or — here’s a thought — selling. Handmade serving boards move incredibly well online and at craft markets.
Tips to Make Your Little Wood Projects Look High-End
Okay, here’s where I share the finishing secrets that separate a “cute DIY” from a “wait, did you actually make that?” result.
- Choose the right stain: Walnut and ebony instantly communicate luxury. Light natural stains look beautiful too, but darker tones read as more intentional and expensive
- Sand between coats: Always — always — do a light sanding with fine grit paper between your stain or paint layers. It creates a glassy, smooth finish
- Use matte black hardware: Cup hooks, brackets, and knobs in matte black add a designer edge to almost any project
- Keep designs simple: Clean, minimal designs look more expensive than overly decorated ones. Resist the urge to add too many elements
- Style before you photograph: Add a small plant, a candle, or a book next to your finished piece before taking photos. Context makes everything look more intentional
Honestly, the finishing is 80% of the result. A rough, unstained piece of wood looks like scrap. The same piece, sanded perfectly and stained in walnut, looks like it came from a furniture boutique.
Take Your Little Wood Projects Further
So you made a coaster set. Then a shelf. Then a serving board. And now you’re eyeing that corner of the garage wondering if it could become a little workshop. Sound familiar? 🙂
That’s how this hobby grows — and it’s a beautiful thing. Here’s where to go next:
- Ready to build your skills? Start with 👉 20 Simple Woodworking Projects For Beginners — the perfect natural next step after these 15 projects
- Thinking about making some money from your hobby? Check out 👉 25 Small Wood Projects You Can Sell as a Beginner — real, sellable ideas that beginners can actually pull off
- Ready to go all in? 👉 32 Profitable Woodworking Projects to Build & Sell from Your Home Workshop — for when you’re serious about turning woodworking into a real income stream
The path from “I made a coaster” to “I have a thriving Etsy shop” is shorter than you think. It just starts with one little wood project.
🌟 The Resource That Took My Little Wood Projects to a Whole New Level
Here’s something I wish someone had told me earlier in my woodworking journey.
There’s a point where you’ve nailed a few beginner projects and you’re hungry for more — but you don’t know what to build next, how to scale the difficulty, or where to find clear, reliable instructions. You spend hours searching YouTube, find half a tutorial here, a vague materials list there, and end up more confused than when you started.
That’s exactly where Ted’s Woodworking Plans became a total game-changer for me.
Ted’s is a massive library of over 16,000 step-by-step woodworking plans organized by skill level and project type. Whether you want to build home décor, furniture, garden projects, or sellable items, there’s a plan for it — and every single one comes with:
- ✅ A complete materials list so you know exactly what to buy before you start
- ✅ Step-by-step instructions written for real beginners, not experienced carpenters
- ✅ Detailed diagrams and measurements so there’s zero guesswork
- ✅ Tool tips and finishing advice built right into each plan
No more half-finished tutorials. No more estimating measurements. No more wasted wood because a plan was unclear. Ted’s gives you everything you need to go from idea to finished piece with confidence.
If these little wood projects have sparked a genuine love for woodworking in you — and I bet they have — then Ted’s Woodworking Plans is the most valuable next step you can take.
👉 Click here to explore Ted’s Woodworking Plans and see what you could build next →
Disclosure: This post contains affiliate links. If you purchase through my link, I may earn a small commission at no extra cost to you. I only ever recommend things I genuinely use and love.
Start One Little Wood Project This Weekend
Here’s the truth: the best little wood project is the one you actually start.
You don’t need a perfect workshop. You don’t need expensive tools. You don’t need to have done this before. You just need one piece of wood, a bit of sandpaper, and an afternoon to yourself.
Pick one project from this list — just one — and commit to making it this weekend. My personal recommendation for absolute beginners? The wood slice coasters. Low cost, low pressure, and the result is genuinely beautiful. You’ll be hooked by Sunday evening.
Big results. Tiny budget. A whole lot of satisfaction. That’s what little wood projects are all about. 🪵✨