

No room for another side table? These DIY sofa arm tray ideas give your drink, book or remote a place to land without taking up floor space. Choose from simple wooden sleeves, flexible roll-up trays and designs with useful side pockets.
Below are 15 real projects with their original photos and links to free tutorials or plan pages. Start with the three-piece pine sleeve if you want a straightforward first build.
Affiliate disclosure: This article includes an affiliate link to Ted’s Woodworking. If you buy through it, we may earn a commission at no extra cost to you.
Find the Right Sofa Arm Tray
| What you want | Start here | Why it stands out |
|---|---|---|
| A simple first build | 1. Three-piece pine sleeve | Straight cuts and no visible fasteners |
| A decorative wood detail | 2. Scalloped oak tray | Curved sides and mitered corners |
| A recessed drink spot | 4. Cup-opening sleeve | A supported opening with a cork insert |
| Flexible sides | 5. Screen-molding mat or 10. Rigid-center slat tray | Different ways to drape over an arm |
| Accessory storage | 3. Book-pocket tray or 6. Divided-pocket sleeve | Space for reading material or small accessories |
Before choosing: A rigid sleeve suits a fairly flat arm; a flexible tray still needs a level, supported center. Measurements below describe the creators’ examples, so adapt them to your couch. Skill ratings are our estimates. Free instructions may be an online tutorial or video rather than a printable PDF.
1. Simple Three-Piece Pine Sofa Sleeve
Best for: A first build for a flat sofa arm.
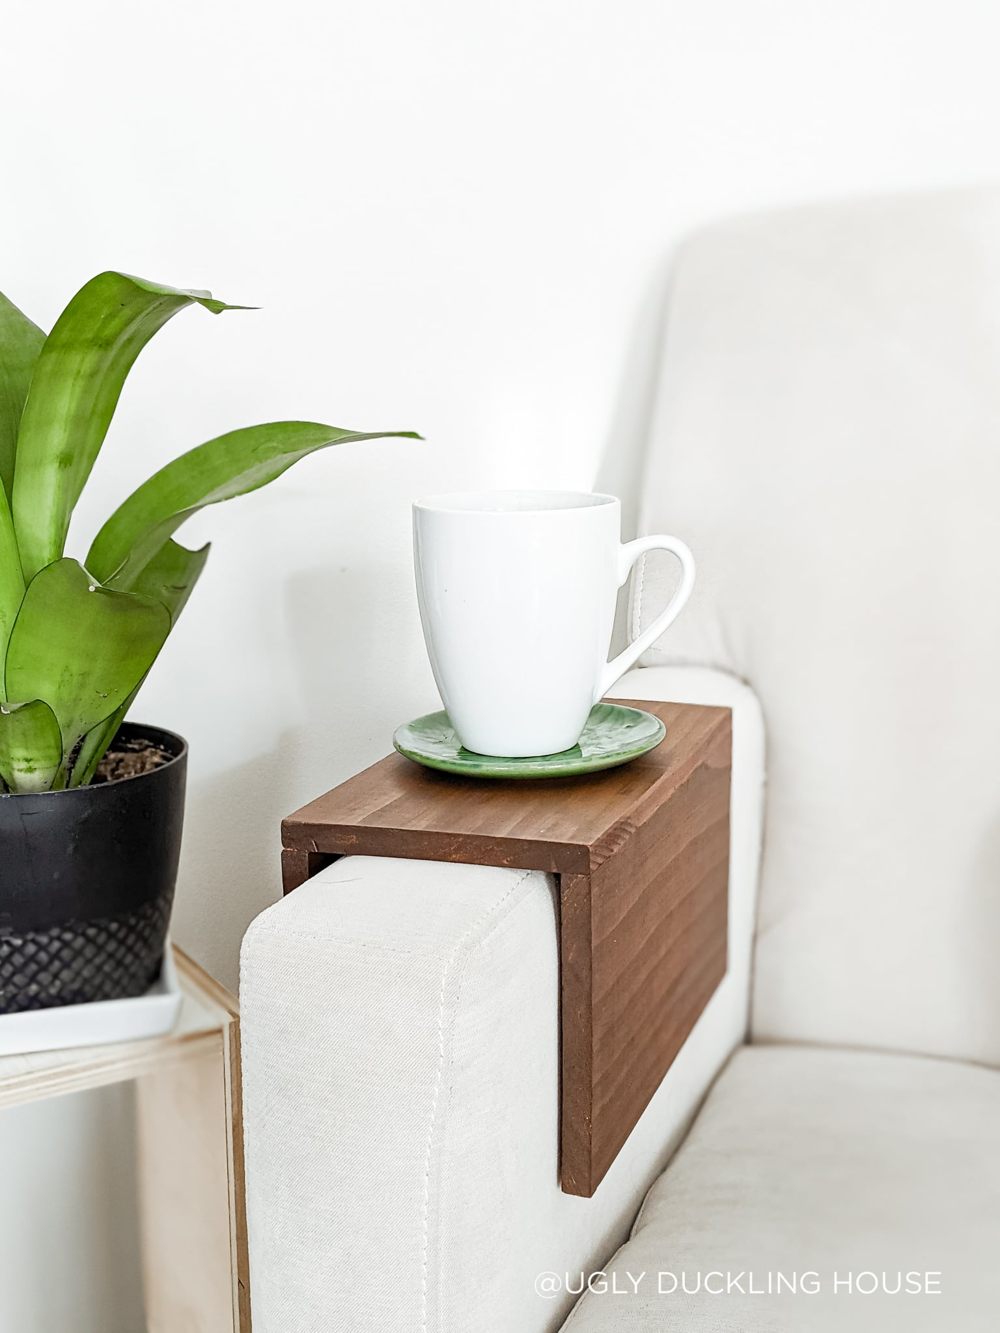
Three boards, straight cuts and a clean silhouette make this the most approachable place to start. The dark-stained pine looks at home on a light sofa without adding pockets or decorative edges.
Ugly Duckling House joins the pieces with wood glue and clamps, leaving no visible fasteners on the outside. The tutorial explains how the arm width and side-board thickness affect the fit.
Take your time with the dry fit and square joints. This small build is a useful way to practice clamping before moving on to more involved beginner woodworking projects.
Skill: Beginner.
Main materials: Three pine boards; wood glue; clamps; stain; polyurethane.
Free illustrated online tutorial at Ugly Duckling House →
2. Scalloped Oak Sofa Arm Tray
Best for: A decorative tray with curved sides.
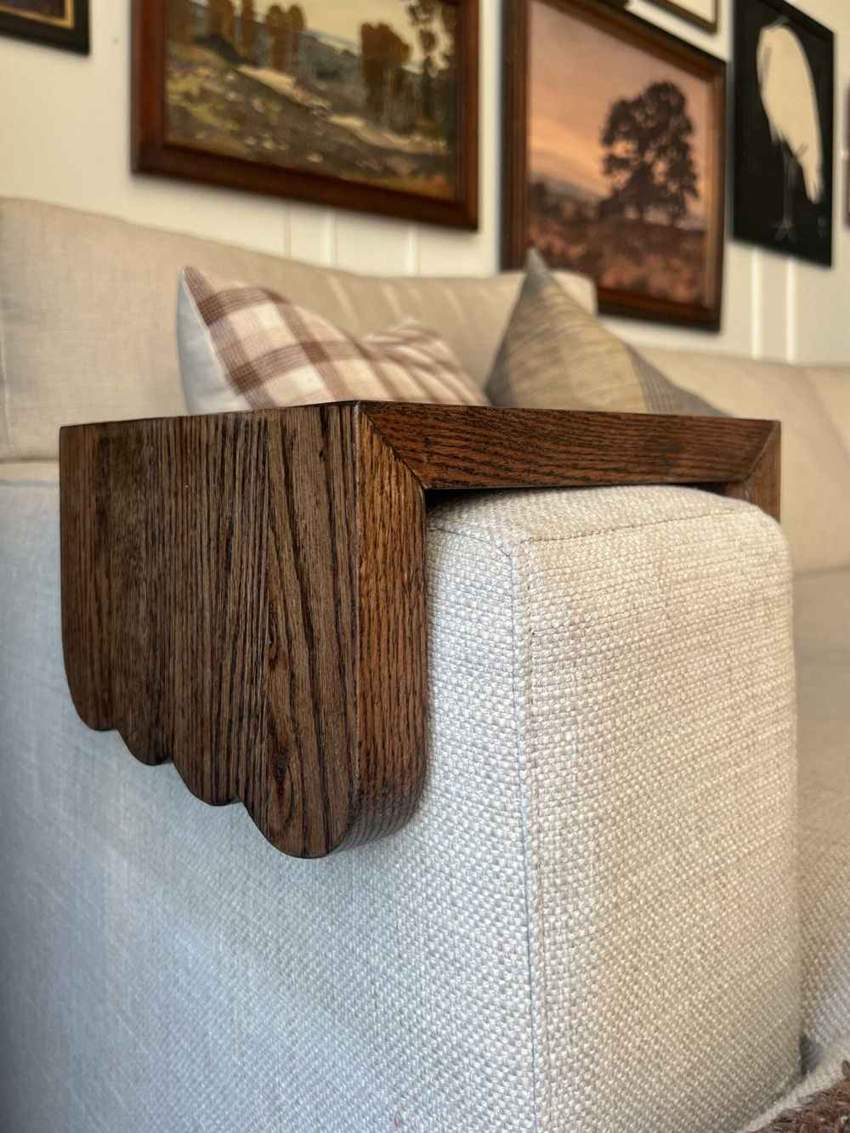
The scalloped sides are what make this oak tray stand out. They soften the familiar U-shaped sleeve and give a small project enough character to leave on display.
Erin Zubot uses a solid oak stair tread, mitered joints and an optional scallop template for a 10-inch-wide board. The example’s side pieces are 5½ inches long; the top is sized to the couch. Simpler versions appear in the tutorial, too.
Try the scallop in paper before cutting the oak. You can check the curve against your sofa and decide whether you prefer a deep decorative edge or a quieter profile.
Skill: Intermediate for the shaped version.
Main materials: Solid oak or other suitable board; wood glue; brad nails; finish.
Free illustrated online tutorial at Erin Zubot Design →
3. Scrap-Wood Sofa Arm Tray with a Book Pocket
Best for: A simple sleeve with space for a book.

A book pocket gives this small tray a useful second job. The open compartment hangs beside the arm, leaving the top available for a drink and keeping a remote within reach.
Woodshop Diaries uses five pieces cut to 12 inches long, with an opening fitted around an arm about 5 inches wide. The illustrated tutorial covers assembly with glue and either brads or screws.
The pocket is the detail to plan carefully: check your book’s thickness and leave enough room to lift it out easily. This is a good way to use several small offcuts in one practical project.
Skill: Beginner.
Main materials: 1×3, 1×6 and 1×12 scraps; glue; brads or screws.
Free online tutorial and video at Woodshop Diaries →
4. One-Board Sofa Sleeve with a Cup Opening
Best for: A recessed spot for your everyday cup.
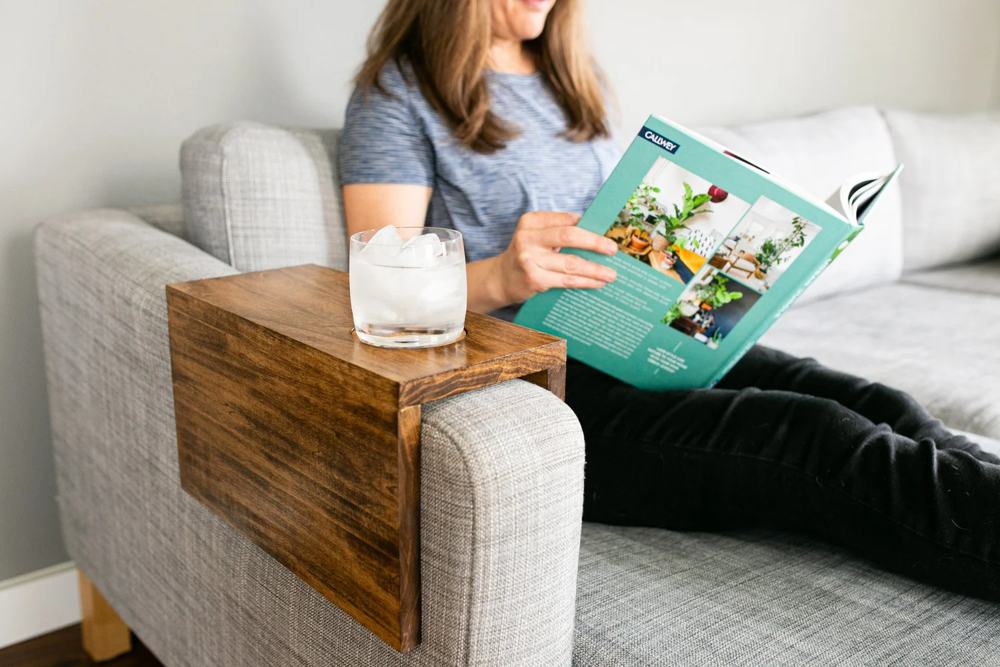
A circular cup opening gives this sleeve a clear purpose: keeping your regular drink in one place. The plywood support below the opening and cork insert are small details that make the design worth a closer look.
Maker Gray uses three 14-inch pieces from a 1×8 board, with the top ripped to 6¼ inches for the maker’s sofa. Pocket holes connect the sleeve, and the example cup opening is 3½ inches across.
Measure your cup and its handle before choosing a hole saw. New to the joinery? Our pocket-hole jig guide explains the basics.
Skill: Confident beginner.
Main materials: 1×8 board; pocket-hole screws; thin plywood; cork; 3½-inch hole saw.
Free online tutorial and video at Maker Gray →
5. Flexible Tray Made from Screen Molding
Best for: A flexible mat that rolls up for storage.
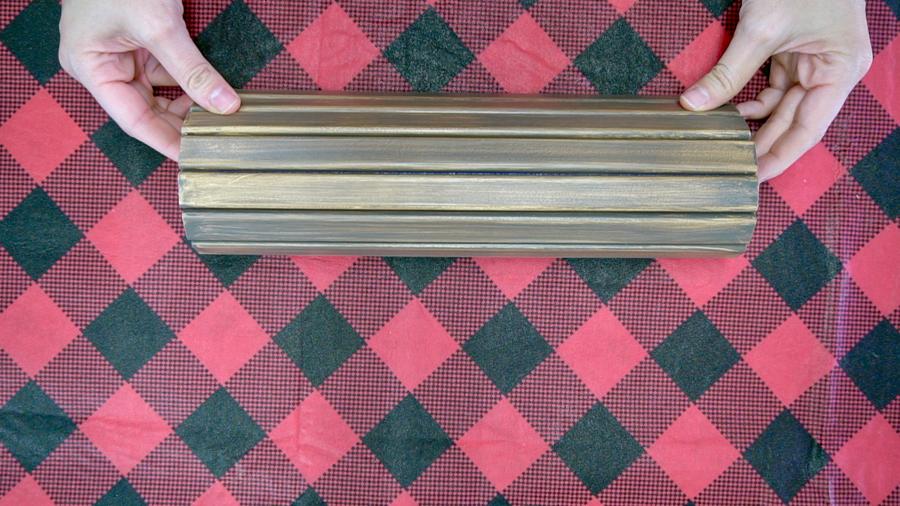
Narrow screen-molding strips turn this tray into a flexible mat you can roll up and tuck away. It is a useful alternative when a rigid wooden sleeve would be awkward to store.
Mother Daughter Projects uses 25 pieces cut to 12 inches, joined underneath with self-stick felt. The video makes the spacing and bending action easy to understand.
Consider it for a curved arm, provided the center has enough support to stay level. If your arm leaves it too curved for a cup, it can still serve as a landing spot for a remote.
Skill: Beginner.
Main materials: Wood screen molding; self-stick felt; stain; protective finish.
Free online tutorial and video at Mother Daughter Projects →
6. Plywood Sofa Sleeve with Remote and Glasses Pockets
Best for: Keeping remotes, a phone and glasses separated.
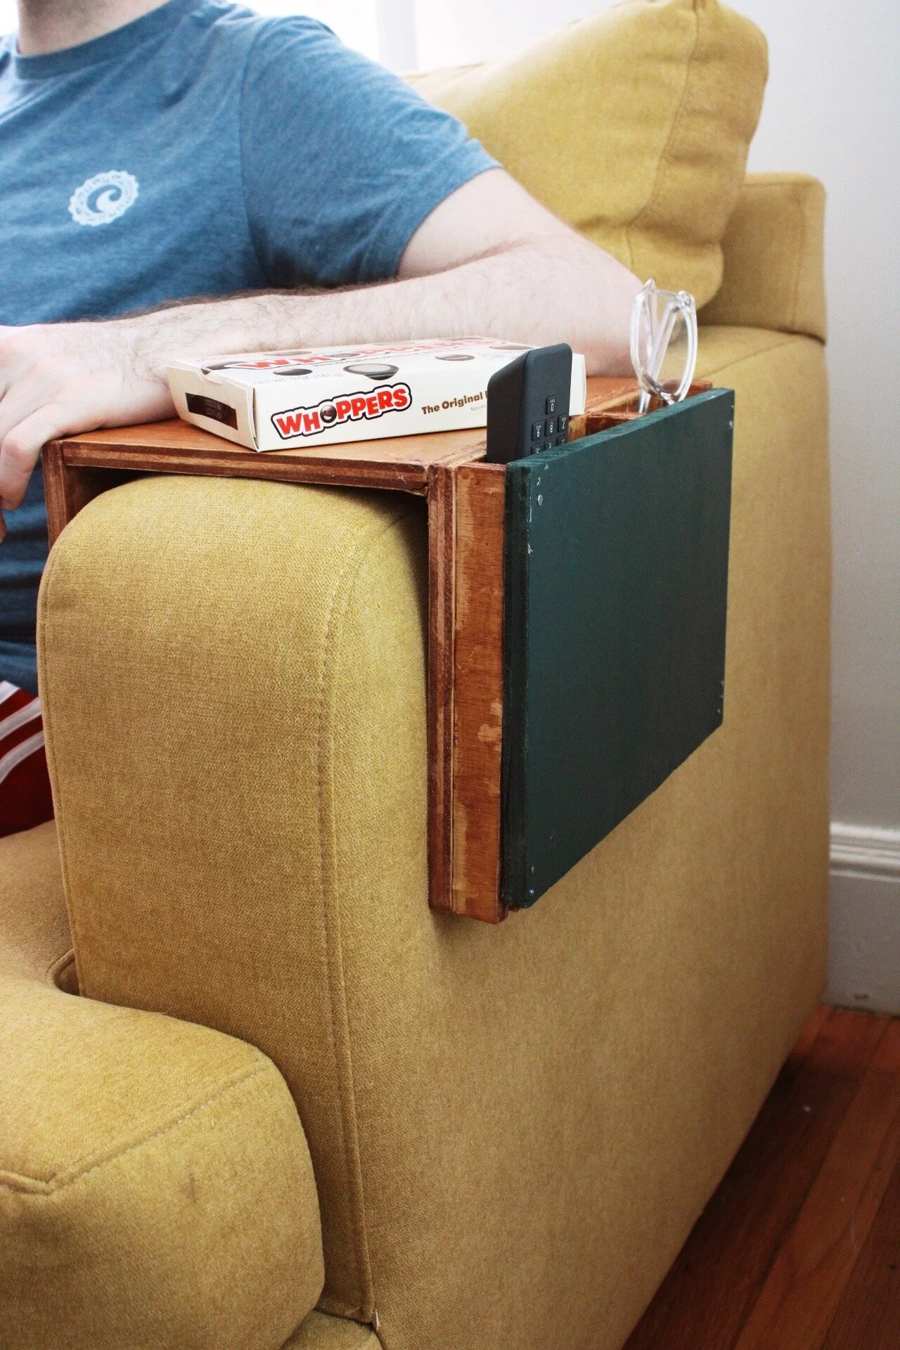
If you are always searching between the cushions, this plywood sleeve puts several everyday items in sight. Divided side pockets separate the small accessories while leaving a platform above for a drink.
Homebody DIY combines stained wood with a contrasting green panel. The tutorial also shares a fitting mistake: the arm was wider farther down than it appeared at the top.
Lay your accessories on paper before sizing the dividers, and leave finger room around each one. The compartments should suit what you actually keep beside the sofa, rather than becoming more places to collect clutter.
Skill: Confident beginner.
Main materials: ½-inch plywood; narrow dividers; suitable adhesive; nails; finish.
Free illustrated online tutorial at Homebody DIY →
7. Bracket-Reinforced Pine Sofa Sleeve
Best for: Broad sofa arms and reinforced corners.

A wide sofa arm calls for a platform with a little more presence. Full Hearted Home’s pine sleeve has unequal side lengths and interior corner brackets, giving it a different construction approach from the glue-only versions.
The original starts with a four-foot 1×12 board and was fitted to an IKEA Ektorp. Its longer inner panel reaches beside the cushion; check that gap before adopting the same layout.
Keep the inside hardware recessed and clear of exposed fabric. The shorter outer side is a useful design detail when a full-depth panel would look bulky beside the couch.
Skill: Beginner.
Main materials: 1×12 pine; corner brackets and screws; glue; stain and protective finish.
Free illustrated online tutorial at Full Hearted Home →
8. Painted Scrap-Wood Tray with Unequal Sides
Best for: A painted finish and mismatched scraps.
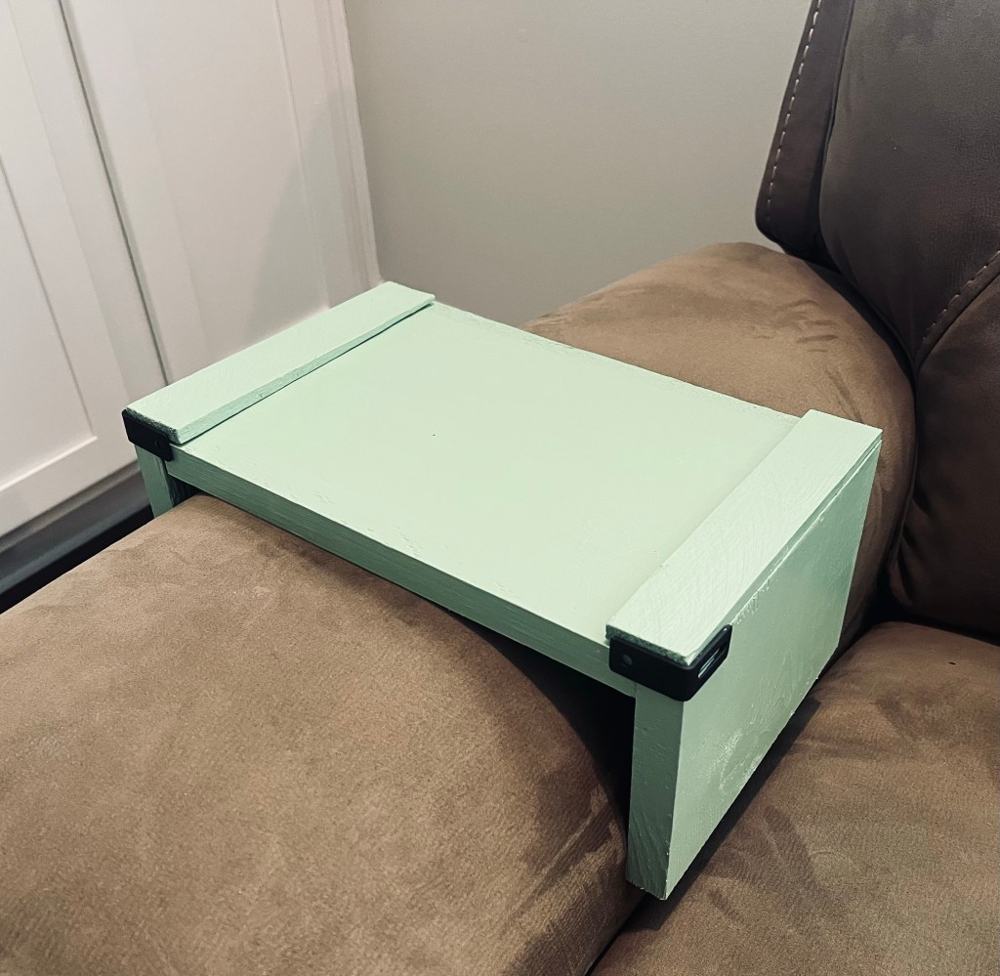
Sage green paint and dark corner accents give this scrap-wood tray a different look from the stained sleeves. Paint is particularly useful when your offcuts have mismatched colors or grain.
It’s Hammer Time uses a 10-inch top piece with side pieces about 7 and 4 inches long. The longer side hangs outside the couch; the shorter one leaves more room beside the seat. These are examples from one build.
The corner brackets are glued-on decorative details, so do not count them as structural reinforcement. The asymmetric shape is the useful idea to borrow when planning your own sleeve.
Skill: Beginner.
Main materials: 1×8 scraps; glue; clamps; paint; optional trim and decorative brackets.
Free illustrated online tutorial at It’s Hammer Time →
9. Chamfered Oak Roll-Up Sofa Tray
Best for: A slim roll-up tray with refined edges.
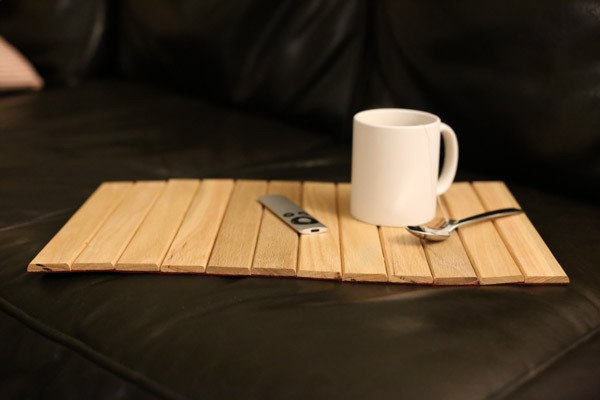
Small chamfers between the oak slats give this roll-up tray its finished appearance. It is a good choice if you like the flexible-mat idea and want to spend a little extra time on the details.
ManMadeDIY starts with four oak strips measuring 1½ inches wide, ¼ inch thick and 36 inches long, then cuts them into 12-inch lengths. Felt connects the underside.
The tutorial walks through the edge treatment and finishing. Consistent spacing is especially noticeable on a design this simple, so lay out all the strips before attaching the backing.
Skill: Intermediate with the chamfered edges.
Main materials: ¼-inch oak strips; felt; suitable adhesive; wipe-on finish.
Free illustrated online tutorial at ManMadeDIY →
10. Flexible Slat Tray with a Rigid Center
Best for: A flexible tray with a broader central platform.
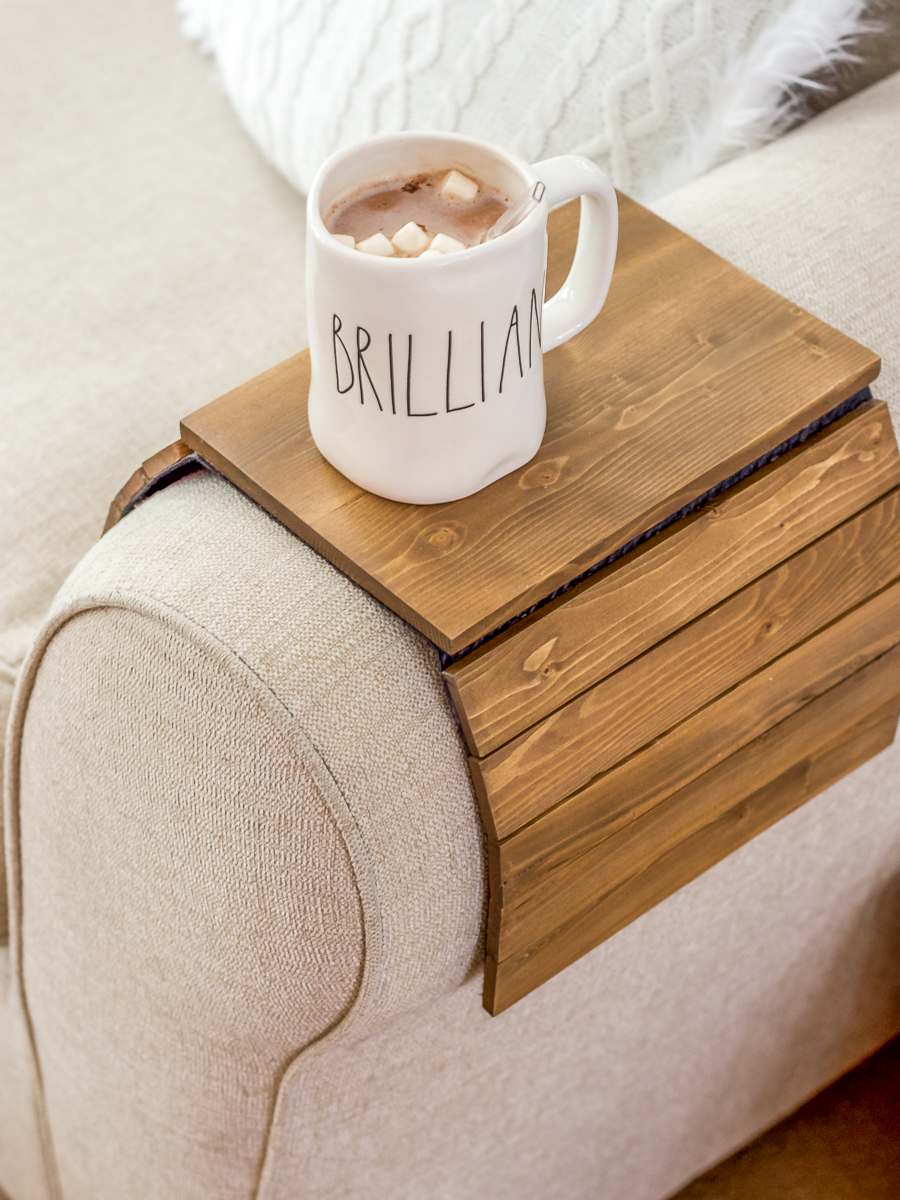
This design combines the draped look of a slatted tray with a more continuous surface under the cup. Two wider boards form the center, while narrow side pieces bend on the backing.
100 Things 2 Do makes the thin components from scrap 2×4 lumber and uses a flexible backing such as leather, faux leather or heavy felt.
Ripping thin stock requires a safe saw setup, making this an intermediate project. If following the source’s stapling method, select staples that cannot reach the top face. The broad center is the feature to compare with the fully slatted roll-up designs.
Skill: Intermediate.
Main materials: Scrap lumber; thin wood slats; leather, faux leather or heavy felt backing; adhesive.
Free illustrated online tutorial at 100 Things 2 Do →
11. Hardwood Sofa Sleeve with a Recessed Cup Holder
Best for: A hardwood sleeve with a supported cup opening.
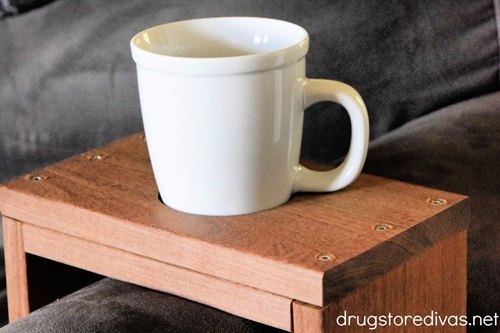
Rich hardwood gives this sleeve a substantial appearance, while the recessed opening locates the cup above a supporting board. It is an alternative to the pocket-hole cup sleeve earlier in the list.
Drugstore Divas uses ¾-inch ipe and a 3-inch hole saw in its example. The tutorial covers drilling, countersinking and assembly with screws and glue.
Dense wood needs sharp tooling and careful predrilling. Choose the opening around your own cup, including its handle, and recalculate the sleeve width from your sofa and actual board thickness.
Skill: Intermediate.
Main materials: ¾-inch hardwood; supporting board; screws; glue; 3-inch hole saw.
Free illustrated online tutorial at Drugstore Divas →
12. Five-Panel Sofa Tabletop Linked with String
Best for: A draped tray joined without fabric backing.
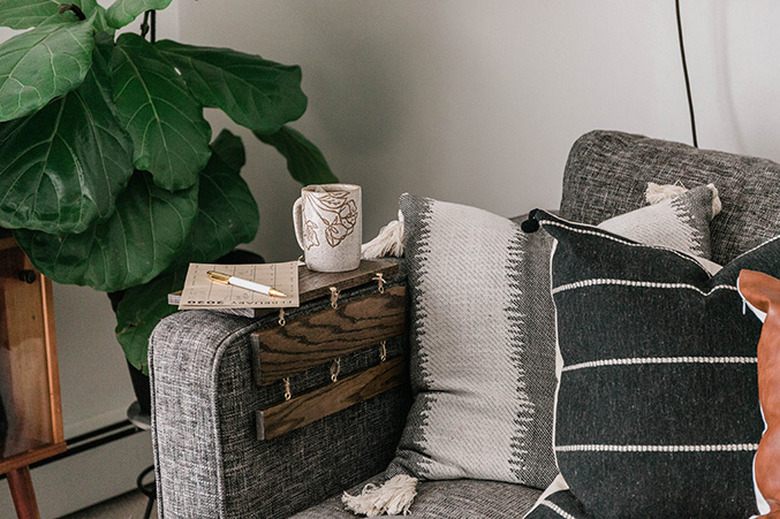
Five panels linked with screw eyes and string create this unusual tabletop. A wide center rests on the arm, with two progressively narrower panels hanging on each side.
Carrie Waller’s Hunker tutorial starts with 24-inch boards in 5½-, 2½- and 1½-inch widths, cut into 12-inch lengths. The assembly uses one wide panel, two medium panels and two narrow panels.
The visible simplicity hides a different kind of joinery underneath. Keep the screw eyes clear of the upholstery and check how the panels settle together before choosing this over a felt-backed design.
Skill: Confident beginner.
Main materials: ½-inch boards in three widths; screw eyes; string; stain and sealer.
Free illustrated online tutorial at Carrie Waller / Hunker →
13. Mitered Walnut Sleeve with Optional Leather Lining
Best for: Showing off a small piece of walnut.

Mitered corners let the walnut grain take center stage on this understated sleeve. Optional leather lining adds a softer contact surface inside without changing the outside appearance.
Love & Renovations demonstrates a taped glue-up and includes a video. The maker’s side drops are roughly 6 inches, with the top sized around the couch.
Accurate 45-degree cuts matter more here than the number of parts. Allow for the lining’s thickness before cutting, and choose a board whose grain you enjoy looking at: there is very little else competing for attention.
Skill: Intermediate.
Main materials: 1×6 walnut or another suitable board; glue; painter’s tape; optional leather; finish.
Free online tutorial and video at Love & Renovations →
14. One-Board Sofa Arm Media Console
Best for: Books and media beside your favorite seat.
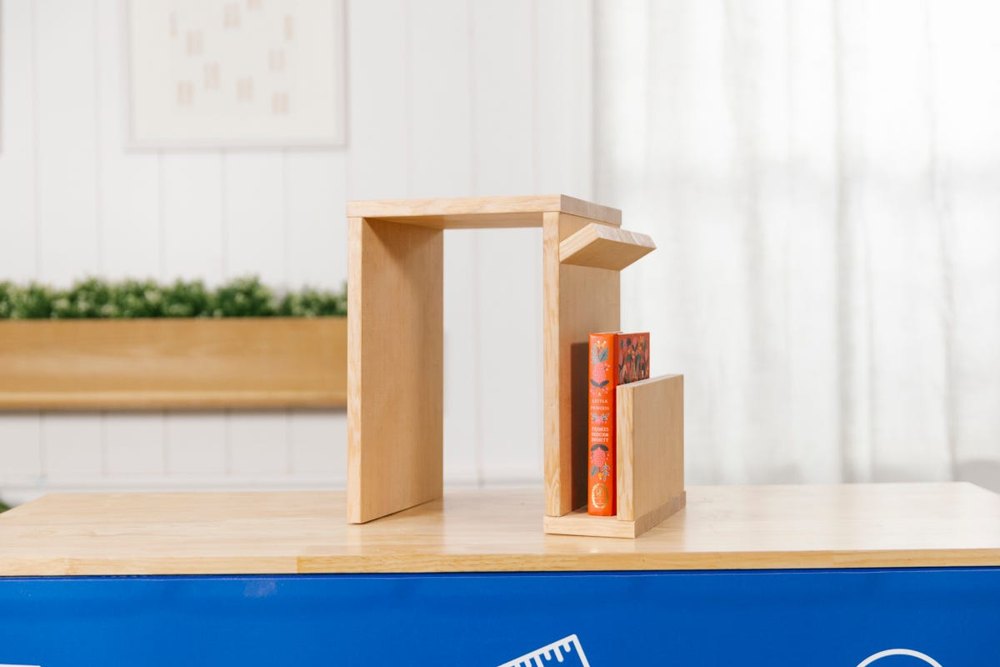
A side shelf and small angled ledge turn this sleeve into a compact media console. It offers more storage than a plain tray while keeping everything attached to the arm.
Dunn Lumber builds the six components from a four-foot Douglas fir 1×10. The illustrated instructions cover predrilling, assembly and concealing the screws with wood plugs.
Check the shelf against your normal sitting position and walking route. This is the design to compare with a book pocket when you want a more open place to put reading material and a remote.
Skill: Confident beginner.
Main materials: One four-foot 1×10; screws; wood plugs; glue; protective finish.
Free illustrated online tutorial at Dunn Lumber →
15. Pocket-Hole Drink Platform and Remote Caddy
Best for: A flat drink platform with an open remote caddy.
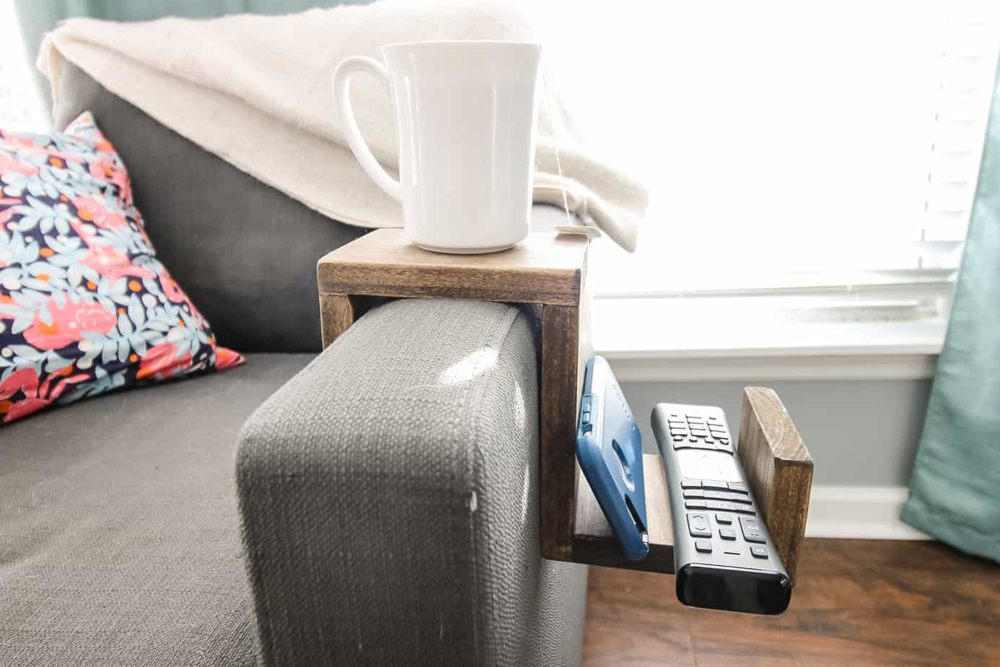
An open side caddy makes the remote easy to see and grab, while the flat platform above leaves room for a drink. There is no circular cup recess in the pictured design.
Charleston Crafted explains the project and links to free detailed Kreg plans. Pocket-hole joinery keeps the construction compact.
Size the pocket around your longest remote and leave room to pick it up comfortably. Because the storage sits to one side, check the sleeve’s balance with your usual accessories in place. This is a practical choice when keeping the sofa area tidy is the main goal.
Skill: Confident beginner.
Main materials: Wood board; pocket-hole jig and screws; glue; finish.
See the project and link to free detailed plans at Charleston Crafted →
How to Size a Wooden Sofa Arm Tray
Measure the whole arm, not just the top
Measure the widest area the tray will surround, including lower down where the sides hang. Some arms taper, flare outward or compress when someone sits on the cushion. Check available length from front to back and the gap beside the seat, too.
Make a cardboard mock-up of the top and sides. Sit normally, reach for the remote and walk past the couch. A sleeve should slip on without squeezing the fabric or forcing the foam into shape.
Allow for actual wood thickness and padding
For a simple butt-jointed sleeve with both side boards attached under the top, the outside top width equals the desired clear opening plus twice the actual side-board thickness. For example, a 6-inch opening with two ¾-inch sides needs a 7½-inch-wide top.
The clear opening must already include room for any protective lining and a comfortable fit. Nominal board sizes are not actual dimensions. Mitered designs use different cutting references, so follow their diagrams instead of applying that formula blindly.
Choose a finish you can live with
Pine is convenient for a painted first project. Oak or walnut can make a small tray feel more like finished furniture, and plywood is useful for pocket dividers. Our scrap wood project ideas can help you use the leftovers.
Round over or soften the contact edges, sand thoroughly and use a protective finish appropriate to the wood and intended use. Follow the product’s cure time before putting it on upholstery; dry to the touch does not always mean fully cured. Our wood finishing tools guide can help with surface preparation.
Test stability before using drinks
Add clean, nonmarking protective pads where needed and test them on an inconspicuous area for staining or color transfer. Make sure there are no protruding screws, staples or sharp hardware underneath.
Start with the empty tray, then a light unbreakable cup of cool water. Check it while sitting down and getting up. If it rocks, slips or tips, correct the fit before using it. A cup opening helps locate a drink but does not make a tray spillproof. Never use the tray as a seat, step or support for your body.
If your arm is too soft, narrow or rounded to support a steady tray, a floor-supported design may be the better project. Browse our DIY C-table plans or end table with cabinet storage for alternatives.
DIY Sofa Arm Tray FAQs
Can I build a sofa tray without screws?
Yes. The three-piece pine sleeve uses glue and clamps, while the screen-molding mat uses self-stick felt. Follow the chosen tutorial’s bonding and curing instructions.
How much will the materials cost?
Check the project’s supply list against what you already own. Wood, finish, adhesive and hardware all count; needing a hole saw or jig can change the total. A small sleeve made from sound scraps is a sensible option when keeping purchases down matters.
Are all the plans printable?
No. The links include illustrated web tutorials, videos and detailed plan pages. Open the creator’s instructions before buying materials to check what is provided.
Choose Your First Tray—and Your Next Build
Start with the simplest design that suits your arm shape and the items you keep nearby. Once you have practiced on a small tray, our coffee table plans offer a larger living-room project to try.
Enjoy planning your next build? You can also explore Ted’s Woodworking, a paid collection of woodworking plans. Check the samples and current offer to see whether it suits your tools and experience. The free projects above remain available through their original creators.