
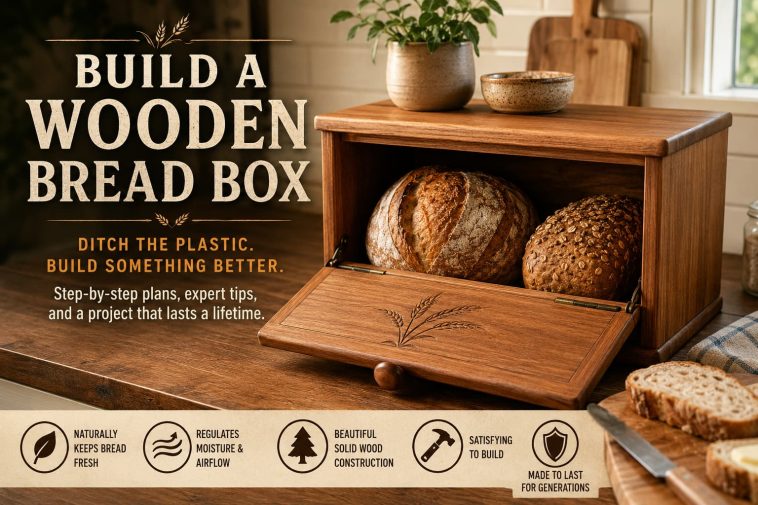
My grandmother never owned a bread bag in her life. She baked on Fridays, put the loaf in a wooden box with a sliding lid, and that bread was still soft and sliceable on Wednesday. No plastic wrap. No zip bags. No desperate last-minute toasting to disguise the staleness. Just a wooden box doing quietly what it was built to do.
I thought about that box for years before I finally built my own. And the week I finished it, I threw out every bread bag in my kitchen and never looked back. Here’s why you should do exactly the same — and how to build one that’ll outlast your kitchen remodel.
The Bread Bag Is Lying to You
Let’s start with something that no one puts on their labels. You’re using a zip-seal bread bag to “keep bread fresh”? It actually accelerates the process that causes bread to become sticky and thick.
Here’s what actually happens when bread stales: it’s not about drying out — it’s about starch retrogradation. The starch molecules inside the bread recrystallize over time, and that recrystallization is what makes your loaf feel like compressed cardboard by day three. Moisture doesn’t stop this process. The worst of all worlds occurs when moisture is trapped in a sealed plastic bag, creating an airtight, humid atmosphere that causes the crust to become floppy and the crumb to become sticky.
Your fridge makes things even grimmer. Cold temperatures accelerate starch retrogradation dramatically. That loaf you refrigerated to “extend its life”? You fast-tracked its demise. Refrigerating bread is basically woodworking with the wrong joints — technically it holds, but it fails where it counts.
A wooden bread box works differently. It creates a regulated microclimate: enough airflow to keep the crust from going soft, enough enclosed space to prevent the crumb from drying out. Wood itself plays an active role here — it naturally absorbs and releases small amounts of moisture, acting as a buffer rather than a barrier. No sealed bag does that.
If you’re thinking about your kitchen as a whole system of thoughtful, functional choices, the bread box belongs right alongside the ideas in 12 Must-Have Features in Our Dream Kitchen You’ll Wish You Had Sooner! — practical upgrades that pay off every single day.
Why Store-Bought Bread Boxes Disappoint (Every Single Time)

Walk into any home goods store and you’ll find three categories of bread boxes: tinny metal ones that dent if you look at them wrong, flimsy bamboo composites held together with glue and optimism, and overengineered acrylic contraptions that look like they belong in a laboratory, not a kitchen.
The metal ones seal too tightly — no airflow, so your bread sweats. The bamboo ones warp with humidity changes. The acrylic ones are just ugly. And every single one of them comes in dimensions designed for a standard supermarket sandwich loaf, which means the moment you buy an artisan sourdough boule or a longer baguette, you’re staring at a bread box you can’t use.
Advertisement
Building your own solves all of this. You control the dimensions, the wood species, the ventilation, the lid style, and the finish. You build it for the bread you actually eat — not the bread that fit the manufacturer’s sample.
Picking the Right Wood: This Decision Matters More Than You Think
Most woodworking guides tell you to use pine because it’s cheap and available. Pine is fine. But this is a piece that’s going to sit on your kitchen counter every single day for potentially the next twenty years. It deserves a little more consideration than “it was at the hardware store.”
Here’s how different woods actually behave in a bread box:
Pine and Poplar — The Honest Workhorses
Pine is affordable, machines easily, and accepts paint beautifully if you want a colored exterior with a natural interior. The downside is that it’s soft — it’ll accumulate dings and scratches over time. If you’re building a bread box to practice skills before moving to harder wood, pine is your friend.
Poplar sits a step above pine in hardness and has a smoother, tighter grain. It’s the best choice if you’re painting the exterior, because the surface is practically made for it.
Cherry and Maple — The Long Game
Cherry is the wood that gets better looking every single year. It starts out a pale pinkish-brown and deepens into a rich reddish-mahogany with light exposure over time. A cherry bread box on your counter in ten years looks dramatically more beautiful than it did new. That’s rare in any object.
Maple is the kitchen material of professional craftspeople — it’s dense, tight-grained, resists moisture absorption, and machines to a glass-smooth surface. A maple bread box finished with mineral oil and beeswax handles daily kitchen humidity better than almost any other species.
Walnut — The Statement Piece
If you want your bread box to stop people mid-sentence when they walk into your kitchen, build it from walnut. The deep chocolate-brown tones against a mineral oil finish look genuinely extraordinary. It costs more, and it’s worth every cent if you’re building something you intend to keep.
One rule that applies to all species: use food-safe finish only on any interior surface. Mineral oil, beeswax, or dewaxed shellac. Nothing else touches a surface that’s in contact with your food.
The Design Decisions You Need to Make Before You Cut Anything
A bread box sounds simple. But there are a handful of choices that shape both how it looks and how well it works — and it’s worth thinking them through before sawdust starts flying.
Size: Bigger Isn’t Better
The most common mistake first-time bread box builders make is going too large. A cavernous bread box has too much air volume to regulate, which means your bread actually dries out faster. You want a snug, intentional fit — just enough room for your typical loaf with a few inches of clearance.
Practical sizing guide:
- Standard sandwich loaf: 12″ W × 6″ H × 5″ D minimum
- Artisan boule: 12″ W × 8″ H × 9″ D
- Two loaves + baguette: 16″ W × 9″ H × 10″ D
Measure your actual bread before you finalize dimensions. It sounds obvious. Do it anyway.
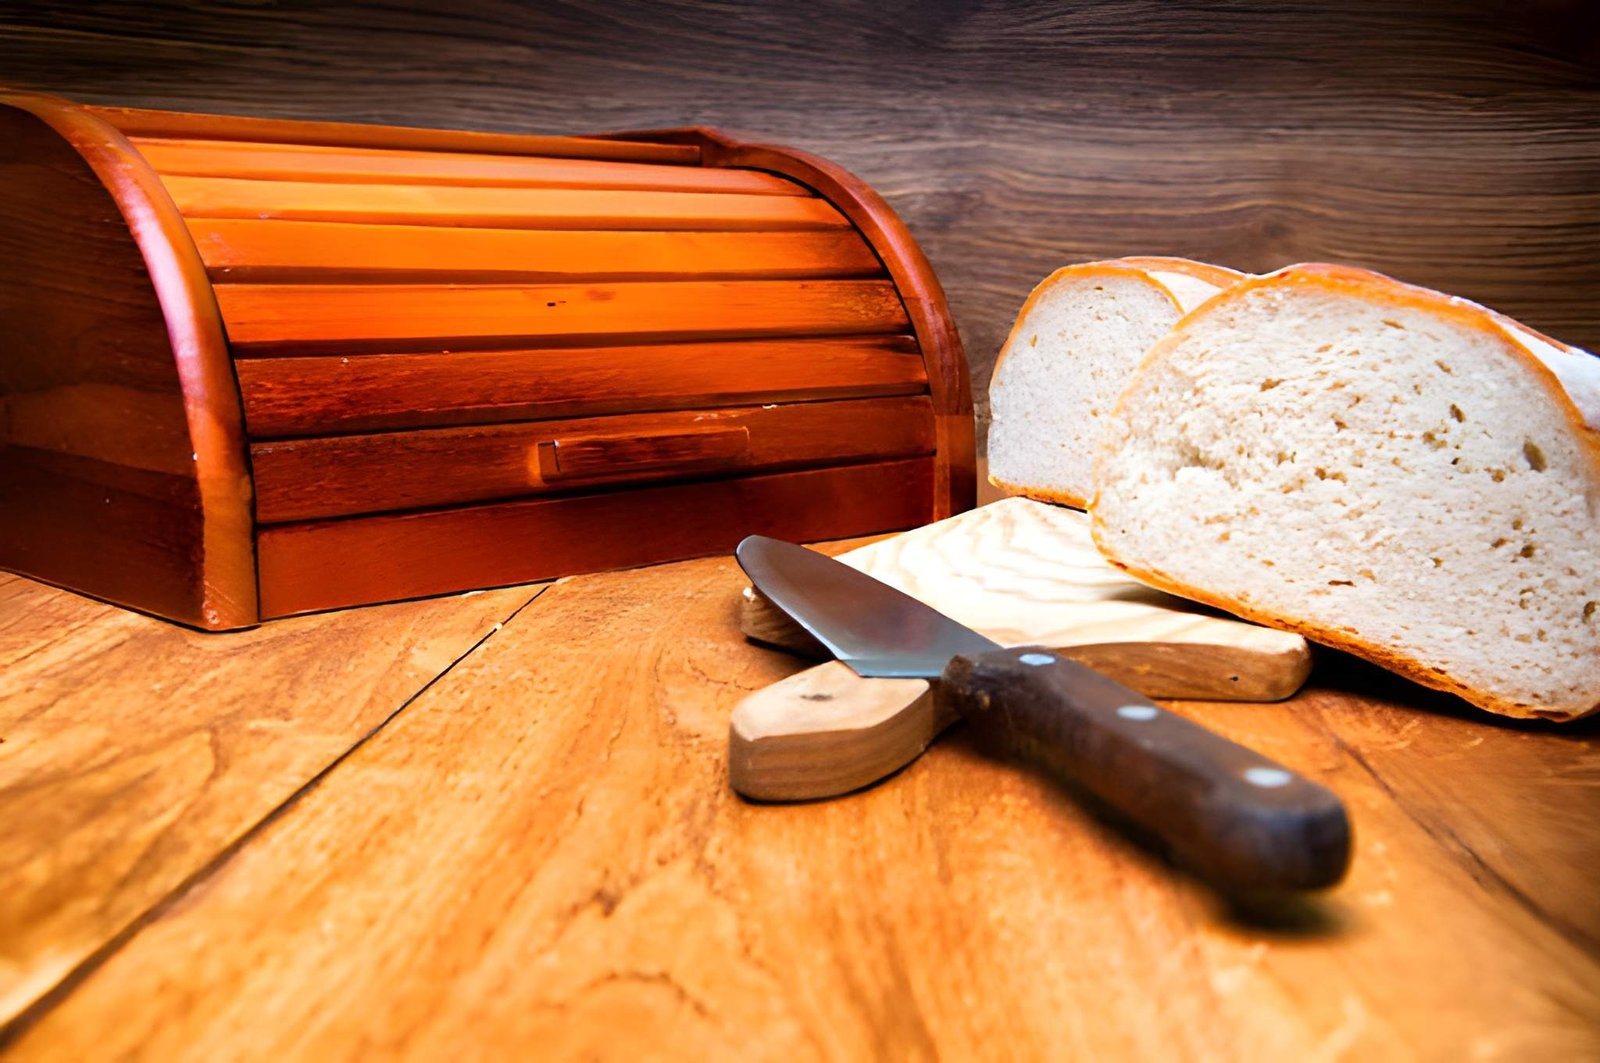
Lid Style: Roll-Top vs. Front-Opening Door
The roll-top lid is the classic choice — it’s what most people picture when they imagine a bread box. Slats of thin wood attached to a flexible backing roll up and out of the way when you open it. It looks beautiful, requires no clearance above the box, and has that satisfying mechanical feel when you open it. The downside: roll-top lids are more complex to build and require either purchasing pre-made slat material or milling your own.
The front-opening door is simpler, cleaner, and equally functional. A panel hinged at the bottom drops forward to reveal the interior, or hinged at the side swings open like a cabinet. This is the better choice for beginners, and honestly it doesn’t look like a compromise — it looks intentional.
For this build, we’re going with a front-opening door hinged at the bottom. It’s the most accessible version of the project, and you can always build a roll-top version later once you’ve got the fundamentals nailed.
Ventilation: The Detail Everyone Forgets
Some airflow is essential. Without it, moisture builds up and mold follows. Most front-opening door designs solve this passively — the door doesn’t seal perfectly airtight, which provides natural ventilation. If you want to be more deliberate about it, drill three or four ¼-inch holes in the back panel. Hidden from the front, totally functional.
Complete Build Instructions: Front-Opening Bread Box

What You’ll Need
Tools:
- Table saw or circular saw for breaking down stock
- Miter saw for clean crosscuts
- Router with ¼-inch roundover bit
- Drill and brad point bits
- Pocket hole jig (optional but useful)
- Clamps — at least four
- Sandpaper: 80, 120, 180, and 220 grit
Not sure which tools to prioritize for your shop? Our guide to 16 Best Woodworking Tools for Beginners lays out exactly what to buy first and what can wait.
Materials (for a 13½” W × 10″ D × 9″ H box):
- ¾-inch hardwood board — 8 linear feet of 1×10
- ¼-inch plywood for the back panel — one 14″ × 9″ piece
- Wood glue
- 1¼-inch brad nails or pocket screws
- Piano hinge (14 inches) for the door
- Small wooden knob or leather pull
- Food-safe finish (mineral oil + beeswax)
Total material cost: roughly $35–$65 depending on wood species. A comparable quality box at a kitchen store runs $80–$150 and looks significantly worse.
Step 1: Mill and Cut Your Parts
Cut everything to final dimension before assembly. Here’s your complete cut list:
| Part | Dimensions | Qty |
| Top panel | 14″ × 10″ | 1 |
| Bottom panel | 14″ × 10″ | 1 |
| Side panels | 10″ × 9″ | 2 |
| Back panel (plywood) | 14″ × 9″ | 1 |
| Door | 13½” × 8¼” | 1 |
The door is intentionally ⅛-inch narrower than the opening on each side — this small gap provides the passive ventilation the box needs.
Step 2: Cut the Back Panel Dado
Before assembly, cut a ¼-inch wide, ¼-inch deep dado into the inside face of both side panels, the top, and the bottom. Position this dado ⅜ inch from the back edge of each panel. The plywood back panel floats in this dado — no glue — which allows the solid wood panels to expand and contract seasonally without cracking.
Set up a straight bit in your router with a fence, or use your table saw with a dado stack if you have one. Run all four pieces with the same edge against the fence for consistency.
Step 3: Profile the Exterior Edges
Now — before assembly makes everything harder to maneuver — run a ¼-inch roundover bit along all exterior edges: the top face of the top panel, the bottom face of the bottom panel, the front edges of both side panels, and all four edges of the door. This softens the entire piece and is the single detail that separates a “built it” result from a “made it” result.
Keep interior edges square for clean glue joints.
Step 4: Assemble the Carcass
Dry-fit the entire box first. No glue, no fasteners — just check that every joint closes tightly and the back panel slides into its dados cleanly. Fix any issues now.
Assembly sequence:
- Glue the bottom panel to one side panel; slide back panel into dadoes; no glue on back panel
- Add the second side panel, gluing it to the bottom and engaging the back panel dado
- Add the top panel, gluing to both side panels
- Measure both diagonals — they must be equal for a square box
- Clamp firmly and let cure for at least two hours
Reinforce each glue joint with 1¼-inch brad nails or pocket screws from the inside. Wipe away any squeeze-out immediately with a damp cloth.
Step 5: Hang the Door
Attach a 14-inch piano hinge to the bottom front edge of the box, then to the bottom edge of the door. The door should drop forward and down when opened, revealing the full interior.
Check the gap on each side — it should be consistent at about ⅛ inch. If one side is tighter, plane or sand the door edge until the gap is even.
Attach your wooden knob or leather pull centered on the door face. A hand-stitched leather pull adds a beautiful artisan touch that takes about five minutes to make from a scrap of leather and two Chicago screws.
Step 6: Sand and Finish
Sand the entire piece — exterior and interior — through 80, 120, 180, and 220 grit. Between 180 and 220, wipe with a lightly damp cloth, let dry completely, then final-sand at 220. This raises and removes the grain whiskers that would otherwise appear after your first finish coat.
The finishing process:
- Apply food-grade mineral oil liberally to all surfaces — exterior and interior
- Let it soak for 20–30 minutes, then wipe off excess
- Repeat this process three to four times over 24 hours
- Buff a beeswax paste over the exterior and let it dry to a soft sheen
- Leave the interior oil-finished only — no wax needed inside
The mineral oil + beeswax combination gives you a finish that’s beautiful, completely food-safe, and easy to refresh with a new coat of oil whenever the wood starts looking a little thirsty.
The Detail That Elevates a Bread Box From Good to Memorable
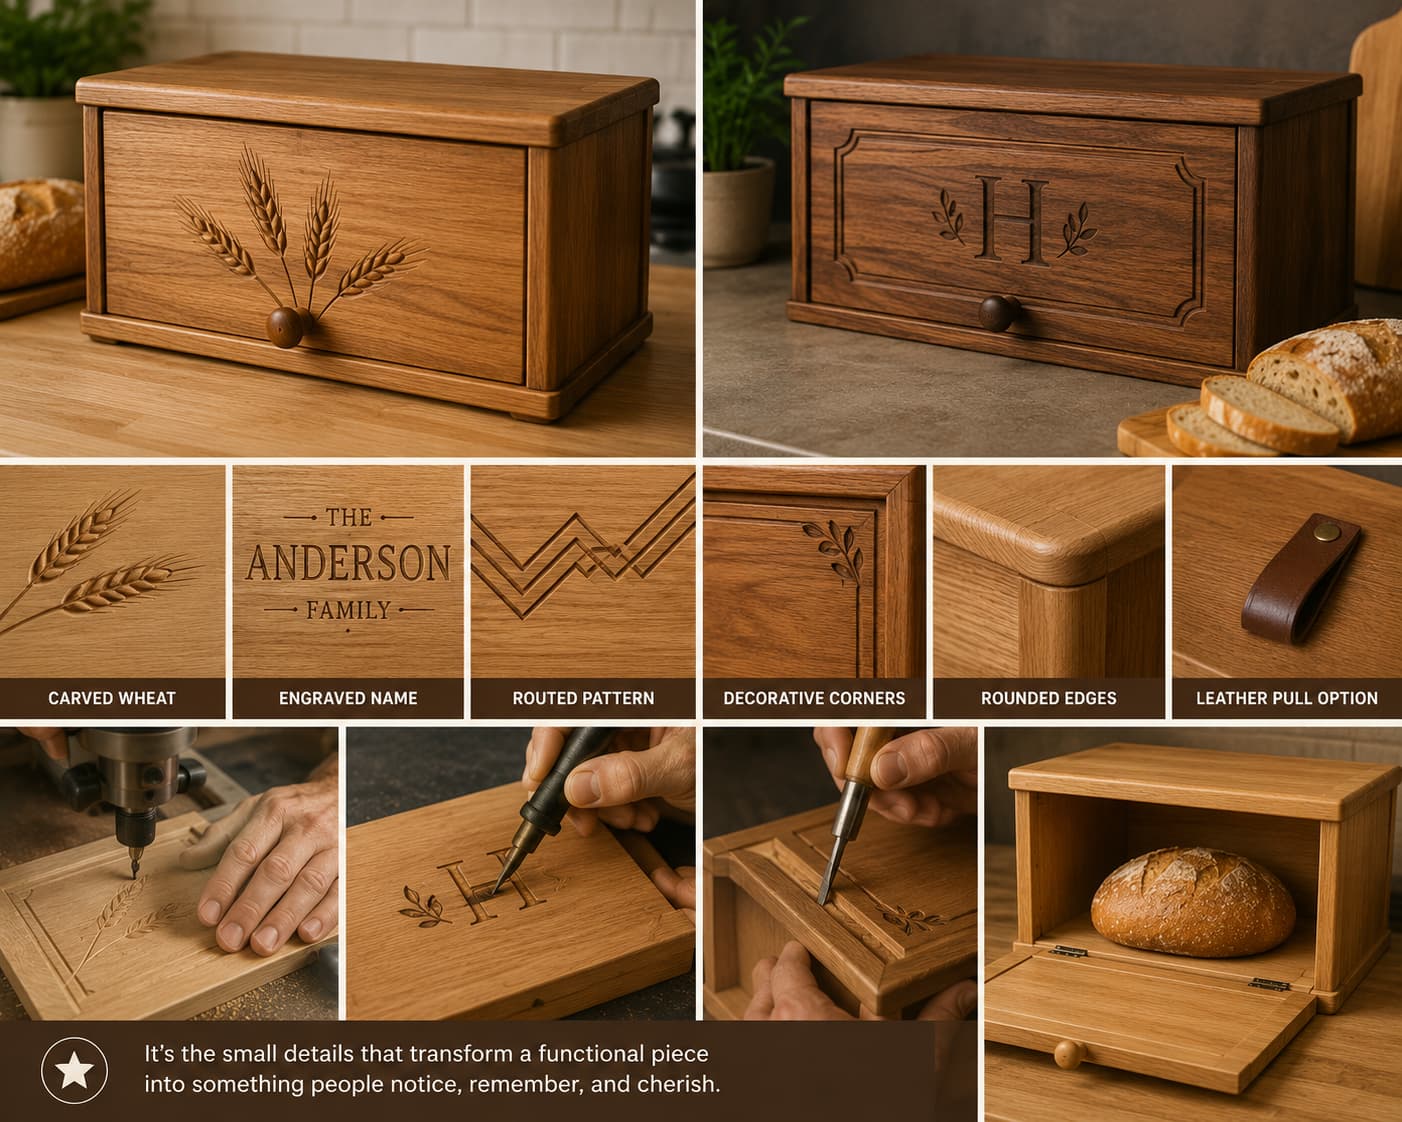
The functional box you just built is excellent. But one more detail transforms it into something people ask about.
Add a simple routed or carved element to the door. It doesn’t need to be complex. A single wheat stalk routed in shallow relief. Your family name carved in block letters. A geometric border run with a v-groove bit. Even a simple line pattern burned with a wood burner.
This kind of personalization is what separates a handmade piece from a manufactured one. It takes 30 extra minutes and elevates the entire project.
Build It to Sell? The Numbers Make Sense
A well-built wooden bread box in cherry or walnut, priced at $75–$120, sells consistently at farmers markets, craft fairs, and Etsy shops. Material cost per box runs $30–$55. Build time after your first one drops to under three hours once you’ve got a system down.
That math works. Especially if you batch production — cutting all your parts for five boxes at once, then running each operation across all five before moving to the next step.
This is exactly the kind of project covered in 25 Small Wood Projects You Can Sell as a Beginner, and it’s one of the stronger kitchen item performers in 32 Profitable Woodworking Projects to Build & Sell from Your Home Workshop — a resource worth keeping open in a browser tab while you plan your production schedule.
Where Ted’s Woodworking Plans Fits Into This
I learned this lesson the hard way: the first bread box I constructed using my own blueprints turned out well. The second one turned out much better and took less time because it was constructed from a carefully drafted plan with an actual cut list and dimensioned schematics.
Ted’s Woodworking Plans carries multiple bread box variations alongside thousands of other projects, and each plan gives you something your napkin sketch never will: a cut list you can take directly to the lumber yard, step-by-step assembly notes that anticipate the exact problems beginners run into, and diagrams that show you how everything fits before you make a single cut.
If you’re building one bread box for your kitchen, building from a solid plan shortens your learning curve. If you’re building bread boxes to sell, it’s what lets you build consistently and quickly across batches — because the decisions are already made, and every box comes out the same. That consistency is what builds a reputation, and a reputation is what turns occasional buyers into repeat customers.
The Short Version
My grandmother’s bread box is still in the family. It has a small crack in one side panel from decades of wood movement, and the finish has been refreshed more times than anyone can count. The sliding lid is a little stiff in summer when the humidity climbs. And it still keeps bread better than anything else in the kitchen.
Build yours this weekend. Use good wood, get the dimensions right for the bread you actually eat, finish it properly, and don’t skip the small details that make it feel handmade rather than assembled.
Here’s what to take away:
- A bread box works because of regulated airflow — not because it seals tight
- Wood actively buffers moisture; plastic and metal just trap it
- Size your box to your actual bread, not to a generic template
- Front-opening door is the fastest build; roll-top is the classic
- Food-safe mineral oil and beeswax is all the finish you need
- Built well, this sells for $75–$120 and takes three hours once you have a system
Your bread deserves better than a zip bag. Go build something.