
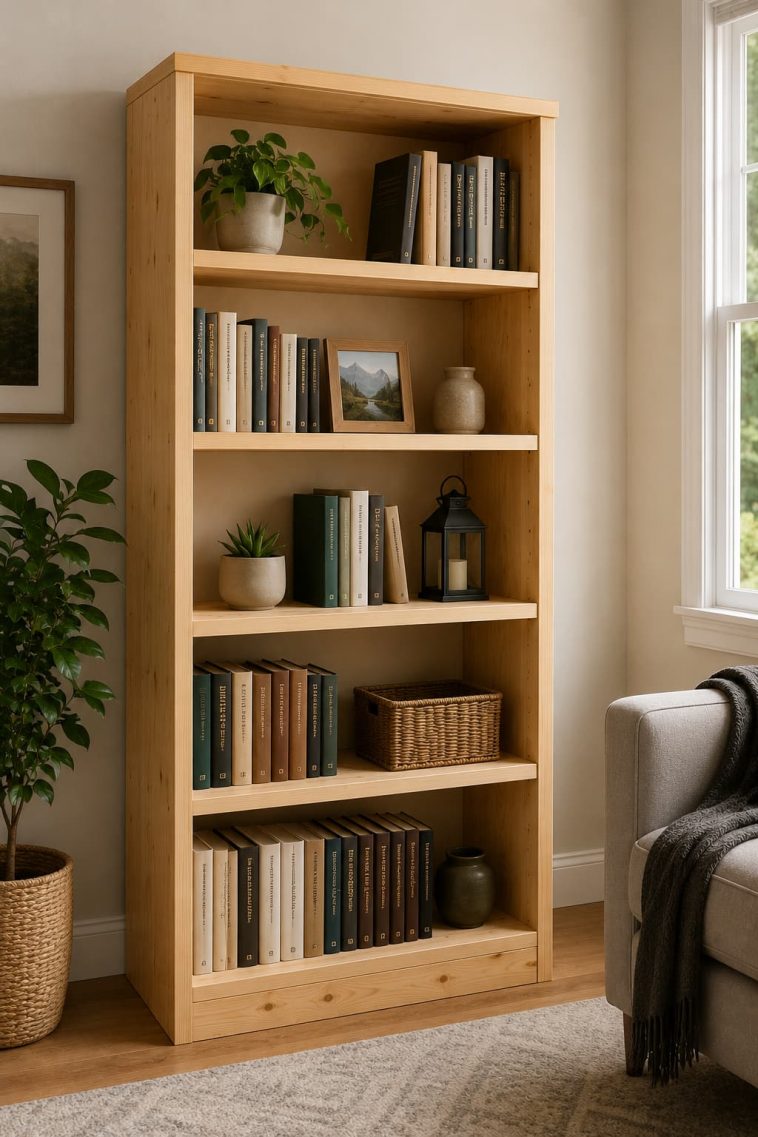
Building your first bookshelf feels like a big deal — and honestly, it kind of is. It’s the project where most beginners go from “I made a small thing” to “I actually built furniture.” And the best part? It’s not nearly as complicated as it looks.
I built my first bookshelf with a circular saw, a drill, and a healthy amount of stubbornness. It wasn’t perfect. One shelf sagged a little, and the back panel was slightly crooked. But it held books, it stood upright, and I made it with my own hands. Still have it. This guide will help you build yours — and make it better than mine was.
What You’ll Actually Build
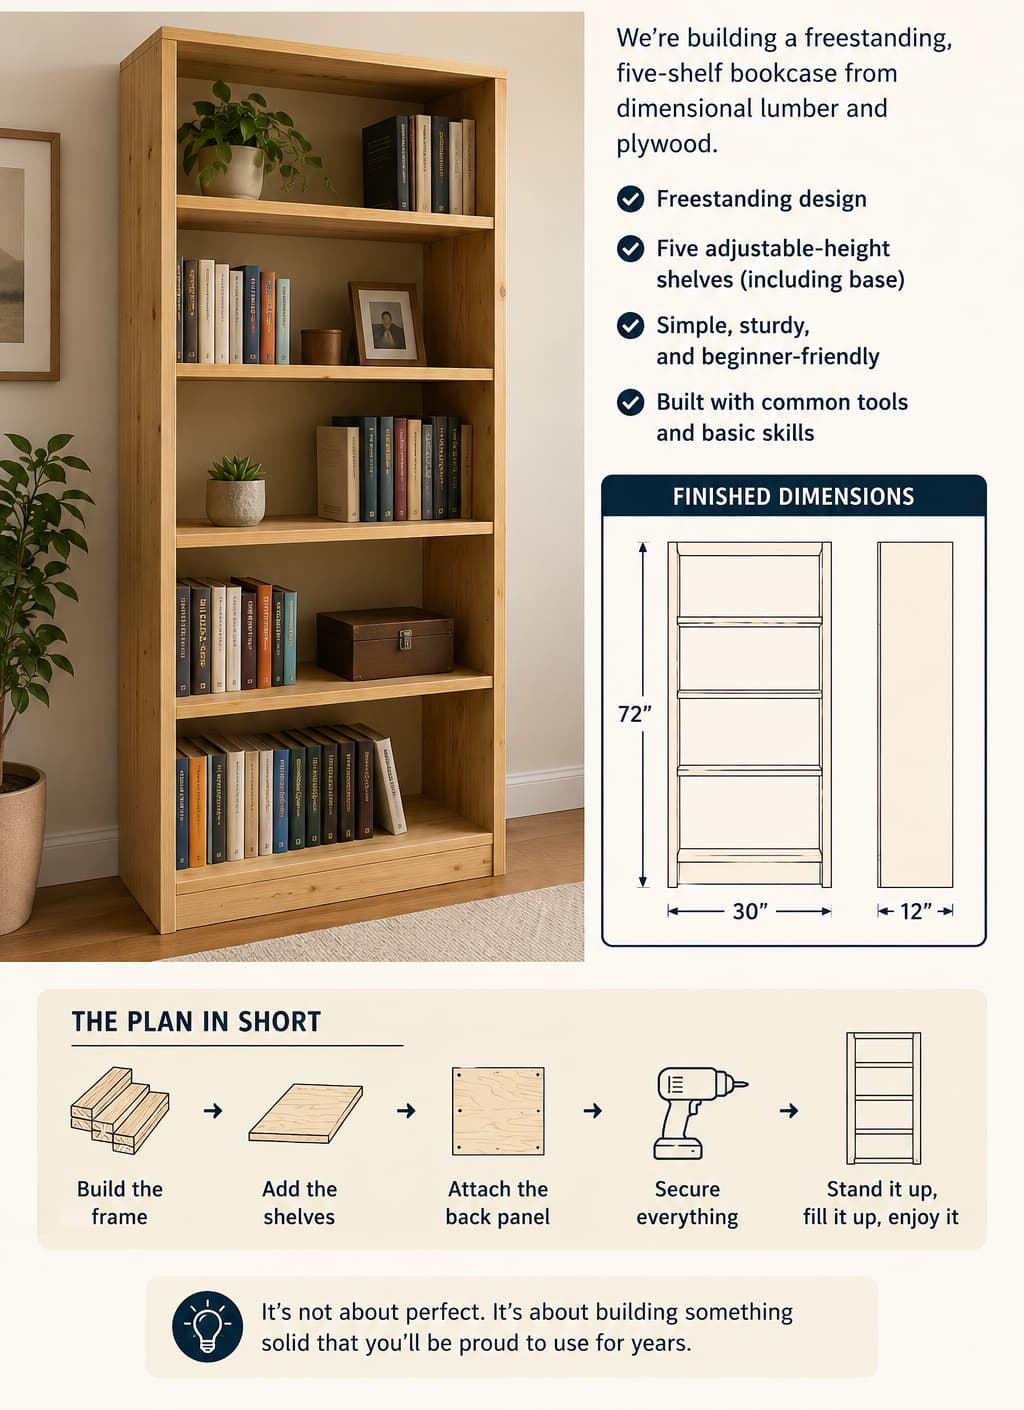
Before anything else, let’s be clear about what “bookshelf from scratch” means here. We’re building a freestanding, five-shelf bookcase from dimensional lumber and plywood. No pocket hole jigs required (though they help), no fancy joinery, no router work unless you want it.
The finished dimensions land around 72″ tall × 30″ wide × 12″ deep — a classic size that fits most rooms and holds a solid book collection. You can scale it up or down, but this is the sweet spot for a first build.
Materials List
Here’s what you’ll need to buy before you start cutting:
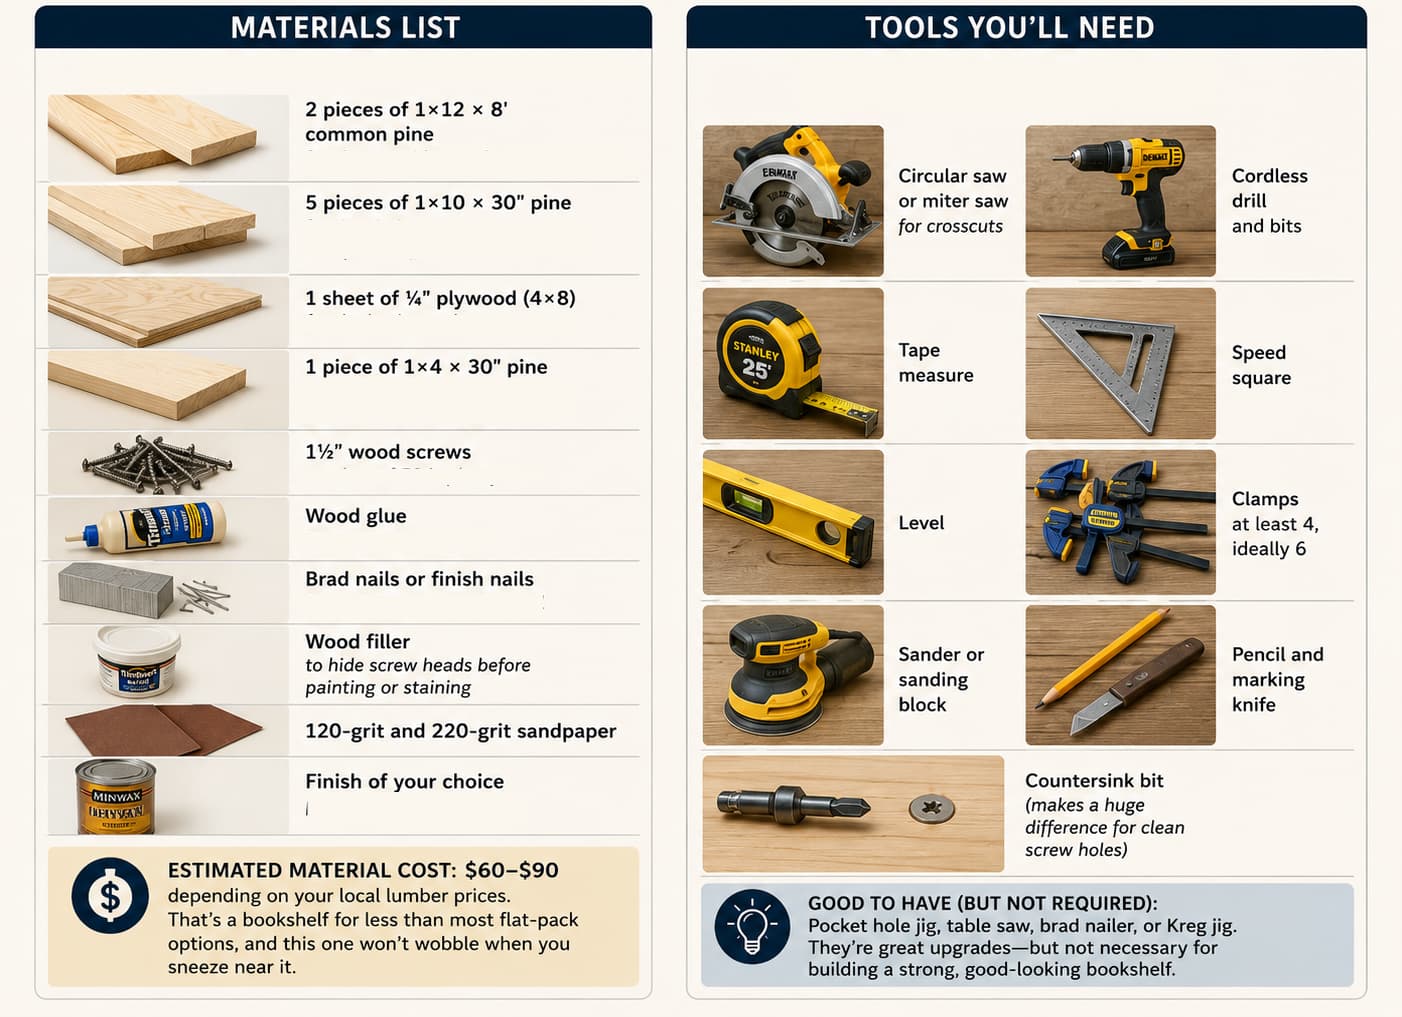
- 2 pieces of 1×12 × 8′ common pine — for the two side panels
- 5 pieces of 1×10 × 30″ pine — for the shelves (or rip down from wider boards)
- 1 sheet of ¼” plywood (4×8) — for the back panel
- 1 piece of 1×4 × 30″ pine — for the top cap (optional but looks great)
- 1½” wood screws — one box of 50 is plenty
- Wood glue — Titebond II or similar
- Brad nails or finish nails — for attaching the back panel
- Wood filler — to hide screw heads before painting or staining
- 120-grit and 220-grit sandpaper
- Finish of your choice — paint, stain, or Danish oil
Estimated material cost: $60–$90 depending on your local lumber prices. That’s a bookshelf for less than most flat-pack options, and this one won’t wobble when you sneeze near it.
Tools You’ll Need
You don’t need a full workshop for this. Here’s the honest minimum:
- Circular saw or miter saw — for crosscuts
- Cordless drill and bits
- Tape measure
- Speed square
- Level
- Clamps — at least 4, ideally 6
- Sander or sanding block
- Pencil and marking knife
- Countersink bit (makes a huge difference for clean screw holes)
If you’re just getting started and building out your toolkit, check out our 16 Best Woodworking Tools for Beginners — it covers exactly what’s worth buying early versus what you can skip until later.
Advertisement
Step-by-Step Build Instructions
Step 1: Plan and Mark Your Cuts
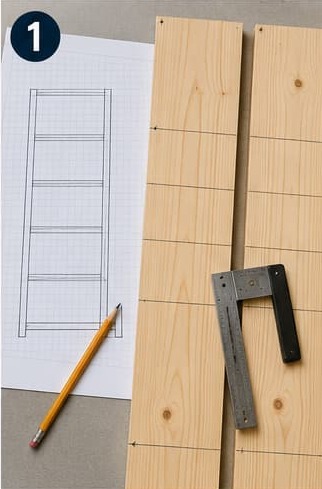
Before any wood gets cut, draw it out on paper. Sketch the side panels with the shelf positions marked. Standard shelf spacing is 12″–14″ for most books — go 16″–18″ if you have oversized coffee table books or binders.
Mark your shelf positions on both side panels at the same time — clamp them together, mark across both with a square. This guarantees your shelves will be level without any fussing later.
Typical layout for 72″ tall sides:
- Bottom shelf: 4″ from floor (leaves room for taller items underneath)
- Remaining four shelves: spaced evenly at 13″ apart
- Top: flush with the top of the side panels
Step 2: Cut Your Parts
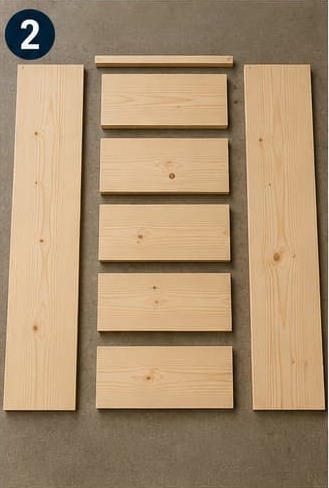
Cut the two side panels to 72″ length. Cut all five shelves to your chosen width — 30″ is a good standard.
The most important thing here: make sure your cuts are square. A cut that’s even 1–2 degrees off will cause your shelf to lean when assembled. Use your speed square to check every cut before you move on.
If you’re using a circular saw, clamp a straight board to your workpiece as a fence guide. It makes far cleaner cuts than freehand and keeps everything consistent.
Step 3: Mark and Drill Pilot Holes
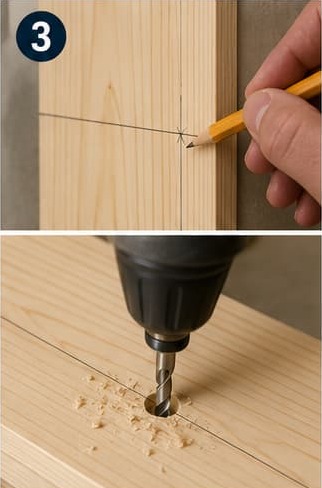
Never drive screws into pine without pilot holes. The wood will split. Every time.
On each side panel, mark your shelf positions with a pencil line using your earlier measurements. Then mark two screw points along each line — roughly 2″ in from the front and 2″ in from the back.
Use a countersink bit to drill your pilot holes. This creates a clean recess for the screw head to sit in, which you’ll fill and sand later for a seamless look.
Step 4: Dry-Fit the Assembly
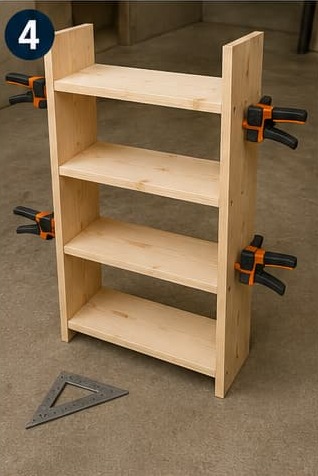
Always dry-fit before glue. Lay one side panel flat on the floor, position your shelves at the marked lines, and clamp everything in place. Check for square with a speed square at each corner.
Does everything look right? Are the shelves flush with the front edge of the side panels? Is the whole thing sitting flat without rocking? Fix any issues now — it’s much easier than trying to adjust after the glue goes in.
Step 5: Glue and Screw the Assembly
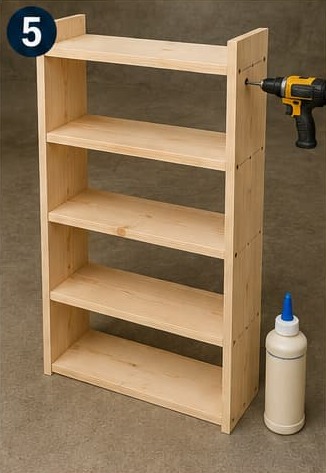
This is where the build comes together. Working from the bottom up:
- Run a bead of wood glue along the end grain of the first shelf
- Position it at your marked line on one side panel
- Drive two screws through your pre-drilled holes to pull it tight
- Repeat for all five shelves on that side
- Bring the second side panel in and repeat the process
Work on a flat surface — your garage floor or a large workbench. If the floor isn’t level, use shims under the panels to keep everything flat while the glue cures.
Clamp the whole assembly together and let the glue cure for at least an hour before moving it.
Step 6: Add the Back Panel
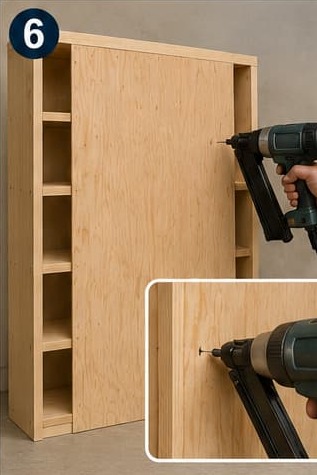
The back panel is what keeps your bookshelf from racking (leaning side to side). Don’t skip it — a bookshelf without a back panel will slowly lean over time, especially once loaded with heavy books.
Cut your ¼” plywood to fit the full back of the assembled case. Check that the bookshelf is square before you attach it — measure diagonally corner to corner in both directions. Equal diagonal measurements = square.
Glue and brad nail the back panel to the back edges of the side panels and shelves. Space your nails about 8″ apart. This locks everything in position permanently.
Step 7: Add the Top Cap (Optional but Recommended)
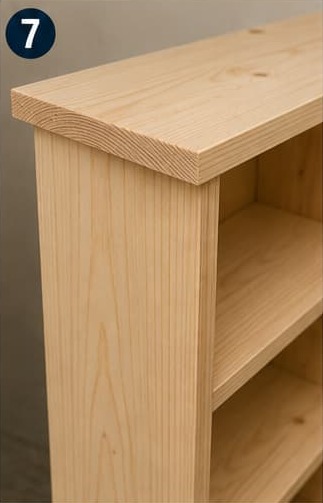
A 1×4 board laid across the top of the bookshelf and attached with glue and a few finish nails gives it a finished, intentional look. It covers the end grain of the side panels and makes the whole piece look more like furniture and less like a crate.
Overhang it slightly on the front — ¼” to ½” — for a clean shadow line that catches the eye.
Step 8: Fill, Sand, and Finish
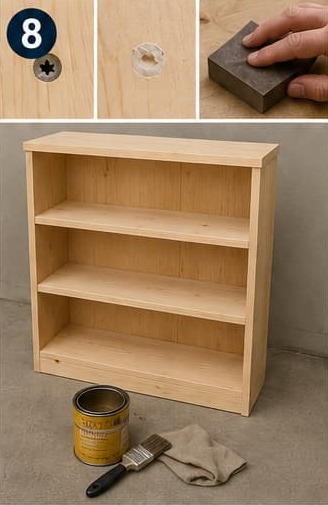
Fill all your screw holes with wood filler, let it dry completely, and sand flush with 120-grit. Then go over the entire piece with 220-grit for a smooth final surface.
Now it’s decision time: paint, stain, or natural finish?
- Paint hides imperfections best and gives the cleanest look for pine — prime first with a shellac-based primer to prevent bleed-through
- Stain shows the wood grain but reveals any tearout or mill marks, so make sure your sanding is thorough
- Danish oil or tung oil is the quickest option and gives pine a warm, natural tone — two or three coats, wiped on and off
Step 9: Mount to the Wall (Important Safety Step)
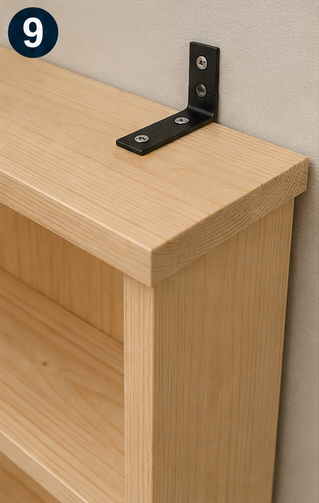
Any tall bookcase needs to be secured to the wall. A top-heavy bookshelf loaded with books can tip forward, especially in homes with children. Don’t skip this step.
Attach an L-bracket or furniture anti-tip strap to the top of the bookcase and anchor it into a wall stud. Takes five minutes and matters a lot.
Common Mistakes Beginners Make
Get ahead of the problems most first-timers run into:
- Skipping the pilot holes. Split end grain looks terrible and weakens the joint. Drill every hole.
- Not checking for square during assembly. A bookcase that’s out of square will look fine until you start loading it — then you’ll notice. Check at every stage.
- Using wet lumber. Lumber from a big-box store is often still drying. Seal it, bring it inside to acclimate for a few days, then build. Green wood warps.
- Undersizing the back panel. Use ¼” plywood minimum. Thinner materials flex too much and don’t provide the racking resistance you need.
- Rushing the finish. A bookshelf you spent a weekend building deserves more than a sloppy 20-minute paint job. Sand properly, prime if needed, and apply two coats.
Customizing Your Bookshelf
Once you’ve nailed the basic build, there’s a lot of room to make it your own:
- Adjustable shelves — drill a column of shelf pin holes inside each side panel instead of fixed positions. Use a shelf pin jig for consistent spacing.
- Face frame — add a 1×2 frame around the front opening for a more traditional, furniture-grade look
- Doors — add simple plywood or shaker-style panel doors to turn it into a cabinet
- Crown molding — a small piece of crown across the top transforms a basic bookcase into something that looks genuinely built-in
- Painted interior — paint the back panel a contrasting color before assembly. Books against a dark navy or forest green interior always look great.
Pairing Projects: What to Build Next
A bookshelf naturally pairs with a few smaller builds. If you want something for smaller items — a single row of favorite books on a nightstand or desk — our guide to DIY Wooden Book Holder: A Quick Build You’ll Use Every Day is a great afternoon project that uses leftover wood from this build.
And if the bookshelf has got you hooked on building furniture, check out 15 Easy Wooden Projects with Step-by-Step Instructions — it covers a solid range of beginner builds that use the same skills you just practiced here.
Ready to Take Your Builds Further?
Here’s the thing about building your first bookshelf: it usually isn’t your last. Once you see what’s possible with a few boards and basic tools, you start looking at your house differently — that corner needs a cabinet, that alcove would be perfect for built-in shelving, that bedroom could use a proper bed frame.
The jump from “I can build a bookshelf” to “I can build anything” is mostly just a matter of having good plans to follow. And that’s where Ted’s Woodworking Plans genuinely earns its keep.
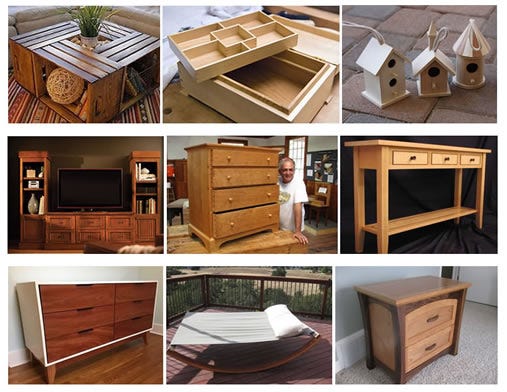
The library covers over 16,000 projects with full cut lists, material lists, and step-by-step diagrams — everything from simple shelving to full room-sized built-ins. I’ve used it myself when I wanted to scale up a project and didn’t want to start the design from scratch. For the price, it’s one of the best resources a woodworker at any level can have access to.
If you’re serious about building more, it’s worth a look.
👉 Browse Ted’s Woodworking Plans here
Final Thoughts
A wooden bookshelf is the kind of project that earns its place in your home for years. You built it, you sized it exactly how you wanted it, and it won’t wobble, chip, or fall apart the way flat-pack furniture tends to.
The steps aren’t complicated — measure twice, cut once, drill pilot holes, check for square, and take your time with the finish. Follow that sequence and you’ll end up with a piece of furniture you’re genuinely proud to put in your living room.
Now go cut some wood. Your books have been waiting for a proper home.