
So you saw one of those gorgeous epoxy river tables online, your jaw dropped, and now you’re convinced you need to make one yourself. Same. There’s something almost hypnotic about that glassy blue “river” flowing through raw wood, and the best part? You don’t need to be a master craftsman to pull this off. You just need patience, the right materials, and a willingness to embrace the learning curve.
Let’s walk through everything you need to know — from picking your wood slab to pouring your first batch of epoxy without turning your garage into a disaster zone.
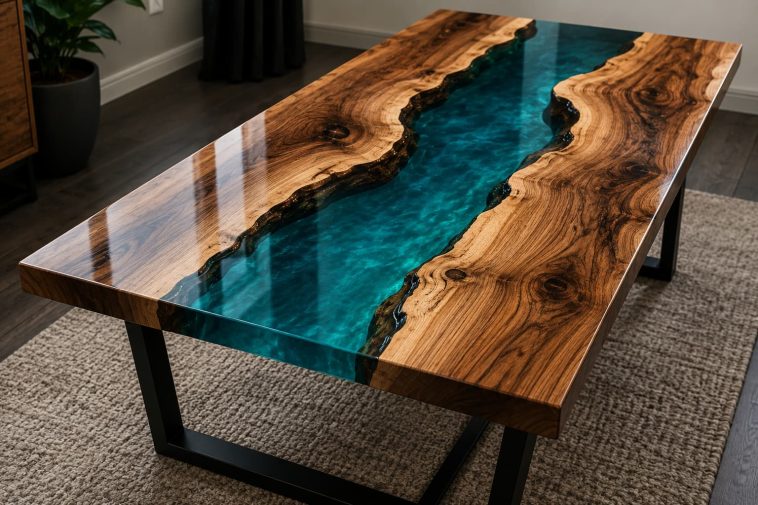
What Exactly Is an Epoxy River Table?
Before we get into the how, let’s quickly cover the what. An epoxy river table is a piece of furniture made from two wood slabs with a gap between them, filled with colored epoxy resin to mimic a flowing river. The epoxy cures hard and crystal-clear (or tinted to whatever color you choose), creating a smooth, continuous surface that looks like something out of a high-end furniture showroom.
The style exploded in popularity a few years back, and honestly? It’s not going anywhere. The combination of natural wood grain and bold, glossy resin is one of those design pairings that just works — rustic meets modern, raw meets refined.
If you’re also looking to incorporate this kind of natural wood beauty into other areas of your home, check out our guide on How to Bring Warm Wood Tones Into Your Kitchen (Without a Full Reno) — it pairs perfectly with the vibe you’re going for here.
Tools and Materials You’ll Need
Let’s get the shopping list sorted first. There’s nothing worse than being mid-pour and realizing you’re missing something critical :/.
Essential Materials
- Two matching live-edge wood slabs (more on choosing these below)
- Epoxy resin — specifically a table-top or casting resin (not hardware store stuff)
- Pigment or dye — alcohol inks, mica powder, or epoxy-specific dyes
- Melamine board or foam for your mold
- Mold release wax or paste wax
- Sandpaper — multiple grits from 80 up to 400+
- Finishing oil or varnish for the wood
- Table legs (metal hairpin legs are a crowd favorite for this style)
Tools You’ll Need
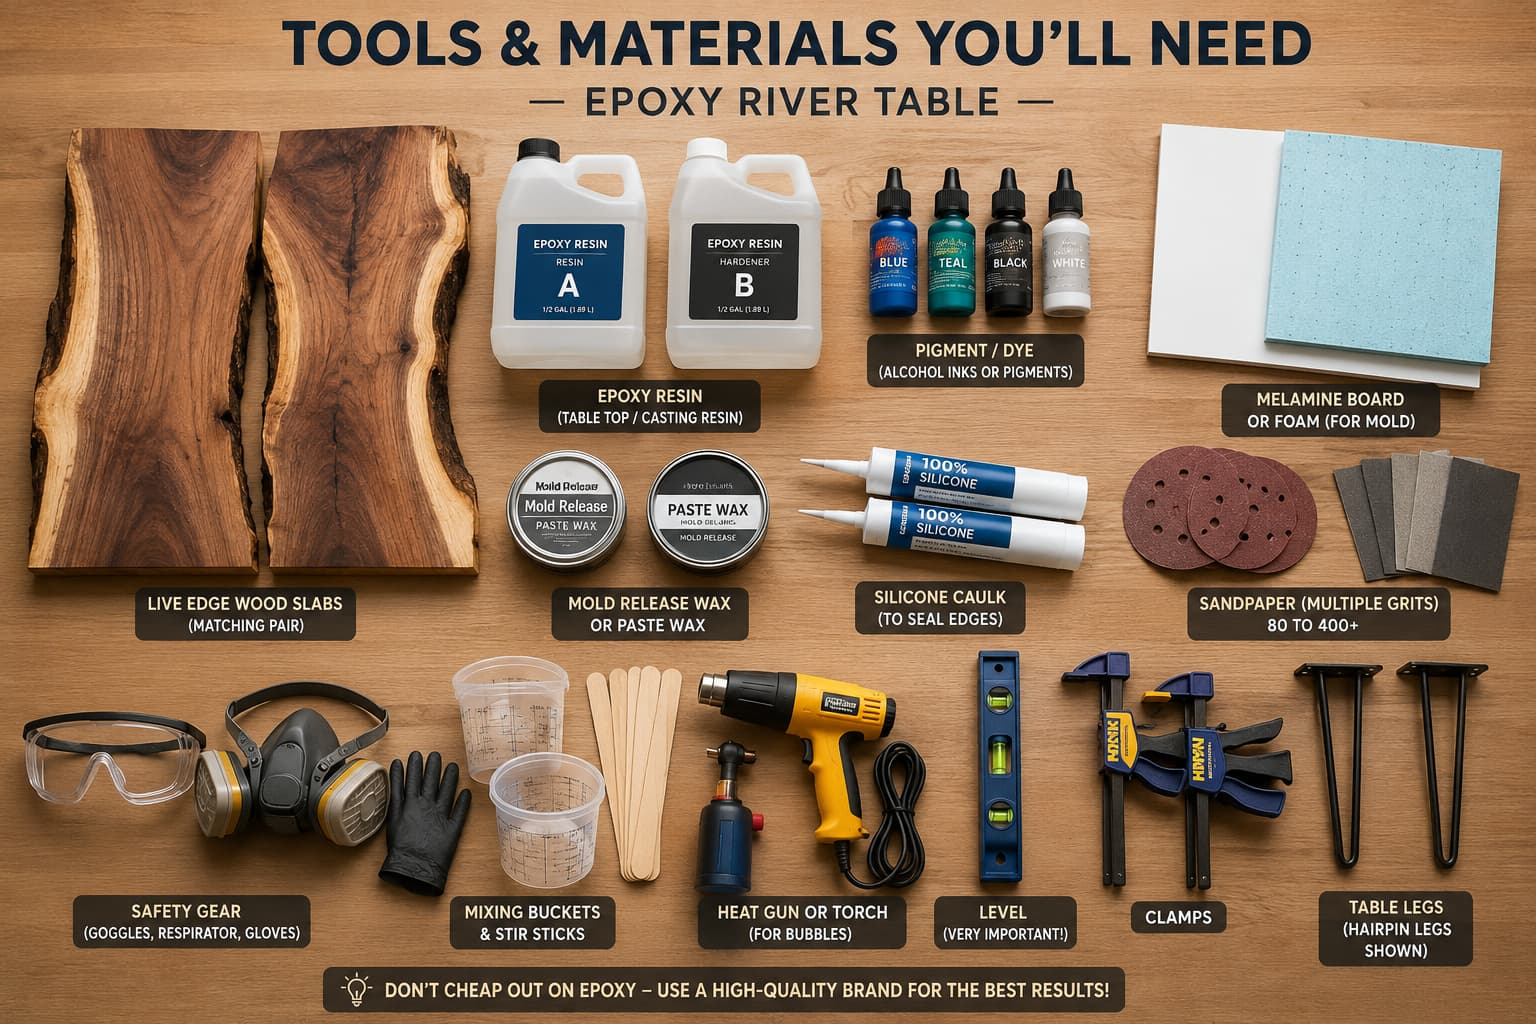
- Mixing buckets and stir sticks
- A heat gun or torch (for removing bubbles — this is non-negotiable)
- Level — your pour MUST be perfectly level
- Orbital sander
- Safety gear — nitrile gloves, respirator, eye protection
- Clamps
Don’t cheap out on your epoxy. Seriously. Bargain resin yellows, stays tacky, or refuses to cure properly, and then you’ve just wasted an entire weekend. Go with a reputable brand.
Step 1: Choosing Your Wood Slabs
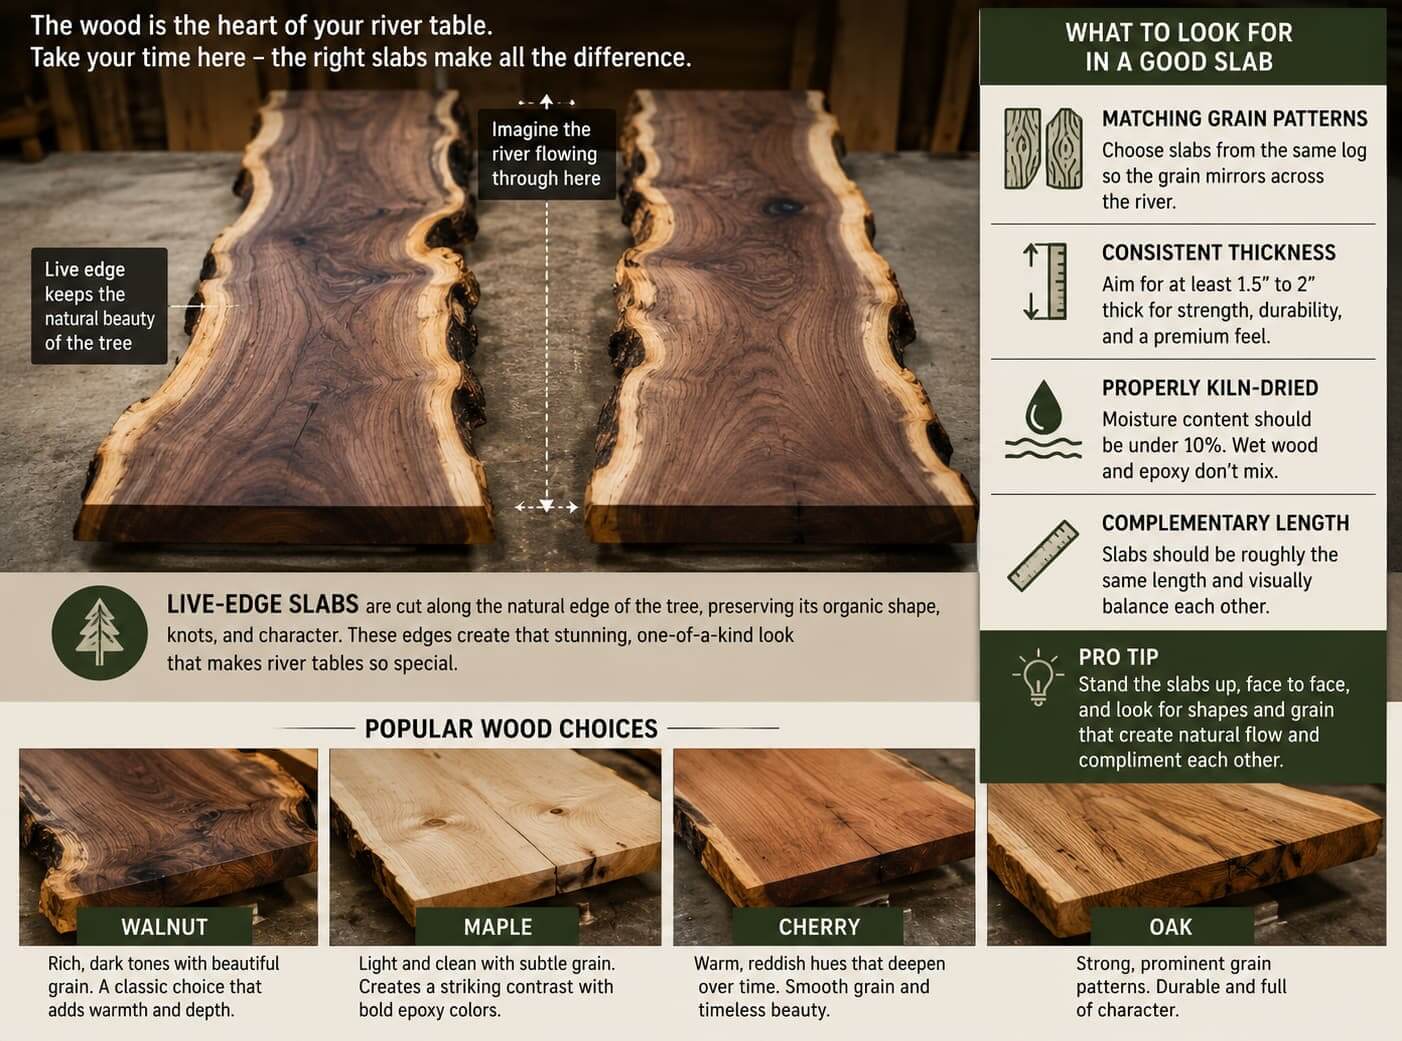
This is arguably the most important decision in the whole process. The wood is the star of the show — the epoxy is just there to highlight it.
Advertisement
Look for live-edge slabs — those are the ones where the natural edge of the tree is preserved rather than cut straight. Walnut, maple, cherry, and oak are all popular choices. Walnut gives you those rich, dark chocolatey tones. Maple tends to be lighter and brings out a more dramatic contrast with colored resin.
What to Look for in a Good Slab
- Matching grain patterns — ideally from the same log so they mirror each other
- Consistent thickness — aim for at least 1.5 to 2 inches for a table that feels substantial
- Properly kiln-dried wood — moisture content should be under 10%. Wet wood and epoxy do NOT get along
Make sure both slabs are roughly the same length and complement each other visually. Hold them up, face to face, and imagine that gap between them. That’s your river.
Step 2: Prepping the Wood
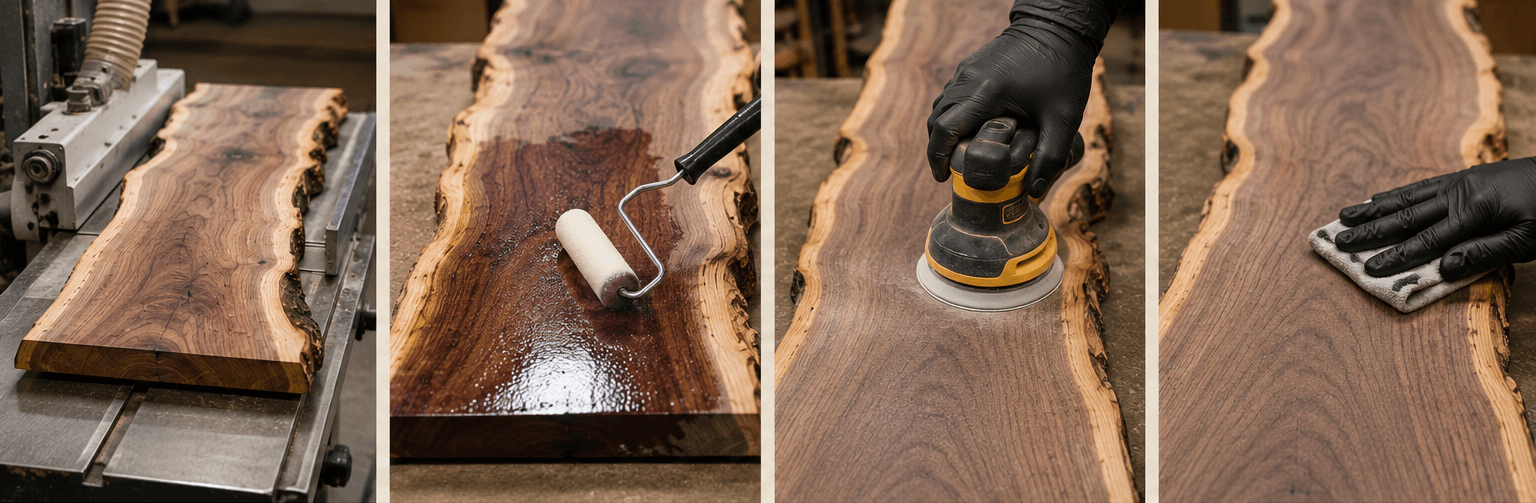
Before you touch any resin, the wood needs prep work. Skip this step and you’ll regret it.
First, flatten both slabs. If you have access to a planer or router sled, use it. Uneven slabs mean an uneven pour, and an uneven pour means a wobbly table. Nobody wants a wobbly table.
Next, seal the wood with a thin coat of epoxy (not your main pour — just a seal coat). This closes up any cracks, voids, or pores in the wood that would otherwise trap air and create bubbles in your final pour. Let it cure fully before moving on.
Sand the surfaces where the epoxy will bond — rough enough for adhesion, but not so rough that you’re creating texture you’ll see in the final piece. Around 80–120 grit works well here.
Step 3: Building Your Mold
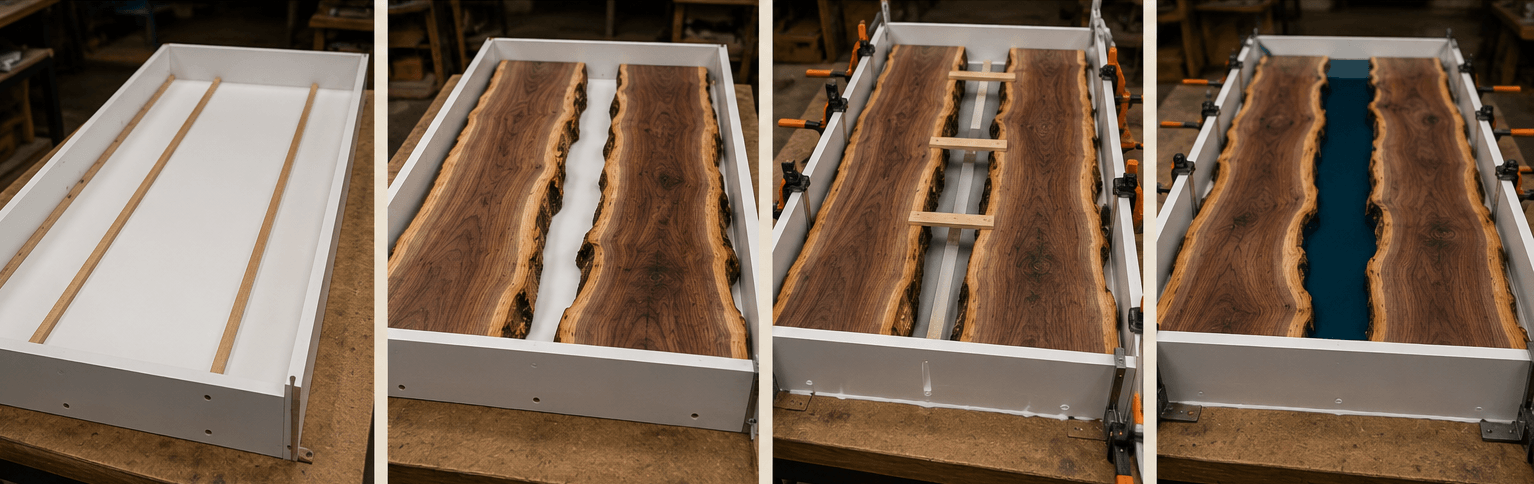
This is the part people often underestimate. Your mold keeps the epoxy contained while it cures, and it needs to be completely sealed to prevent leaks.
How to Build a Simple River Table Mold
- Cut your melamine board to the dimensions of your finished table
- Attach side walls using melamine strips and screws
- Apply paste wax or mold release to all interior surfaces — this is what lets you pop the table out later
- Position your wood slabs inside the mold with the gap between them (your future “river”)
- Seal around the base of the slabs with silicone caulk to prevent epoxy from sneaking underneath
Place the whole setup on a surface you’ve confirmed is perfectly level with a spirit level. Even a slight tilt will cause your river to look lopsided. Eye-balling it is not an option here, IMO.
Step 4: Mixing and Pouring Your Epoxy
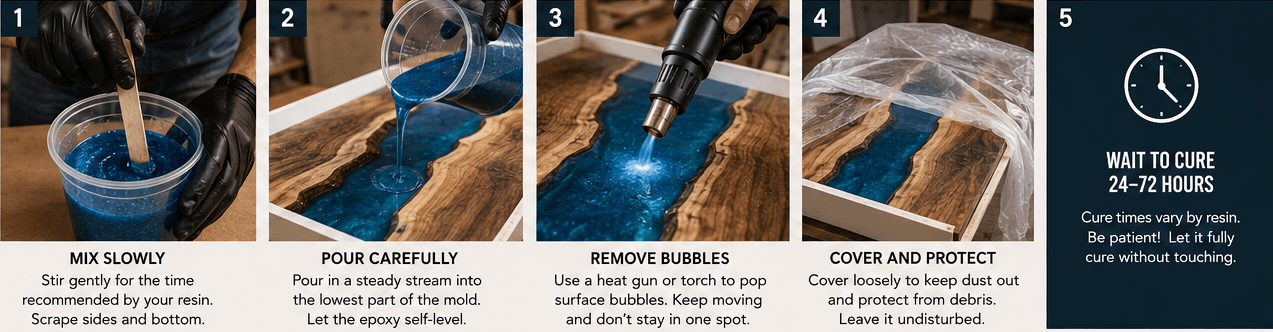
Here’s where the magic happens — and where first-timers often make mistakes. Read your epoxy’s instructions carefully. Different resins have different mix ratios and working times.
Tips for a Successful Pour
- Mix slowly — aggressive stirring introduces air bubbles
- Scrape the sides and bottom of your mixing container as you stir
- Add your colorant sparingly — you can always add more, but you can’t take it out
- Pour in layers if your river is deeper than 1.5 inches — epoxy generates heat as it cures (called an exothermic reaction) and thick pours can crack or yellow
Once you’ve poured, run your heat gun or torch lightly over the surface to pop surface bubbles. Keep it moving — holding it in one spot can scorch the resin or even cause it to bubble up dramatically.
Cover your mold loosely to keep dust out, and then… wait. Most casting resins need 24–72 hours to cure fully. Walk away. Touch nothing. I know it’s tempting. Walk away anyway.
Step 5: Demolding and Sanding
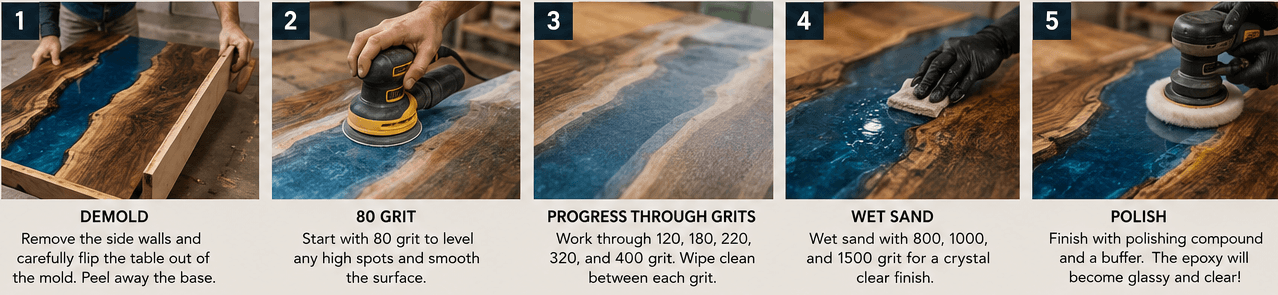
Once your epoxy has fully cured, it’s time to release the table from the mold. Pop off your side walls, flip it carefully, and peel away the melamine.
What you’ll likely see at this point: a beautiful but rough surface with a slightly matte finish. That’s completely normal. Sanding transforms it.
The Sanding Sequence
- Start with 80 grit to level any high spots
- Work through 120, 180, 220, 320, and 400 grit progressively
- For a truly glassy finish, wet-sand with 800, 1000, and 1500 grit
- Finish with polishing compound and a buffer
The resin goes from cloudy to crystal clear as you move through the grits. It’s genuinely one of the most satisfying parts of the process — like watching someone clean a foggy window.
Step 6: Finishing the Wood and Attaching the Legs
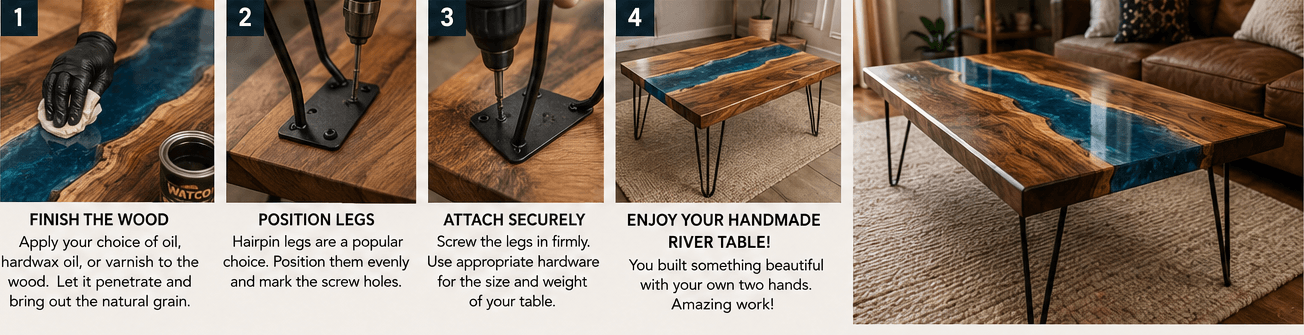
The wood portions of your table deserve their own finishing treatment. Apply a wood oil, hardwax oil, or varnish to bring out the grain and protect the surface. Waterlox and Rubio Monocoat are both excellent choices that penetrate the wood rather than just sitting on top.
For legs, hairpin legs in raw or matte black steel are a classic pairing for river tables — they keep the focus on the slab without competing with it visually. Simply make sure that the hardware you choose is appropriate for the size of your table.
Common Beginner Mistakes (And How to Avoid Them)
Let’s be honest, your first attempt may not be ideal. That is okay. However, here are the most common mistakes that people make:
- Not leveling the mold — causes a lopsided river
- Pouring too thick in one go — causes cracking or yellowing from heat buildup
- Using cheap epoxy — leads to yellowing and a permanently tacky surface
- Not sealing the wood first — causes air bubbles to rise through your pour
- Rushing the cure time — the resin won’t reach full hardness and will scratch easily
FYI — a lot of these mistakes are the kind of thing you only learn from experience, or from someone who’s been through it before.
Want Plans That Take the Guesswork Out?
Here’s something that genuinely saved me a ton of frustration when I started woodworking: having detailed, step-by-step plans to work from. Ted’s Woodworking Plans is an incredible resource that gives you access to thousands of woodworking project plans — including furniture builds like this one — all laid out with clear diagrams, cut lists, and instructions.
If you’re the kind of person who likes to see the full picture before picking up a tool (and honestly, who isn’t?), it’s worth checking out. The plans are designed for all skill levels, so whether you’re a complete beginner or just looking for new project ideas, Ted’s Woodworking Plans has something for you. Think of it as having an experienced woodworker on call — minus the workshop dust in your face.
Wrapping It Up
Making an epoxy river table is one of those projects that looks incredibly intimidating from the outside but becomes totally manageable once you break it down into steps. Choose quality materials, prep your wood properly, level your mold, pour in layers, and take your time with the sanding. That’s genuinely the whole formula.
The result? A piece of furniture that looks like it cost a few thousand dollars at a boutique studio — built by your own hands. There’s a real satisfaction in that.
If you want to keep building on that natural wood aesthetic throughout your home, don’t miss our companion article on How to Bring Warm Wood Tones Into Your Kitchen (Without a Full Reno). Same vibe, zero epoxy required 🙂
Now go get yourself some wood slabs and start planning. That river table isn’t going to build itself.