

A wood router is probably the most versatile power tool in any woodworking shop—and also one of the most intimidating if you’ve never used one before. High-speed spinning bits, aggressive cuts, and just enough noise to make your neighbors resent you. What’s not to love?
But here’s the thing: once you get comfortable with a router, it completely transforms what you can do in the shop. Decorative edges, perfect dadoes, flush trimming, mortises, inlays—this one tool does all of that. Let’s break it down from scratch so you can pick it up with confidence.
What Is a Wood Router (And Why Do You Need One)?
At its core, a router is a high-speed motor that spins a cutting bit at anywhere from 8,000 to 30,000 RPM. You guide the bit through the wood—either freehand with a handheld router, or along a controlled path using a fence, template, or router table.
The reason every serious woodworker eventually gets one? Versatility. A router can:
- Profile edges — roundovers, chamfers, ogees, coves, and more
- Cut dadoes and grooves — essential for shelving and cabinet joinery
- Flush-trim — match laminate or template shapes perfectly
- Cut mortises — for traditional mortise and tenon joinery
- Create decorative inlays — with a template guide and steady hands
- Shape signs and patterns — with a CNC setup or template routing
If you check out our piece on woodworking projects, you’ll quickly notice how many of them require a router for that clean, professional finish. It’s one of those tools that opens doors you didn’t even know were closed.
Types of Routers: Which One Should You Buy?

Before you can use a router, you need to know which type fits your needs. There are two main categories, and they’re quite different in how you use them.
Fixed-Base Router
A fixed-base router locks the bit depth before you start cutting. You set the depth, lock it down, and that’s where it stays for the entire cut. These are ideal for:
- Edge profiling
- Working on a router table
- Making repetitive cuts at a consistent depth
Fixed-base routers are generally more stable and precise, which makes them a favorite for router table use. They’re also slightly more compact, which makes them easier to handle for beginners.
Plunge Router
A plunge router lets you lower the bit into the material mid-cut by pressing the router body down against spring-loaded posts. This makes them perfect for:
Advertisement
- Starting a cut in the middle of a panel (like when cutting out a recess)
- Mortising
- Template routing where you need to plunge in and out
Plunge routers are more flexible, but they have a bit more going on mechanically, which can feel like a lot when you’re just starting out.
Combo Kit — The Smart Beginner Choice
Many routers now come as combination kits that include both a fixed base and a plunge base for the same motor. You buy one motor and swap bases depending on the task. IMO, this is the smartest buy for most beginners—you get maximum flexibility without doubling your investment.
Understanding Router Bits

Choosing the correct bit is half the battle because that’s where all the real cutting takes place. The two primary shank diameters for router bits are 1/4 and 1/2 inch.
Always go for 1/2-inch shank bits when you have the choice. They’re stiffer, produce less vibration, and give you a cleaner cut. Yes, they cost a little more. No, it’s not worth skimping.
Common Bit Types for Beginners
Here’s a quick rundown of the bits you’ll use most often:
- Straight bit — Cuts flat-bottomed grooves, dadoes, and rabbets. The workhorse of the bit family.
- Roundover bit — Creates a rounded edge profile. Beautiful on tabletops, shelves, and furniture.
- Flush trim bit — Has a bearing that rides against a template or surface to cut flush. Essential for template routing.
- Chamfer bit — Cuts a 45-degree angled edge. Clean and modern-looking.
- Rabbet bit — Cuts rabbets (step cuts along an edge). Great for cabinet backs and drawer bottoms.
- Cove bit — Cuts a concave curved profile. Classic, elegant look.
- Dovetail bit — Used for cutting dovetail slots in jigs. Often paired with a dovetail jig for drawer construction.
Don’t try to buy every bit at once. Start with a straight bit, a roundover, and a flush trim bit. Those three will handle 80% of beginner tasks right away.
Router Safety: Non-Negotiable Rules
Let’s be straight here: routers are safe when used correctly, but they demand respect. You’re spinning carbide at 20,000+ RPM. Here’s how you stay in one piece:
Always do this:
- Wear safety glasses. Every. Single. Time.
- Make sure the bit is fully seated and the collet is tight before turning the router on
- Let the router reach full speed before making contact with the wood
- Keep both hands on the router during cuts
- Unplug the router before changing bits
- Secure your workpiece—never try to hold wood with one hand and operate the router with the other
Never do this:
- Feed the router in the wrong direction (more on this in a moment)
- Use dull or damaged bits
- Take too deep a cut in a single pass
- Leave the router running unattended on the bench
Most beginner mistakes come from rushing. Take the extra 30 seconds to double-check your setup. Your fingers will thank you 🙂
Feed Direction: The Rule You Must Never Forget
This is the single most important concept for new router users. Feed direction determines whether the router cuts cleanly or grabs violently into the wood.
The rule: Move the router in the opposite direction of bit rotation.
- When routing freehand, the bit spins clockwise (viewed from above). This means you move the router left to right when working on the outside of a piece, and right to left on the inside.
- Climbing (feeding in the same direction as bit rotation) can cause the router to grab and pull itself forward aggressively. This is dangerous and produces a rough cut.
A simple way to remember it: the bit should always be cutting into fresh wood, not running away from it. When in doubt, take a scrap piece of wood and test your feed direction first.
Setting Up Your Router: Step by Step

Ready to make your first cut? Here’s the process:
Step 1: Choose and Install Your Bit
- Unplug the router
- Insert the bit shank fully into the collet, then pull back about 1/8 inch
- Tighten the collet nut firmly—most routers require two wrenches
- Never insert a bit less than 3/4 inch into the collet
Step 2: Set Your Cutting Depth
- Place the router on your workpiece
- Loosen the depth adjustment
- Lower the bit until it reaches your desired depth
- Lock the adjustment and measure to confirm
Important: For deep cuts, never try to reach full depth in one pass. Make multiple shallow passes, increasing depth each time. For most cuts, 1/4 inch per pass is a safe starting rule.
Step 3: Set Up Your Guide
For straight cuts, you have several options:
- Edge guide — Attaches to the router base and rides along the edge of the board
- Straight fence — A clamped board that the router base rides against
- Template — A shaped guide for curved or repeated cuts
For edge profiling with a piloted bit (one with a bearing), the bearing itself acts as the guide—just ride it along the edge of the workpiece.
Step 4: Make the Cut
- Start the router and let it reach full speed (2–3 seconds)
- Position the bit at the start of your cut without touching the wood
- Move smoothly in the correct feed direction
- Maintain consistent speed—don’t rush or slow down mid-cut
- Complete the cut, then move the router away before shutting it off
Using a Router Table: Game-Changer for Consistency
Once you’re comfortable with a handheld router, a router table absolutely changes the game. You mount the router upside-down under a table, with the bit poking up through an opening in the surface. Instead of moving the router, you move the wood.
Router tables are better for:
- Small pieces that are too dangerous to route by hand
- Long edge profiles that require consistent results
- Repeated cuts where speed and repeatability matter
- Raised panel doors — virtually impossible without a table
A shop-built router table is one of the classic beginner projects, and it immediately expands what you can do. Our guide to 11 Woodworking Jigs That Will Save You Time and Effort includes some great router table accessories worth making—like featherboards and push blocks that keep your hands safe during those smaller cuts.
Common Router Techniques You Should Learn First
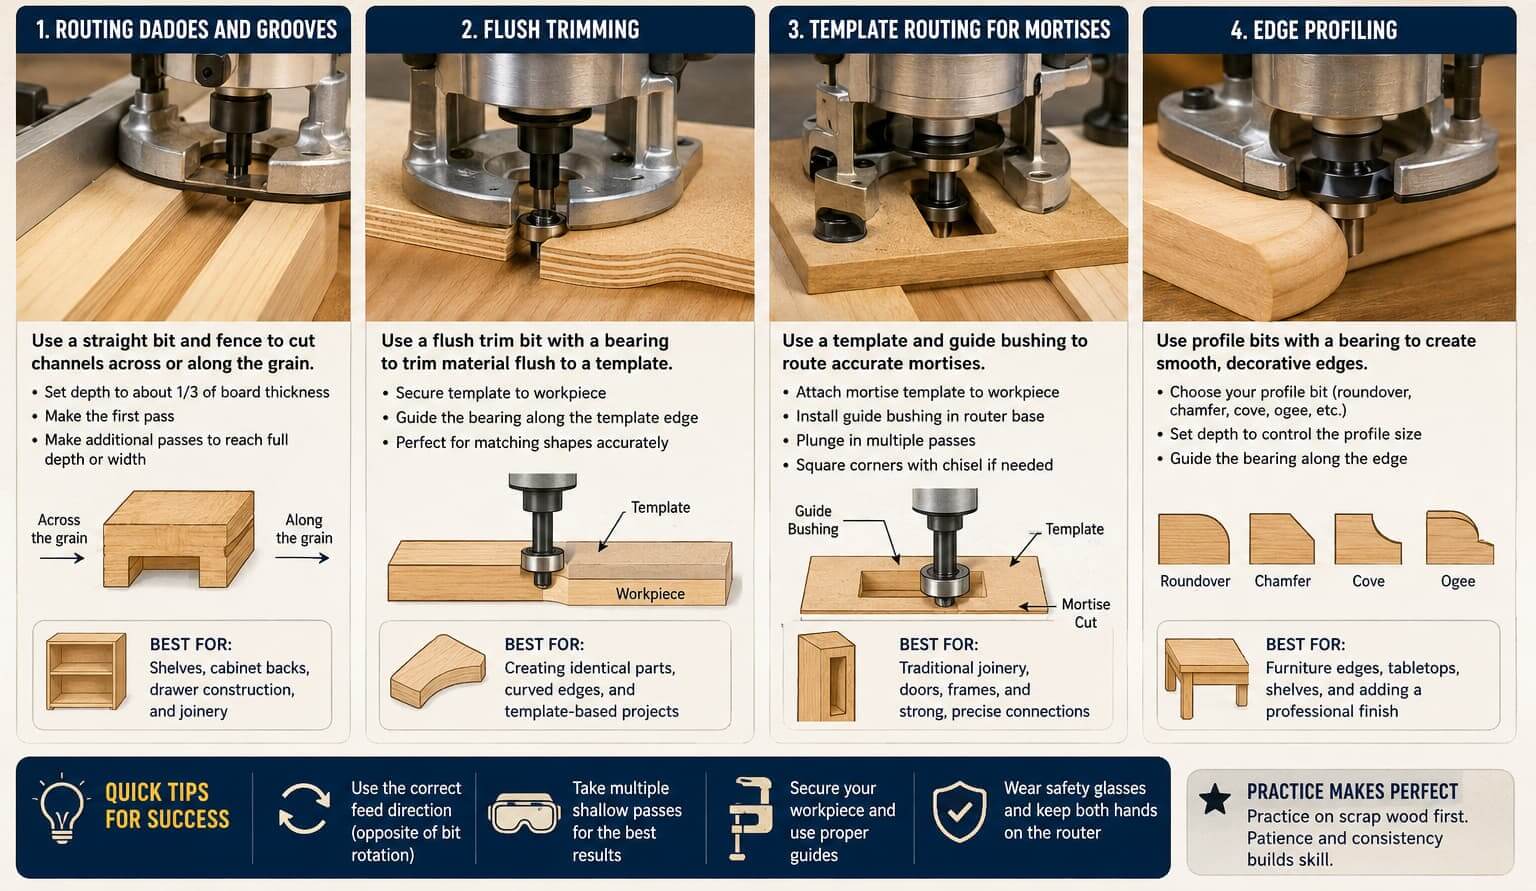
Routing Dadoes and Grooves
A dado is a channel cut across the grain; a groove runs with the grain. Both use a straight bit guided by a fence. Set your depth to about one-third of your board thickness, make your first pass, then widen the channel if needed by repositioning the fence.
This skill directly connects to cabinet and shelf building—an essential technique for dozens of woodworking projects.
Flush Trimming
Mount a flush trim bit with a bearing at the tip. Use a template clamped to your workpiece, then run the bearing along the template edge. The bit cuts the wood to match the template exactly. This is how you create multiple identical curved parts without measuring every single one.
Template Routing for Mortises
Mount a template guide bushing in your router base, attach a mortise template to your workpiece, and route the mortise in multiple passes. Combined with a sharp chisel to square the corners, this gives you a consistent mortise every time—far more reliable than freehand work.
If you’re building furniture with traditional joinery, this technique pairs beautifully with the concepts we covered in our companion article, The Ultimate Guide to Wood Joints.
Edge Profiling
The simplest and most satisfying router operation for beginners. Chuck in a roundover or chamfer bit with a bearing, set your depth, and run the router along the edge. In under a minute, you transform a sharp, raw edge into something that looks intentional and professional.
Router Jigs That Make Your Life Easier
Here’s the thing about routing: most of the power comes from combining your router with smart jigs. Even simple jigs dramatically expand what you can do.
- Box joint jig — Cuts perfect interlocking finger joints with a straight bit
- Dovetail jig — Cuts matching pins and tails with a dovetail bit
- Circle jig — Routes perfect circles from a pivot point
- Mortise jig — Guides your router for clean, repeatable mortises
Our 10 Essential Table Saw Jigs You Can Build This Weekend guide gives you a head start on shop-built jigs—and while those are table saw focused, many of the same principles apply to router jigs. Also check out the full rundown in 11 Woodworking Jigs That Will Save You Time and Effort for router-specific options.
Finding Plans That Show You Exactly How to Use a Router
Here’s a confession: when I was starting out, the hardest part wasn’t using the router itself—it was knowing when and how to incorporate it into a project plan. Which edge gets profiled? Where do the dadoes go? What depth?
That’s exactly where Ted’s Woodworking Plans becomes invaluable. With over 16,000 detailed project plans, every single one comes with complete step-by-step instructions that specify the exact cuts, bits, and techniques needed—including router operations. You’re not just getting a drawing; you’re getting a complete roadmap.
For anyone learning to use a router, working through Ted’s beginner-friendly plans is one of the best ways to build real skill fast. You practice routing in the context of actual projects, which means you’re building something useful at the same time. It’s a win-win that shortens your learning curve considerably.
Essential Gear to Add to Your Router Setup
Beyond the router itself, a few accessories make a big difference:
- Router table (shop-built or purchased) — Expands your capabilities dramatically
- Edge guide — Included with most routers; essential for straight cuts
- Template guide bushings — A set of different sizes covers most template routing needs
- Quality bits — Freud and Whiteside are consistently excellent brands
- Featherboards — Keep workpieces pressed against the fence consistently
- Push blocks — Keep your hands away from the bit during router table work
If you’re building out your shop more broadly, our article on the 16 Best Woodworking Tools for Beginners covers everything from routers to table saws to hand tools—a great reference for building a well-rounded shop on a sensible budget.
Troubleshooting Common Router Problems
Even experienced woodworkers run into issues. Here’s what to do when things go wrong:
Burning or scorch marks: You’re moving too slow, your bit is dull, or you’re cutting too deep in one pass. Speed up your feed rate, sharpen or replace the bit, or take lighter passes.
Tearout at the end of a cut: You’re exiting with the grain. Rout across the ends of a panel first, then rout the long edges to clean up any tearout.
Bit chattering or vibrating: The bit isn’t seated correctly in the collet, the collet is worn, or the bit shank is too short. Re-seat the bit and check collet condition.
Router grabbing or pulling: You’re routing in the wrong direction. Stop, check your feed direction, and try again on scrap.
Inconsistent depth: Your depth lock isn’t holding. Tighten it more firmly, or check that the router base is properly seated.
The Bottom Line on Learning to Route
A wood router rewards patience and practice more than almost any other shop tool. Start slow, use sharp bits, respect feed direction, and take multiple shallow passes instead of trying to hog material in one shot.
Here’s the beginner’s action plan:
- Buy a combo router kit with both fixed and plunge bases
- Start with three bits: straight, roundover, and flush trim
- Practice on scrap before touching project wood
- Build a simple router table when you’re ready to level up
- Add jigs progressively to expand your capabilities over time
The router is one of those tools that reveals new possibilities the longer you work with it. Every new bit, every new jig, every new technique opens another door. Start with the basics, build your confidence, and before long you’ll wonder how you ever worked without it.
Now go plug that thing in and make some chips. FYI — your first dozen edges might not be perfect. That’s exactly how it’s supposed to go.