
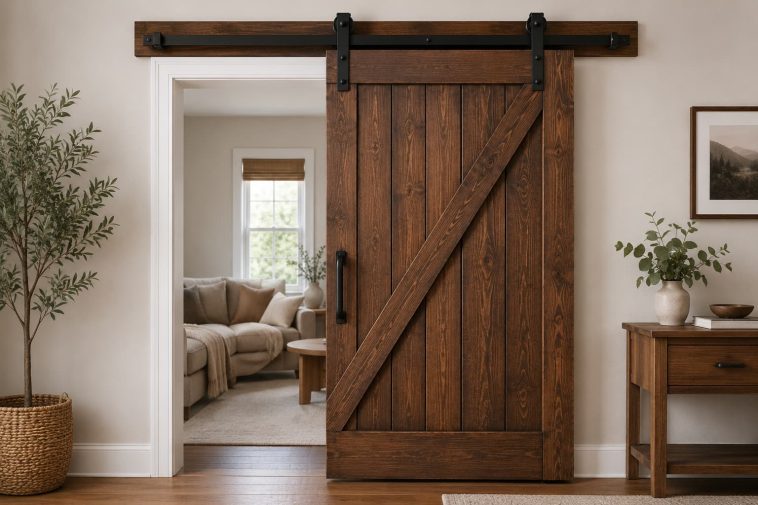
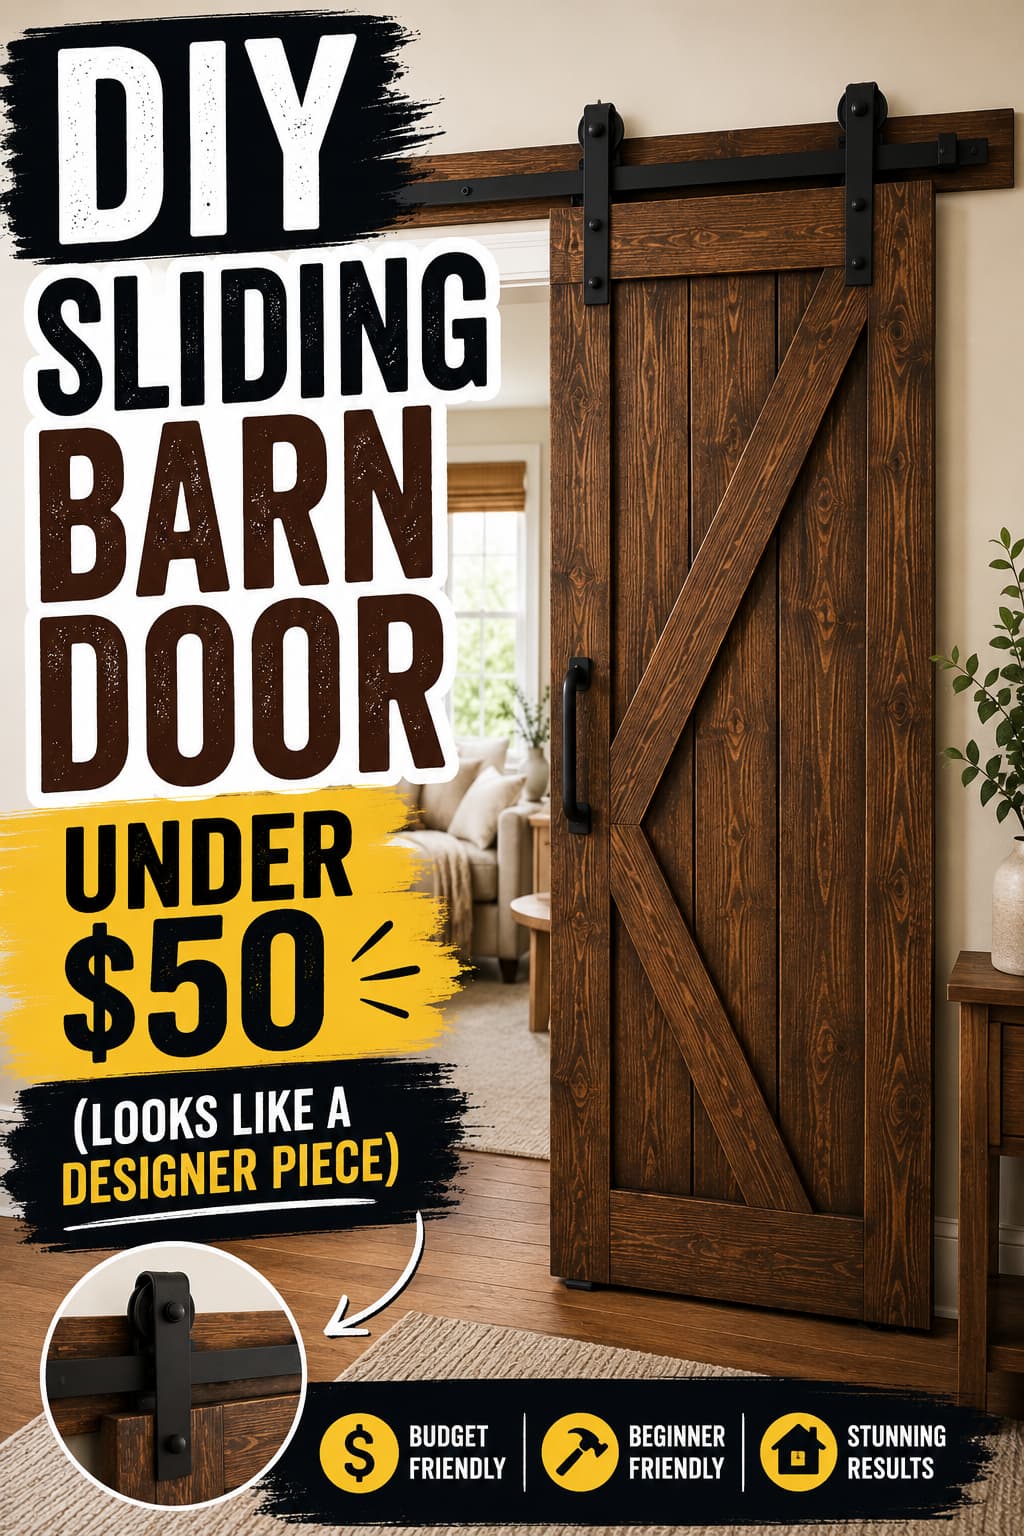
My neighbor paid $480 for a sliding barn door. I watched the delivery guy wrestle it through her front hallway, she hung it up, it looked great — and then I went home and built the same thing for $47 out of pine boards and a hardware kit from Amazon.
She still doesn’t know. I’m not going to tell her.
Sliding barn doors are one of those home upgrades that feel expensive and complicated until you actually break them down. The door itself? Just flat boards glued and screwed together in a Z pattern. The hardware? A track, two rollers, and a floor guide. That’s genuinely all there is to it. The $400+ markup you see in stores is for the brand name on the box, not the complexity of what’s inside.
So let’s build one. Here’s exactly how I did it — mistakes, fixes, and all.
What You’ll Need Before You Start
I’ll be honest: the first time I priced this out, I second-guessed myself. A hardware kit alone can run $30–$35, which feels like a lot for something that’s basically a sliding door on a stick. But compare that to the $200 “budget” options at the big box stores and it starts making a lot more sense.
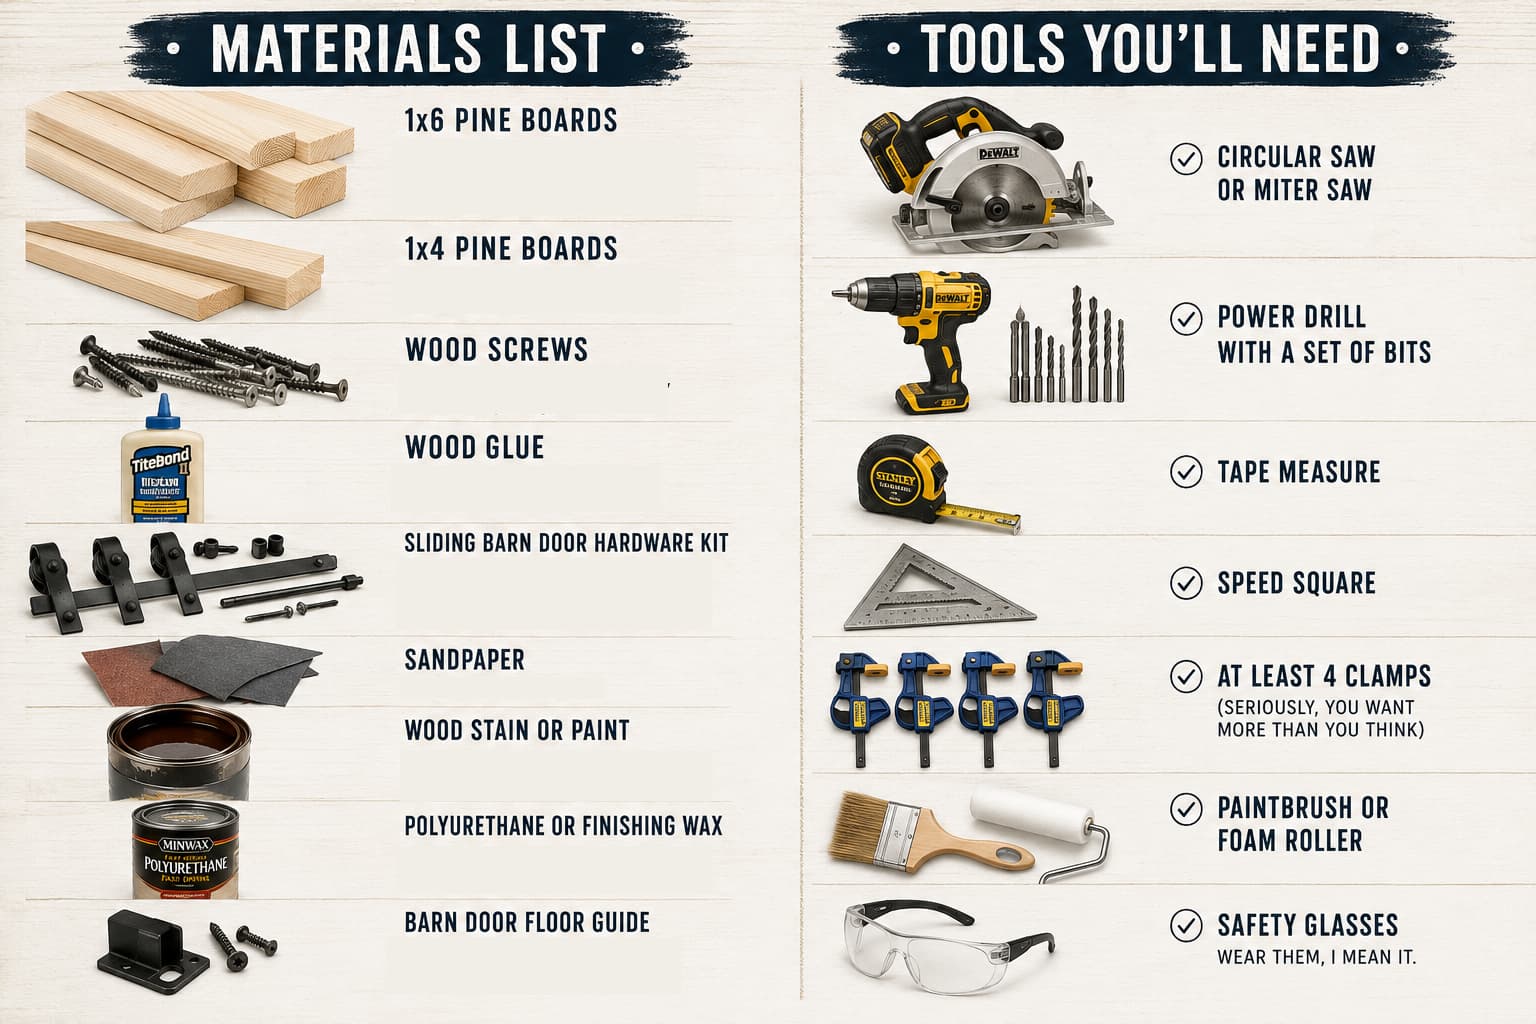
Materials List
- 1×6 pine boards, 8 feet long — grab 4 or 5 depending on how wide your door opening is
- 1×4 pine boards, 8 feet long — 2 boards for the Z-brace
- Wood screws — 1.5″ for the brace connections, 2.5″ for anything structural
- Wood glue — Titebond II is what I use; it’s cheap and stupid strong
- Sliding barn door hardware kit — this is your biggest expense; shop around on Amazon and you’ll find decent kits in the $25–$35 range
- Sandpaper — 80-grit and 120-grit
- Wood stain or paint — more on this later because the finish is where everything comes together
- Polyurethane or finishing wax — optional, but you’ll regret skipping it on a high-traffic door
- Barn door floor guide — most hardware kits include one; double-check before you buy
Tools You’ll Need
- Circular saw or miter saw
- Power drill with a set of bits
- Tape measure
- Speed square
- At least 4 clamps (seriously, you want more than you think)
- Paintbrush or foam roller
- Safety glasses — wear them, I mean it
Budget reality check: I spent $47 total. Pine boards ran about $18, the hardware kit was $27, and I already had stain and screws in the garage. If you’re starting from zero on consumables, budget $55–$60 to be safe. Still nowhere near $480.
Step-by-Step: Building the Sliding Barn Door
Step 1: Measure the Doorway (Then Measure It Again)
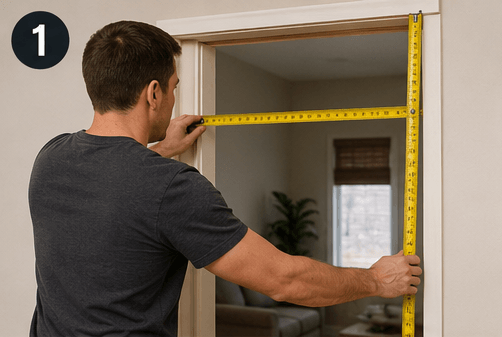
I know you’ve heard “measure twice, cut once” so many times it’s basically background noise at this point. But I’m going to say it anyway because the one time I skimped on this step I ended up with a door that was three inches too narrow and had to recut everything.
Your barn door needs to overlap the door frame by 2–3 inches on each side when it’s closed. For height, measure from the floor to where the track will sit, then subtract about an inch for hardware clearance at the top and add a half inch of gap at the bottom so the door doesn’t drag.
Write these numbers on a scrap piece of wood and keep it nearby. Phone notes work too but I always end up accidentally closing the app at the worst moment.
Step 2: Cut Your Boards
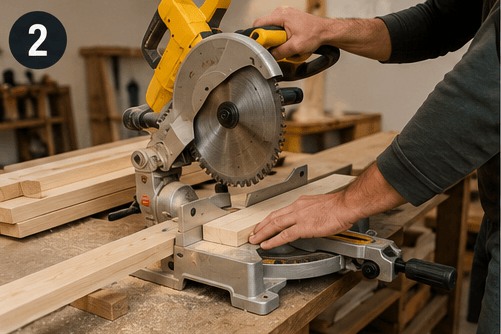
Cut all your 1×6 pine boards to the same length — your door height measurement from Step 1.
Here’s something most guides don’t mention: let your pine boards sit in the room for 24–48 hours before you cut them. Wood acclimates to humidity. If you grab boards from a cold lumber yard and immediately cut them in your warm house, they can shift slightly as they adjust. A day of sitting costs you nothing and saves you from warped panels later.
Cut everything in one session if you can. Consistent setup = consistent cuts.
Step 3: Glue the Panels Together
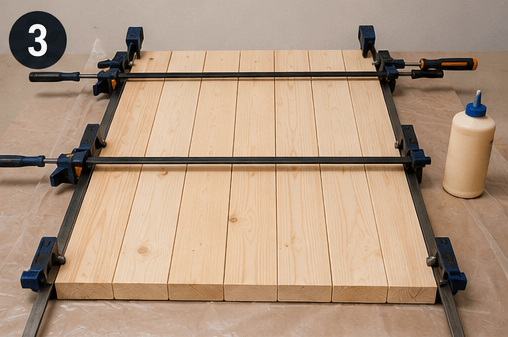
Lay your boards flat on a clean surface, edges touching. Run a bead of wood glue down each mating edge, press them together firmly, and clamp the whole assembly across its width.
Use as many clamps as you have. The goal is even pressure across the full length so you don’t end up with a subtle bow in the middle. I use four clamps minimum — two near the ends, two in the middle.
Wipe off the glue squeeze-out immediately with a damp rag. Dried glue doesn’t absorb stain. You’ll sand through a lot of effort trying to remove it later, and you’ll still see ghost marks in the finished surface. Ask me how I know.
Let it sit for a full hour. Go make coffee. Watch something. The glue isn’t done in 20 minutes no matter how impatient you are.
Step 4: Build and Attach the Z-Brace
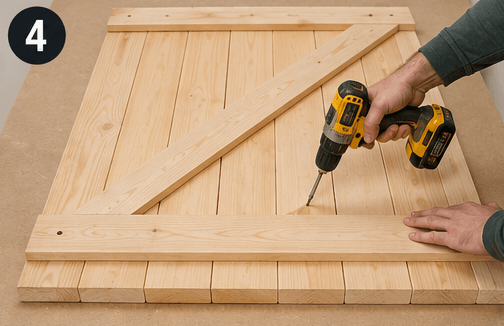
The Z-brace is the signature detail that makes a barn door look like a barn door rather than a piece of drywall. It also keeps your panels from racking or warping over time, so it’s doing real structural work, not just looking pretty.
From your 1×4 boards, cut:
- Two horizontal rails — one for the top of the door back, one for the bottom
- One diagonal piece — running from the bottom corner to the top, creating the Z
A quick note on direction: the diagonal should run upward toward the hinge side — meaning the side that sits closest to the wall when the door is fully open. This is the traditional barn door configuration and it’s not just aesthetic; it distributes weight more effectively.
Attach everything with 2.5″ screws, pre-drilled to avoid splitting the pine. I also run a bead of glue under each brace piece for extra rigidity. Belt and suspenders.
Step 5: Sand It Like You Mean It
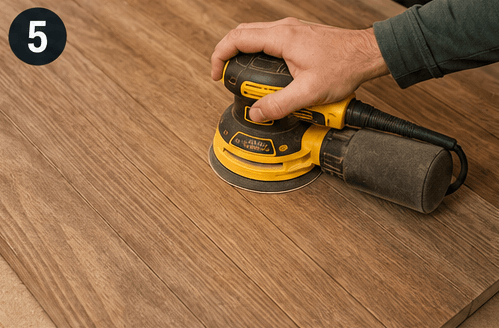
Start with 80-grit to knock down any ridges where the boards meet at the joints, any dried glue you missed (there’s always some), and any rough spots from the saw cuts.
Move to 120-grit for the whole surface. Work with the grain, not across it.
The edges matter more than most people think. A properly sanded edge catches the light differently — it looks intentional instead of raw. Run the 120-grit along every edge at a slight angle to break the sharpness. This tiny detail is what separates a door that looks handmade from one that looks homemade. There’s a difference.
Step 6: Stain or Paint (This Is the Fun Part)
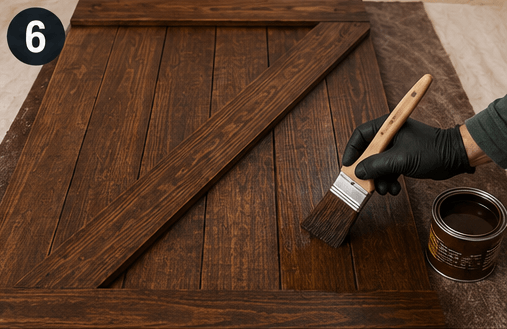
Pine is a tricky wood to stain because it’s uneven — it has soft grain and hard grain, and they absorb color at different rates, which can leave you with a blotchy, inconsistent finish. The fix is simple: use a pre-stain wood conditioner before your actual stain. Brush it on, let it soak in for 15 minutes, then apply your stain color on top. The difference is night and day.
For color: I went with Varathane Dark Walnut on mine and it looked incredible — rich, warm, and genuinely indistinguishable from more expensive hardwood at a glance. If you’re going farmhouse modern, matte black paint with a foam roller is the move. Two coats, let it fully cure before the next one.
Finish with polyurethane or a finishing wax. IMO, satin polyurethane is the most practical choice for a door — it’s durable, easy to apply, and doesn’t yellow over time the way glossy finishes can.
Step 7: Mount the Track
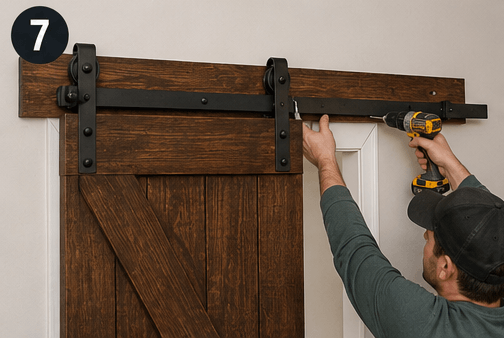
This step is where people get nervous and it’s the one that actually matters most structurally. A barn door puts real lateral load on whatever it’s hung from. If that’s just drywall, it will eventually pull out. You need to hit studs.
Before anything else, locate your wall studs with a stud finder. Mark them clearly. Your track needs to span at least two studs — three is better.
Most hardware guides recommend installing a header board first: a 2×6 or 2×8 piece of lumber mounted horizontally above the door frame, screwed directly into the studs. The track bolts to the header board, the header board transfers the load to the studs. This is the right way to do it, and skipping it is the #1 reason barn door installations fail.
Once the header is up, bolt the track to it at the height specified in your hardware instructions, hang your rollers, and lift the door into place. Get a second person for the lifting step if you can. A 50-lb pine door at arm’s length above your head is not a fun solo project.
Step 8: Install the Floor Guide
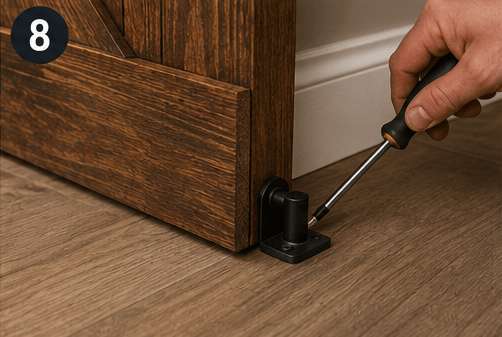
The floor guide is a small bracket that slots around the bottom edge of the door and keeps it tracking parallel to the wall instead of swinging outward like a pendulum.
Position it so your door sits roughly half an inch from the wall surface when closed. That gap prevents the door from scuffing your trim or baseboard while still keeping it flush and tidy-looking. Screw it down, test the movement, adjust if needed.
Step 9: Test, Tweak, Admire
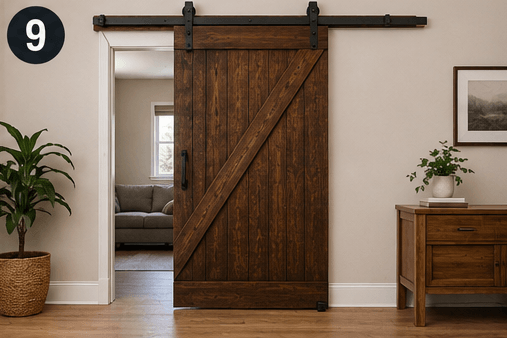
Slide the door back and forth slowly. It should glide without wobbling, dragging, or bumping. If it’s uneven or one side sits lower than the other, adjust the rollers — almost every hardware kit includes a small hex key for exactly this reason.
When it’s moving clean and level, you’re done. Step back and look at what you just built for under fifty dollars. It’s a good feeling 🙂
Mistakes I Made (So You Don’t Have To)
I didn’t acclimate the wood first. One of my early panels developed a slight bow after a week. Caught it early and was able to clamp it back flat, but it was a close call.
I rushed the glue. Moved the assembly before the glue had fully set and shifted two panels slightly. The gap was tiny but visible under a raking light. Sand more aggressively and you can usually disguise this, but prevention is easier.
I skipped the wood conditioner on my first stain attempt. The blotching was bad enough that I had to sand it back and start over. Never again.
I didn’t pre-drill before screwing into the brace. Split the end of a 1×4 clean in half. Pine is soft and it splits easily near edges. Always pre-drill.
Want More Projects Like This?
Once you’ve built one thing like this, something clicks. You stop looking at furniture and fixtures as things you buy and start seeing them as things you make. That shift is kind of addictive, honestly.
If you want to keep building, Ted’s Woodworking Plans is the most useful resource I’ve found for what comes next. It’s a collection of over 16,000 woodworking plans — furniture, storage, outdoor builds, you name it — with detailed diagrams, cut lists, and instructions written for people who actually want to build things rather than just read about them.
Having a solid plan library means you spend your time building instead of guessing. Worth checking out if this barn door left you wanting more.
A Few Finishing Touches Worth the Extra Hour
- Add a pull handle in matte black. A $10–$15 metal handle from the hardware store makes the whole door feel finished and intentional. It’s the detail that makes people think you bought it, not built it.
- Lightly distress the edges with 60-grit sandpaper after staining for an aged, authentic look. Focus on corners and high-contact areas.
- Caulk the gap between your header board and the ceiling before painting the header. Keeps everything looking clean and intentional from across the room.
- Seal the back too. Most people only finish the front face. Sealing the back reduces moisture absorption and helps the door stay flat over time.
Final Thoughts
A $47 sliding barn door that stops guests in their tracks. That’s the whole pitch, and it delivers.
The build itself is genuinely approachable — you don’t need a workshop full of expensive tools or years of woodworking experience. You need accurate measurements, patience during the glue-up, and a finish you care about. Get those three things right and you’ll end up with something that looks like it came out of a design showroom, not your garage.
Now go build it. Your neighbor’s overpriced version deserves some competition.