
Let’s be honest — scrap wood has a personality.
You bring home one useful offcut, and within three months your garage looks like a lumber yard exploded in slow motion. Sound familiar? Yeah, me too. One corner turns into a leaning tower of two-by-fours, then suddenly you can’t open the car door without knocking over a pile of plywood.
Classic.
The good news? You don’t need a massive workshop to fix this. With the right scrap wood storage ideas, even the tightest garage can feel organized, safe, and — dare I say it — enjoyable to work in.
This guide walks you through 20 practical storage solutions for long boards, short offcuts, plywood, dowels, trim pieces, and all the “I’ll definitely use this someday” scraps you’ve been hoarding.
And once your wood is sorted, you’ll actually be able to use it.
Let’s sort this out.
Quick Comparison: Best Scrap Wood Storage Ideas
| Storage Idea | Best For | Difficulty | Best Location |
|---|---|---|---|
| Vertical Scrap Wood Bin | Short boards and offcuts | Easy | Garage corner |
| Wall-Mounted Lumber Rack | Long boards | Medium | Open wall space |
| Ladder-Style Wood Rack | Long boards and 2x4s | Easy–Medium | Against a wall |
| French Cleat Lumber Rack | Flexible storage | Medium | Workshop wall |
| Rolling Scrap Wood Cart | Mixed scraps | Medium | Small garage shop |
| Mobile Plywood Cart | Sheet goods and plywood | Medium | Near table saw |
| Under-Workbench Storage | Small offcuts | Easy | Below workbench |
| Bucket Scrap Storage | Tiny blocks and wedges | Easy | Floor or shelf |
| PVC Pipe Organizer | Dowels and trim | Easy | Wall-mounted |
| Full Scrap Wood Command Center | Serious organization | Medium–Advanced | Dedicated wall |
Sort Before You Store
Building a fancy lumber rack before you sort your wood is like organizing a junk drawer without throwing anything away.
Before you pick up a single tool, split your stash into piles:
- Long boards over 4 feet
- Short boards under 4 feet
- Plywood and sheet goods
- Trim, molding, and thin strips
- Dowels and round stock
- Small offcuts and blocks
- Firewood-only scraps
Once you can actually see what you have, choosing the right storage becomes a lot easier.
Advertisement
FYI, this step alone usually cuts your “scrap wood pile” in half because you realize how much of it is basically garbage. Tough love, but true.
If you still have a lot of usable pieces after sorting, that is a good problem to have. You can turn those scraps into small shop builds, home decor, organizers, and even sellable pieces.
Wall and Vertical Storage: Get It Off the Floor
Floor space is gold in a small garage. The moment you start using your walls for wood storage, your whole shop opens up.
Here are the best ways to do it.
1. Vertical Scrap Wood Bin
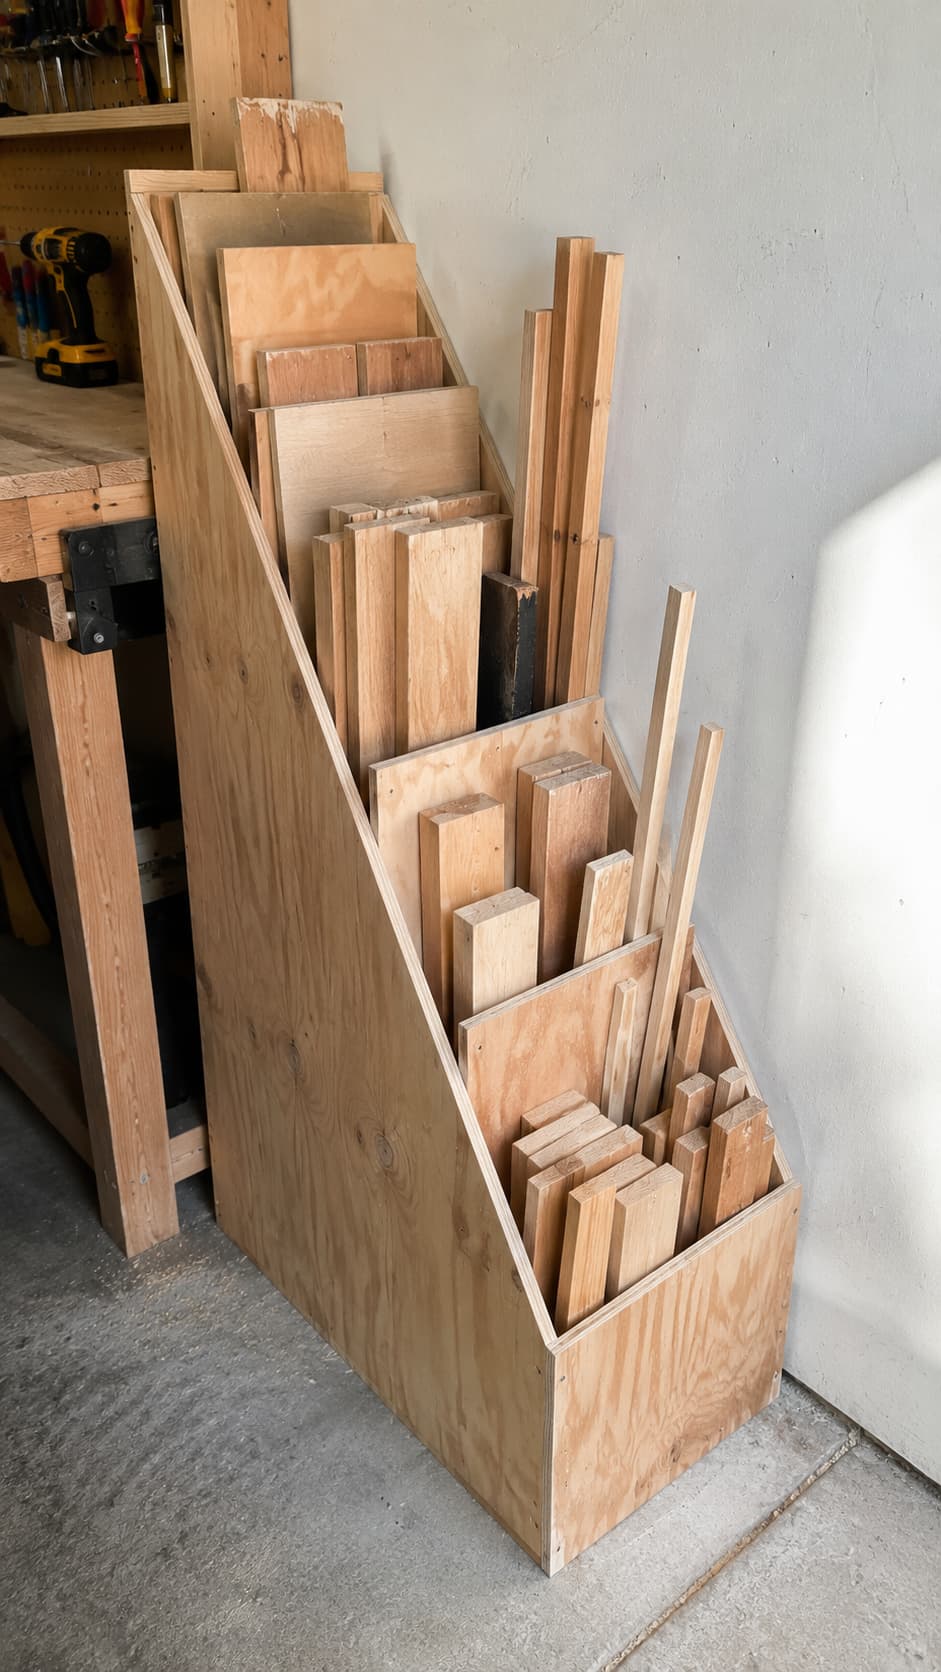
This is the best beginner pick and probably the fastest project on this list.
A vertical bin is essentially a tall box divided into sections where short boards stand upright instead of piling on top of each other. Build it from scrap plywood — fitting, right? — and add a few internal dividers to separate sizes.
Stick it in a corner, and you’ve gone from “chaos pile” to “organized workshop” in an afternoon.
Best for: Short boards, 2×4 offcuts, narrow pieces
Difficulty: Easy
Best location: Garage corner
Tip: Add a small label to each divider — short boards, medium boards, thin strips — so you actually maintain the system.
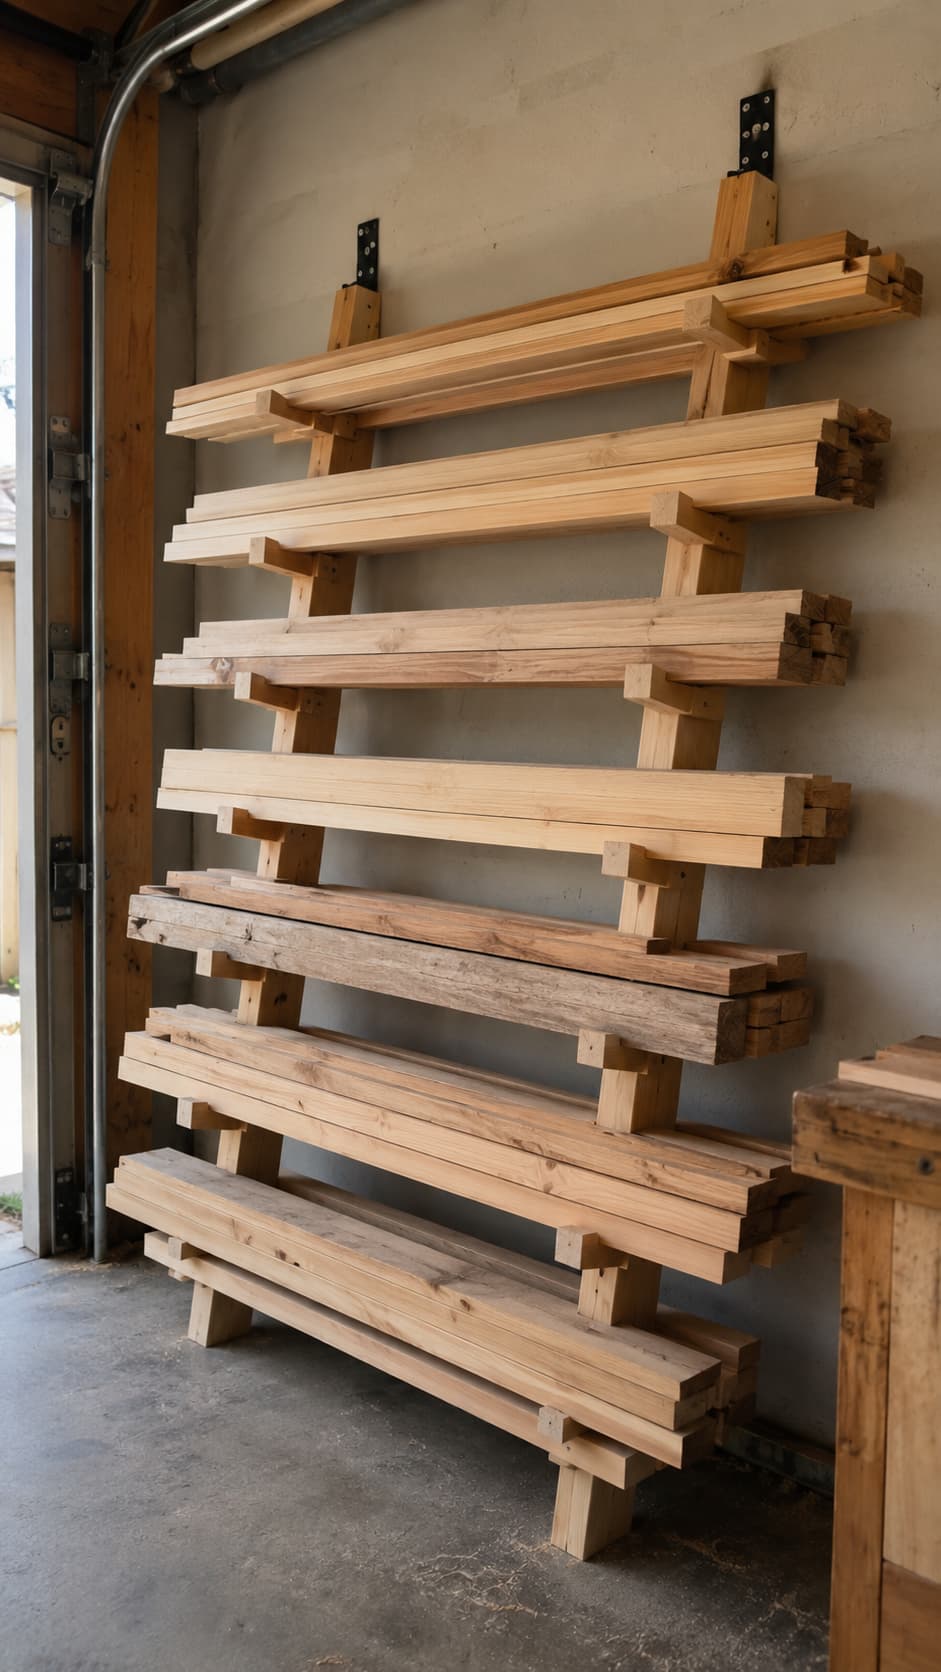
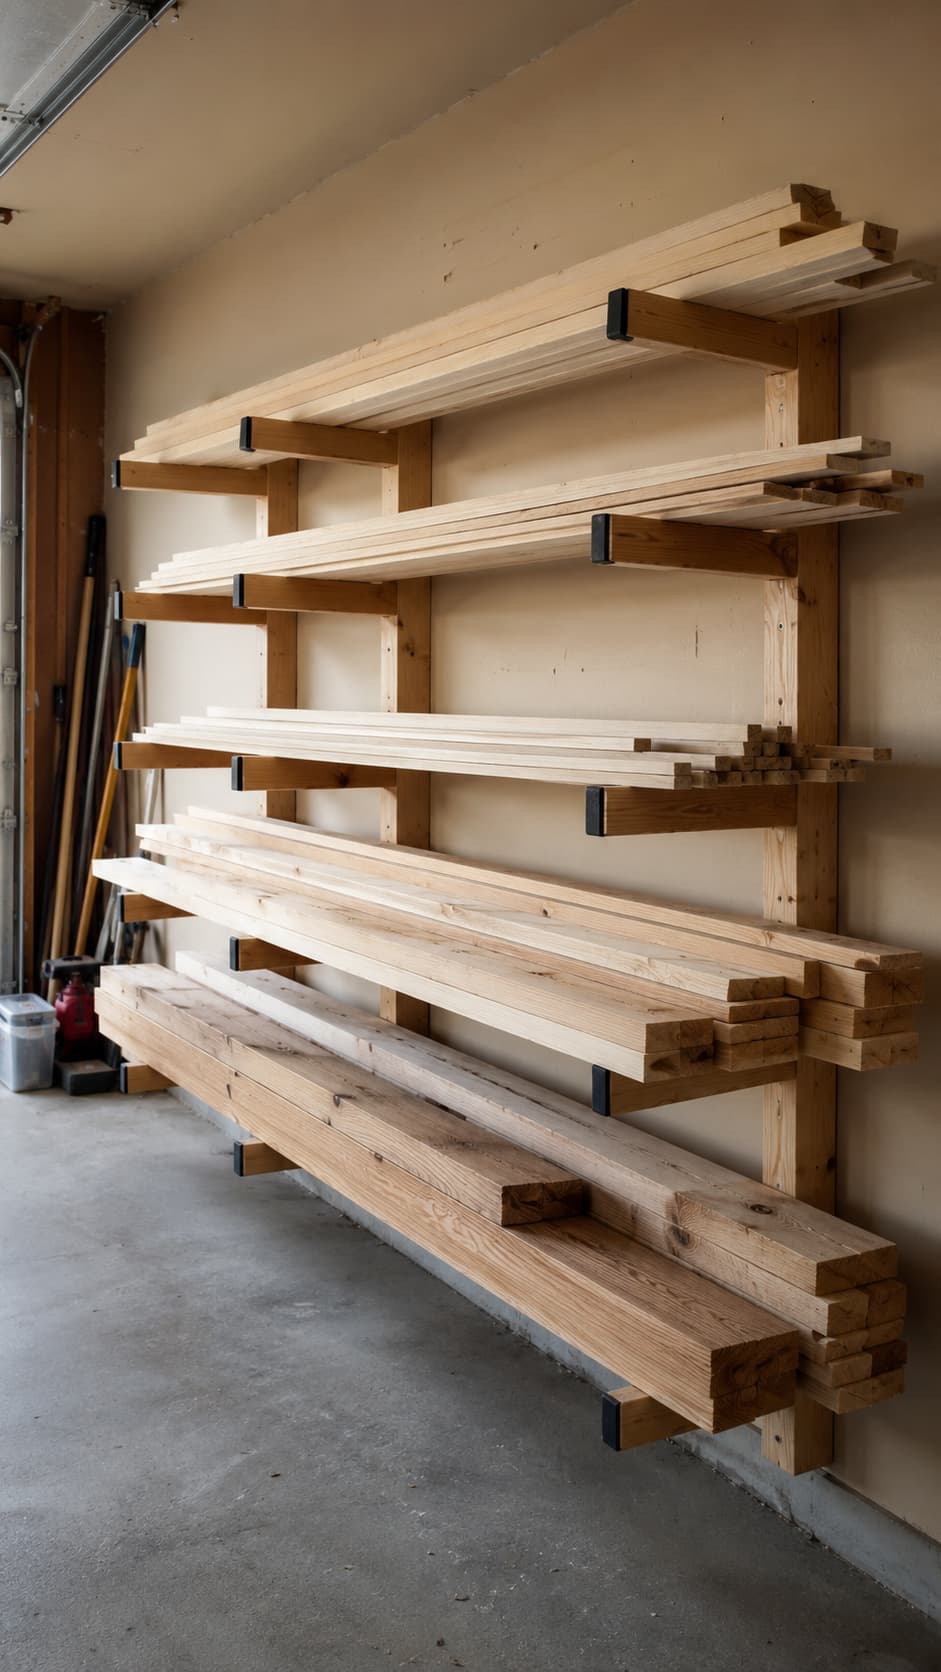
2. Wall-Mounted Lumber Rack
The best pick for small garages, hands down.
When the floor is off-limits, the wall becomes your best friend. A wall-mounted lumber rack uses horizontal arms bolted into studs to hold long boards up off the ground.
You can build a solid version from 2x4s or buy heavy-duty metal brackets if you want to skip the build.
Best for: Long boards, 2x4s, 1x boards
Difficulty: Medium
Best location: Strong open wall
Store your heaviest lumber on the bottom levels and lighter trim up top.
And please — bolt it into studs, not just drywall. A rack loaded with lumber that pulls free from the wall is a genuinely terrible afternoon.
3. Ladder-Style Wood Rack
Think of this as a wall-mounted rack’s more relaxed cousin.
A ladder-style rack leans against the wall and creates multiple horizontal levels for long boards. It’s quicker to build than a full wall mount, and you can reposition it if your shop layout changes.
Best for: Long boards, medium boards, 2x4s
Difficulty: Easy–Medium
Best location: Along a garage wall
Critical tip: Secure the top to the wall with a bracket or cleat. A fully loaded lumber rack that tips forward is not a gentle experience.
4. French Cleat Lumber Rack
If you love flexible storage, a French cleat wall is basically magic.
You mount angled cleats across the wall, then hang removable lumber holders, bins, or small shelves wherever you want. The whole system is adjustable — move a holder left, add a new bin, swap sections around as your needs change.
Best for: Flexible storage, evolving workshops
Difficulty: Medium
Best location: Main workshop wall
IMO, this is one of the smartest wall storage systems for any workshop that keeps evolving.
It also pairs perfectly with tool storage.
5. Corner Lumber Tower
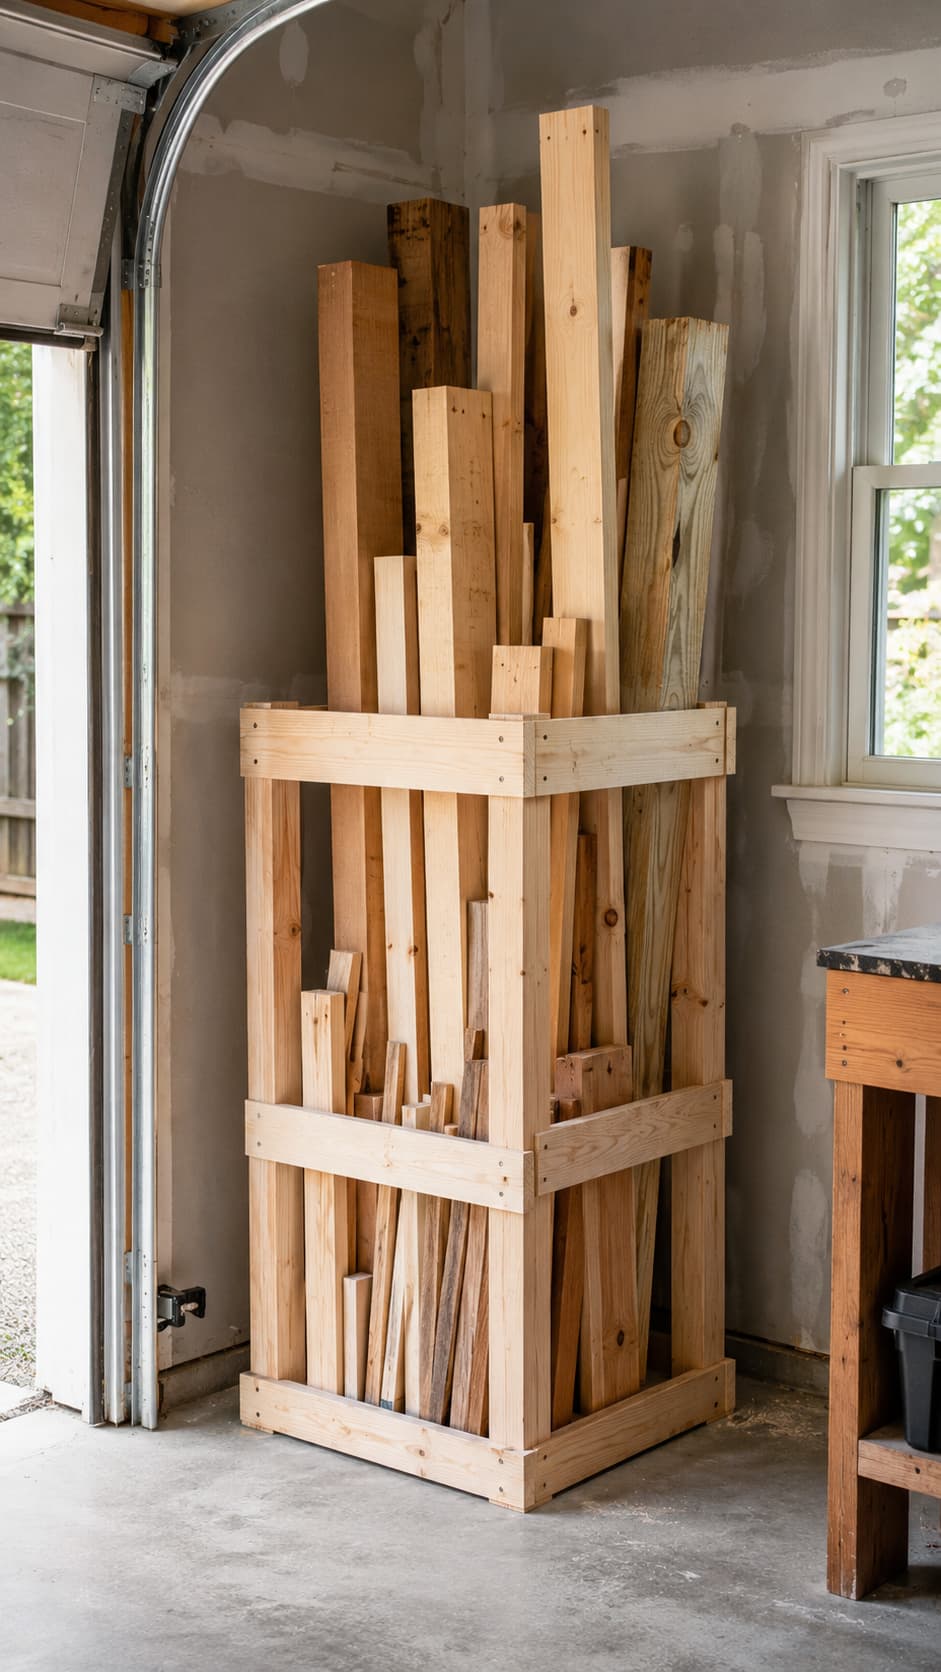
Here’s an easy win: most garages have at least one empty corner just sitting there, looking useless.
A corner lumber tower fills that dead space with vertical storage for 2x4s, short boards, and medium offcuts. Build a simple four-sided frame with a wide, stable base and you’ve created storage from literally nothing.
Best for: Corners, short boards, mixed scraps
Difficulty: Easy
Best location: Empty garage corner
This is a great option if you don’t have much wall space but still want to keep boards standing upright and easy to grab.
Rolling and Mobile Storage: Workshop Flexibility
Ever notice how the perfect piece of wood is always buried at the back of a stack?
Mobile storage fixes that.
Here are the best rolling solutions for a small garage shop.
6. Rolling Scrap Wood Cart
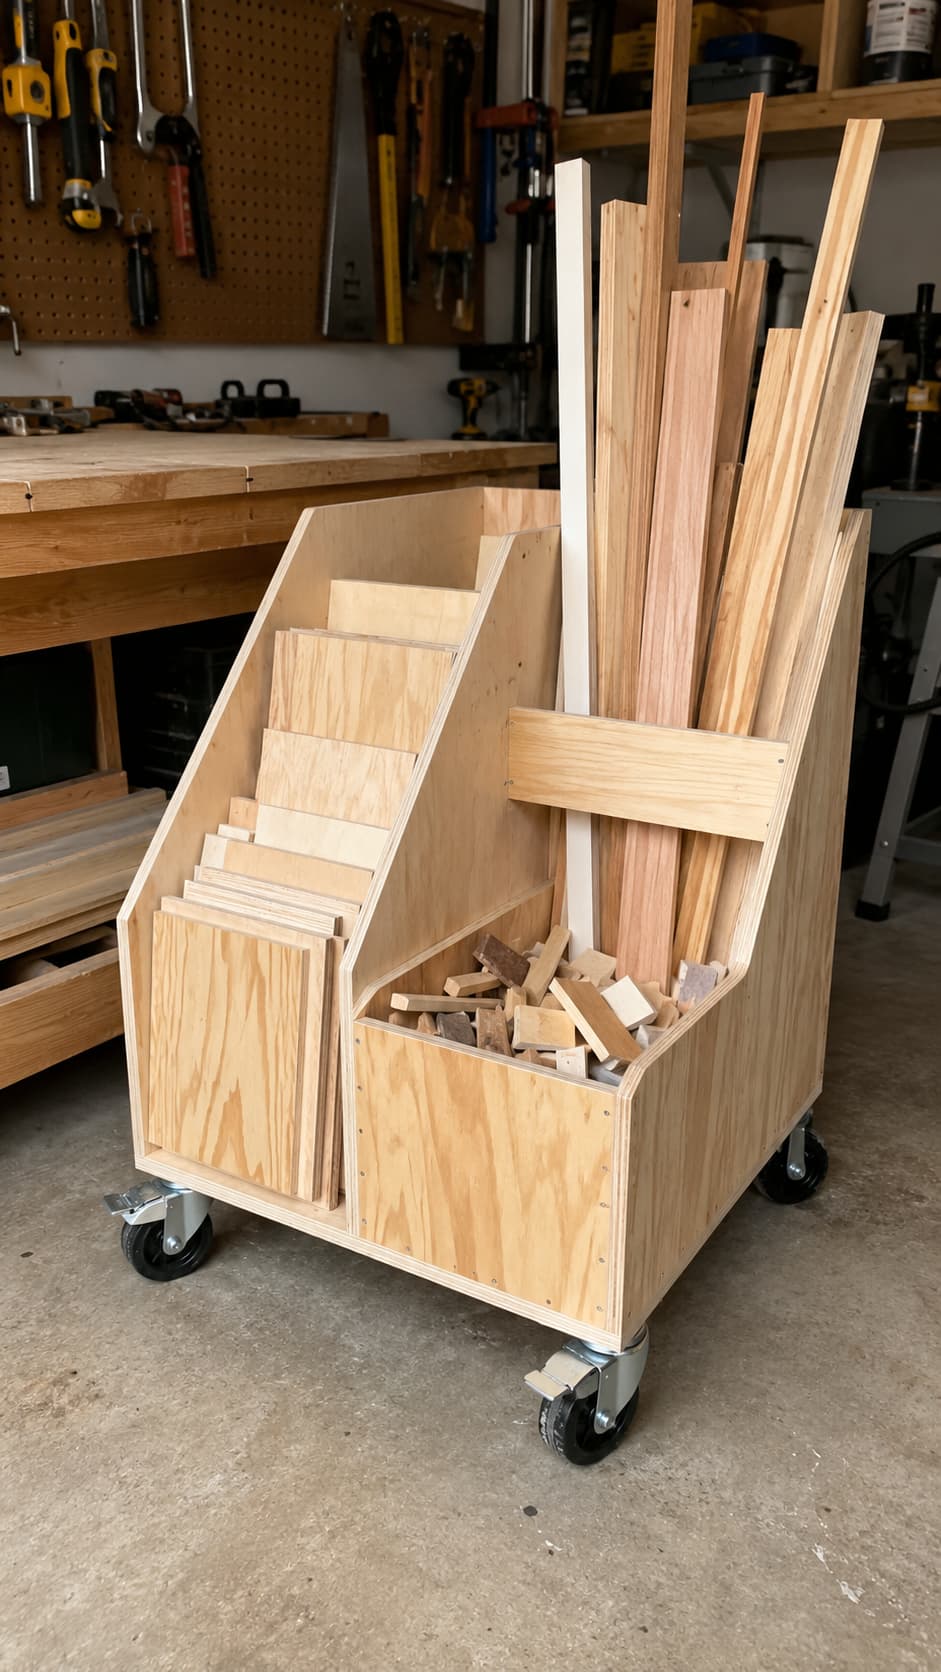
This is the best mobile pick for mixed scrap wood.
A rolling cart on caster wheels lets you pull your wood stash right next to your workbench while you’re building, then roll it out of the way when you’re done.
Build it with separate sections for plywood scraps, long boards, and small offcuts so everything stays sorted.
Best for: Mixed scrap wood
Difficulty: Medium
Best location: Small garage workshop
Use heavy-duty locking casters. The cheap ones that spin and slide when you don’t want them to are maddening.
Lock it in place while you’re working, roll it away when you’re not.
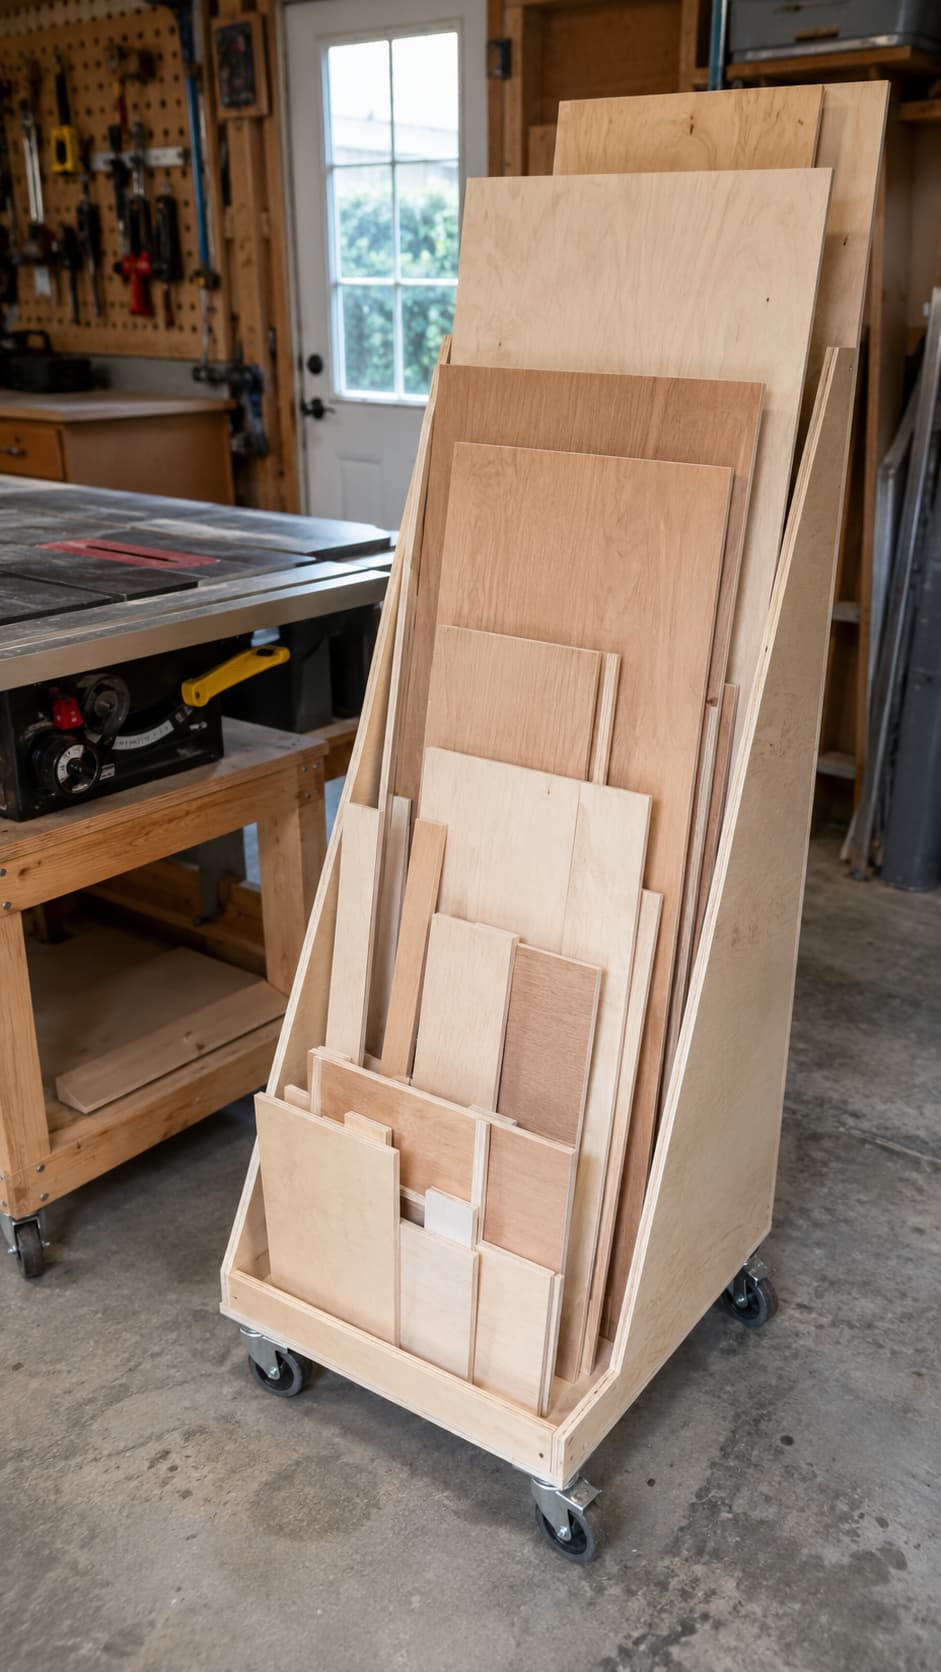
7. Mobile Plywood Cart
Plywood is awkward.
Full sheets are heavy, wide, and nearly impossible to stand upright without something to lean them against. A mobile plywood cart gives sheet goods a dedicated home: upright, separated by dividers, and easy to roll to your saw when needed.
Best for: Plywood, sheet goods, panel scraps
Difficulty: Medium
Best location: Near table saw or workbench
Build one side for full or large sheets and one side for smaller offcuts. Angle the whole cart slightly backward so the plywood stays in place instead of flopping forward when you move it.
Plywood and Sheet Goods Storage: The Most Neglected Area
Plywood scraps are the silent space-killers in most garage workshops.
They end up flat on the floor, stacked in corners, or leaning at weird angles where they warp and get damaged.
These ideas actually fix that.
8. Plywood Storage Rack

A dedicated plywood rack keeps sheets upright against a wall, preventing warping and keeping them accessible.
The basic build is a 2×4 frame with a few vertical dividers so different sheet sizes stay separated.
Best for: Full sheets, plywood offcuts, MDF, panels
Difficulty: Medium
Best location: Wall or side of garage
Keep the rack slightly angled backward — about 5 to 10 degrees — so gravity works in your favor instead of against it.
9. Pull-Out Scrap Wood Drawer
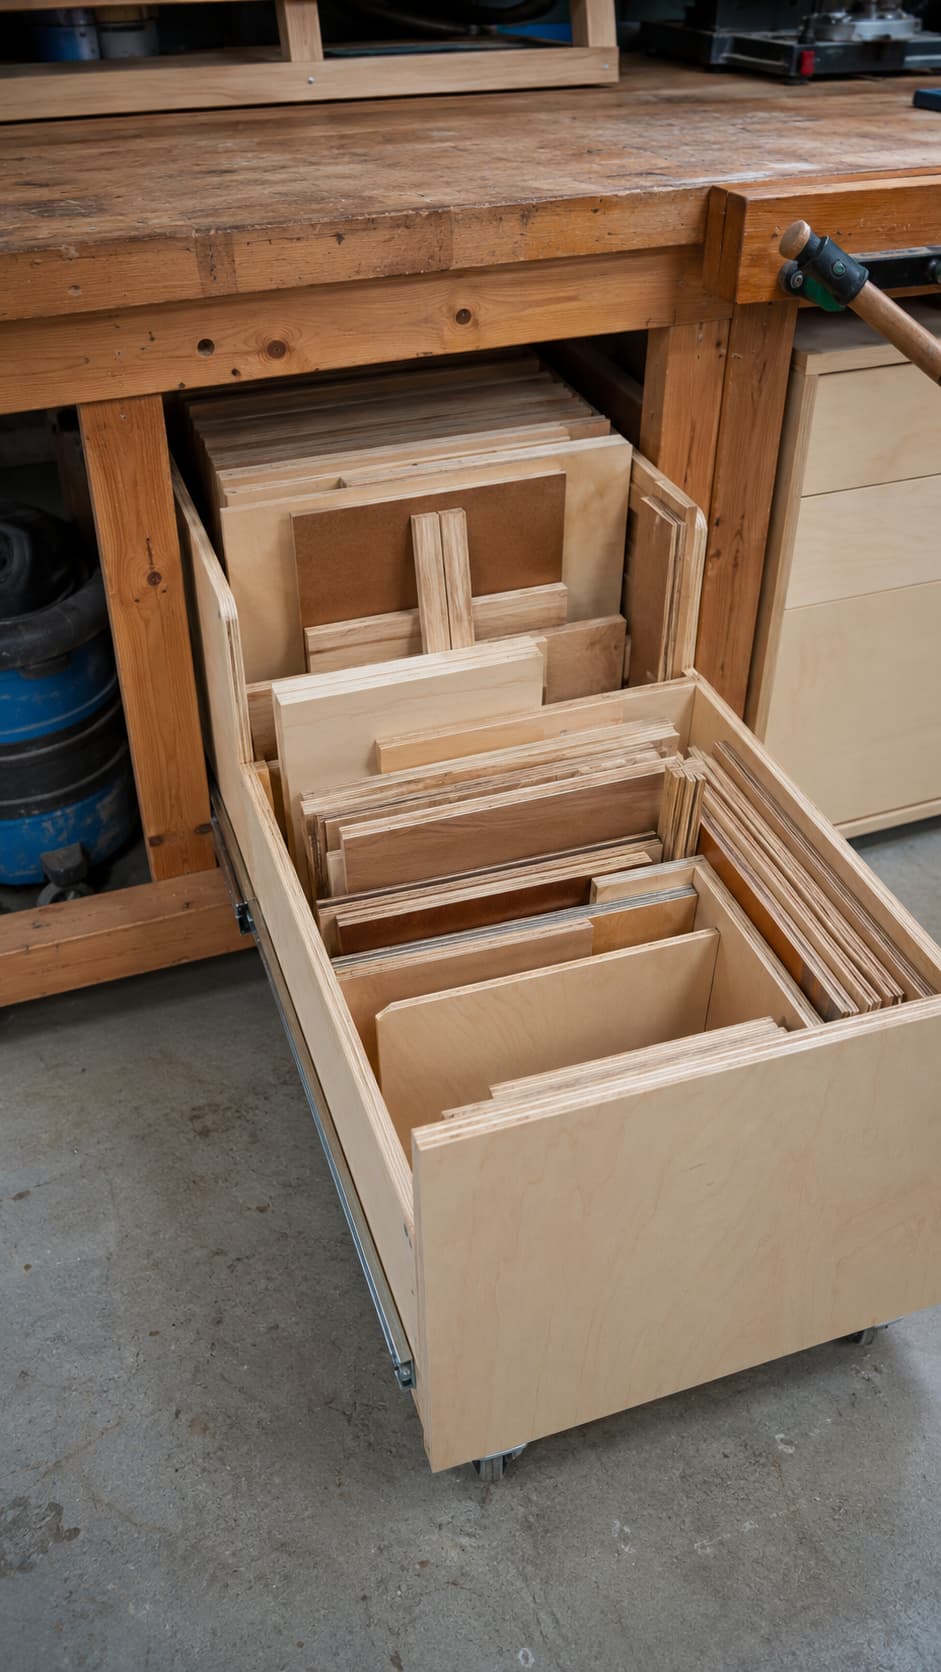
Got a workbench or base cabinet?
A pull-out drawer underneath it is perfect for thin plywood offcuts, panel pieces, and flat boards that don’t fit anywhere else.
Best for: Thin plywood, flat boards, small panels
Difficulty: Medium
Best location: Under a workbench or cabinet
Use full-extension drawer slides so you can see every piece inside. Otherwise, you’ll forget what’s in there within a week.
If your current workbench does not have enough storage space underneath, you may want to browse 20+ Free DIY Workbench Plans for Every Skill Level before building your next setup.
Small Scrap and Offcut Solutions: The Stuff That Piles Up Fast
Small offcuts are the sneakiest clutter in any shop.
They’re too useful to throw away but too awkward to store with your main lumber. These ideas are built for the small stuff.
10. Under-Workbench Scrap Storage
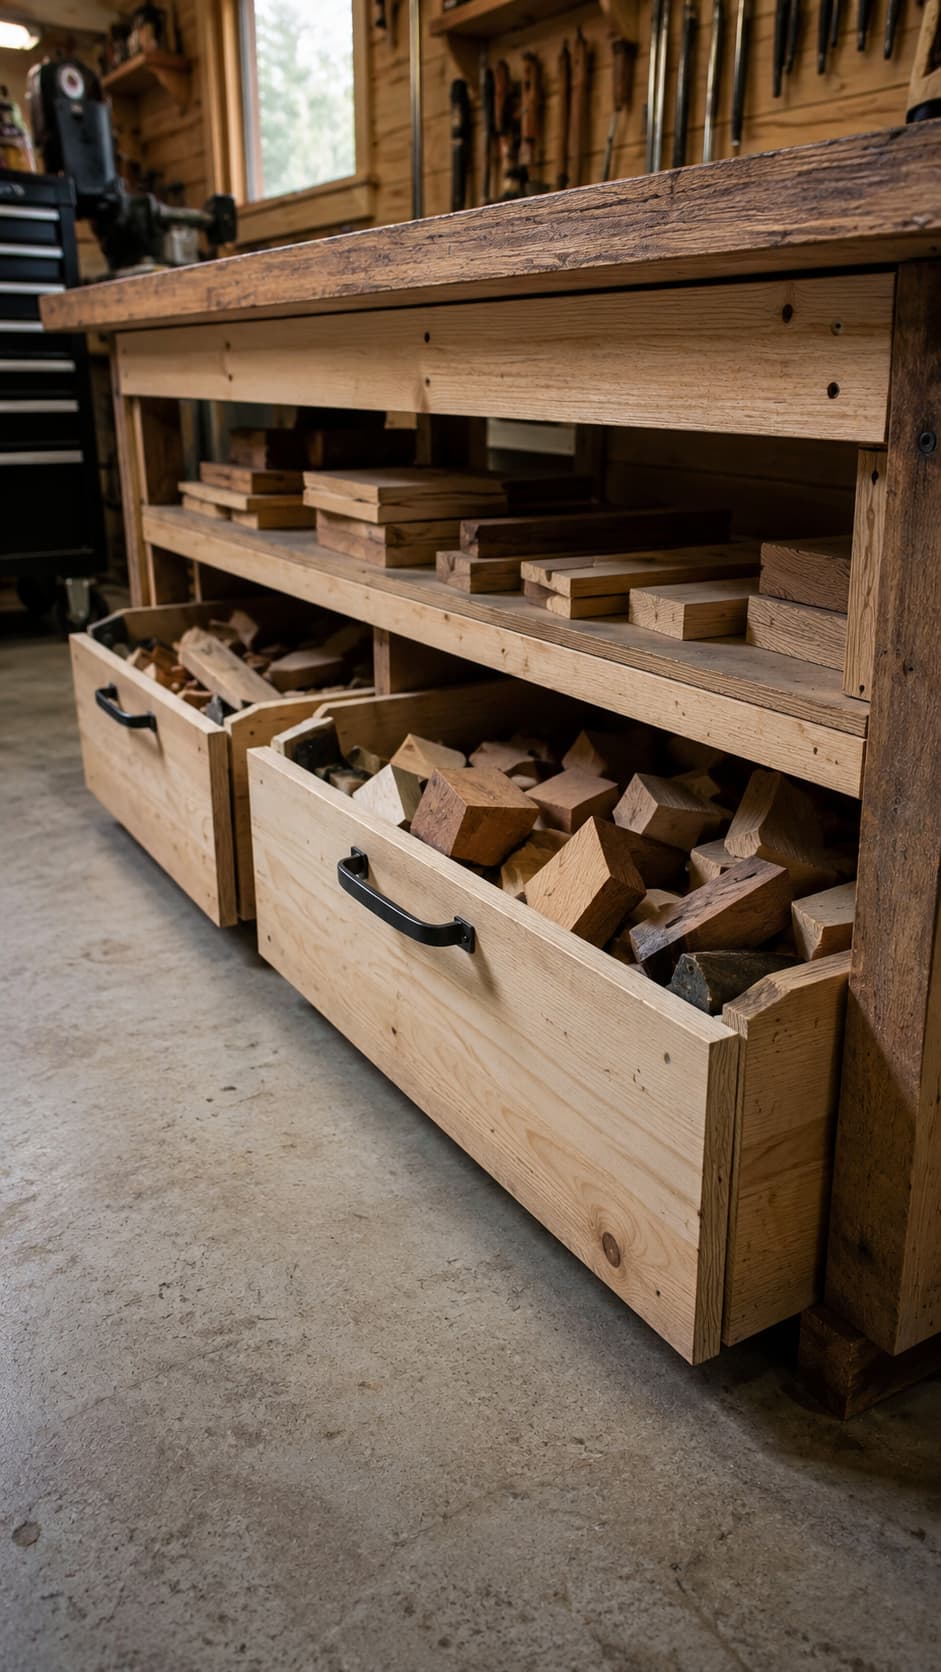
The space under your workbench is prime real estate.
Add a simple plywood shelf, a few sliding bins, or even a couple of crates and you instantly have hidden storage for short boards and small offcuts.
Best for: Frequently used scraps
Difficulty: Easy
Best location: Under workbench
Keep only frequently used scraps here. Otherwise, it turns into a dark hole where good wood goes to disappear.
This is also a great spot to store small parts for workshop builds. If you enjoy making shop upgrades, you may also like 15 Wooden Tool Box Ideas You Can Build This Weekend.
11. Bucket Scrap Wood Storage
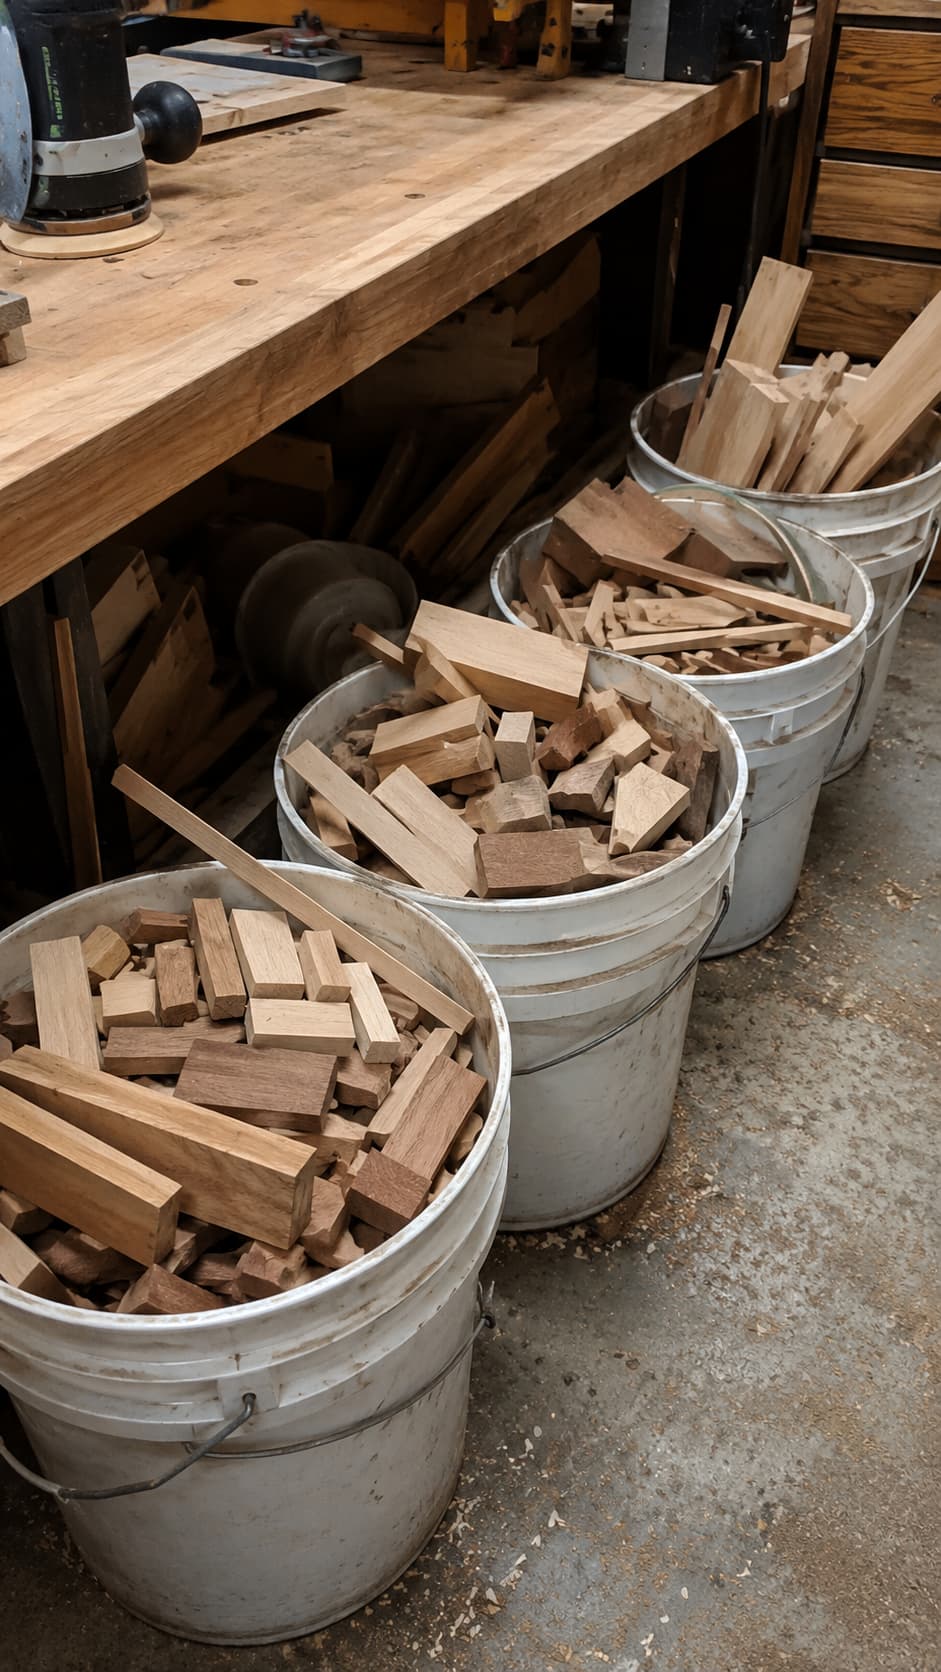
This is the best tiny scrap solution, and it costs almost nothing.
A few five-gallon buckets can hold small blocks, wedges, sanding helpers, and future jig pieces perfectly well.
Best for: Tiny blocks, wedges, scraps, jig parts
Difficulty: Easy
Best location: Floor, shelf, or under bench
Label each bucket — small blocks, wedges, offcuts, firewood — and you have an instant sorting system.
Honestly, don’t overthink small scrap storage. Buckets work. Sometimes the simplest solution is the right one.
12. PVC Pipe Offcut Organizer
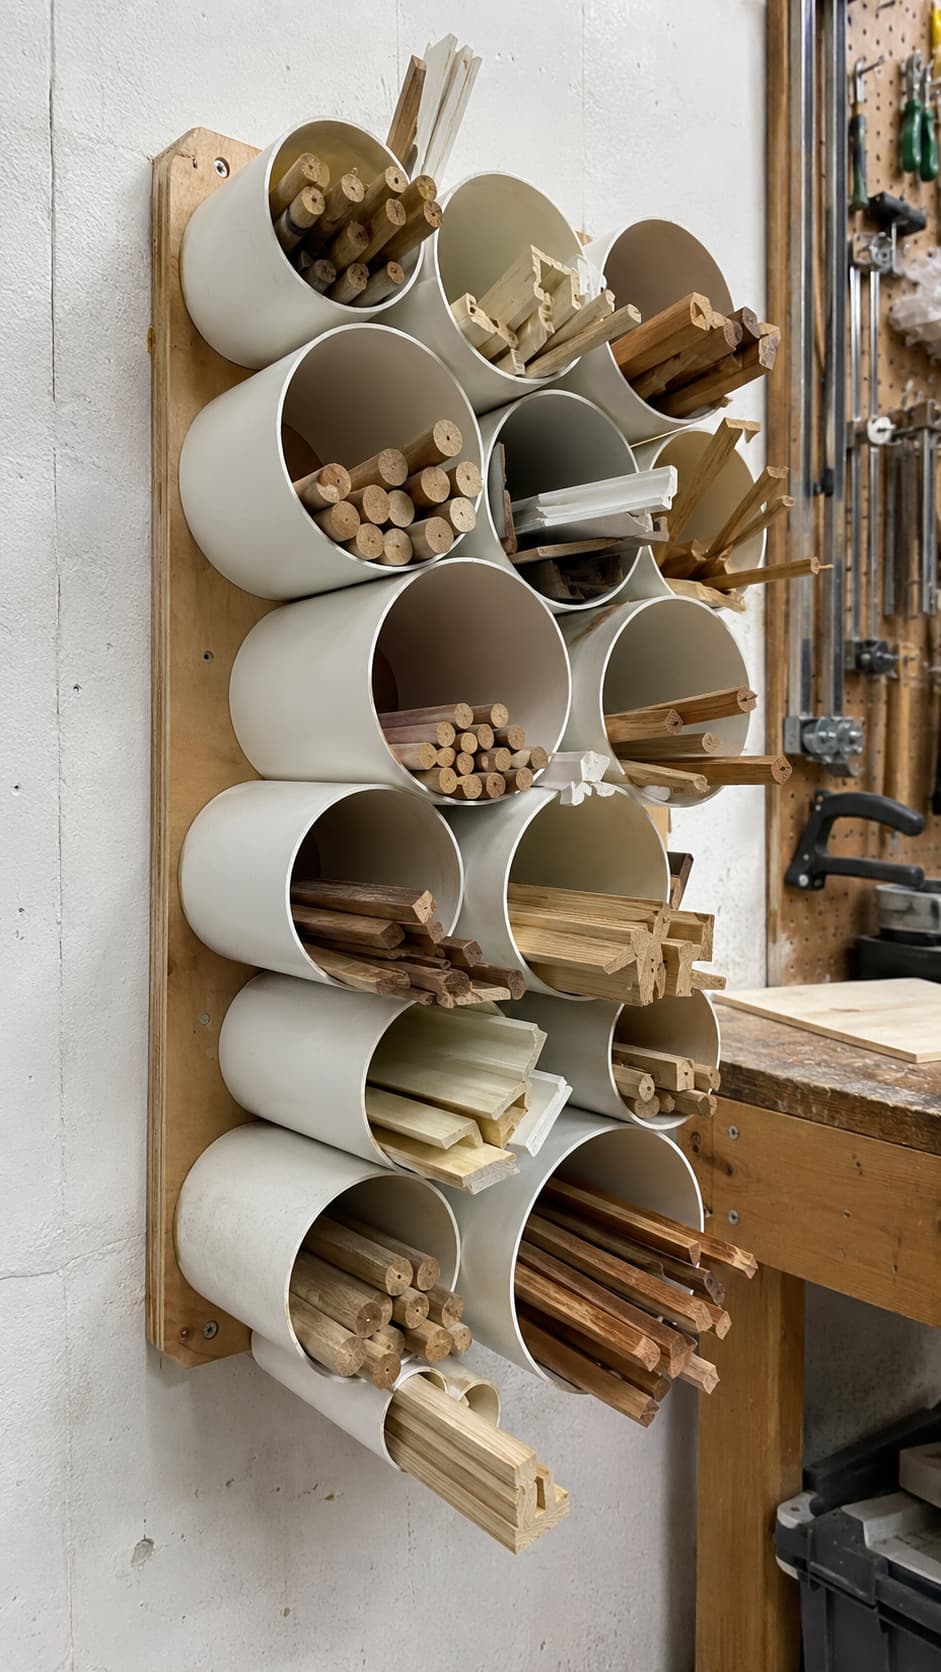
Dowels, round stock, trim pieces, and narrow molding are notoriously hard to store.
They slide, roll, and end up mixed together in a mess.
Cut sections of PVC pipe in different diameters, mount them to a plywood backing, and you have a wall-mounted organizer that keeps every long, skinny piece separated and visible.
Best for: Dowels, trim, molding, narrow strips
Difficulty: Easy
Best location: Wall-mounted
This is one of those small shop ideas that looks almost too simple until you realize how much frustration it saves.
13. Open Crate Storage
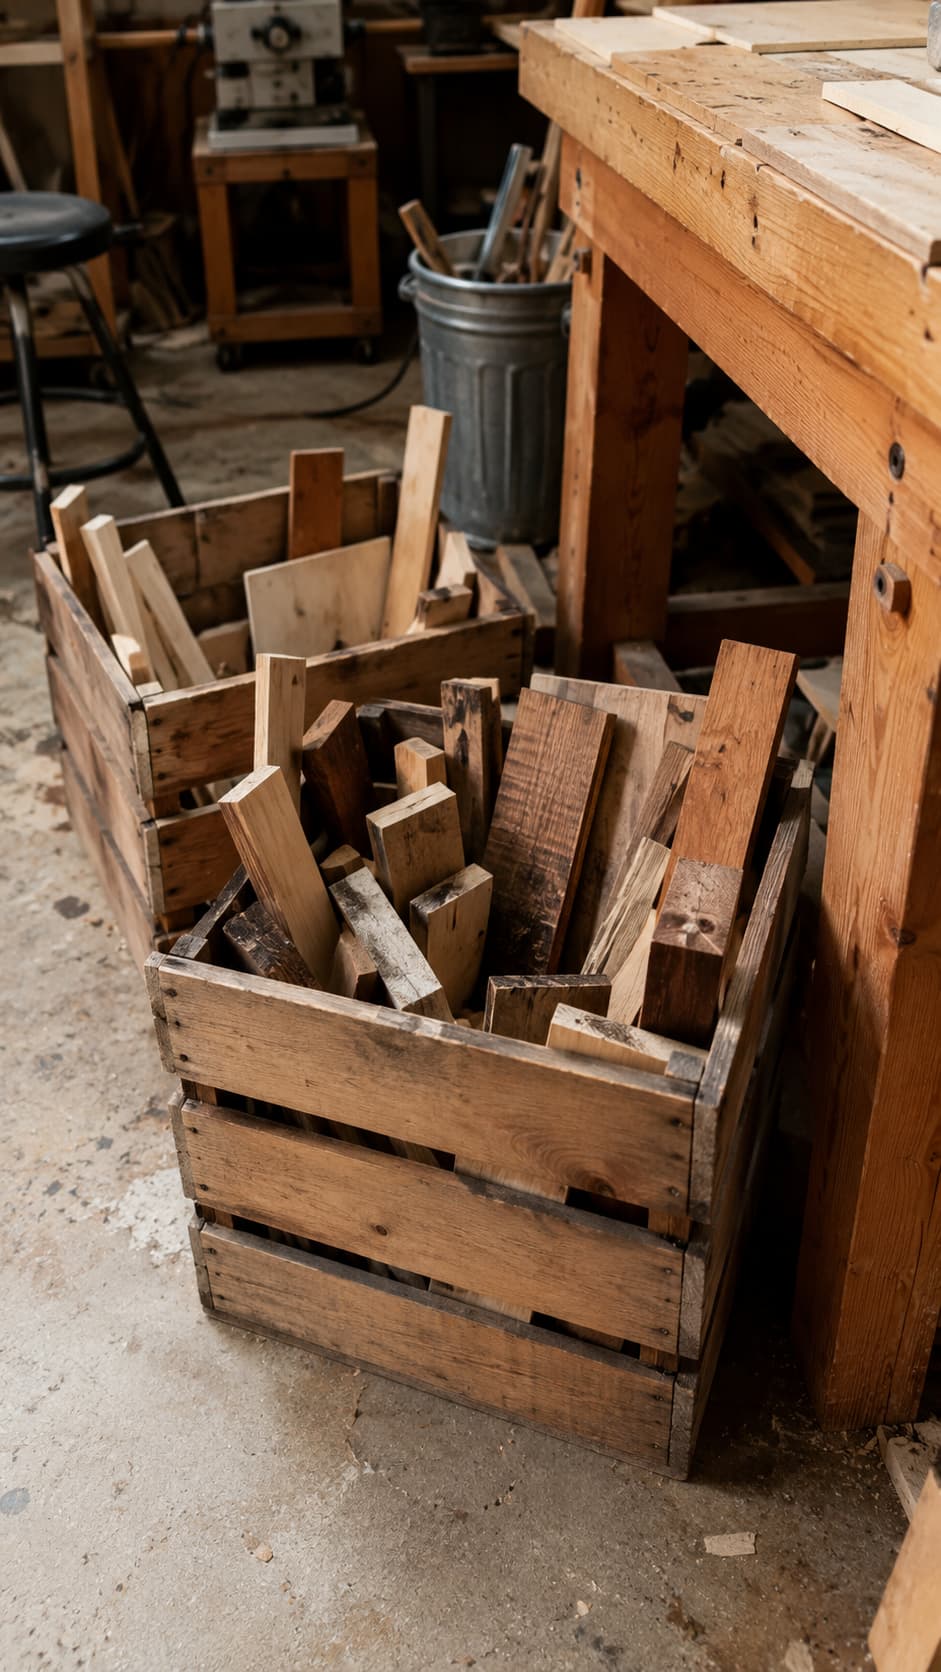
Wooden crates are great for short-term project scrap.
Keep one crate labeled “current project” for offcuts you’ll use this week.
Best for: Active project scraps
Difficulty: Easy
Best location: Near workbench
The key? Empty it once a month.
The crate only works if it stays a temporary holding zone, not a permanent wood cemetery.
14. Stackable Scrap Wood Bins
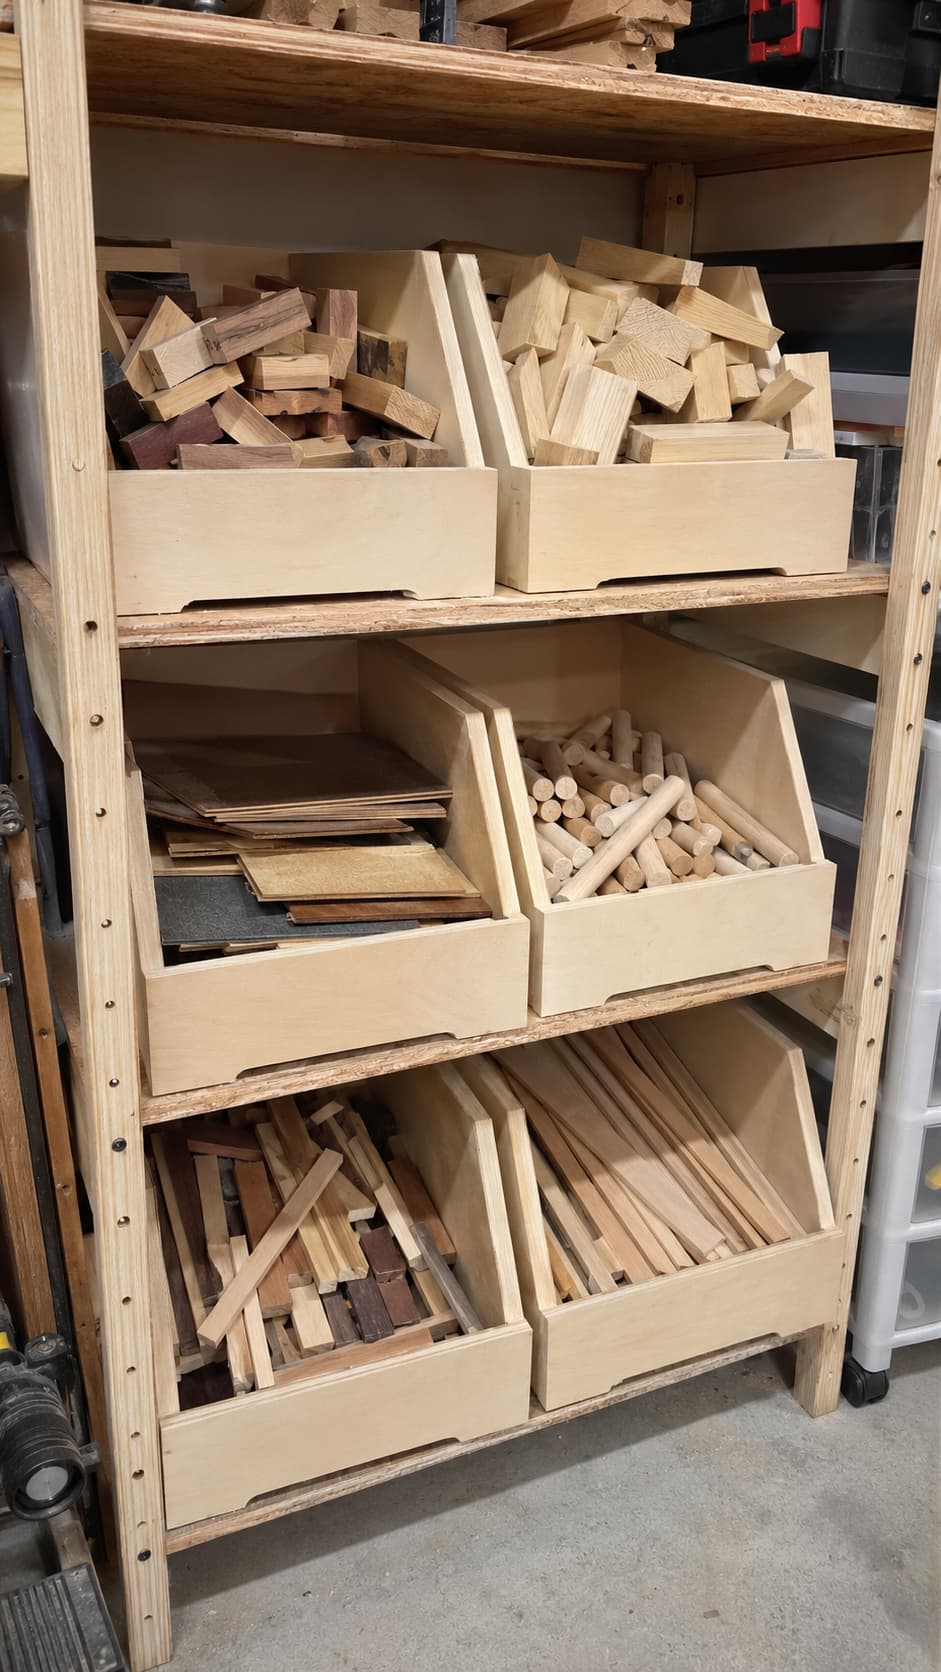
Stackable bins on a shelving unit work beautifully for sorting scraps by category — hardwood offcuts, softwood pieces, plywood scraps, dowels.
Build simple plywood boxes or use plastic bins. Label them clearly.
Best for: Sorted small scraps
Difficulty: Easy
Best location: Shelving unit
The system only works if you can tell what’s in each bin without opening it.
Small offcuts are perfect for shop upgrades, too. Once you have them sorted into buckets, crates, or stackable bins, you can turn some of those pieces into simple workshop builds like tool holders, storage boxes, and organizers. For more ideas, check out 15 Genius Tool Storage DIY Ideas to Organize Your Workshop .
Creative and Overhead Solutions: Think Beyond Eye Level
When walls are full and floor space is gone, it’s time to look up — and get creative.
15. Ceiling Lumber Rack
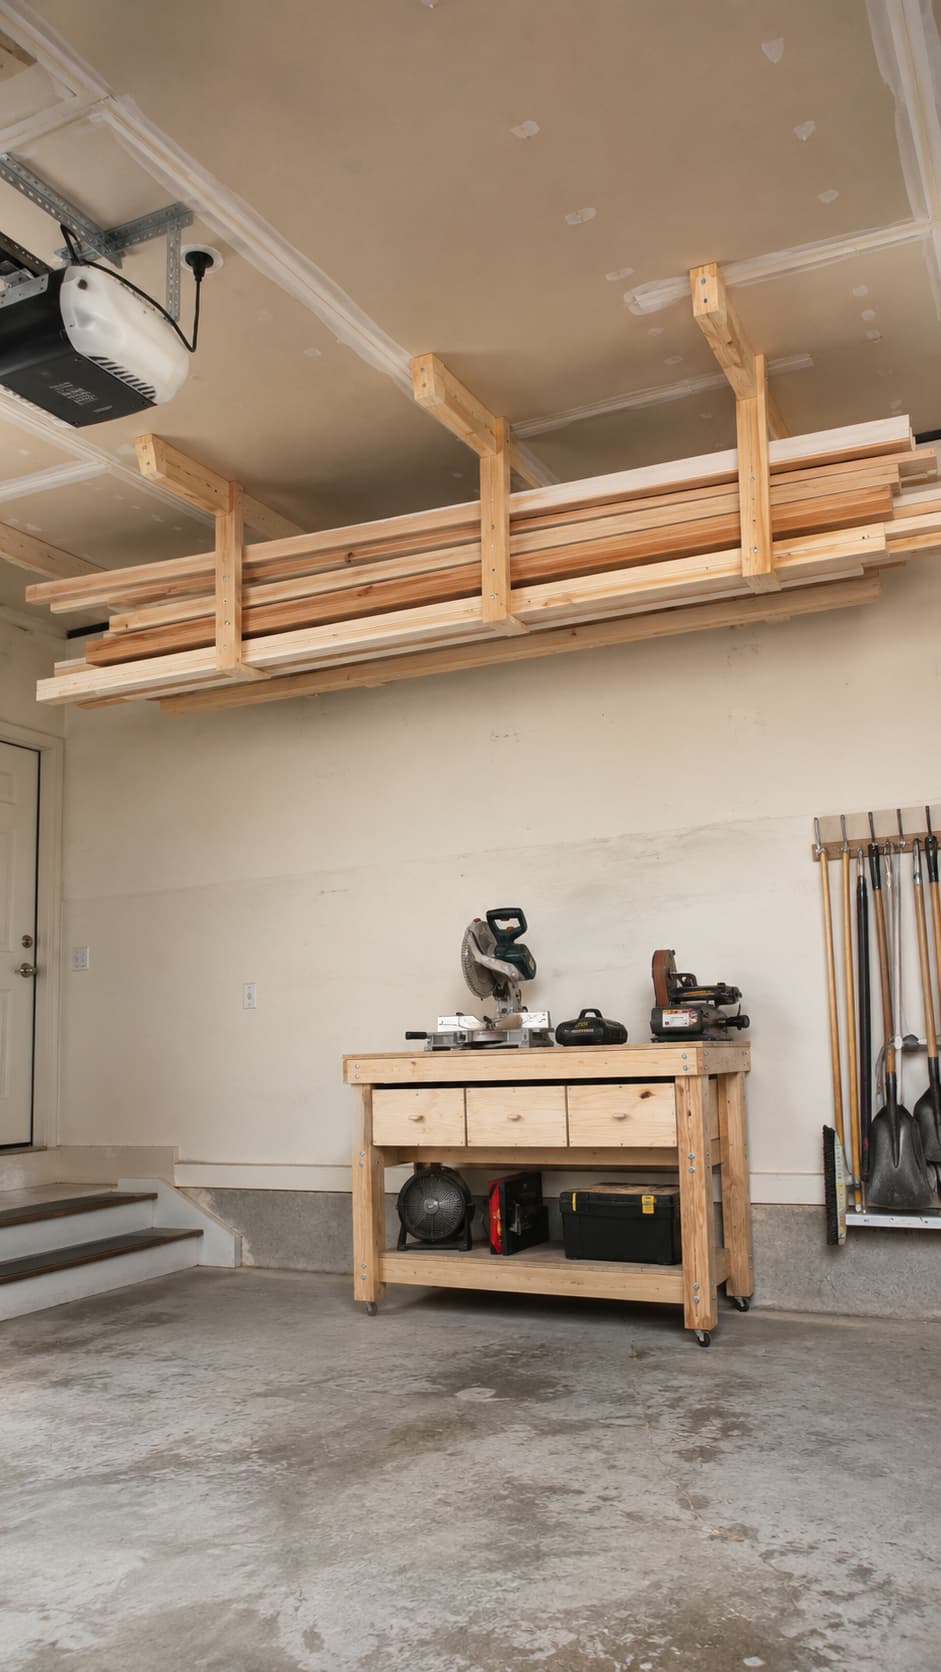
Got 9-foot ceilings?
A ceiling rack can hold long boards completely out of the way overhead, freeing up every inch of your walls and floor.
Best for: Lightweight long boards
Difficulty: Medium
Best location: Garage ceiling
Use 2×4 cradles bolted into ceiling joists with strong lag screws.
Critical rule: only store lightweight boards overhead. Heavy lumber above your head is a risk you don’t want to take.
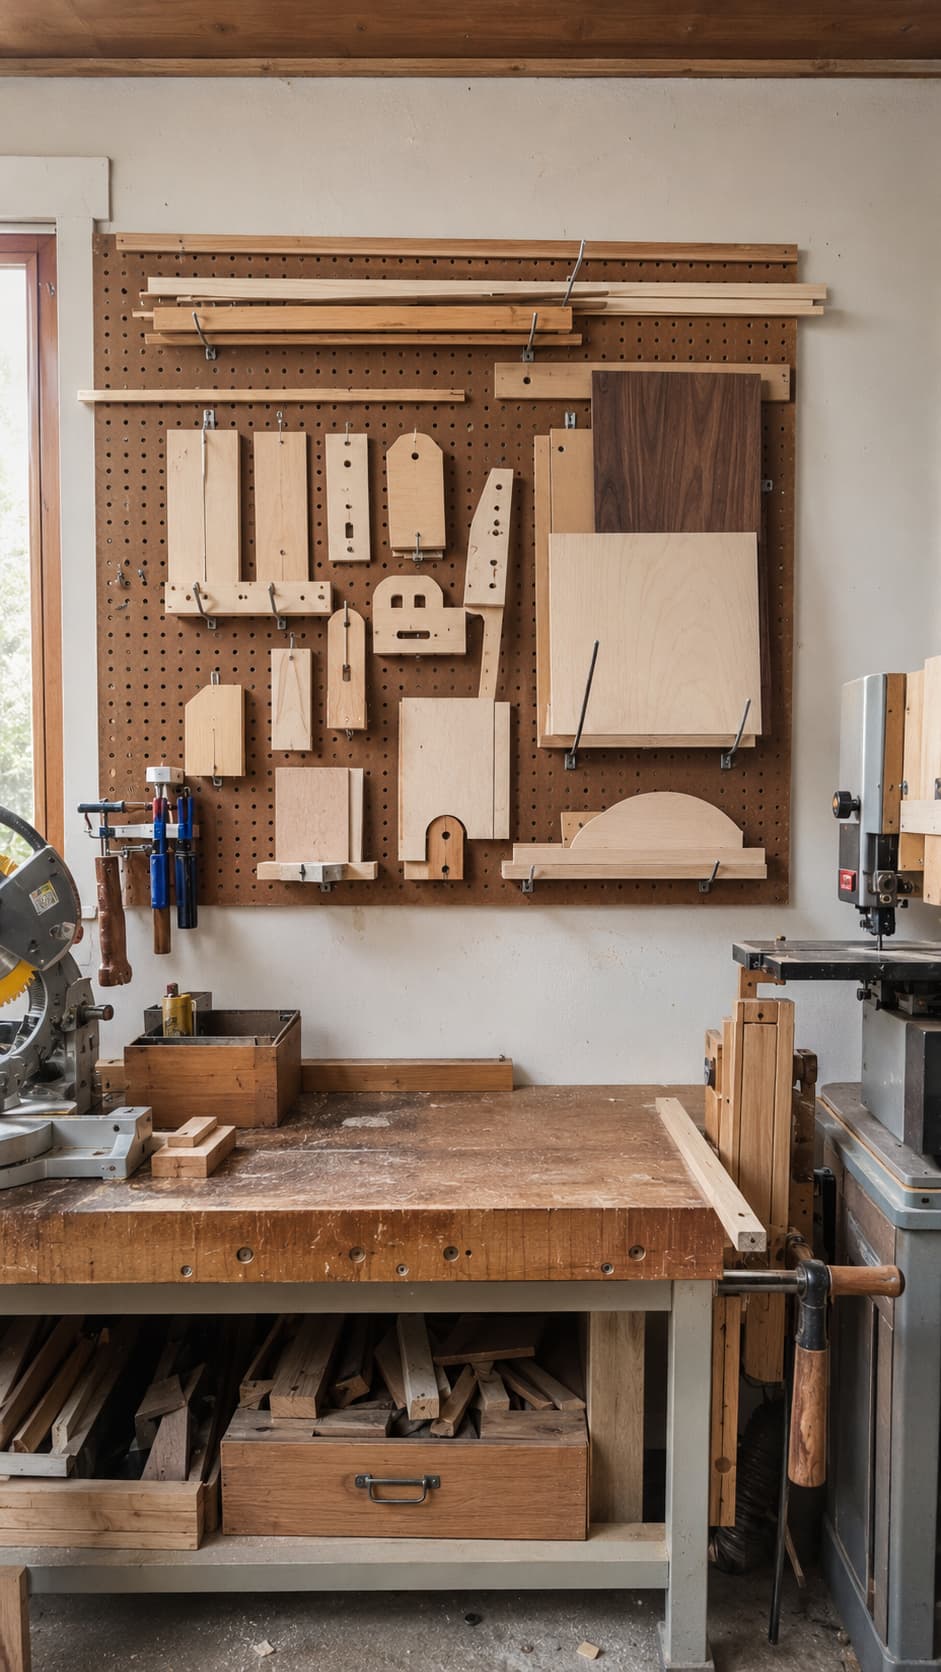
16. Pegboard Scrap Station
Pegboard isn’t just for tools.
A section of pegboard above your bench can hold thin wood strips, templates, small jig pieces, and lightweight panels with hooks and small ledges.
Best for: Templates, thin strips, lightweight pieces
Difficulty: Easy
Best location: Above workbench
It’s not for heavy stock, but for the thin stuff that has no home anywhere else, it’s surprisingly effective.
This is also a good companion setup if you already use pegboard or wall storage for your tools. For more workshop wall ideas, check out 15 Genius Tool Storage DIY Ideas to Organize Your Workshop.
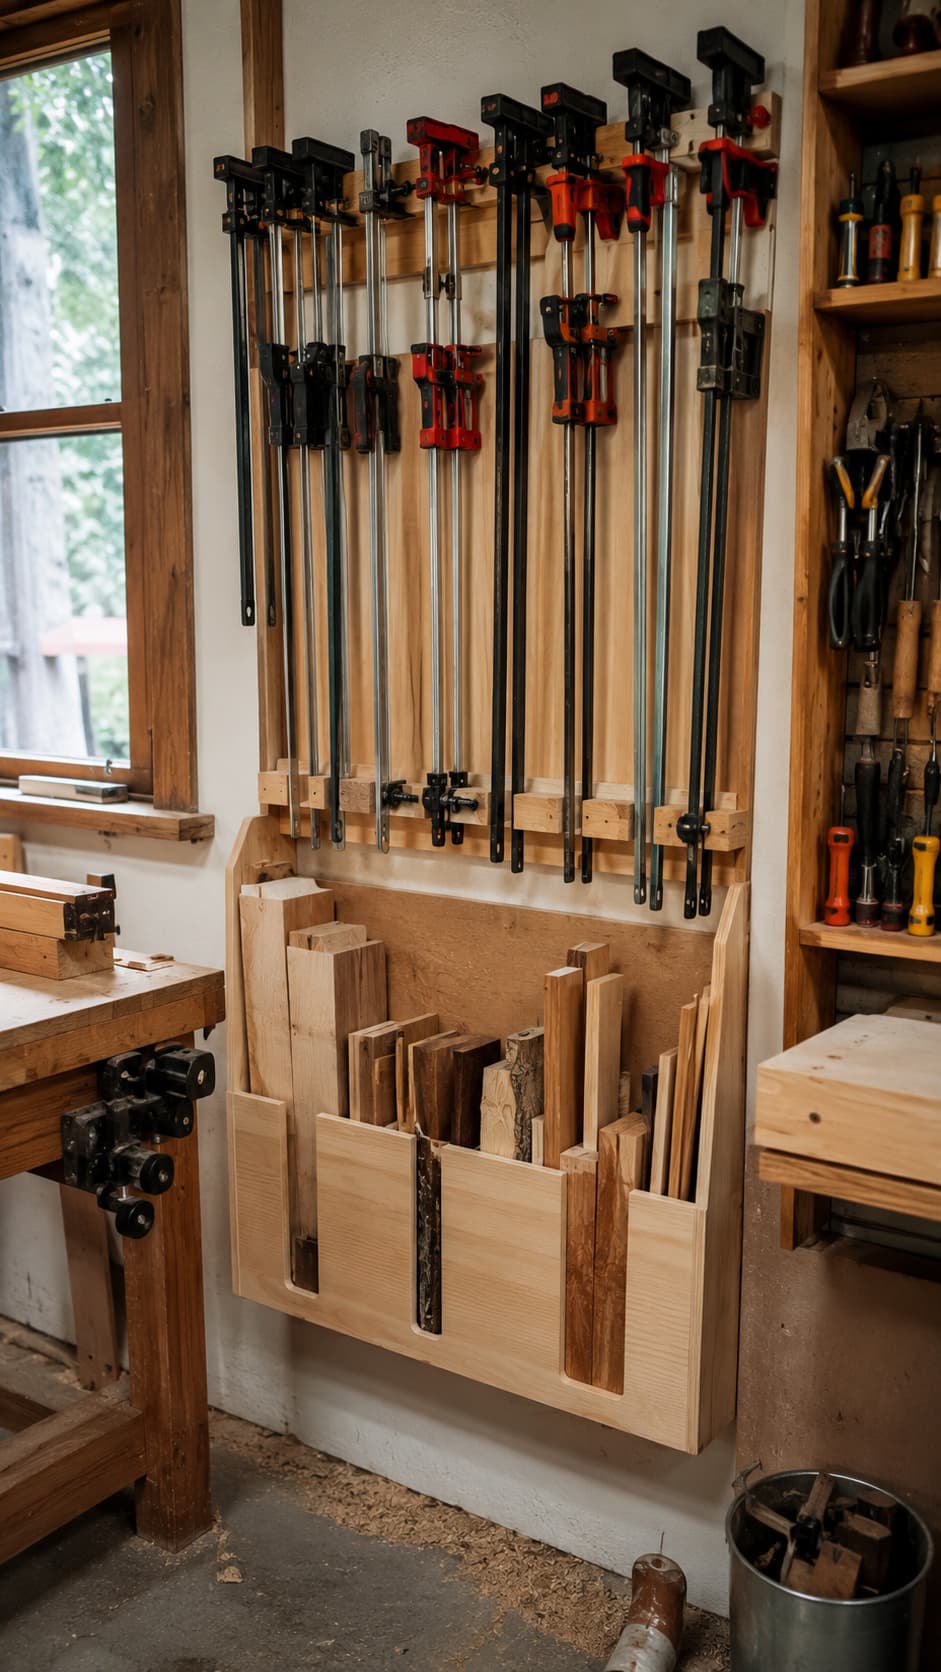
17. Clamp-and-Wood Combo Rack
Short on wall space?
Combine your clamp storage and wood storage into one wall rack. Clamps on the upper half, small lumber and offcuts on the lower half.
Best for: Small workshops with limited wall space
Difficulty: Medium
Best location: Workshop wall
You save wall real estate and keep two essential things in one spot.
Keep clamps at eye level where they’re easy to grab.
18. Firewood-Style Scrap Rack
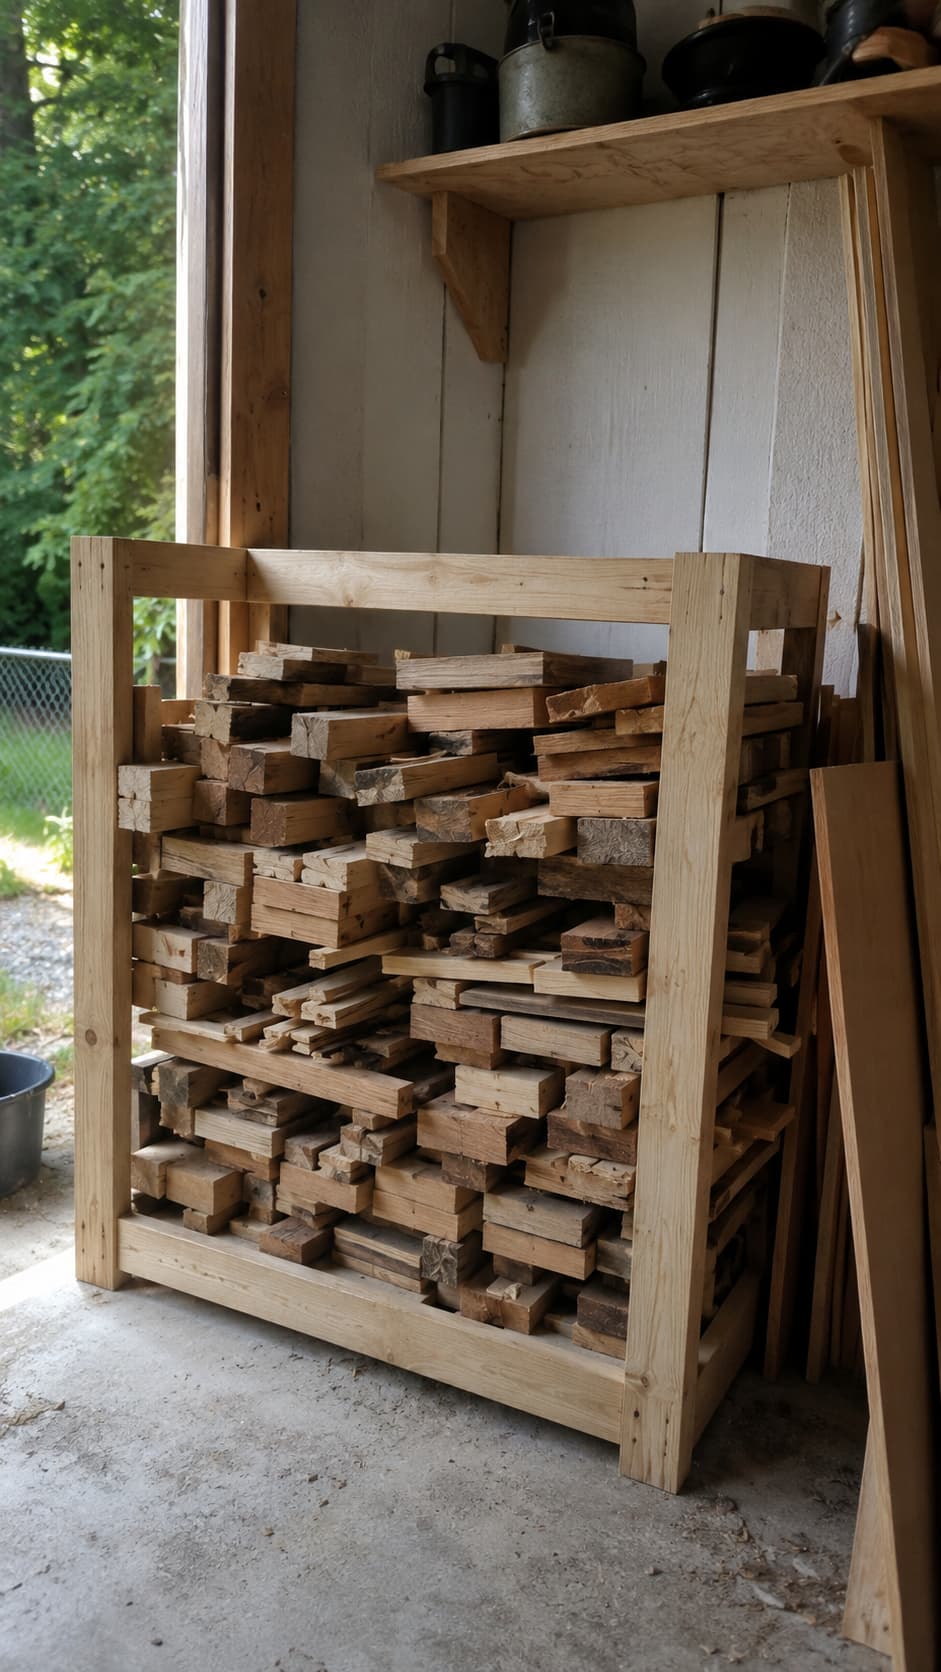
Got a pile of rough, chunky offcuts that are too big to toss but too rough for fine projects?
A simple open frame — basically a firewood holder — stacked neatly in a corner works perfectly for this category.
Best for: Rough scraps and chunky offcuts
Difficulty: Easy
Best location: Corner or outdoor covered area
Use it only for rough scraps and building-grade cuts. Keep your hardwoods elsewhere where they won’t get forgotten.
Advanced Setups: When You’re Ready to Go All In
If your workshop is growing, basic bins and buckets may not be enough anymore.
These setups are for woodworkers who want a full system instead of another temporary fix.
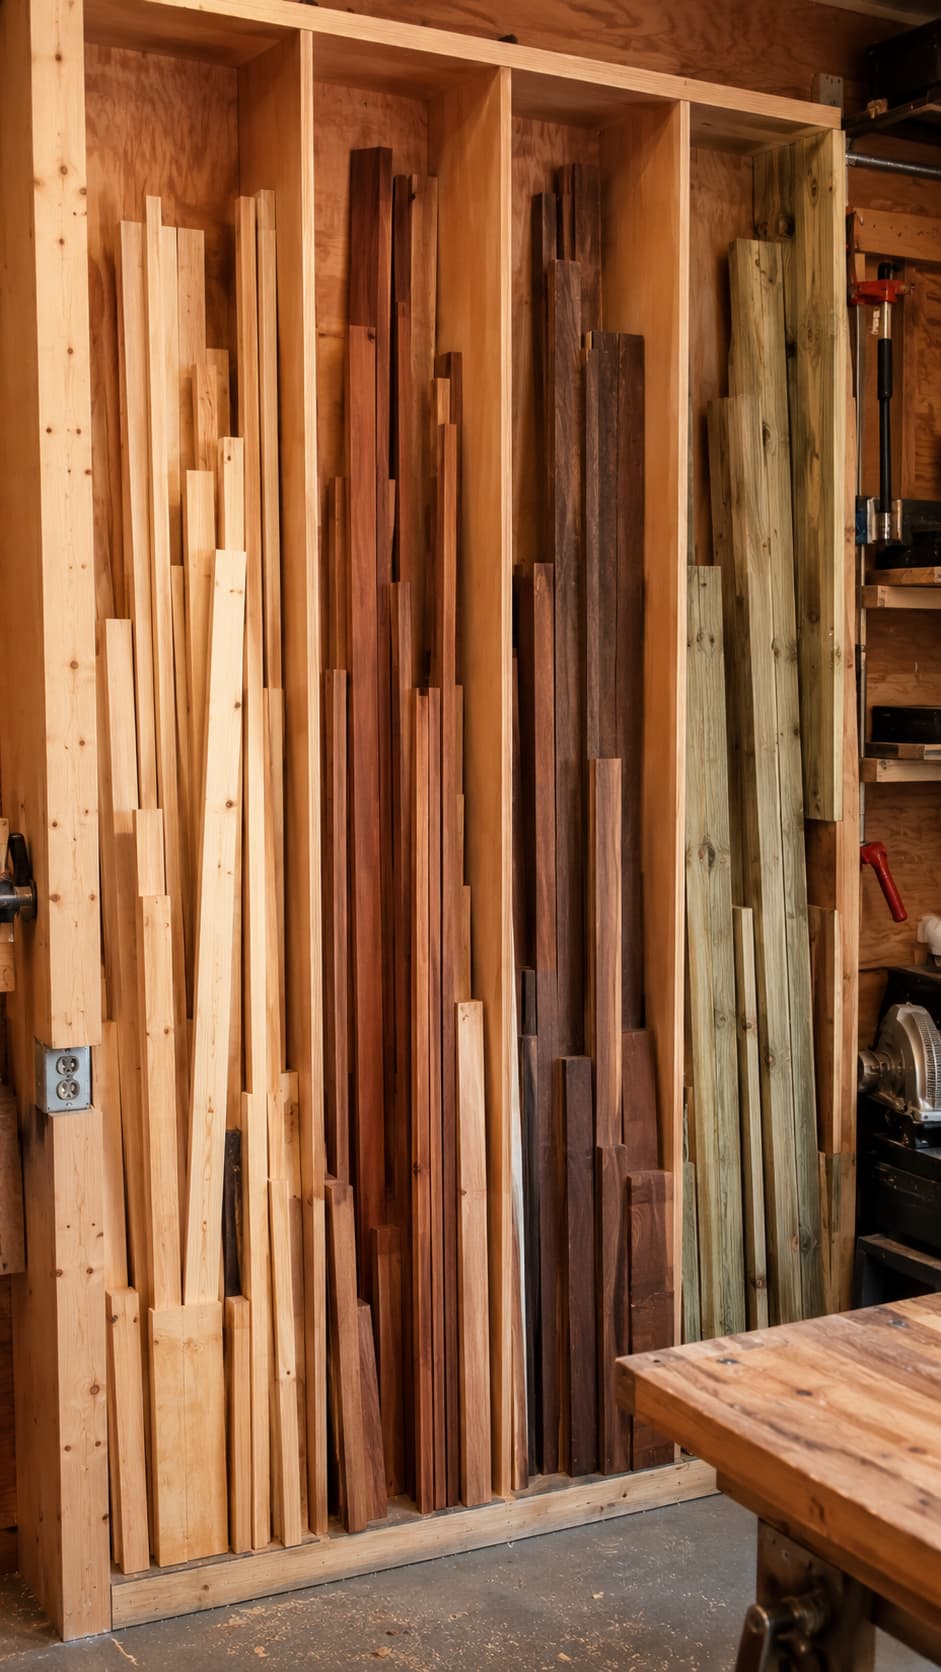
19. Wood Type Sorting Station
If you work with multiple wood species — pine, cedar, hardwood, pressure-treated — a dedicated sorting station makes life significantly easier.
Build a wall unit with clearly labeled vertical sections for each category.
Best for: Multiple wood species
Difficulty: Medium–Advanced
Best location: Dedicated wall space
Keep outdoor-treated lumber completely separate from your indoor project wood. Pressure-treated scraps have no business touching your nice hardwood.
This setup takes more time to build, but serious woodworkers who use a variety of species will tell you it’s completely worth it.
Ever spent ten minutes digging for a specific piece of poplar only to find it buried under pressure-treated 2x6s?
Yeah. Never again.
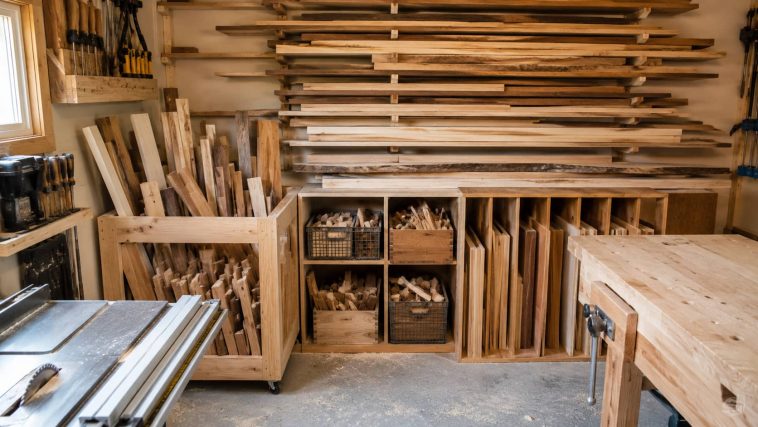
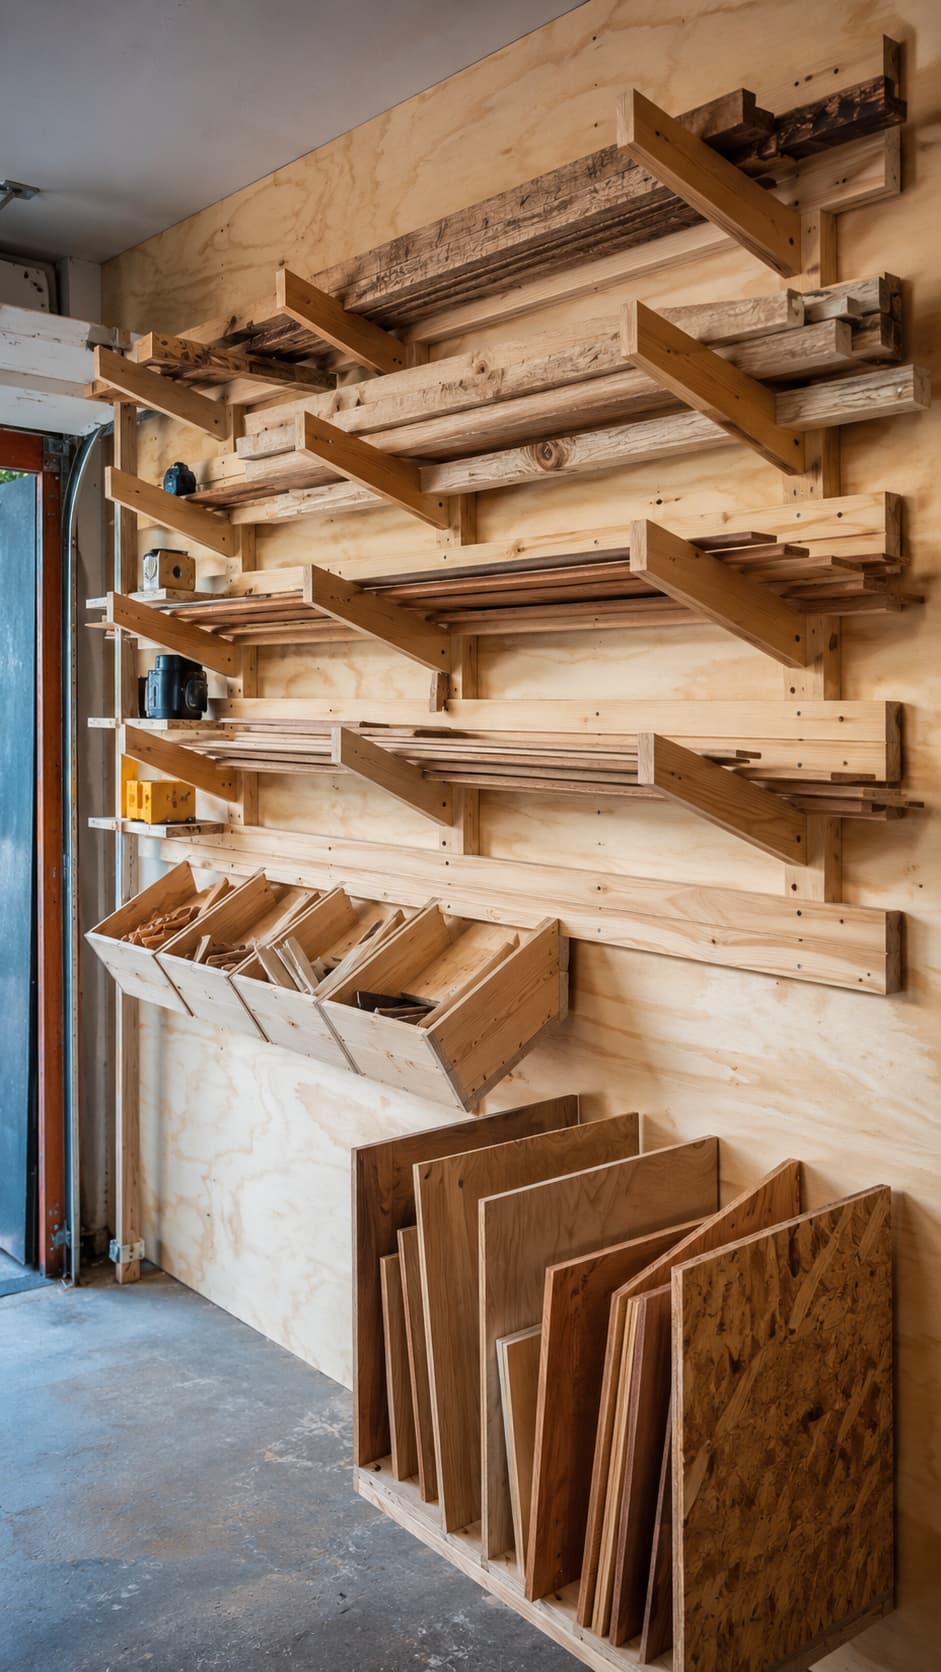
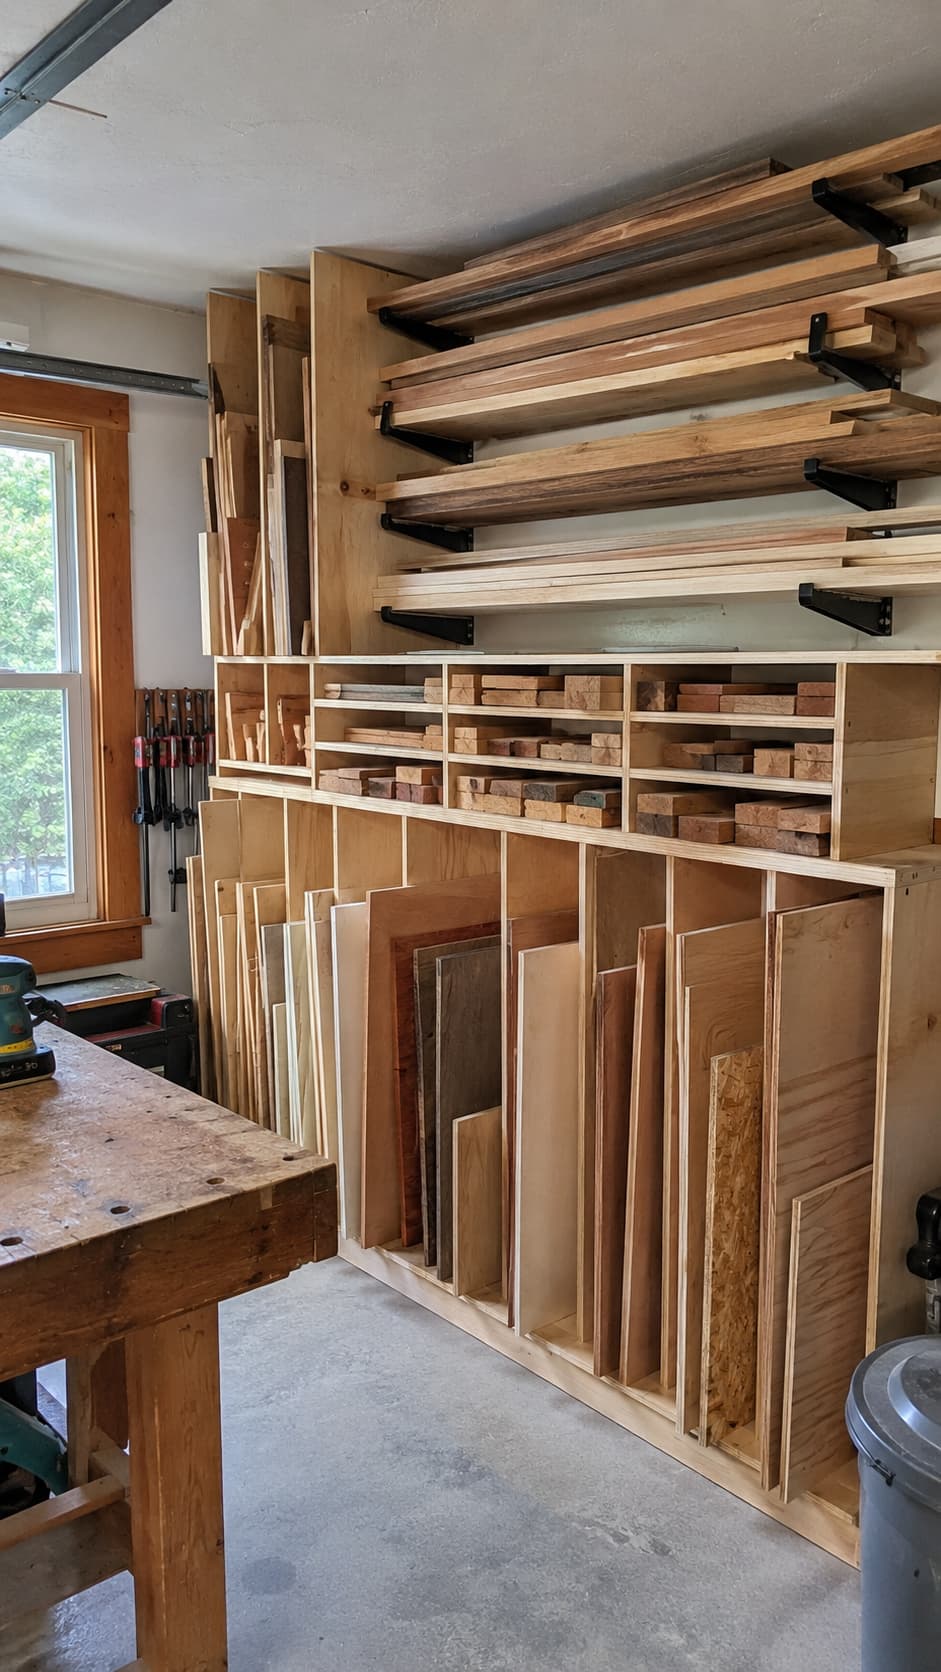
20. Full Scrap Wood Command Center
The best complete setup for a serious small workshop.
A full command center combines vertical bins, a wall-mounted lumber rack, plywood storage, small bins, and labeled sections all on one dedicated wall.
Best for: Serious workshop organization
Difficulty: Medium–Advanced
Best location: One dedicated garage wall
It’s a bigger project — figure a weekend or two — but it can completely transform your garage workshop from cluttered chaos to a space that actually works.
Design it around the wood you actually use most often, not around what looks impressive in photos. The best command center is the one that matches your actual workflow, not some idealized shop you saw on YouTube.
Scrap Wood Storage Tips That Actually Matter
Building the storage is step one.
Maintaining it is the part most people skip.
Here’s what actually keeps a scrap wood system working over the long haul:
- Keep your best pieces visible — if you can’t see the wood, you won’t use it.
- Sort by size first — long, medium, short, tiny. That’s all you need to start.
- Be ruthless about letting go — cracked, warped, or unsafe wood costs you storage space you need for better pieces.
- Keep wood off the floor — garage floors hold moisture, and moisture warps wood.
- Label your bins and sections — the system breaks down fast without labels.
- Review your scrap stash monthly — one quick sort keeps everything from collapsing into chaos again.
Once your scraps are organized, you’ll probably realize you have enough usable material for small builds, shop upgrades, and weekend projects. For more ideas, browse 10 Creative and Easy Scrap Wood Projects to Transform Your Home.
Common Mistakes to Avoid
A few things trip up even experienced woodworkers:
- Saving every tiny piece — some scraps are just firewood in disguise.
- Mixing plywood with solid lumber — they need different storage approaches.
- Building storage before sorting — you’ll build the wrong thing.
- Storing heavy lumber too high on the wall — keep heavy boards low, always.
- Forgetting labels — an unlabeled bin is a mystery bin, and mystery bins become junk bins.
- Blocking walkways, doors, or outlets — safety first, storage second.
- Skipping proper wall anchoring — racks fall when they’re not properly secured.
If your workshop feels messy beyond just the scrap wood pile, you may also want to check out 15 Genius Tool Storage DIY Ideas to Organize Your Workshop. Sometimes the problem is not just the wood — it’s the clamps, bits, screws, sandpaper, and tools slowly taking over every flat surface.
Now That Your Scrap Wood Is Organized — What Are You Actually Going to Build With It?
Here’s the thing about getting your scrap wood properly organized: it immediately makes you realize how much good material you’ve been sitting on.
That pile of offcuts you thought was junk?
Once it’s sorted and visible, you’ll see hardwood pieces perfect for a small shelf, plywood cutoffs ideal for a shop jig, and short 2x4s that could become a wall-mounted tool holder.
If you want to turn those scraps into practical projects, start with 25 Genius DIY Organizers You Can Build From Scrap Wood. And if you want beginner-friendly projects with selling potential, check out 25 Scrap Wood Projects That Sell (Low-Cost & Beginner-Friendly).
The problem most woodworkers hit next is knowing what to build.
You’ve got the material. You’ve got the tools. But staring at a stack of sorted scraps and trying to design a project from scratch is frustrating — especially when you want something that actually turns out great, not just something that uses up wood.
That’s exactly why I keep coming back to Ted’s Woodworking Plans.
It’s a massive collection of over 16,000 woodworking plans covering everything from simple shop organizers and small boxes to furniture, garden projects, and full workshop builds. Every plan comes with step-by-step instructions, cut lists, and material guides — which means you can take your sorted scrap wood, match it to a plan that fits what you have, and actually start building something instead of just staring at a pile.
Whether you want to turn those short boards into a small garden bench, use your plywood offcuts for a wall-mounted organizer, or tackle a bigger furniture project with your better hardwood pieces, Ted’s has plans that fit.
It’s genuinely one of the most useful resources I’ve found for going from “I have wood” to “I have a project.”
→ Check out Ted’s Woodworking Plans here
The Bottom Line: Start Small, Build the Habit
Scrap wood storage doesn’t have to be a massive project.
The goal is simple: keep your boards visible, sorted, safe, and easy to grab when inspiration strikes.
You don’t need to build all 20 of these ideas. You need the right two or three for your space and your workflow.
Start with a vertical bin for your short boards. Add a wall rack for your long lumber. Once the floor is clear and everything has a home, your small garage workshop will feel bigger, safer, and — most importantly — like a place you actually want to spend time in.
And when the storage is sorted and the workbench is clear?
That’s when the real fun begins.
Pick a plan, grab your best scraps, and build something worth keeping.