
One Tool Changed Everything About How I Build
Let me be real with you — I used to dread joining wood pieces together. Either the joints were wonky, or I’d spend forever waiting for glue to dry, or worse, the whole thing just fell apart three days later. Then someone at my local woodworking meetup casually slid a pocket hole jig across the table and said, ‘Try this.’ Game. Changed.
A pocket hole jig is exactly what it sounds like: a small tool that guides a drill bit to cut angled holes into wood, so you can join two pieces together with special screws — no complicated joinery skills needed, no waiting for glue to set, and no visible hardware. It costs less than a decent dinner out, and honestly? It’s the single best beginner woodworking investment you can make.
This guide is for complete beginners, weekend DIYers, and anyone who’s ever looked at a furniture build and thought, ‘That looks way too complicated for me.’ By the end, you’ll know exactly how to set up and use a pocket hole jig, which screws to buy, what mistakes to avoid, and which projects to tackle first.
|
📌 Pinterest Pull Quote: “A pocket hole jig is the one tool that turns a frustrated beginner into a confident builder — and it costs less than dinner.” |
What Is a Pocket Hole Jig?
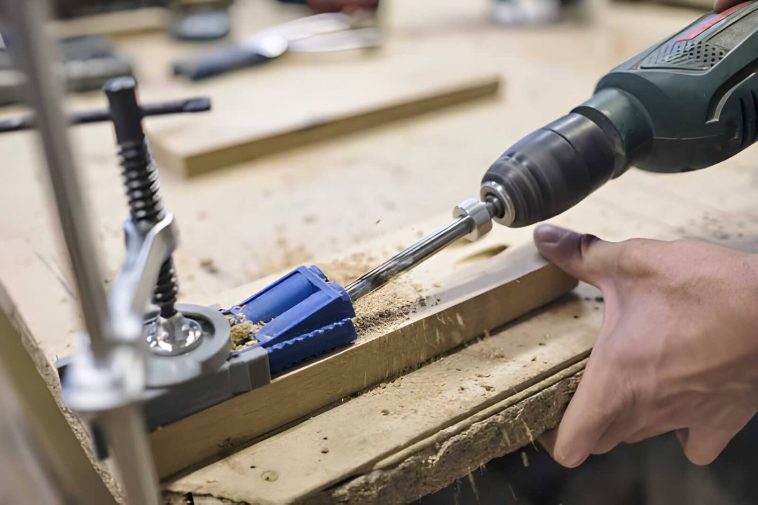
At its core, a pocket hole jig is a drill guide — it holds your drill at a precise angle (usually 15 degrees) so the bit enters the wood and creates an angled tunnel, or ‘pocket.’ You then drive a pocket hole screw through that tunnel into the adjacent piece of wood, pulling the two pieces together into a tight, strong joint.
That’s it. No chisels. No mortises. No complicated clamping setups. Just drill, clamp, screw. Even if your woodworking experience is limited to assembling IKEA furniture (we’ve all been there), you can do this.
The pocket hole concept has been around for decades, but it exploded in popularity when Kreg Tool Company made it accessible with affordable, beginner-friendly jig systems in the 1980s and 90s. Today, it’s hands-down the most popular beginner joinery method — and for very good reason.
Why Every Beginner Needs One
Still on the fence? Here’s why a pocket hole jig deserves a permanent spot in your shop from day one:
- No glue wait time — join pieces and keep building immediately
- No advanced skills required — if you can drill a hole, you can do this
- Strong, permanent joints — rock solid for furniture, shelves, cabinets
- Works on almost any wood type — pine, plywood, hardwoods, MDF
- Affordable — you can get started for under $30
💛 Recommended Pocket Hole Jigs (Amazon) |
|
→ Kreg R3 Jr. Pocket Hole Jig — Best starter jig, under $30 — perfect for your first project Advertisement |
|
→ Kreg K4 Pocket Hole Jig System — Best mid-range — what most beginners upgrade to after their first few builds |
|
→ Massca M2 Aluminum Pocket Hole Jig — Best premium alternative to Kreg — heavy-duty aluminum, built to last |
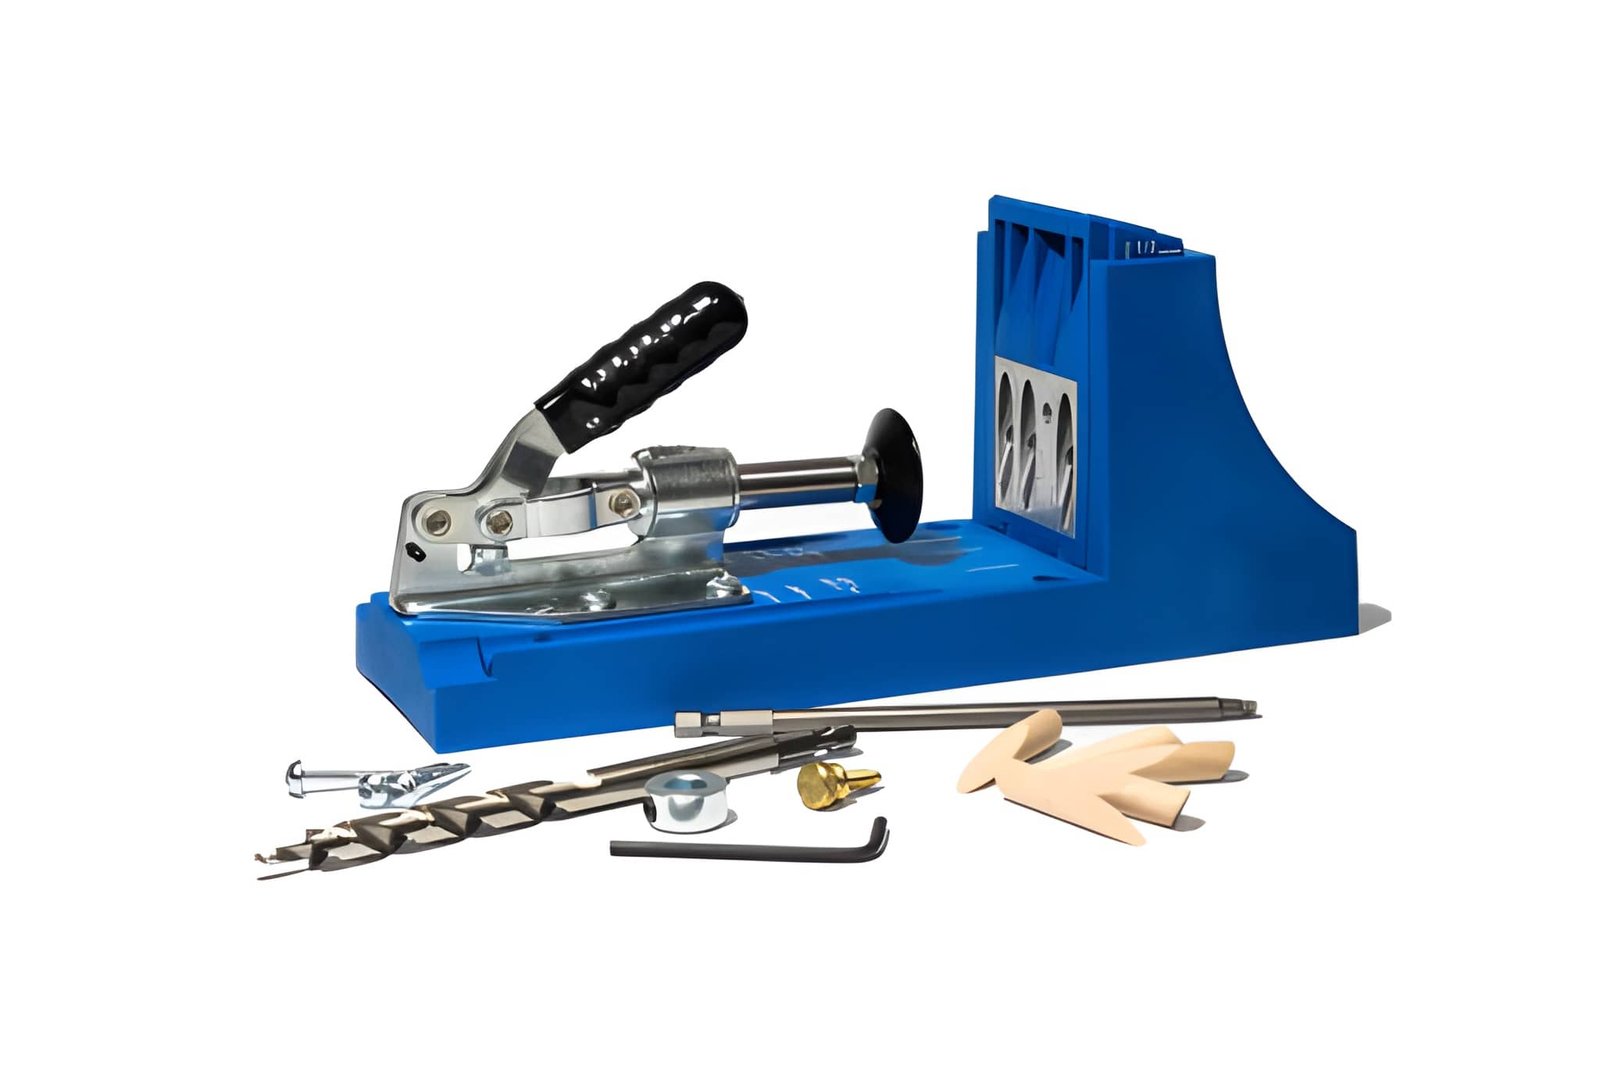
Tools & Supplies You’ll Need
Before you drill your first pocket hole, let’s make sure you have everything ready. FYI, you probably own half of this stuff already.
- Pocket hole jig (see recommendations above)
- Power drill or cordless drill
- Stepped drill bit (usually included with the jig)
- Pocket hole screws (NOT regular screws — more on this below)
- Clamps — at least one face clamp and one bar clamp
- Wood of your choice
💛 Recommended Tools & Supplies (Amazon) |
|
→ Kreg Pocket Hole Screw Kit — Variety pack — covers virtually every project you’ll attempt as a beginner |
|
→ DEWALT 20V Cordless Drill — Best beginner drill — reliable, powerful, widely available |
|
→ Bessey Clamp Set — Essential for clean joints — don’t skip the clamps |
|
→ Kreg Step Drill Bit — Replacement bit for heavy users — grab a spare so you’re never stuck mid-project |
|
💡 Pro Tip: You don’t need expensive wood to practice — grab a cheap 2×4 from your local hardware store. Master the settings on scrap wood before touching your good lumber. |
How to Set Up Your Pocket Hole Jig (Step-by-Step)
Okay, here’s the section you actually came for. Let’s walk through the process together. Take it one step at a time — there’s no rush.
Step 1: Measure Your Wood Thickness
Grab your calipers or a simple ruler and measure the thickness of the wood you’re joining. This number drives every other setting — so get it right before anything else.
Step 2: Set the Jig Collar Depth
Most pocket hole jigs have a guide collar or adjustable stop that you set to match your wood thickness. Look for the markings on your jig — they usually say ½”, ¾”, 1″, 1½”, etc. Line it up and lock it in.
Step 3: Adjust the Drill Bit Stop Collar
Your stepped drill bit has a stop collar — a metal ring that prevents the bit from going too deep. Slide it to the position that matches your wood thickness setting and tighten it with the included hex key. This step is critical. Skip it and you’ll drill straight through your board (yes, it happens, no judgment).
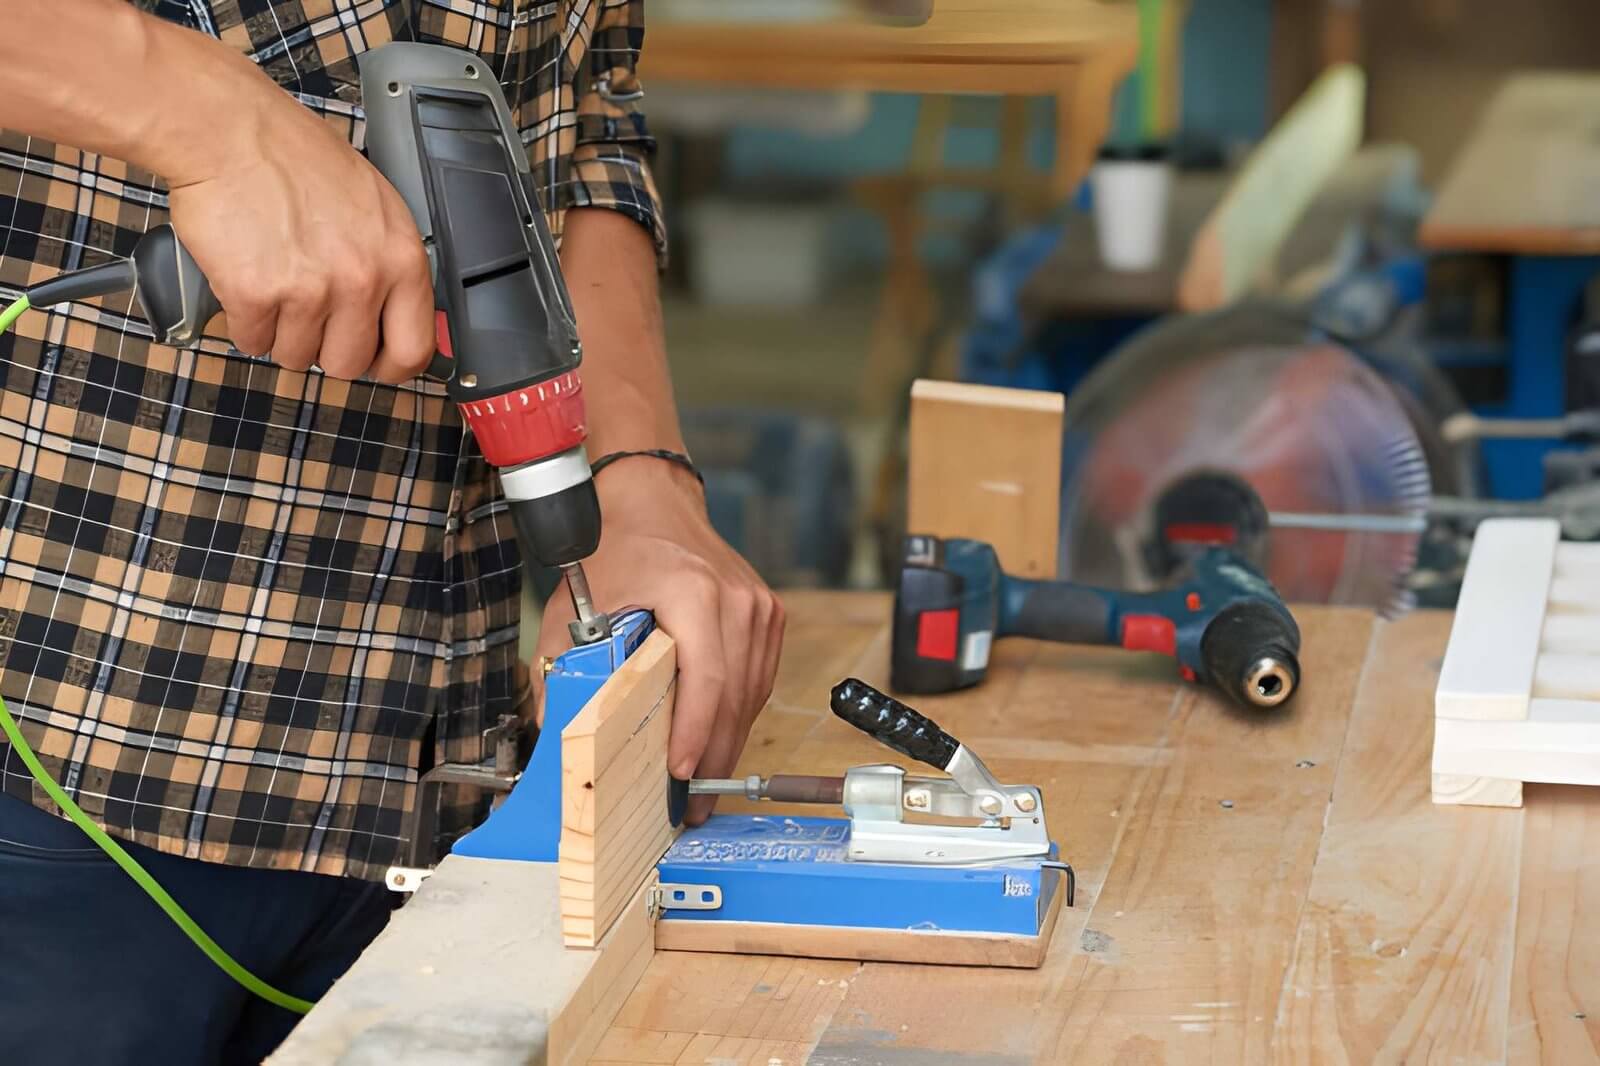
Step 4: Clamp the Jig to Your Workpiece
Position the jig on the end or face of your board — wherever you want the pocket hole to go. Clamp it down firmly. The jig should not move at all when you start drilling. If it wiggles, tighten your clamp.
Step 5: Drill the Pocket Hole
Set your drill to a medium speed — not too fast, not too slow. Insert the bit into the guide hole and drill smoothly until the stop collar hits the jig. Pull back, clear the shavings, and repeat for any additional holes. Two pocket holes per joint is the standard for most projects.
Step 6: Apply Wood Glue (Optional but Recommended)
This step is optional, but if you’re building furniture that’ll see real use — chairs, tables, shelves — add a thin bead of wood glue to the joint surface before clamping. It takes about 30 minutes to set, and your joint will be significantly stronger for it.
Step 7: Drive the Pocket Hole Screw
Hold or clamp the two pieces together tightly. Drive the pocket hole screw through the angled pocket and into the adjacent board using a square-head driver bit (also called a Robertson bit). The screw will pull the pieces together as it tightens — it’s genuinely satisfying to watch.
|
⚠️ Important: Always drill into scrap wood first to test your settings before working on your real project. Spend 5 minutes testing — save yourself 2 hours of frustration. |
Pocket Hole Jig Settings Cheat Sheet
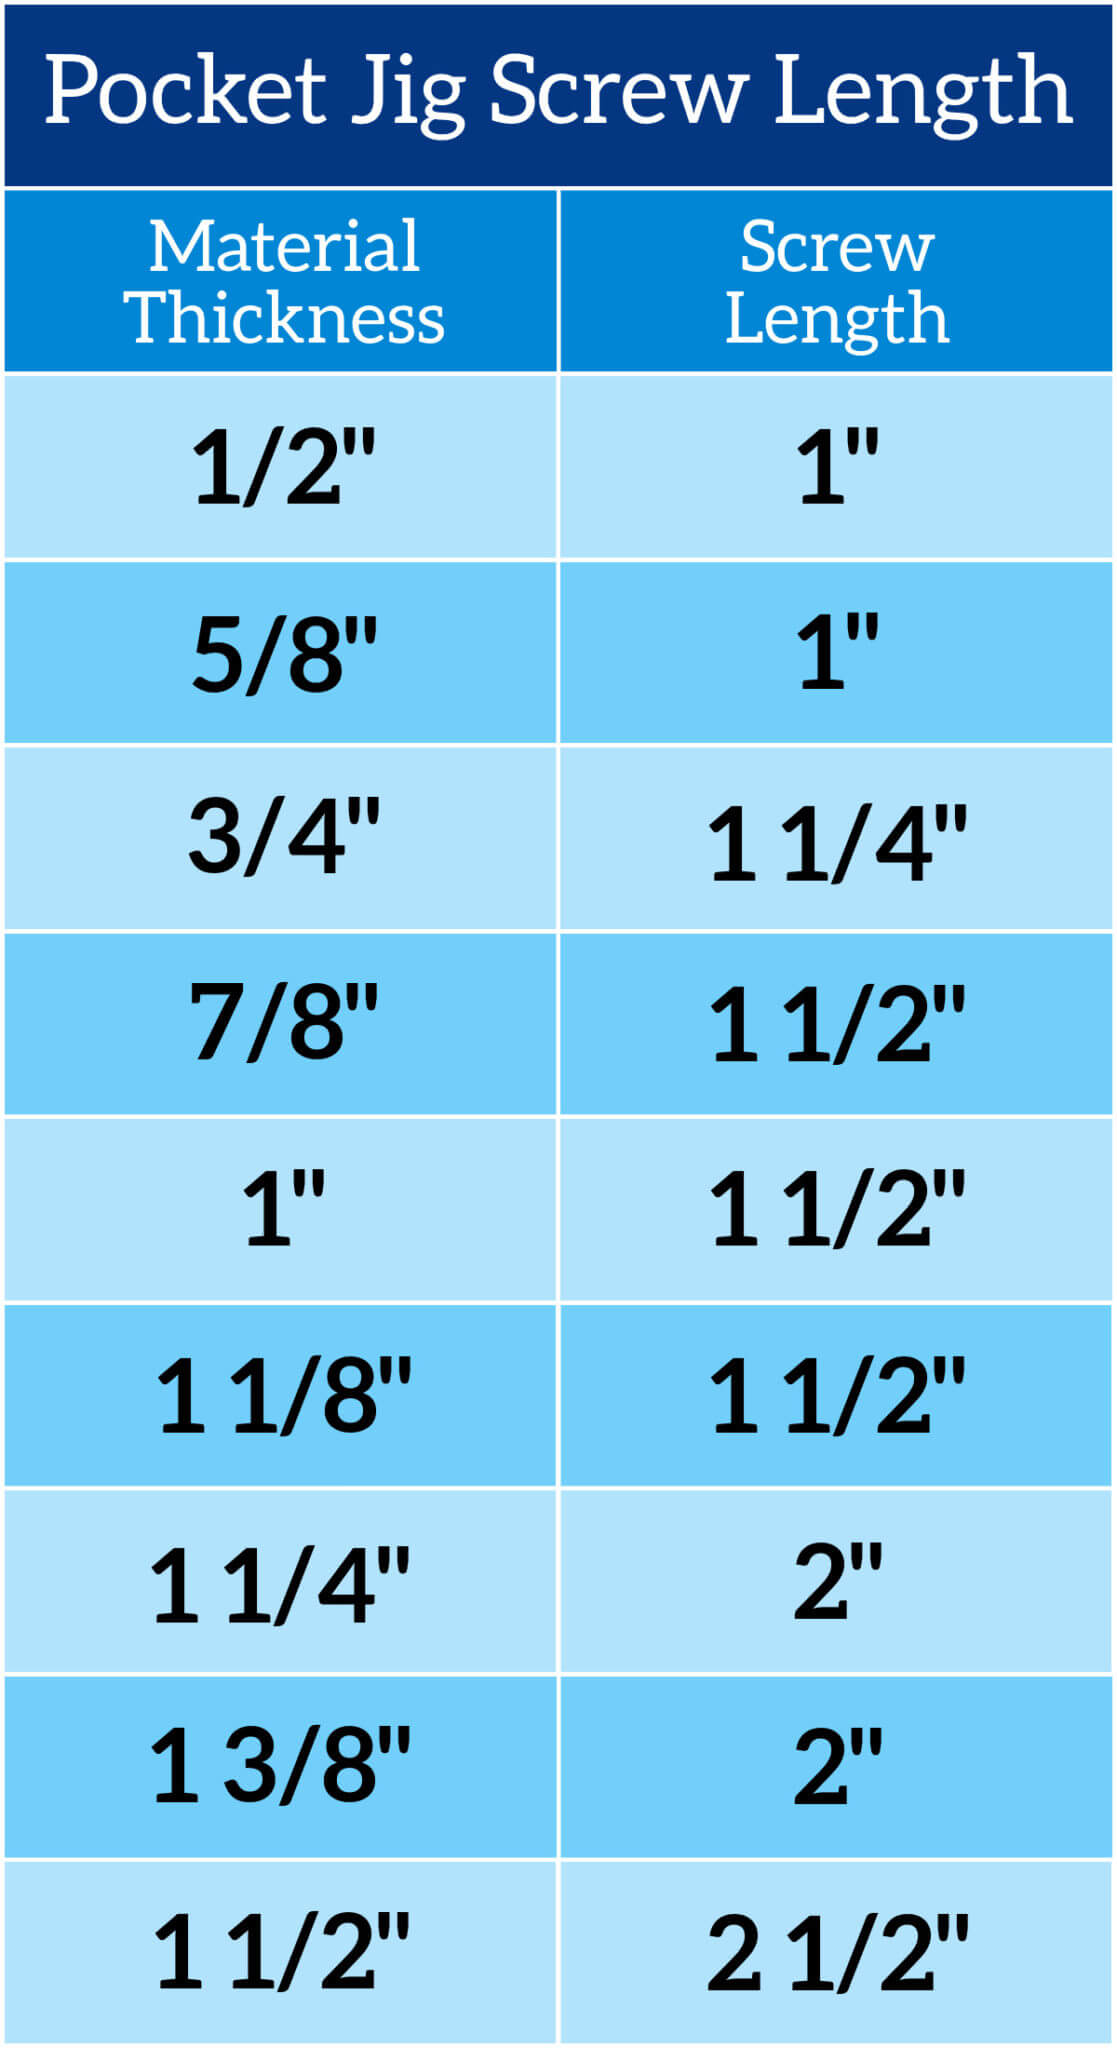
Credit : diycandy
Confused about which setting to use? Here’s your quick reference guide. Save this, print it, tape it inside your workshop door — whatever you need to do.
|
Wood Thickness |
Drill Bit Setting |
Screw Length |
|
½ inch |
Setting A |
1″ screw |
|
¾ inch |
Setting B |
1¼” screw |
|
1½ inch |
Setting C |
2½” screw |
|
📌 Pinterest Tip: Turn this cheat sheet into a vertical pin graphic — it gets massive saves from beginner woodworkers who want a quick reference. |
Common Beginner Mistakes to Avoid
Look, everyone makes these mistakes the first time around. The good news? Now you don’t have to. :/
- Wrong screw length for your wood thickness — always match screw length to the settings table above
- Not clamping the jig tightly enough — even a tiny wobble ruins the angle
- Drilling too fast and stripping the pocket hole — medium speed only, no need to rush
- Skipping the face clamp when joining pieces — the boards will shift as you drive the screw
- Using regular screws instead of pocket hole screws — they’re not interchangeable, period
|
🔧 Mistake #3 Fix: If you’re stripping pocket holes, slow your drill speed down and make sure your bit is sharp. A dull bit + high speed = stripped hole every single time. Grab a replacement Kreg Step Drill Bit (linked above) if yours is worn out. |
Best Wood Types for Pocket Hole Joinery
Good news — pocket hole joinery works with almost every wood type you’ll encounter as a beginner. Here’s a quick breakdown:
- Pine — Best for beginners. Soft, affordable, forgiving, and easy to drill. Perfect for practice and simple furniture builds.
- Plywood — Very common in furniture, cabinetry, and shelving. Works great with pocket holes, especially ¾” sheets.
- Hardwoods (Oak, Maple, Walnut) — Absolutely doable, but you’ll need sharp bits and may want to adjust your drill speed slightly lower.
- MDF — Works for painted projects, but screws don’t hold as well in MDF edges. Use glue alongside pocket screws here.
- Avoid: Particle board edges — screws won’t hold reliably. Stick to faces only if you must use it.
|
💛 Recommended Product (Amazon) |
|
→ Titebond Original Wood Glue — Always pair pocket holes with wood glue for maximum strength on furniture builds — it’s the combo the pros use |
Easy First Projects to Try
Once you’ve drilled a few test joints, it’s time to build something real. Here are four beginner-friendly projects that are perfect for your first pocket hole adventure:
- Simple floating shelf — 2 boards + a few pocket holes = your first functional piece
- Basic picture frame — great for learning corner joints
- Small wooden box — practice all joint types in one compact project
- Farmhouse-style wooden tray — beginner-friendly and wildly popular on Pinterest
|
💛 Tools to Level Up Your Builds (Amazon) |
|
→ Kreg Jig K5 Master System — Once you’re hooked, this is the upgrade worth every penny — more capacity, better clamping, built-in clamp |
|
→ Wood Filler Putty Sticks — Fills pocket holes perfectly for a clean, paint-ready finish |
|
👉 Ready for your next challenge? 10 Essential Table Saw Jigs You Can Build This Weekend — once you’ve mastered pocket holes, these jigs will take your entire workshop to the next level. |
How to Hide Pocket Holes for a Clean Finish
Pocket holes are strong, but they’re not exactly pretty. Here’s how to hide them like a pro:
- Position joints on the hidden side of your project whenever possible — back of a shelf, underside of a table
- Use wood filler / putty sticks for painted projects — fill, sand, paint, done
- Use matching wood plugs for stained/natural finish projects — this is the pro move
|
💛 Recommended Finishing Products (Amazon) |
|
→ Kreg Pocket Hole Plug Cutter — Cut your own matching wood plugs from the same wood species — totally seamless look |
|
→ Elmer’s Wood Filler — Budget-friendly option for painted projects — sands perfectly smooth |
Pocket Hole Jig vs. Other Joinery Methods

IMO, pocket holes win for beginners in almost every scenario — but let’s look at the comparison honestly so you can make your own call.
Pocket holes vs. Dowels: Dowels are strong and look clean, but require precise alignment and a separate doweling jig. Pocket holes are faster and more forgiving.
Pocket holes vs. Biscuit Joinery: Biscuits are great for alignment on wide panels, but require a dedicated biscuit joiner tool. Pocket holes are cheaper to get started with.
Pocket holes vs. Mortise & Tenon: Mortise and tenon is the gold standard for strength and durability — but it requires advanced skills, chisels, and significant time. Pocket holes are beginner-friendly by comparison.
|
Method |
Skill Level |
Cost |
Strength |
Speed |
|
Pocket Holes |
Beginner |
Low |
High |
⚡ Fast |
|
Dowels |
Intermediate |
Low |
High |
Moderate |
|
Biscuit Joinery |
Intermediate |
Medium |
Medium |
Moderate |
|
Mortise & Tenon |
Advanced |
Low |
Very High |
🐢 Slow |
|
👉 Want to explore more joinery options? 11 Woodworking Jigs That Will Save You Time and Effort — a full breakdown of the jigs every serious woodworker should know about. |
Frequently Asked Questions
Can I use a pocket hole jig on plywood?
Yes — absolutely. Plywood is one of the most common materials used with pocket hole jigs, especially for cabinet and shelf builds. Just make sure you’re driving the screw into the face grain, not the edge.
What screws do I use with a pocket hole jig?
Pocket hole screws only — not regular wood screws. Pocket hole screws have a special self-tapping tip and a pan head that seats properly in the pocket. Using the wrong screw type causes splits, strips, and weak joints.
Is the Kreg jig worth it for beginners?
Yes — especially the K4. It’s the most beginner-friendly system on the market, with clear markings, solid clamping, and a huge community of tutorials online. The R3 Jr. is great if you want to start even cheaper.
How strong are pocket hole joints?
Very strong — strong enough for furniture, cabinets, shelves, and bed frames. Pair with wood glue for maximum strength on pieces that’ll see heavy daily use.
Can I use a pocket hole jig without a Kreg brand jig?
Absolutely. The Massca M2 Aluminum jig is a fantastic alternative with a premium aluminum build. There are also several affordable options on Amazon that work well for occasional use.
|
👉 New to woodworking tools altogether? The Complete Beginner’s Guide to Woodworking Tools — everything you need to know to set up your first workshop the right way. |
Final Thoughts: Your First Pocket Hole Joint Won’t Be Perfect — And That’s Totally Fine
Here’s the thing — every expert woodworker you’ve ever admired once drilled their first wonky pocket hole into a piece of scrap 2×4 and thought, ‘What on earth am I doing?’ The difference between them and everyone else? They drilled the next one anyway.
Your settings will be slightly off the first time. Your screw might not pull perfectly tight. The boards might shift a millimeter as you drive the screw. That’s all completely normal. Pocket hole joinery has one of the shortest learning curves in all of woodworking — and by your second or third joint, you’ll wonder why you ever struggled with any other method.
So grab that jig, dig out a couple of 2×4s, and make something — even if it’s just a practice joint that lives in the scrap pile. The only bad first project is the one you never start. 🙂
📌 Pin this guide and save it to your woodworking board for later!
💬 Drop a comment below — what’s the first project you’re going to build?