
You know that pile of books sitting on your nightstand, your desk, or honestly just scattered across your floor? Yeah, that pile. The one you keep telling yourself you’ll “organize soon.” Well, today’s the day — and the fix is a lot more satisfying than a plastic organizer from a big-box store.
A DIY wooden book holder is one of those projects where you spend a couple of hours in the workshop and end up with something genuinely beautiful and useful. I built mine on a Sunday afternoon, and I haven’t stopped recommending it to everyone since. Let’s get into it.
Why Build a Wooden Book Holder Instead of Buying One?
Fair question. You can grab a metal bookend set for $15 on Amazon, so why bother building your own?
Here’s why: a handmade wooden book holder looks infinitely better, costs about the same, and lasts far longer. There’s also something deeply satisfying about reaching for a book and knowing the holder it’s sitting in is something you made yourself.
Furthermore, when you make it yourself, you may choose the size, wood type, finish, and design. Want it to match your walnut desk? Done. Need it to hold oversized art books? Scale it up. That kind of customization just doesn’t exist at the store.
And honestly? This build is beginner-friendly. If you’ve never touched a saw before, this is a great first project. If you’re already comfortable in the workshop, you’ll knock this out before lunch.
What You’ll Need
Let’s talk materials and tools before we start cutting anything.
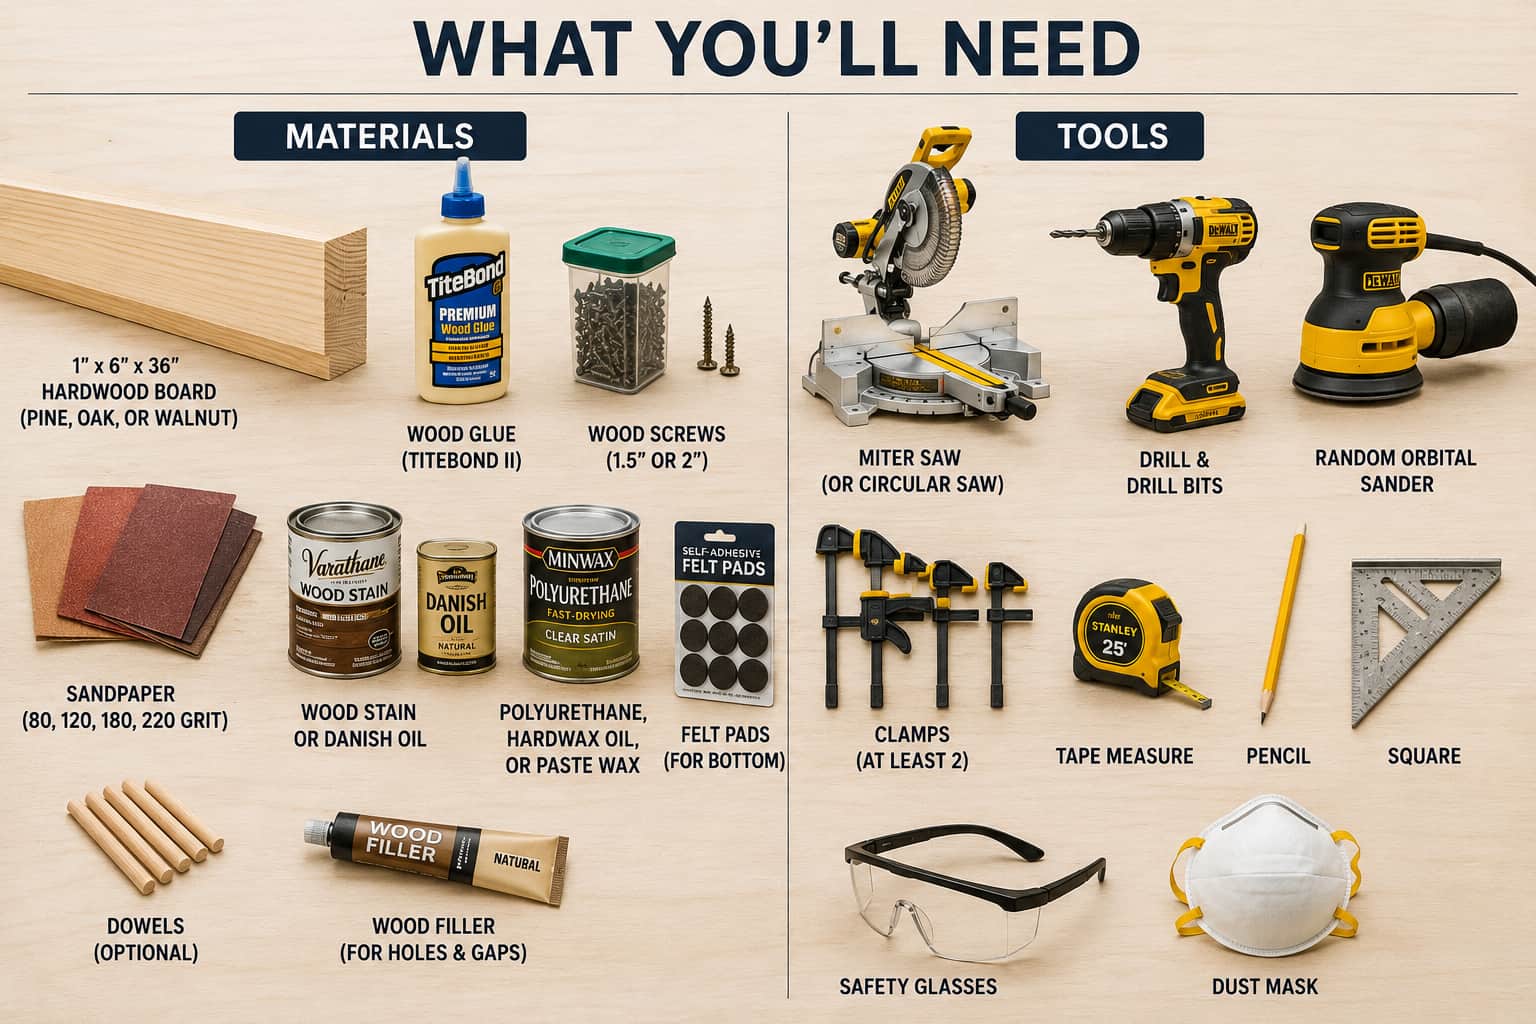
Materials List
- One hardwood board — 1″x6″x36″ is a great starting size (pine, oak, or walnut all work well)
- Wood glue (Titebond II is the gold standard)
- Wood screws — 1.5″ or 2″ depending on your thickness
- Sandpaper — grits 80, 120, 180, and 220
- Wood stain or danish oil (your choice)
- Polyurethane, hardwax oil, or paste wax for sealing
- Felt pads for the bottom (protects your surfaces)
- Dowels (optional, for a cleaner joinery look)
- Wood filler for any gaps or nail holes
Tools You’ll Need
- Miter saw or circular saw for straight cuts
- Drill and drill bits
- Random orbital sander
- Clamps — at least 2, more is always better
- Tape measure and pencil
- Square — to keep your angles true
- Safety glasses and dust mask — always
Step 1: Choose Your Design
Choose the type of book holder you want to make before making any cuts. There are a numerous well-liked versions, and each one has a somewhat different construction.
The Classic L-Shaped Bookend Pair
Two mirrored L-shaped pieces that sit at either end of your book collection. This is the most common style and the easiest to build. Great for desks and shelves.
Advertisement
The Box-Style Book Trough
A shallow open box — essentially a rectangular tray with low sides — that holds books upright or at a slight lean. This style looks fantastic on coffee tables and desks, and it holds more books than a simple bookend pair.
The Slanted Tabletop Book Display
A single angled piece that holds one book open for display — think cookbook holder or a recipe stand. Slightly more complex but incredibly useful in the kitchen.
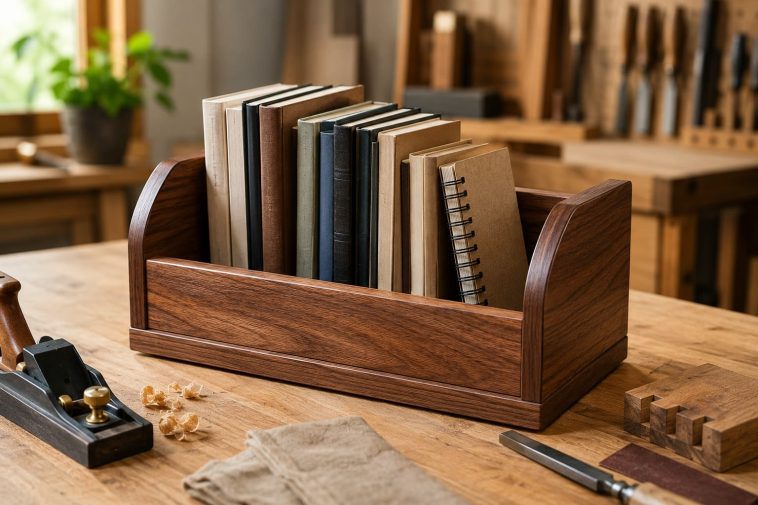
For this guide, we’re focusing on the box-style book trough — it’s the most versatile, beginner-friendly, and genuinely the most useful in everyday life. IMO, it’s the move for a first build.
Step 2: Cut Your Pieces
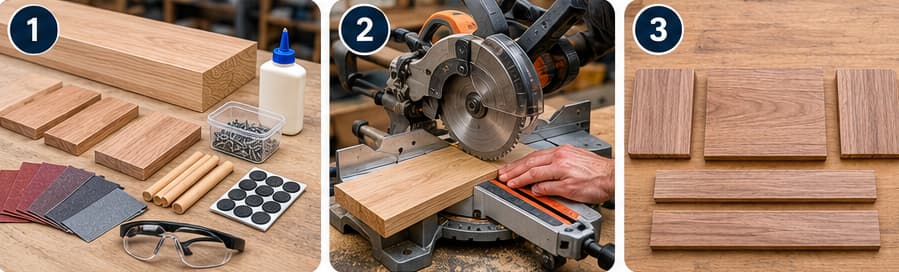
For a standard box-style book trough (approximately 12″ wide x 4″ tall x 5″ deep), you’ll need these cuts from your 1″x6″ board:
- 2 side pieces — 5″ x 4″ (the short ends)
- 1 bottom piece — 12″ x 5″ (the base)
- 2 back/front lip pieces — 12″ x 2″ (optional low walls to keep books from sliding)
Cut list at a glance:
| Piece | Dimensions | Quantity |
| Side panels | 5″ x 4″ | 2 |
| Bottom panel | 12″ x 5″ | 1 |
| Front/back lips | 12″ x 2″ | 2 (optional) |
Cutting Tips
- Always clamp your board before cutting — it keeps the cut straight and keeps your fingers safe
- Use a sharp, fine-tooth blade for cleaner cuts with less tear-out
- Mark with a marking knife instead of pencil where possible — it gives you a more precise cut line
- Cut slightly outside your line and sand back to it for the most accurate dimensions
Step 3: Sand All Pieces Before Assembly
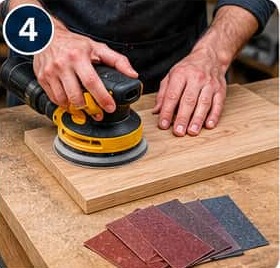
Here’s a tip that most beginners skip and then regret: sand your pieces before you glue them together.
Once the box is assembled, getting into the interior corners with a sander is genuinely miserable. Sand everything while the pieces are still flat and separate — it takes five minutes and saves you twenty.
Sanding sequence:
- 80-grit — removes any saw marks or mill marks from the lumber
- 120-grit — begins smoothing the surface
- 180-grit — significant refinement
- 220-grit — final smooth pass before finishing
Always sand with the grain, not across it. Cross-grain scratches catch stain unevenly and are surprisingly visible in a finished piece. Between each grit, wipe the surface with a slightly damp cloth, let it dry, then continue — this raises the grain so your final finish doesn’t do it for you.
Step 4: Dry Fit First
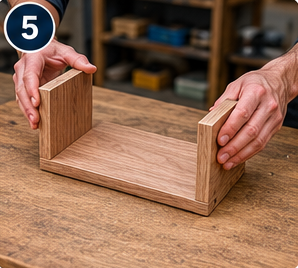
Before you reach for the glue, do a dry fit — assemble all the pieces without any adhesive and check that everything lines up properly.
This step saves so much frustration. Glue sets fast, and if you discover a mis-cut piece once everything is stuck together, your options are limited. A dry fit takes two minutes and gives you complete confidence before the glue goes on.
Check for:
- All pieces sitting flush against each other
- No gaps at the corners
- The overall box sitting flat on a surface without rocking
- Correct proportions (hold some books up to it to check sizing)
If anything is off, now’s the time to adjust with a hand plane or a quick sanding pass on the offending edge.
Step 5: Glue and Assemble
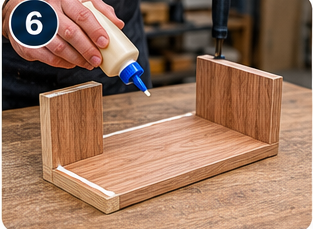
Time to put it all together. This is where your build starts looking like an actual thing — exciting stuff.
Assembly Order
- Apply wood glue to the inside faces of both side pieces where they’ll meet the bottom panel
- Press the bottom panel into position between the two side pieces
- Clamp everything firmly — you want good pressure across all glue joints
- Check for square using your square tool or by measuring diagonally corner to corner (both diagonal measurements should be equal)
- Wipe away any squeeze-out immediately with a damp cloth before it dries
- Let the glue cure — at least 1 hour for initial strength, 24 hours for full strength
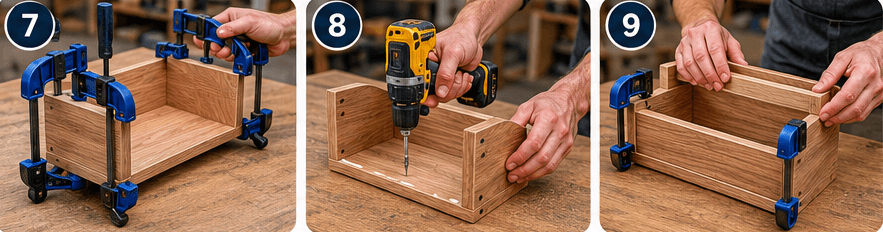
Adding Screws for Extra Strength
Wood glue alone is actually incredibly strong on long-grain joints, but for a book holder that’ll be moved around and loaded with heavy hardcovers, adding a couple of screws gives extra peace of mind.
- Pre-drill pilot holes to prevent splitting — this is critical in thinner pieces
- Drive screws from the outside of the side panels into the bottom panel
- Countersink your screw heads so they sit flush or slightly below the surface
- Fill countersink holes with wood filler, let dry, sand smooth
Step 6: Add the Front and Back Lips (Optional)
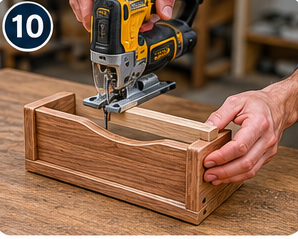
If you’re building the version with low front and back walls to keep books from sliding, now’s the time to attach them.
Apply glue along the top edges of the front and back of the bottom panel, press the lip pieces into place, clamp, and let cure. These low walls (about 2″ tall) make a huge difference in keeping everything tidy — especially if your holder sits on a surface that gets any kind of vibration or movement.
You can also get creative here. Instead of straight lips, cut a gentle curve on the top edge of each lip piece using a jigsaw. Sand it smooth and it adds a beautiful design detail with minimal extra effort.
Step 7: Final Sanding and Surface Prep
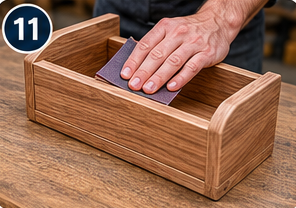
Once your assembly is fully cured (give it that full 24 hours), do a final sanding pass over the entire piece.
- Start with 150-grit to blend any glue squeeze-out or uneven joints
- Follow with 220-grit for a final smooth surface
- Pay special attention to the outside corners — break them slightly with sandpaper so they’re smooth to the touch, not sharp
- Wipe down with a tack cloth before finishing to remove all dust
If you used wood filler anywhere, make sure it’s fully sanded flush. Filled spots can sometimes telegraph through a finish if they’re not perfectly level.
Step 8: Apply Your Finish
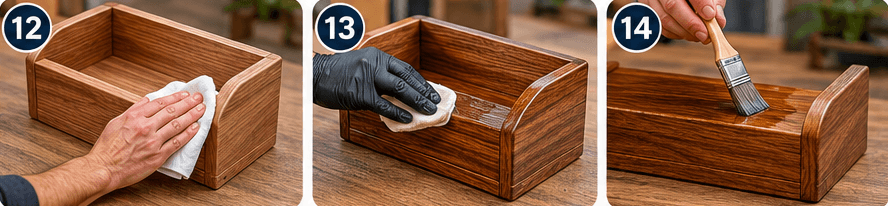
This is where your book holder goes from “rough workshop piece” to “actually gorgeous.” The finish you choose sets the whole tone.
Best Finish Options for a Book Holder
Danish Oil
- Penetrating finish, enhances natural wood color
- Matte, natural look
- Easy to apply with a rag
- Best for: walnut, oak, or any wood where you want to show off the grain
- Reapply annually for best results
Stain + Polyurethane
- Huge color range — from light honey tones to deep espresso
- Very durable and scratch-resistant once cured
- Best for: pine or poplar if you want a richer color
- Apply stain first, let dry, then 2–3 coats of poly
Hardwax Oil (Rubio Monocoat)
- One-coat application
- Beautiful natural satin finish
- You actually feel the wood texture, not a plastic coating
- Best for: premium hardwoods
- More expensive but an exceptional result
Painted Finish
- Prime first with a wood primer
- Two coats of latex or chalk paint
- Seal with a matte or satin topcoat
- Best for: a modern, Scandi-style look or if you want the holder to match room decor
Application Tips
- Always apply in thin, even coats — thick coats drip, bubble, and take forever to cure
- Let each coat dry fully before applying the next
- Lightly sand with 320-grit between poly coats for a glass-smooth result
- The final coat gets no sanding — just a gentle wipe with a soft cloth once cured
Step 9: Attach Felt Pads
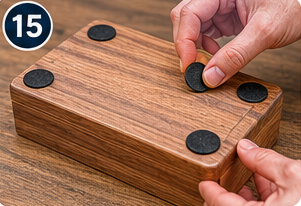
This tiny step makes a big difference. Stick self-adhesive felt pads to the four bottom corners of your book holder before you ever set it on a surface.
Without them, the wood will scratch your desk, shelf, or table over time — especially hardwoods, which can be surprisingly abrasive on finished surfaces. Four felt pads cost about $2 and take thirty seconds to apply. Do it.
Want More Detailed Woodworking Plans? Ted’s Woodworking Has Thousands
Here’s the honest truth about building furniture from scratch: the hardest part is often not the cutting or the finishing — it’s figuring out the dimensions, the joinery, and the sequence of steps before you’ve even touched a piece of wood.
That’s exactly where Ted’s Woodworking Plans becomes genuinely valuable. It’s one of the most comprehensive libraries of woodworking plans available online — over 16,000 step-by-step projects covering everything from small desktop builds like this one to full bedroom furniture sets, outdoor structures, cabinets, and way beyond.
What makes Ted’s worth it:
- Complete cut lists and materials lists for every project — no guesswork
- Step-by-step instructions written for all skill levels
- CAD/DWG files so you can visualize exactly what you’re building before you start
- Video tutorials for techniques that are hard to explain in text alone
- Lifetime access — it’s a one-time purchase, not a subscription
- Projects ranging from 30-minute beginner builds to advanced multi-week furniture projects
If you’re getting serious about woodworking and you want to stop reinventing the wheel every time you start a new project, Ted’s is worth every penny. The time you save on planning alone pays for it many times over.
Check out Ted’s Woodworking Plans here — your next project is already in there waiting for you.
Variations and Upgrades to Try
Once you’ve nailed the basic build, here are some ways to level it up:
Add a Drawer
Build a small shallow drawer into the base of your book trough for storing bookmarks, reading glasses, or a pen. Requires basic drawer slide hardware and a bit more joinery work, but the result is incredibly functional.
Burn or Engrave the Wood
A wood burning kit lets you add personalized designs, names, or patterns to your finished piece before sealing it. It’s an easy way to make a gift version truly special. FYI, always burn before you apply any finish — burning sealed wood doesn’t work and smells terrible.
Add a Charging Station
Route a small hole through the back of the trough for a cable pass-through, and your book holder doubles as a bedside charging station. Keep your phone, your book, and your reading lamp all in one organized spot.
Build a Matching Set
Build two or three matching holders in different sizes — one for your desk, one for the nightstand, one for the kitchen counter for cookbooks. Using the same wood and finish across all three creates a cohesive, intentional look throughout your home.
Common Mistakes to Avoid
Even experienced builders trip over these on small builds like this one:
Not clamping during glue-up. Holding pieces together by hand while the glue sets is a recipe for joints that shift slightly out of alignment. Even one clamp is dramatically better than none.
Skipping the dry fit. Glue sets faster than you expect, especially in a warm shop. Always dry fit first.
Over-driving screws. In thinner stock like a 1″x6″, it’s easy to split the wood or strip out the hole entirely by driving screws too aggressively. Use a drill with a clutch setting, or drive screws by hand for the final turns.
Rushing the finish. Poly that isn’t fully cured between coats will peel, bubble, or stay tacky. Follow the manufacturer’s drying times — they exist for a reason. :/
Not testing the stain on scrap first. Different woods absorb stain very differently. Always test your stain on a scrap piece of the same wood before committing to the final piece.
Quick Build Recap
Let’s run through the full process one more time so you’ve got a clean mental checklist:
- Choose your design — box trough, L-shaped bookends, or slanted display
- Cut your pieces — clamp, measure twice, fine-tooth blade
- Sand all pieces before assembly — 80 through 220 grit
- Dry fit everything — check for square and fit before glue
- Glue and assemble — clamp firmly, check square, wipe squeeze-out
- Add screws for strength — pre-drill, countersink, fill
- Add optional lips — curved top edge for a design detail
- Final sand and prep — 220-grit, tack cloth wipe-down
- Apply your finish — multiple thin coats, sand between poly coats
- Attach felt pads — always, every time, no exceptions
Wrapping Up
A DIY wooden book holder is the kind of project that reminds you why you got into woodworking in the first place. It’s quick, it’s satisfying, it’s genuinely useful, and it looks a hundred times better than anything in the same price range at a furniture store.
Whether you build the simple box trough or start riffing on the design with curves, engravings, or a built-in drawer, the core skills you practice here — accurate cuts, glue-ups, sanding, and finishing — carry forward into every project you build after this one.
If you want a solid foundation of plans to keep building from, don’t forget to check out Ted’s Woodworking Plans for over 16,000 project ideas, and revisit 16 Best Woodworking Tools for Beginners if you’re still building out your tool setup.
Now go make that book pile disappear — one beautiful wood holder at a time.