
So you’ve been scrolling through Pinterest for the 47th time this week, staring at gorgeous round wood coffee tables that cost anywhere from $400 to $1,200, thinking “I could probably make that.” Spoiler alert: you absolutely can. And for a fraction of the price.
I built my first DIY round coffee table a couple of years back — a beautiful live-edge walnut slab situation — and I haven’t stopped building since. There’s something deeply satisfying about setting a cup of coffee on a table you made with your own hands. So let’s get into it.
Why a Round Coffee Table?
Before we grab the saw, let’s talk about why round is such a smart choice for a DIY project.
Round tables work in almost any room layout. No sharp corners to bump your shins on (we’ve all been there), they feel more inviting, and they naturally encourage conversation flow. Plus — and here’s the kicker — a round slab of wood is one of the most forgiving shapes to work with as a beginner.
If you’re still figuring out your style and what table shape fits your space, check out this roundup of 25 Coffee Table Plans You Can Build This Weekend.
What You’ll Need: Materials & Tools
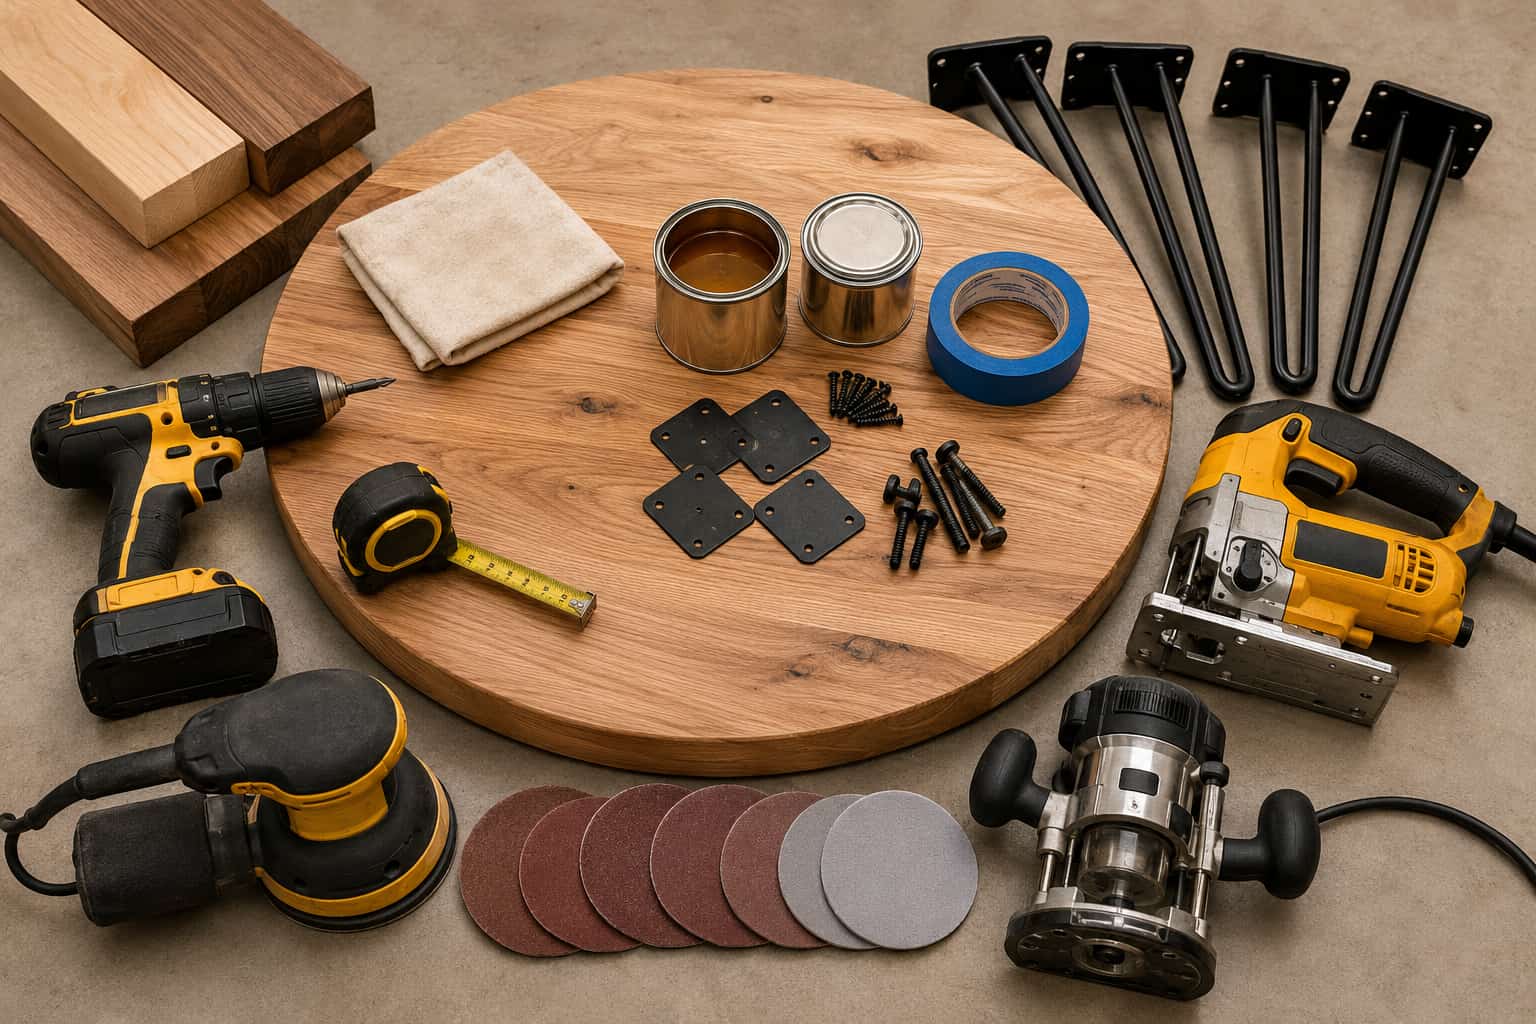
Let’s keep this real. You don’t need a full woodworking shop to pull this off. Here’s what you’ll want to have on hand.
Materials
- One round wood slab or glued-up panel (24″–36″ diameter works great for most living rooms)
- 4 hairpin legs or tapered wooden legs (metal hairpin legs are popular for a mid-century look)
- Wood screws (1.5″ for attaching legs)
- Wood filler (optional, for filling knots or cracks)
- Sandpaper — grits 80, 120, 180, and 220
- Wood stain or danish oil (your choice of finish)
- Polyurethane or hardwax oil for sealing
- Leg mounting plates (if using hairpin legs)
Tools
- Jigsaw or circular saw (for cutting the circle if you’re starting from a flat board)
- Random orbital sander
- Drill and drill bits
- Tape measure and pencil
- Router with roundover bit (optional but makes a huge difference)
- Safety glasses and dust mask — non-negotiable
Before you go on a buying spree at your neighborhood hardware store, I would highly suggest reading through 16 Best Woodworking Tools for Beginners if you’re new to the field of woodworking and are unsure which instruments to prioritize.
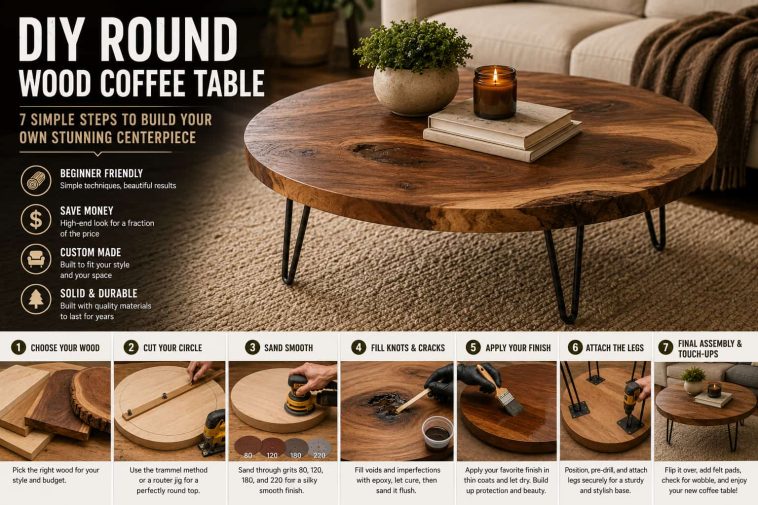
Step 1: Choose Your Wood

This is honestly where most people overthink things. Let me save you some time.
Advertisement
The best woods for a DIY round coffee table are:
- Pine — affordable, easy to work with, takes stain beautifully
- Oak — durable, gorgeous grain pattern, slightly harder to cut
- Walnut — premium look, rich dark tones, but pricier
- Poplar — budget-friendly, great for painted finishes
- Live-edge slabs — the showstopper option if you want something truly unique
If you want that natural, organic look with bark edges and wood character, a live-edge round slab is your best bet. Many lumber yards sell pre-cut round slabs, which saves you the cutting step entirely. IMO, this is the move if you’re doing your first build.
Avoid: Green or freshly cut wood — it’ll warp as it dries. Always use kiln-dried lumber.
Step 2: Cut Your Circle (If Needed)

If you bought a pre-cut round slab, skip ahead to Step 3. Lucky you. 🙂
If you’re starting with a flat board or panel, here’s how to cut a clean circle:
The Trammel Method (Most Accurate)
- Find the center of your board and mark it with a pencil.
- Build a trammel — this is just a strip of wood with a nail at one end and a pencil hole at the other, set to your desired radius.
- Draw your circle by pivoting the trammel around the center nail.
- Cut just outside the line with a jigsaw, using a clean, fine-tooth blade.
- Sand back to the line once your rough cut is done.
Pro tip: Use painter’s tape along your cut line before you cut. It reduces tear-out dramatically, especially on oak or pine.
Using a Router Jig
For an even cleaner edge, a router circle-cutting jig is worth making or buying. It takes more setup time but gives you a glass-smooth circular edge right off the bat. This technique is especially satisfying if you’re a precision-obsessed person (no judgment — I am too).
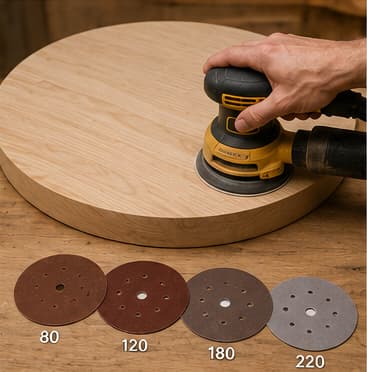
Step 3: Sand, Sand, and Then Sand Again
No novice carpenter knows that sanding makes up 80% of the final result. Your finish is only as excellent as the surface it is applied on. If you rush the sanding, your stain will look blotchy and your poly will highlight every scratch. So take your time here.
The sanding sequence to follow:
- 80-grit — removes any saw marks, levels the surface
- 120-grit — smooths out the 80-grit scratches
- 180-grit — refines the surface significantly
- 220-grit — final pass before finishing
Always sand with the grain, not across it. And between each grit change, wipe the surface with a slightly damp cloth to raise the grain, let it dry, then sand again. This prevents the grain from rising after you apply your finish — a rookie mistake that’ll make you want to flip the table (not literally, hopefully).
Step 4: Fill Knots and Cracks (Optional but Recommended)

Natural wood slabs often have character — knots, small cracks, live edges with voids. This is what makes them beautiful, but you’ll want to stabilize them before finishing.
Two-part epoxy resin works wonderfully here. Mix it up, pour it into voids, let it cure, then sand it flush. You can even add pigment to the epoxy to make those voids pop — black-tinted epoxy in walnut knots looks absolutely incredible.
If you want a live-edge slab with enormous gaps, you should look at deep-pour epoxy built for thick fills.
Step 5: Apply Your Finish

This is where your table transforms from “wood circle” to “stunning centerpiece.” The finish you choose dramatically affects the final look and the durability of your table.
Popular Finish Options
Danish Oil
- Penetrating oil finish that enhances the wood’s natural color
- Easy to apply, low sheen
- Best for: natural, matte looks on walnut or oak
- Not the most durable for high-use surfaces
Wood Stain + Polyurethane
- Stain first to color the wood, then poly for protection
- Huge range of color options
- Best for: pine or poplar if you want a darker, richer tone
- Very durable once fully cured
Hardwax Oil (like Rubio Monocoat)
- One-coat application, feeds the wood fibers
- Beautiful satin finish, very natural feel
- Best for: premium hardwoods where you want to feel the wood texture
- More expensive but worth every penny
Epoxy Resin Top Coat
- Creates a thick, glass-like surface
- Extremely durable
- Best for: statement pieces, river tables, or if you want that glossy showroom look
How to Apply Polyurethane (The Basics)
- Apply a thin first coat, wiping the excess off quickly
- Let it dry fully (check manufacturer timing — usually 4–8 hours)
- Lightly sand with 320-grit between coats
- Wipe away dust, apply a second coat
- Repeat for a third coat for maximum durability
Three coats is the sweet spot for a coffee table that’ll handle daily life.
Step 6: Attach the Legs

You made it to the fun part. Legs make or break the whole vibe of your table, so choose wisely.
Leg Styles to Consider
- Hairpin legs — sleek, mid-century modern, very popular, easy to attach
- Tapered wooden legs — warmer, more traditional, great for farmhouse or rustic builds
- Pipe legs — industrial aesthetic, very sturdy
- Pedestal base — single central post with a base plate, good for smaller round tables
How to Attach Hairpin Legs
- Mark your leg positions — for four legs, space them evenly around the underside, typically 2″–3″ in from the edge
- Pre-drill pilot holes to avoid splitting the wood
- Attach the mounting plates with wood screws
- Thread on the hairpin legs (most come with threaded bolt tops)
- Check for wobble — if one leg is slightly off, most hairpin legs have adjustable feet on the bottom
For wooden legs, you’ll want to use leg mounting plates with hanger bolts — this gives you a more secure connection and lets you remove legs if needed (great for moving).
Step 7: Final Assembly and Touch-Ups
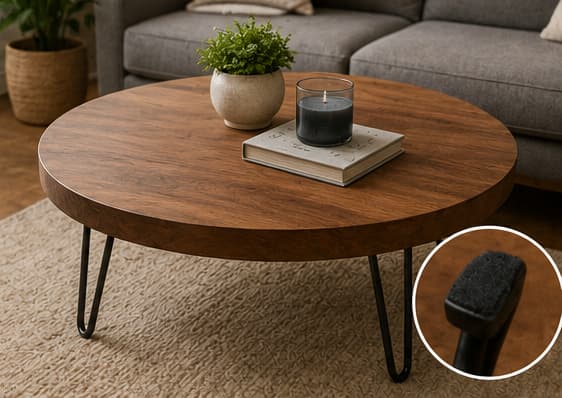
Flip that baby over, set it on the floor, and step back. How’s it looking?
If everything went well, you should have a beautiful, sturdy round wood coffee table that you made yourself. Give yourself a moment — seriously, that’s impressive.
Final checklist before you call it done:
- ✅ No wobble when you press down on the center
- ✅ All legs are tight and secure
- ✅ Finish is fully cured (wait 72 hours minimum before heavy use)
- ✅ No rough spots or drips in the finish
- ✅ Bottom of legs have felt pads to protect your flooring
If you discover any minor flaws in the surface, a gentle hand-sand with 400-grit followed by a thin application of paste wax would work wonderfully as a finishing touch.
Want More Detailed Plans? Ted’s Woodworking Has You Covered
Here’s the thing — building one coffee table is great. But once you catch the woodworking bug (and trust me, you will), you’ll want access to a solid library of detailed plans you can follow for any project.
That’s where Ted’s Woodworking Plans comes in. Ted’s is honestly one of the most comprehensive woodworking plan databases I’ve come across — we’re talking over 16,000 step-by-step plans covering everything from coffee tables to full bedroom furniture sets, outdoor structures, and beyond.
What makes it genuinely useful:
- Detailed, beginner-friendly instructions with materials lists and cut sheets
- CAD/DWG files so you can visualize the build before you start
- Video tutorials for the trickier techniques
- Plans for every skill level — whether you’re just starting out or you’ve been in the shop for years
If you’re serious about building more furniture and want to skip the guesswork of figuring out dimensions and joinery yourself, Ted’s Woodworking is a worthwhile investment. It’s the kind of resource that pays for itself after your first couple of builds when you realize how much time (and wood) you save by following a proper plan.
Check out Ted’s Woodworking Plans here and see if it’s right for your next project.
Common Mistakes to Avoid
Even experienced woodworkers trip up on these. Here’s what to watch out for:
Rushing the finish cure time. Polyurethane feels dry to the touch in a few hours, but it’s not fully hardened for 72 hours or more. Put a hot mug on it too early and you’ll have a ring permanently embedded in your finish. :/
Skipping grits. Going from 80 to 220 in one jump doesn’t save time — it just means your 220 is doing the job of 120 and 180. The scratches show through your finish.
Not sealing end grain. The end grain on your table edge soaks up stain much faster than face grain, creating dark blotchy patches. Apply a wood conditioner or a thinned coat of finish to end grain first.
Attaching legs off-center. Measure twice, drill once. An off-center leg placement creates wobble that no amount of adjustment will fully fix.
Using the wrong blade for your jigsaw. A coarse blade on oak or walnut will tear out the surface badly. Use a fine-tooth, downcut blade for clean results.
Finishing Touches and Styling Tips
Your table is built — now let’s make it look like it belongs in an interior design magazine.
For a natural wood round table, try:
- A simple linen tray with a candle and a small succulent
- A stack of your favorite coffee table books
- A single sculptural vase with dried pampas grass
For a darker stained or walnut table:
- Light-colored ceramics pop beautifully against dark wood
- Brass or gold accents complement warm wood tones perfectly
Keep it minimal. The wood grain is the star of the show. Don’t clutter the surface — let that beautiful slab breathe.
Wrapping It Up
Building a DIY wood round coffee table is one of those projects where the effort-to-payoff ratio is genuinely fantastic. A weekend of work, a modest materials budget, and you end up with a piece of furniture that looks custom-made — because it is.
The key steps one more time:
- Choose your wood (live-edge slab for max impact, pine for budget builds)
- Cut your circle using the trammel method or a router jig
- Sand through the grits — don’t skip this
- Fill knots and voids with epoxy if needed
- Apply your finish of choice in multiple thin coats
- Attach your legs securely with proper hardware
- Let everything cure fully before use
Whether you’re a first-time builder or you’ve got a few projects under your belt, this build is absolutely within reach. And once you finish it, you’ll immediately start planning your next one — that’s just how this goes.
If you want a shortcut to your next project, don’t forget to check out Ted’s Woodworking Plans for thousands of ready-to-use plans, and browse through 25 Coffee Table Plans You Can Build This Weekend for even more inspiration.
Now go build something. You’ve got this.