
Your porch is one small build away from looking like it belongs on a magazine cover — and your back patio doesn’t have to be a graveyard for random cushions, pool toys, and gardening gloves anymore. A DIY outdoor storage bench solves all of that in one weekend, for less than $50. Sounds too good to be true? It’s not. I’ve seen complete beginners pull this off on a Saturday morning with zero woodworking experience and a borrowed drill.
This bench gives you a comfortable place to sit and a hidden storage compartment underneath the lid. It works on a porch, a patio, a deck, or even an entryway. And the best part? You don’t need to be a woodworker to build it. If you can measure, drill, and follow directions, you’ve already got the skills for this one.
Let’s get into it.
What You’ll Actually Build
Before we start buying lumber, let’s talk about what this bench looks like so you know exactly what you’re getting into.
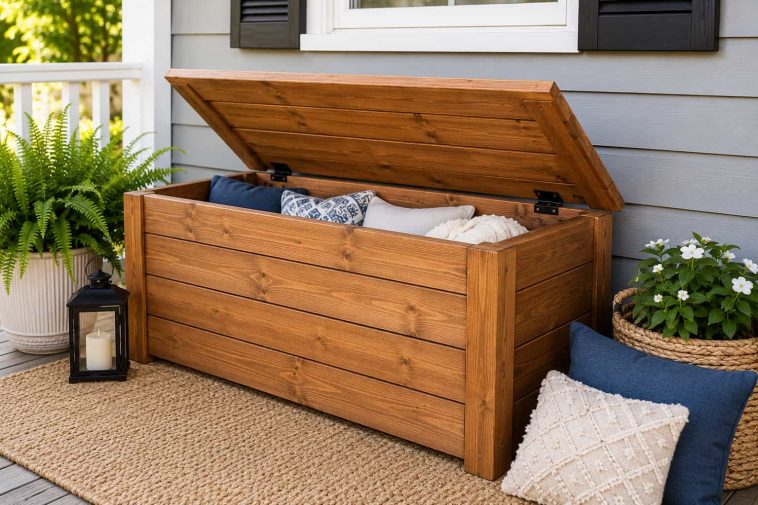
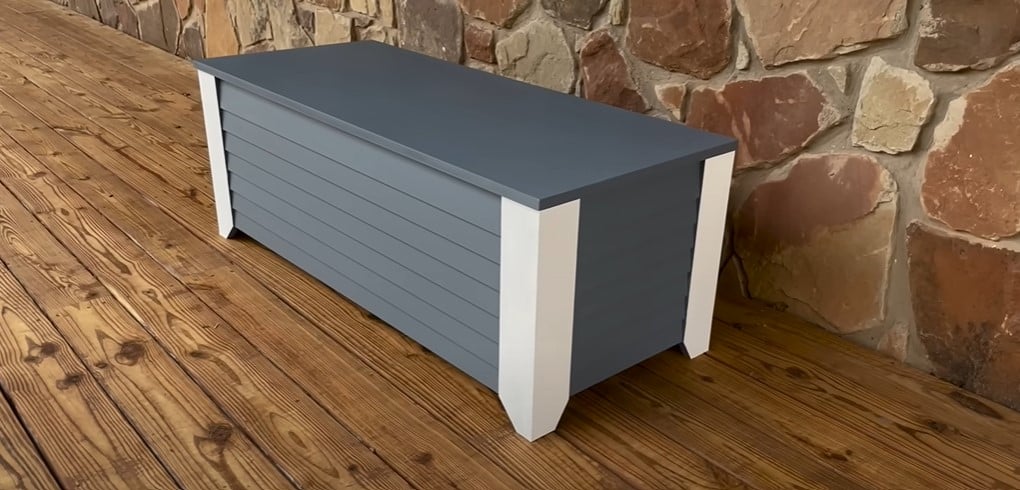
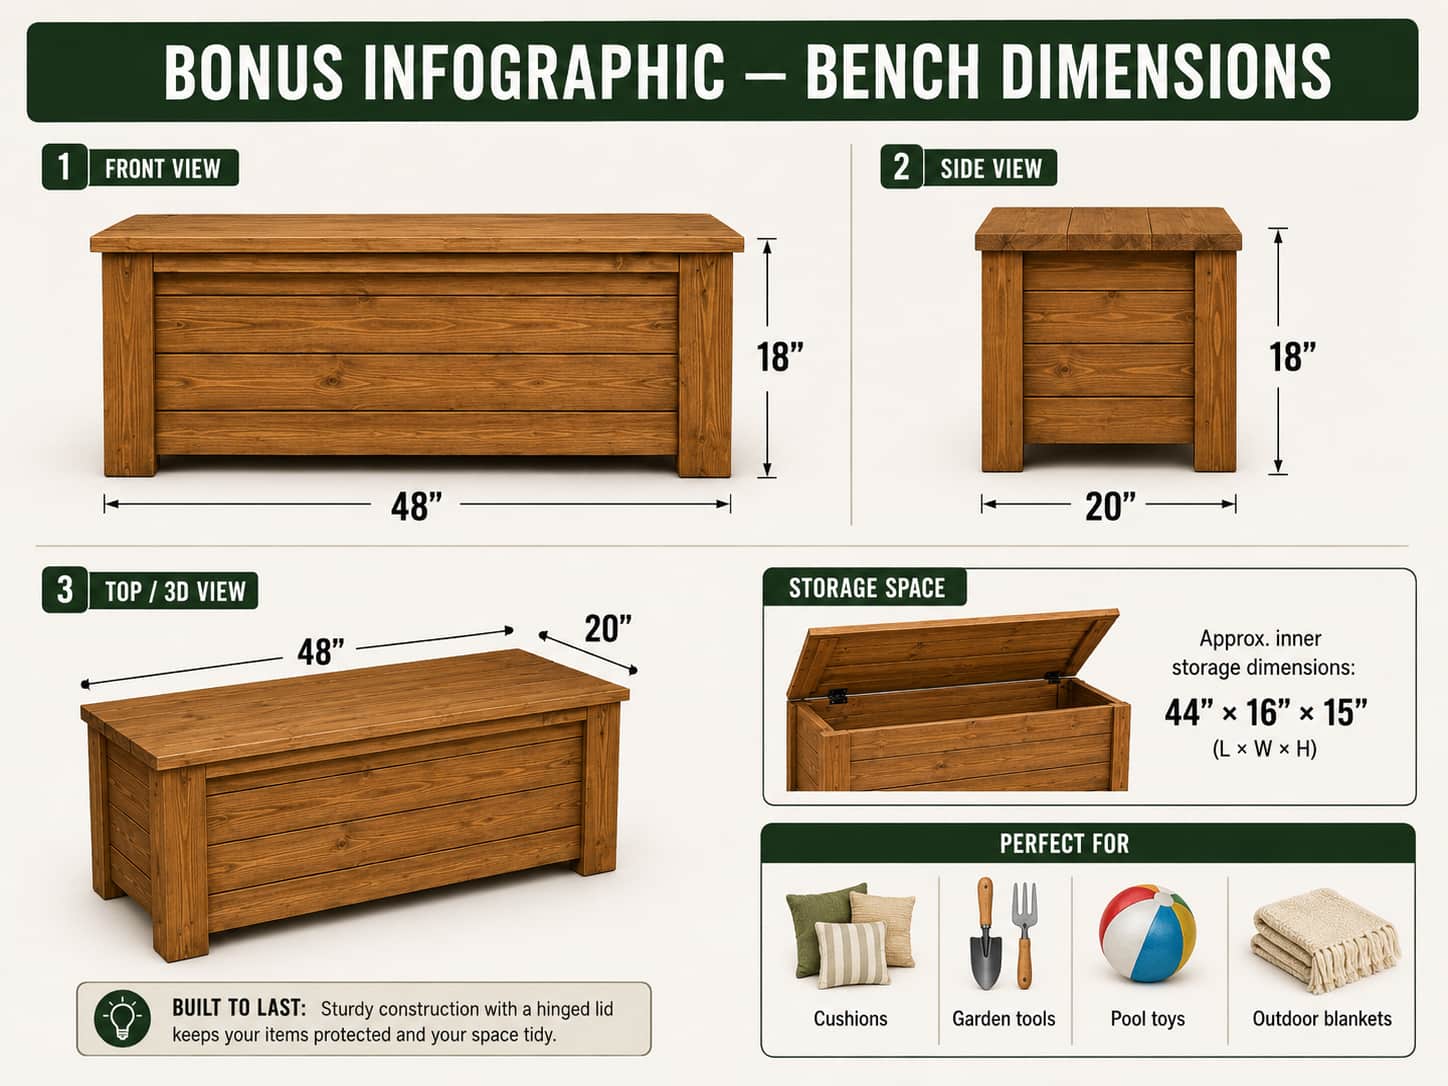
You’re building a rectangular wooden bench approximately 48 inches long, 20 inches wide, and 18 inches tall — that’s a comfortable sitting height for most adults. The top is a hinged lid that lifts up to reveal a roomy storage compartment inside. Think of it as a treasure chest that also doubles as patio furniture. 😄
This bench fits perfectly on a front porch, beside a pool, on a deck, or even inside an entryway to store shoes and bags. It seats two adults comfortably and can hold a surprising amount of stuff inside — cushions, pool floaties, gardening tools, outdoor blankets, you name it.
The materials are simple: mostly 2x4s and 1×6 boards, which you can find at any Home Depot or Lowe’s. Nothing exotic, nothing expensive.
Free Plans to Download Before You Start
Here’s something a lot of beginner woodworking sites skip over — they give you vague instructions without actual plans. Not today. Below are five free, legitimate plan sources you can download right now and follow along:
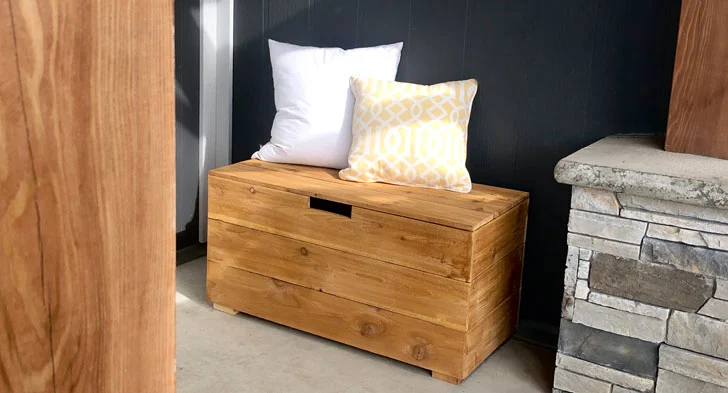
Ana White — Outdoor Modern Cedar Storage Bench
Advertisement
Source : Ana-white
Ana’s plans are legendary in the DIY world. Clear diagrams, cut lists, and beginner-friendly instructions. Start here if you’ve never built anything before.
Instructables — Outdoor Storage Bench Plans
Source : Instructables
Solid step-by-step plan with detailed measurements and a shopping list already done for you.
Family Handyman — How to Build an Outdoor Storage Bench
Source : familyhandyman
Trusted source, great photos of the finished build, and very clear written instructions.
Wilker Do’s — Easy DIY Storage Bench (1-Day Build)
Source : Wilkersdo
If you want to get this done in a single day, this is the plan to follow. She also has a video walkthrough which helps a lot.
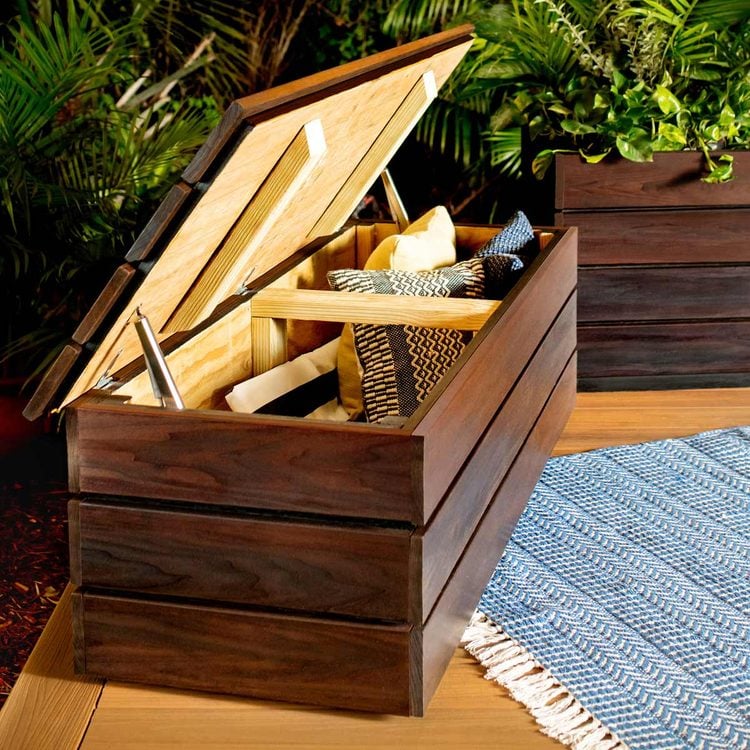
Real Cedar — Free Planter Bench with Storage PDF
A beautiful variation that adds built-in planters on each side. Perfect if you want something that doubles as garden decor.
FYI — I’d recommend picking one plan and sticking with it from start to finish rather than mixing and matching. Different plans use slightly different measurements, and combining them mid-build is a recipe for a wobbly bench.
Tools You’ll Need
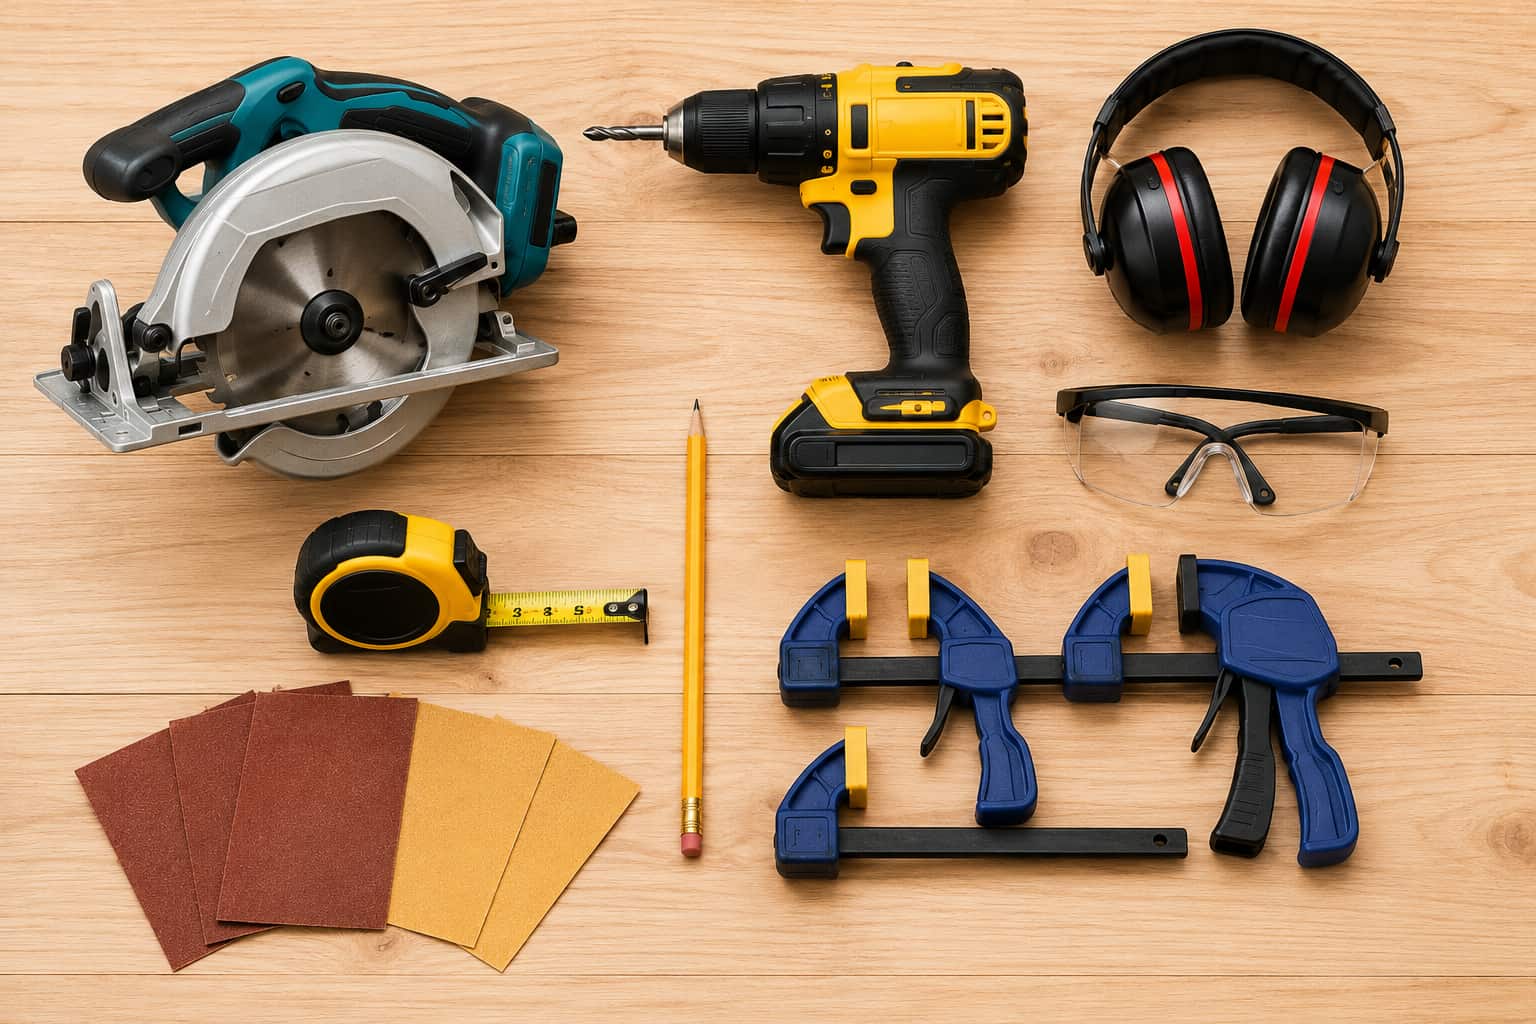
Good news: you don’t need a workshop full of fancy equipment. Here’s the basic tool list:
- Circular saw or miter saw — for cutting your lumber to size
- Drill + drill bits — your most important tool for this build
- Measuring tape — measure twice, cut once (seriously, every time)
- Sandpaper — 80 grit and 120 grit
- Clamps — 2 to 4 clamps make your life so much easier
- Safety glasses and ear protection — non-negotiable
- Pencil — for marking your cuts
No saw at home? No problem. Both Home Depot and Lowe’s will cut your lumber to size for free(or a very small fee) right in the store. You give them your cut list, they handle it, and you take home pieces that are ready to assemble. It’s one of the most underrated beginner hacks out there.
A pocket hole jig is optional but worth mentioning — it creates incredibly strong hidden joints and makes assembly faster. The Kreg Jig Mini runs about $20 and is a solid investment if you plan to build more than one project.
Materials & Shopping List (Under $50 Budget Breakdown)
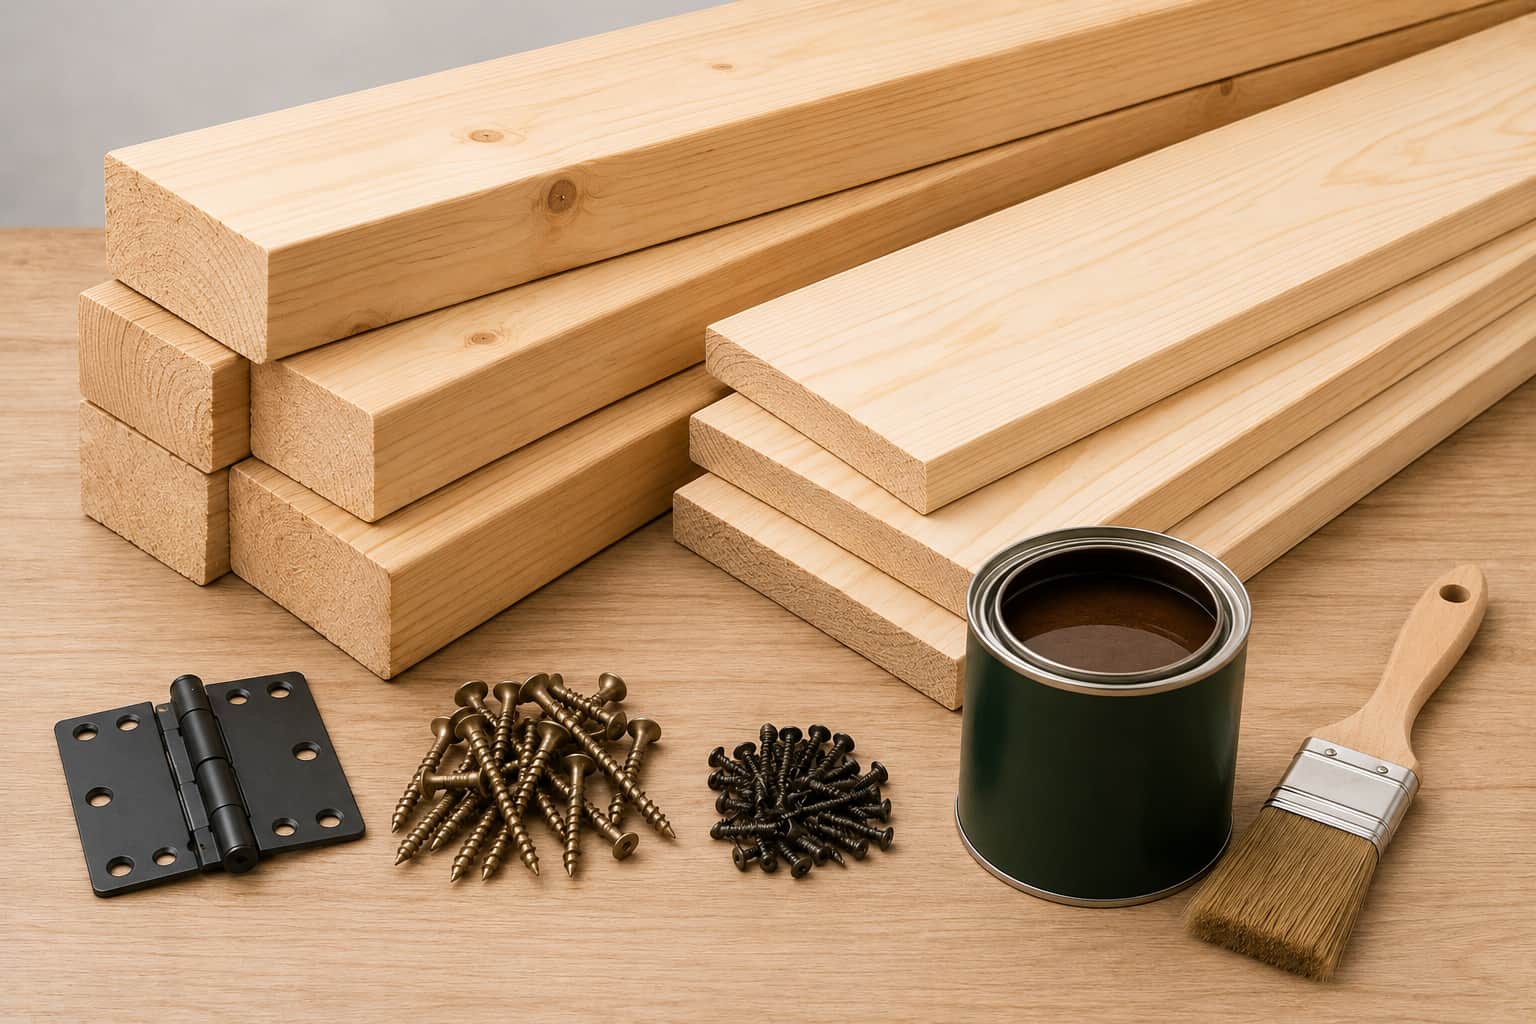
Here’s what you need and what it’ll cost you at a typical hardware store:
| Material | Qty | Estimated Cost |
| 2x4x8 lumber boards | 6 | ~$18 |
| 1x6x8 lumber boards | 3 | ~$12 |
| Exterior hinges + screws | 1 pack | ~$6 |
| Exterior wood screws (3″ and 1.5″) | 1 box | ~$7 |
| Exterior wood stain or paint | 1 quart | ~$8 |
| Total | ~$51 |
A couple of notes on hitting that $50 mark: if you already have screws at home or leftover stain from a previous project, you’ll easily come in under budget. Also, watch for lumber sale days at big box stores — they happen more often than people realize.
Cedar and pressure-treated lumber cost slightly more but are worth it if your bench will sit in a rainy climate. Both are naturally resistant to rot and insects, which means your bench lasts years longer without extra maintenance.
Step-by-Step Build Instructions
Alright, here’s where the real fun begins. Roll up your sleeves — this is easier than it looks.
Step 1 — Cut Your Lumber
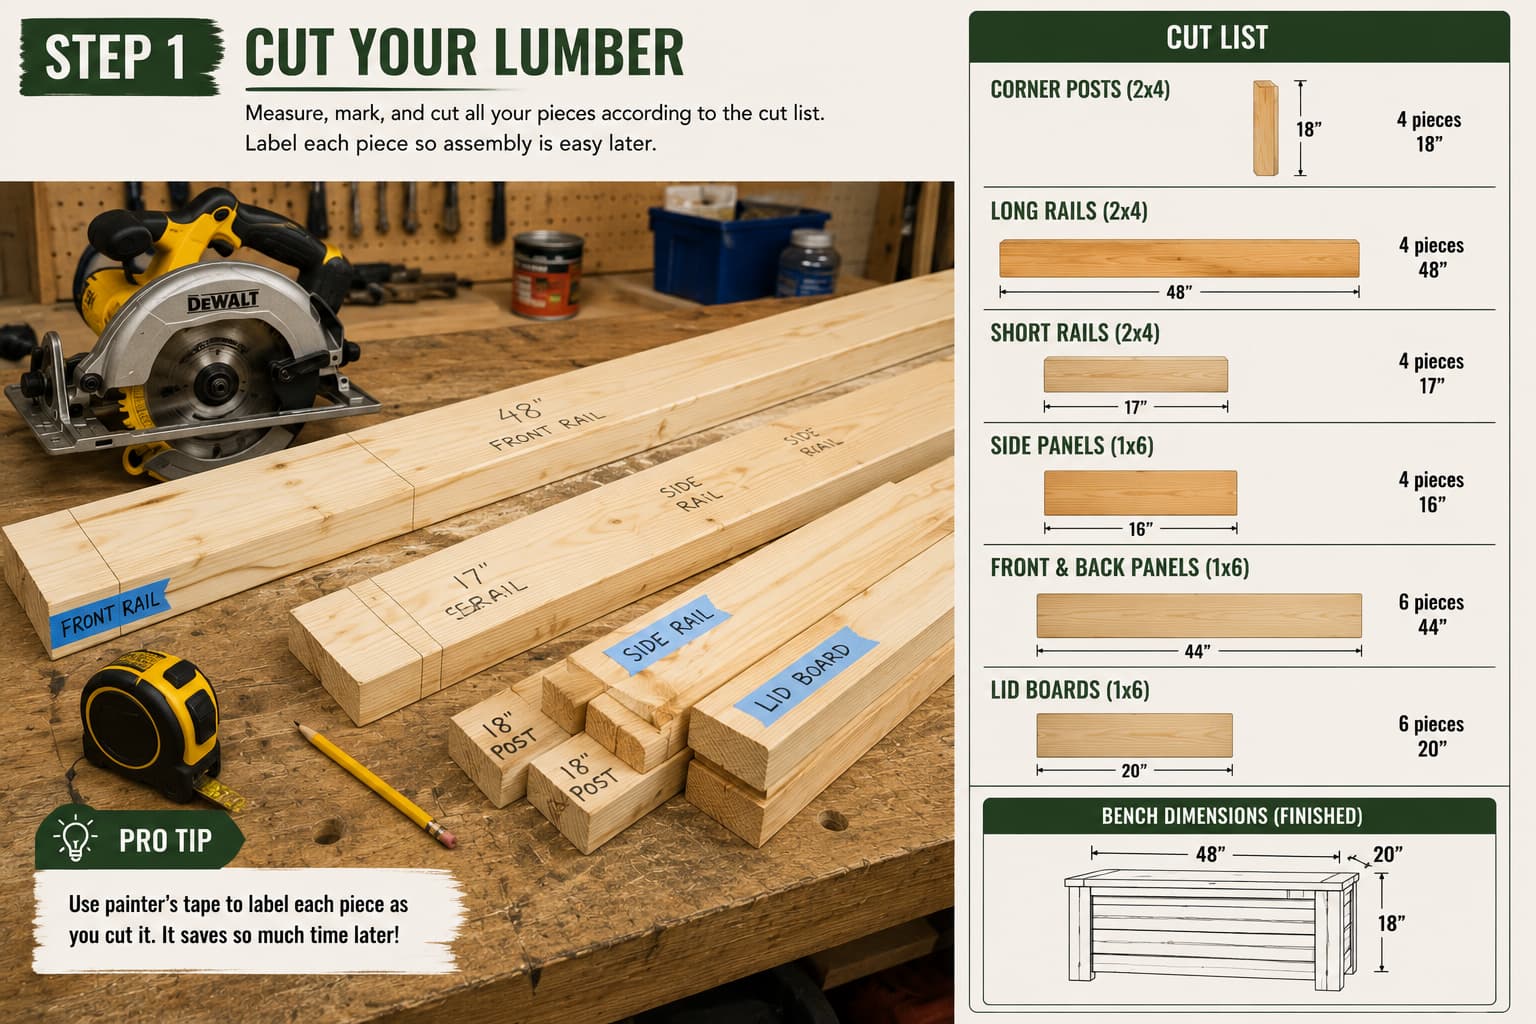
Start by printing your chosen plan and writing out your full cut list. Then grab your measuring tape and pencil and mark every cut on your boards before you make a single one.
Pro tip: label each piece with a strip of painter’s tape as you cut it — “front panel,” “side frame,” “lid board,” etc. It sounds silly until you’re staring at 15 similar-looking pieces trying to remember which is which. Trust me on this one :/
Step 2 — Build the Base Frame
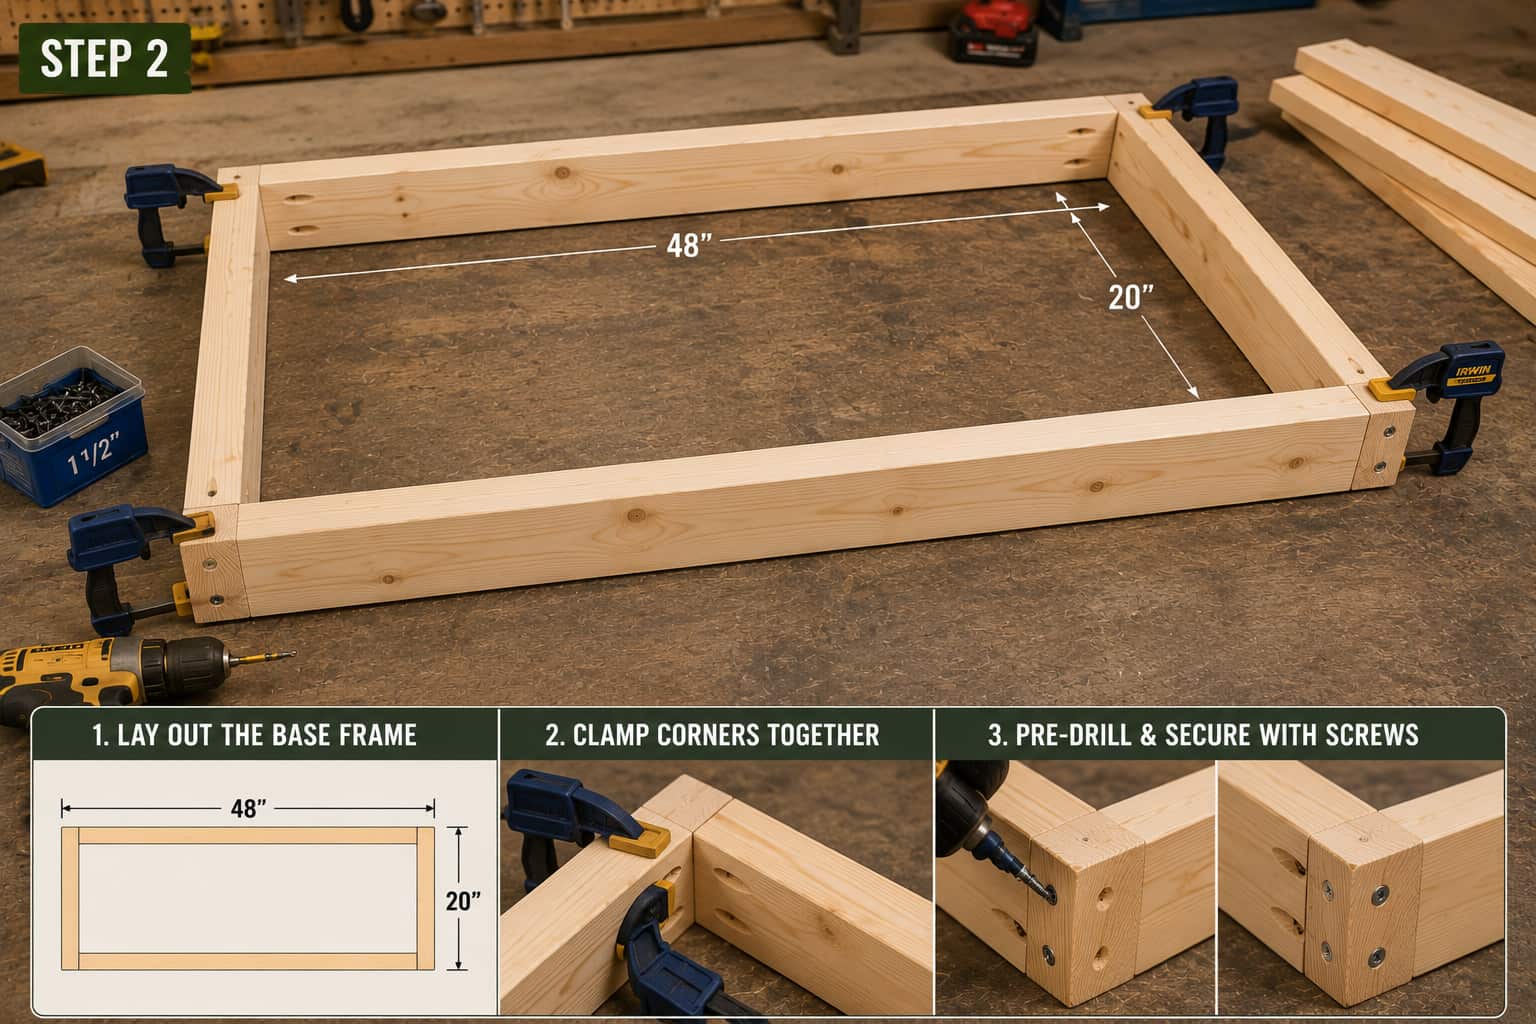
The base is a simple rectangle built from 2x4s lying flat on the ground. This is the foundation of your bench, so take your time here.
- Lay out two long boards (the front and back of the base) and two shorter boards (the sides)
- Pre-drill pilot holes at every connection point before driving screws — this prevents the wood from splitting
- Clamp the pieces together before driving any screws for a tighter, cleaner joint
Once the base rectangle is assembled, flip it over and make sure all four corners sit flat on the ground. If it rocks, one corner is slightly off — just loosen one screw and adjust before tightening everything back down.
Step 3 — Build the Side Frames
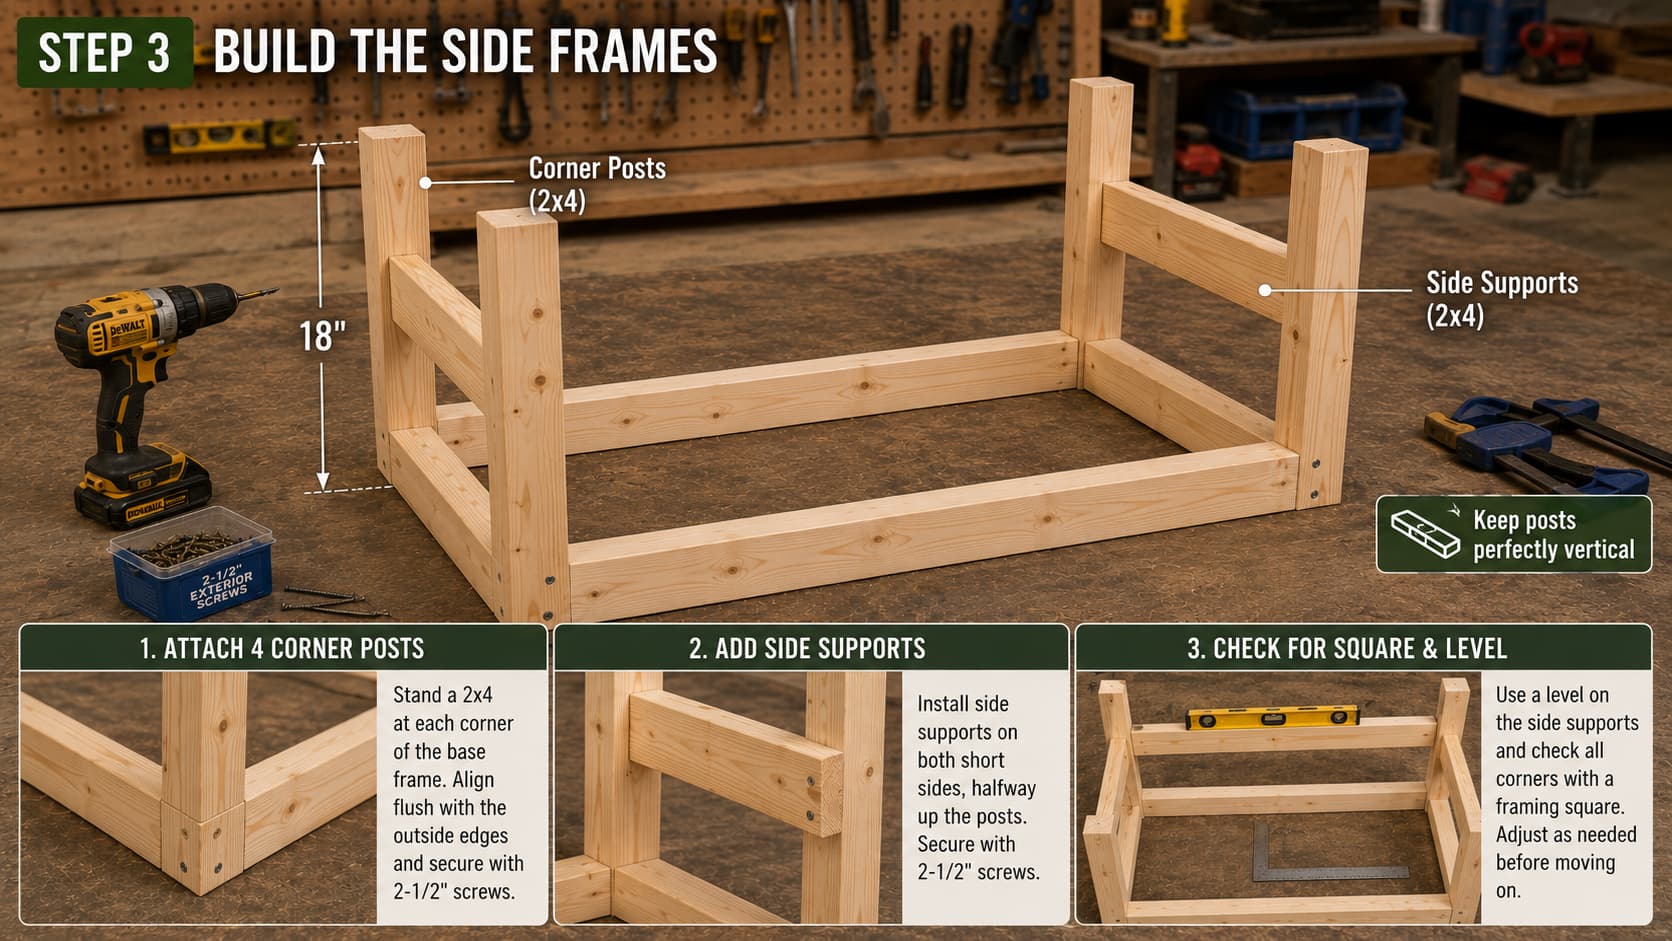
Now you’re adding the vertical structure that gives your bench its height. This is where it starts looking like actual furniture.
- Attach four vertical corner posts (cut from 2x4s) to each corner of your base frame
- Add horizontal support boards halfway up on each side for extra strength
- Make sure every post is perfectly vertical before you drive the final screws — a cheap bubble level works great here or even a free smartphone app
The side frames carry the weight of whoever sits on the bench, so don’t rush this step. Solid corners now mean a bench that doesn’t wobble six months from now.
Step 4 — Add the Front and Back Panels
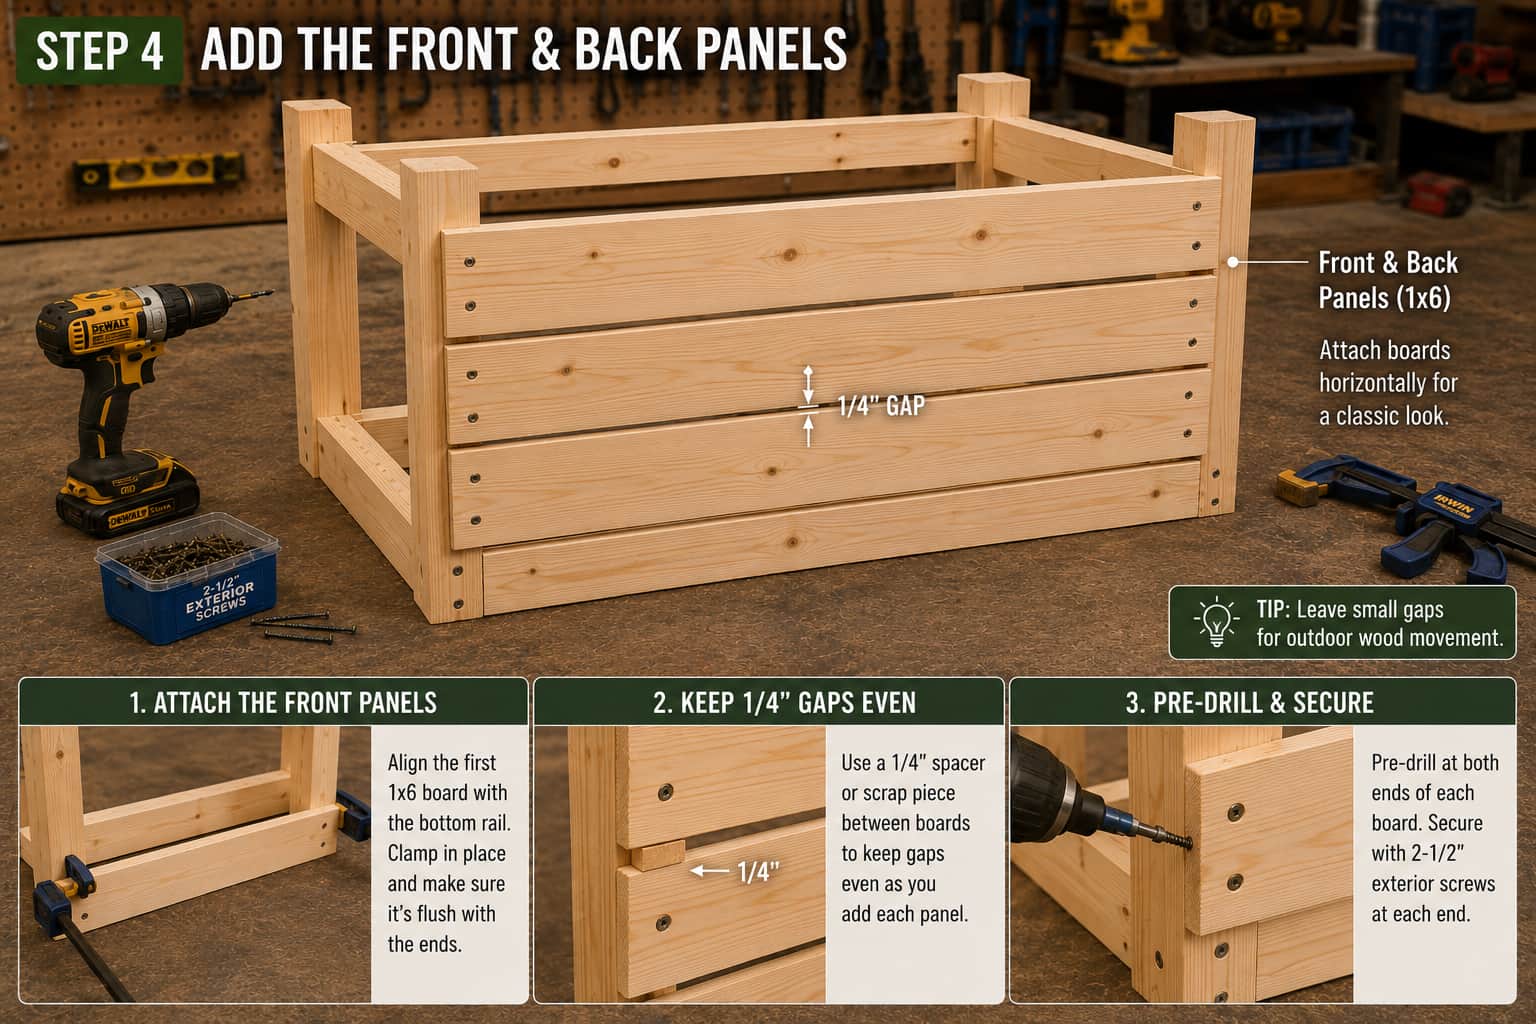
This is the step that makes your bench look finished and polished. You’re attaching 1×6 boards to the front and back of the frame.
- Attach boards horizontally for a classic look, or vertically for a more modern feel — either works structurally
- Leave a small gap (about 1/4 inch) between boards if your bench will live outside year-round. Wood expands and contracts with humidity, and that gap prevents warping
- Pre-drill every hole before screwing to keep the face boards from splitting
Step 5 — Build and Attach the Lid
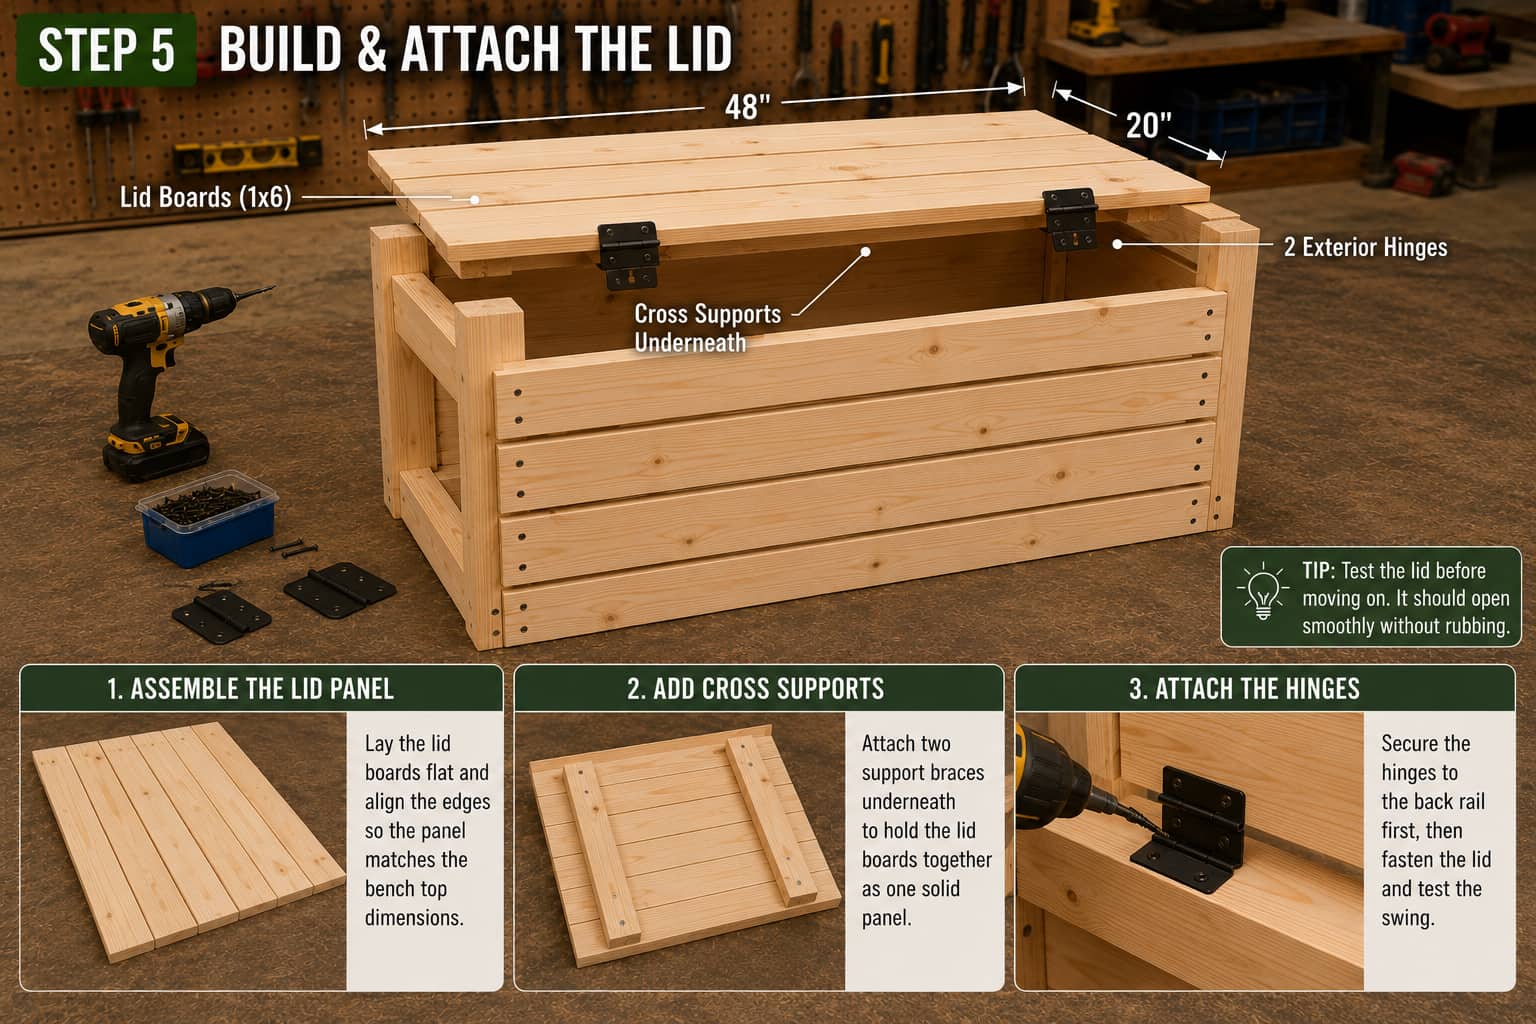
The lid is what makes this a storage bench rather than just a bench. It’s simpler to build than it looks.

- Cut your lid boards to match the exact outer dimensions of your bench top
- Lay them flat and attach two cross-support boards underneath (running front to back) to hold the lid boards together as one panel
- Attach two exterior-grade hinges to the back edge of the bench frame, then attach the other side of the hinges to the back edge of your lid
Test the lid before moving on — it should open smoothly and stay open on its own (or you can add a lid support chain to hold it open, which costs about $5 and saves a lot of frustration).
Step 6 — Sand Everything
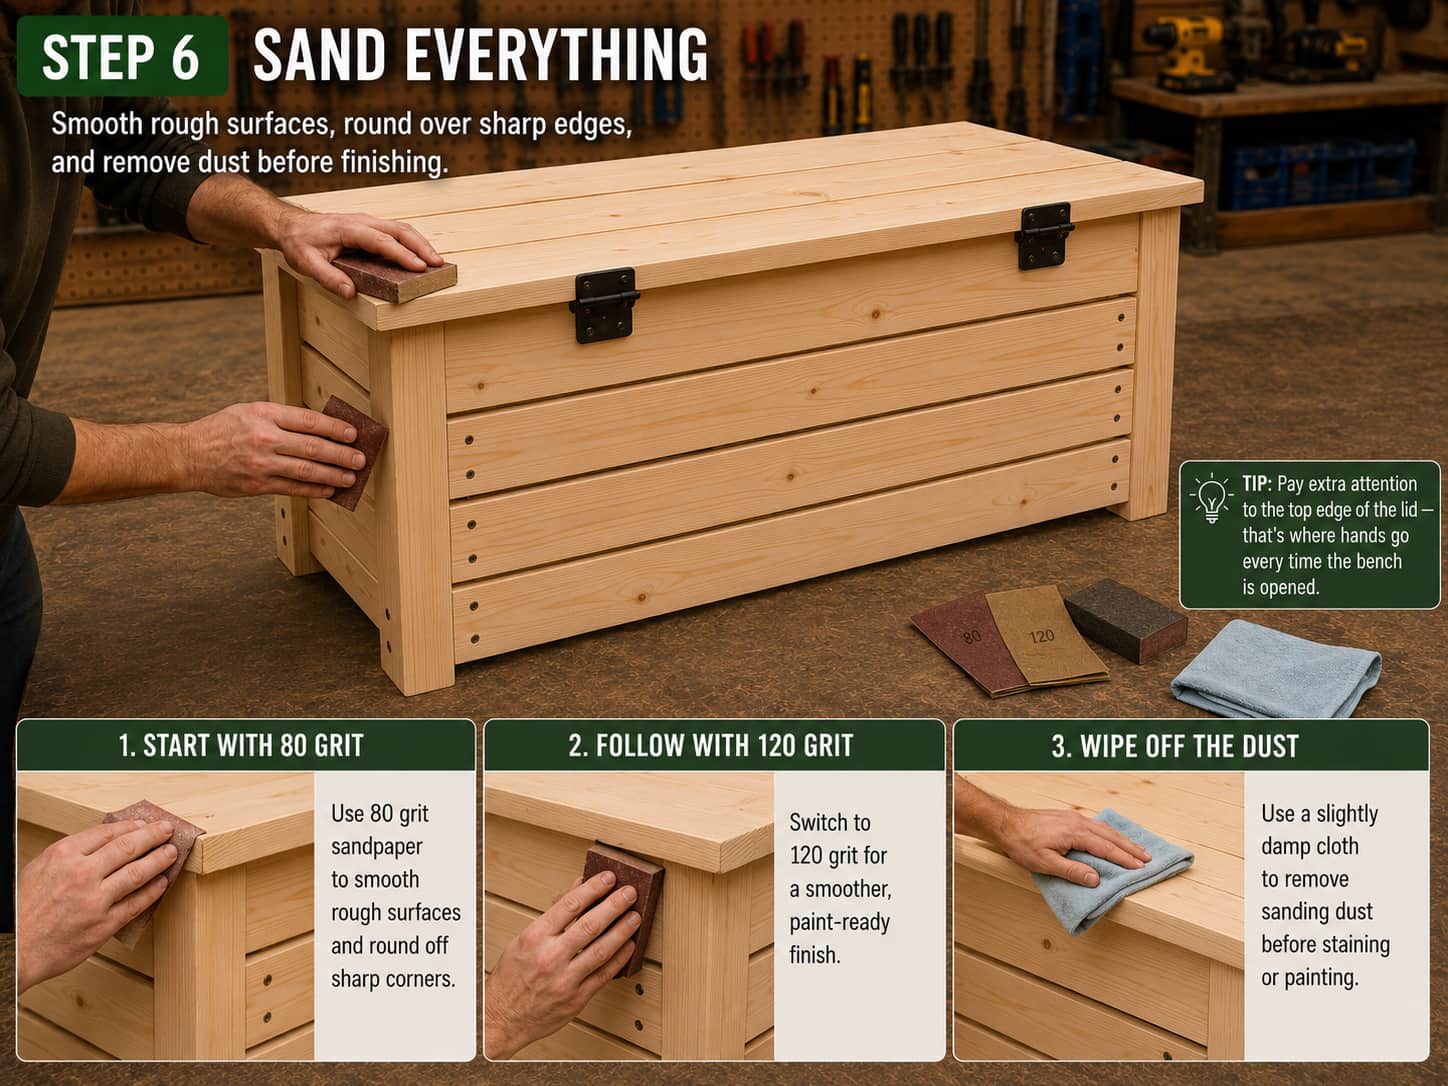
Sanding is the step people skip and then regret. Rough edges on outdoor furniture become splinters, and nobody wants that — especially if kids are sitting on this bench.
- Start with 80 grit sandpaper to smooth out any rough surfaces and round off sharp corners
- Follow up with 120 grit for a smooth, paint-ready finish
- Wipe everything down with a slightly damp cloth to remove all dust before you move on to finishing
Pay special attention to the top edge of the lid — that’s where hands go every single time someone opens it.
Step 7 — Stain, Paint, or Seal

This is the most satisfying step because it’s where your bench transforms from raw lumber into something that actually looks beautiful.
- Choose an exterior-grade product — interior stains and paints won’t hold up to rain and sun
- Apply two coats, letting each coat dry fully before adding the next (check the can for dry times)
- Popular finish choices: natural cedar stain for a warm rustic look, crisp white paint for a farmhouse feel, or charcoal gray for something more modern
Let the bench cure for 24 hours before using it or loading anything inside.
Bonus Infographic : Outdoor Storage bench
Tips to Make Your Outdoor Storage Bench Last for Years
Building it is the fun part. Keeping it looking great long-term takes about ten minutes a year. Here’s what actually works:
- Use cedar or pressure-treated lumber from the start — it’s worth the small extra cost
- Add rubber feet to the bottom of the legs so the wood doesn’t sit directly on wet concrete or decking
- Apply a fresh coat of exterior sealant every one to two years, especially before winter
- Add a waterproof liner or tray inside the storage compartment if you’re storing pool chemicals, wet gear, or gardening supplies
IMO the rubber feet tip alone is the single biggest factor in whether your bench lasts 2 years or 10. Moisture wicking up from the ground is what rots outdoor wood furniture fastest.
Fun Ways to Customize Your Outdoor Storage Bench
Once you’ve built the basic version, there are so many ways to make it your own. Here are some ideas worth considering:
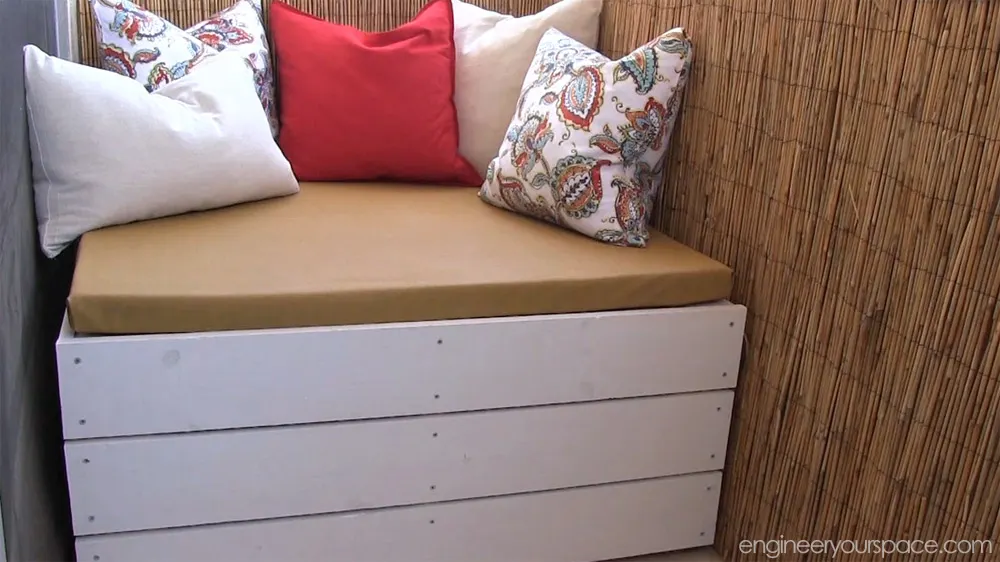
- Add a cushion — a standard 48″ outdoor bench cushion drops right on top and turns this from a functional build into actual comfortable seating
- Paint it to match your existing outdoor furniture for a coordinated, put-together look
- Add rope handles on the sides so you can easily move the bench around your deck or patio
- Build two benches and place them on either side of an outdoor dining table — instant matching set for a fraction of what furniture stores charge
- Try the planter variation from the Real Cedar plan above — it adds built-in side planters and looks absolutely stunning on a front porch
And if you’ve already knocked out this bench and caught the building bug — which happens to pretty much everyone — check out 15 Outdoor Wood Projects for Your Backyard for what to tackle next. Or if you’re thinking about selling what you build, 25 Scrap Wood Projects That Sell is worth a look too.
Ready to Take Your Woodworking Further?
Here’s the thing about building your first outdoor bench — it never stops at one project. Once you realize you can build real, functional furniture yourself for a fraction of the retail price, you start looking at every room in your house differently. Could I build that? Probably. Should I? Absolutely.
If you want a massive library of step-by-step woodworking plans — everything from outdoor furniture to full workshop builds — Ted’s Woodworking Plans is hands down the best resource I’ve come across. It includes over 16,000 projects with detailed diagrams, cut lists, and instructions written for beginners. Whether you want to build more outdoor pieces, storage solutions, garden projects, or eventually tackle bigger furniture, it’s all in there.
👉 Check out Ted’s Woodworking Plans here — it’s one of those investments that pays for itself after your very first project.
Wrapping It Up
So there you have it — a complete DIY outdoor storage bench you can build this weekend for under $50, even if you’ve never picked up a drill before. You’ve got the free plans, the tool list, the materials budget, and every single step laid out so there’s no guessing involved.
The hardest part of this build is honestly just getting started. Once you make that first cut, the rest flows naturally. And when you’re sitting on that finished bench a couple of days from now, coffee in hand, staring at something you actually built with your own hands — that feeling is genuinely hard to beat.
Pin this post so you have it ready for the weekend, and if you build one, I’d love to see how it turns out. Now go build something.