
You open your cabinet looking for that one pan. Spoiler: it’s in the back, behind four other pans, a muffin tin, and that air fryer attachment you bought once and never used again. Sound familiar?
Deep kitchen cabinets are basically storage black holes. Stuff goes in, and stuff disappears. You crouch down, you dig around, you pull out three things you didn’t need just to reach the one thing you did. And somehow, even with all that wasted depth, your kitchen still feels cluttered.
Here’s the thing though: most kitchens don’t need more space — they just need smarter storage.
That deep, dark cabinet you’re cursing right now? It’s not the problem. The way it’s organized is the problem. And the fix is way simpler (and cheaper) than ripping out your cabinets for a full kitchen remodel.
Enter pull-out drawers. They’re one of the easiest DIY upgrades you can make to transform your existing cabinets without touching a single wall or draining your savings account. I’ll be honest, I put this project off for almost a year because I assumed it required some kind of professional carpentry skill set. It doesn’t. It requires a tape measure, a little patience, and a free Saturday.
In this guide, you’ll learn how to build pull-out drawers step-by-step — even if you’ve never picked up a drill before. Grab your coffee, and let’s get into it.
What Are Pull-Out Drawers (And Why They Change Everything)

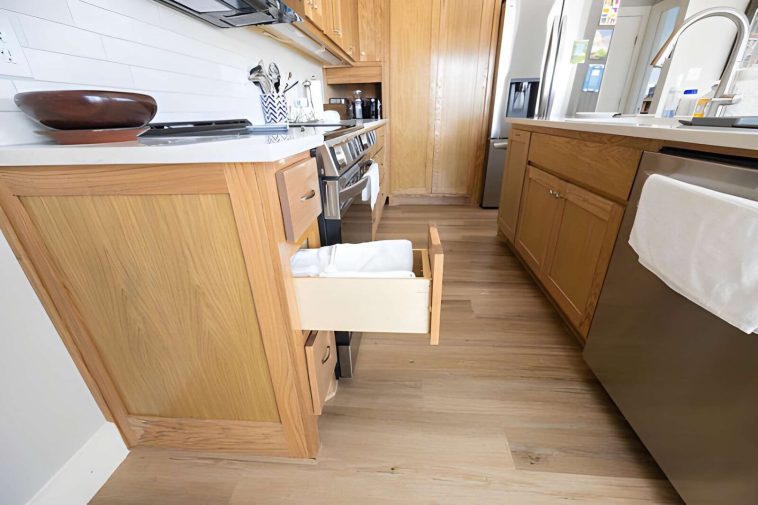
Let’s keep this simple. A pull-out drawer is basically a wooden box on slides that sits inside your existing cabinet. Instead of digging into a dark, deep shelf, you just pull the whole thing toward you, and everything’s right there in full view.
The mechanism isn’t fancy. You mount drawer slides to the inside walls of your cabinet, attach matching slides to the sides of your drawer box, and the whole thing glides in and out smoothly. No more crawling on the floor with a flashlight to find your roasting pan.
Why does this small change make such a big difference? Because it solves the actual problem with cabinets, which is depth. A cabinet that’s 24 inches deep sounds great on paper, but in practice you only ever use the front 8 inches. The rest becomes a graveyard of forgotten lids and mystery containers.
Here’s what you actually gain:
- Maximize storage space – every inch of that cabinet becomes usable, not just the front row
- Improve accessibility – no more bending, reaching, or knocking things over to grab what’s behind
- Reduce clutter – when you can see everything you own, you stop buying duplicates of stuff you already have
- Add a custom-built look – pull-out drawers instantly make your kitchen feel like it came from a renovation magazine, not a big-box store
IMO, this is one of the highest-ROI weekend projects you can tackle in your whole house. Low cost, big payoff. 🙂
And here’s a bonus you don’t think about until it happens: pull-out drawers genuinely change your relationship with cooking. When you can see every pan and lid at a glance, meal prep stops feeling like a scavenger hunt. You spend less time hunting and more time actually cooking, which honestly might be the real upgrade here.
Where You Can Use Pull-Out Drawers
Kitchen cabinets are the obvious target, but don’t stop there. Once you build one drawer, you’ll start eyeing every cabinet in your house and thinking “that needs a pull-out too.”
Some prime real estate for this upgrade:
- Kitchen cabinets – base cabinets next to your stove or sink are usually the worst offenders
- Pantry storage – tall, narrow pantries are perfect for pull-out shelving
- Under-sink cabinets – that plumbing-cluttered mess under your sink finally gets organized with a custom-fit pull-out
- Bathroom storage – vanities suffer from the exact same depth problem as kitchen cabinets
- Garage organization – pull-out drawers under a workbench keep tools accessible without digging through bins
If you want more ideas on organizing what you’ve already got, before or after adding drawers, check out our guide on 10 Kitchen Drawer Organization Ideas (From Messy to Magazine-Worthy). It pairs really well with this project.
Tools & Materials You’ll Need
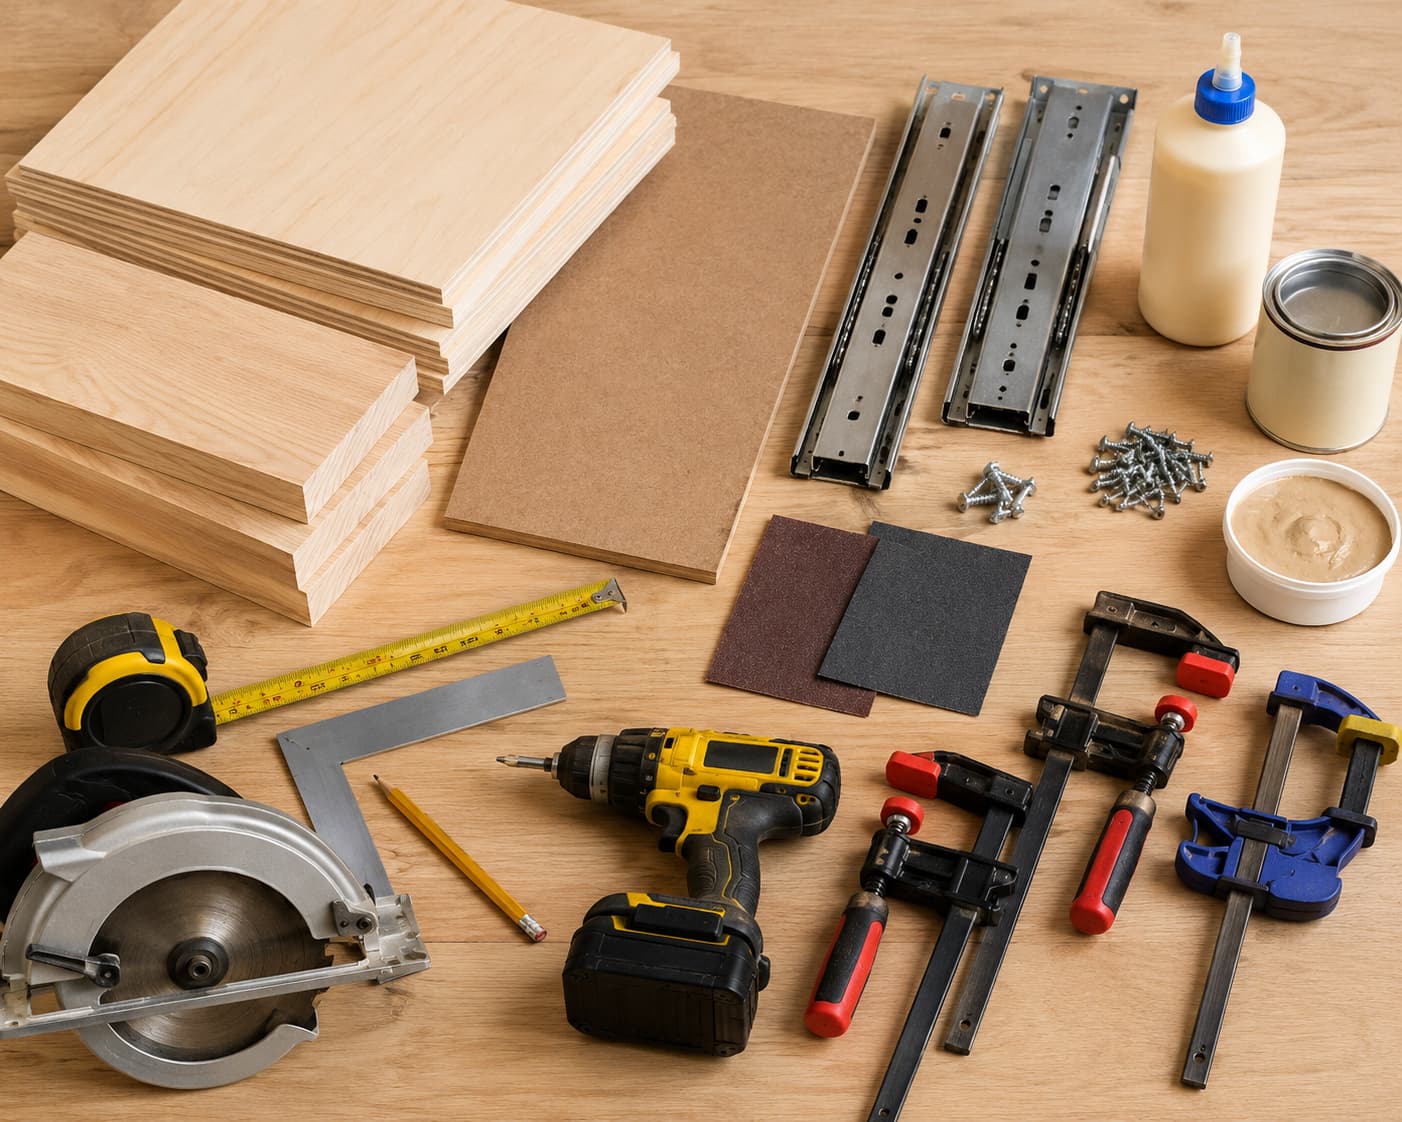
Before you start cutting wood, lay everything out. Nothing kills DIY momentum faster than realizing you’re missing a part halfway through.
Materials:
- Plywood or hardwood (3/4″ for the box, 1/4″ or 1/2″ for the bottom panel)
- Drawer slides (ball-bearing or soft-close — more on this in a second)
- Wood screws (1 1/4″ works for most drawer boxes)
- Wood glue
- Sandpaper (120 and 220 grit)
- Optional: wood filler, paint, or sealant
Tools:
- Measuring tape
- Drill/driver
- Circular saw or table saw (or have your wood cut at the store)
- Square for marking straight lines
- Clamps
- Level
Quick note on drawer slides: quality drawer slides genuinely make or break this project. Cheap slides bind up, sag under weight, or stop sliding smoothly within a few months. Ever bought a $5 part that ruined a $50 project? Yeah, don’t let that be your drawer slides.
Step-by-Step: How to Build Pull-Out Drawers
Alright, time for the actual build. Take it slow on the measuring step — everything downstream depends on getting this part right.
Step 1: Measure Your Cabinet Space
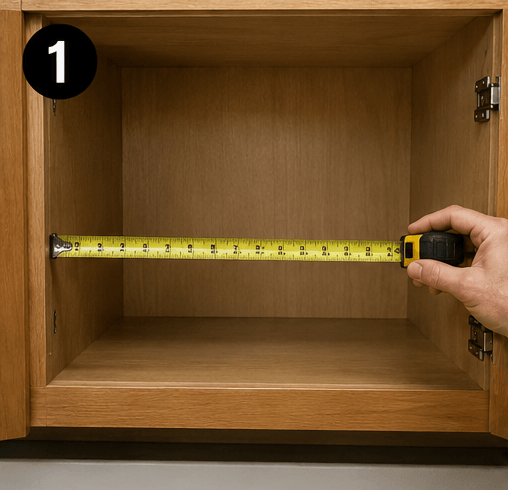
Grab your tape measure and get the interior width, depth, and height of your cabinet opening. Measure in multiple spots — front, middle, and back — because older cabinets are rarely perfectly square. Trust me, I’ve been burned by this exact thing more than once.
Subtract about an inch from your total width to leave room for the slides on each side. This clearance gap is non-negotiable. Skip it, and your drawer either won’t fit or will scrape the sides every single time you open it.
Step 2: Cut the Wood Panels
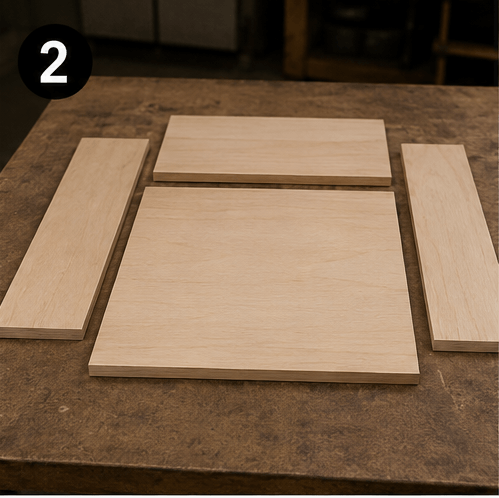
Cut your panels for the base, two sides, back, and front of the drawer box. A standard drawer box height runs 4 to 6 inches for kitchen use, but go taller if you’re storing bulkier items like pots and pans.
Label each piece as you cut it. It sounds unnecessary until you’ve mixed up two “almost identical” side panels and had to redo a glue-up. Not naming names, but it’s happened.
Step 3: Assemble the Drawer Box

Apply wood glue along the edges where panels meet, then reinforce with screws for extra strength. Glue alone won’t hold up to years of pots sliding around — you need both working together.
Square up the box as you go using a carpenter’s square. Clamp it together and let the glue cure fully before moving on; rushing this step means a wobbly drawer down the line.
Step 4: Install Drawer Slides
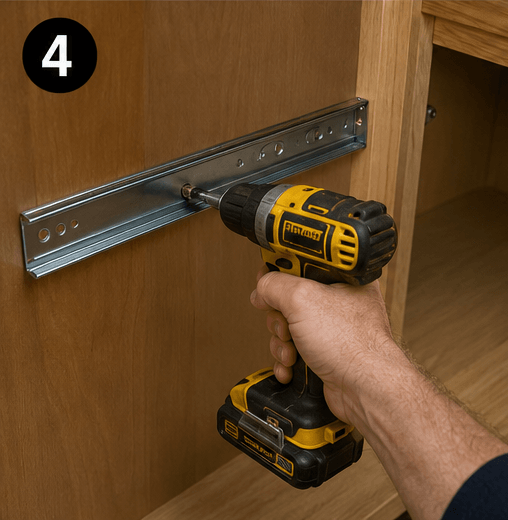
Mount one half of each slide set to the inside walls of your cabinet, and the other half to the sides of your drawer box. Use a level to make sure both slides sit at the exact same height, since even a slight tilt causes binding.
Most slides have minor adjustment screws built in for further fine-tuning, so don’t be discouraged if it doesn’t work perfectly the first time. That’s normal, and it’s exactly why those screws exist.
Step 5: Mount the Drawer Inside the Cabinet
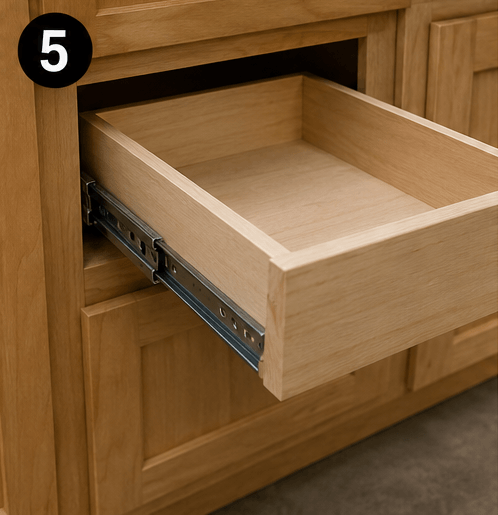
Slide the drawer box onto the installed slides and test the movement. It should glide smoothly with zero resistance. If it sticks or feels gritty, something’s misaligned.
Pull it all the way out, push it all the way in, and repeat a few times. Adjust the slide screws as needed until it moves like butter — an actual measurable standard, I promise.
Step 6: Add Finishing Touches
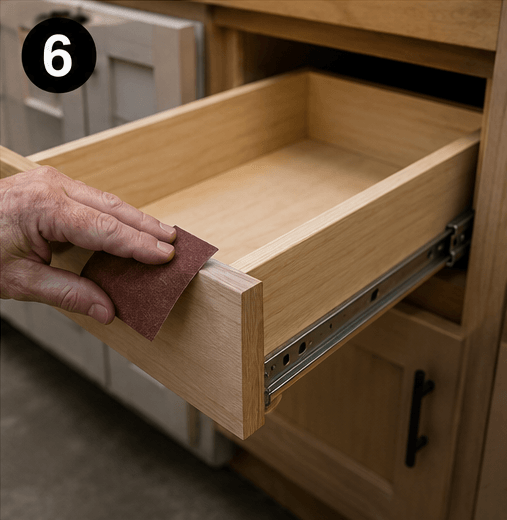
Sand any rough edges, especially on the drawer front where hands will touch it constantly. A quick pass with 220-grit sandpaper makes a noticeable difference here.
From there, paint or seal the wood to match your existing cabinets, or leave it raw if you’re going for an exposed-wood look. Either way, let everything dry fully before loading it with your heaviest pots.
Common Mistakes to Avoid
Even simple projects go sideways when you skip the small stuff. Here’s what trips people up most:
- Incorrect measurements – measuring once and trusting it blindly; always double-check, especially on older, uneven cabinets
- Using weak slides – bargain-bin slides that sag or jam under weight, undoing all your hard work
- Not leaving clearance space – forgetting the gap needed for the slide hardware on each side
- Poor alignment – mounting one slide slightly higher than the other, which causes the drawer to stick or tilt
Catch these early, and you’ll save yourself a frustrating redo. Ask me how I know. :/
Smart Upgrade Ideas (Make It Look Custom-Built)
Once your basic drawer works, you can level it up. These upgrades take a functional drawer and turn it into something that looks like it came from a high-end renovation:
- Soft-close slides – no more slamming; the drawer eases shut on its own
- Dividers for utensils – turn one big drawer into organized compartments
- Pull-out spice racks – narrow, vertical drawers that fit into skinny gaps between cabinets
- Heavy-duty pantry drawers – reinforced slides rated for 100+ lbs for canned goods and small appliances
If this kind of project gets you excited, you’ll probably enjoy going even further with smaller builds too. Check out 25 Genius DIY Organizers You Can Build From Scrap Wood for more ways to put leftover lumber to good use.
Before & After Pull out Drawers Transformation Section
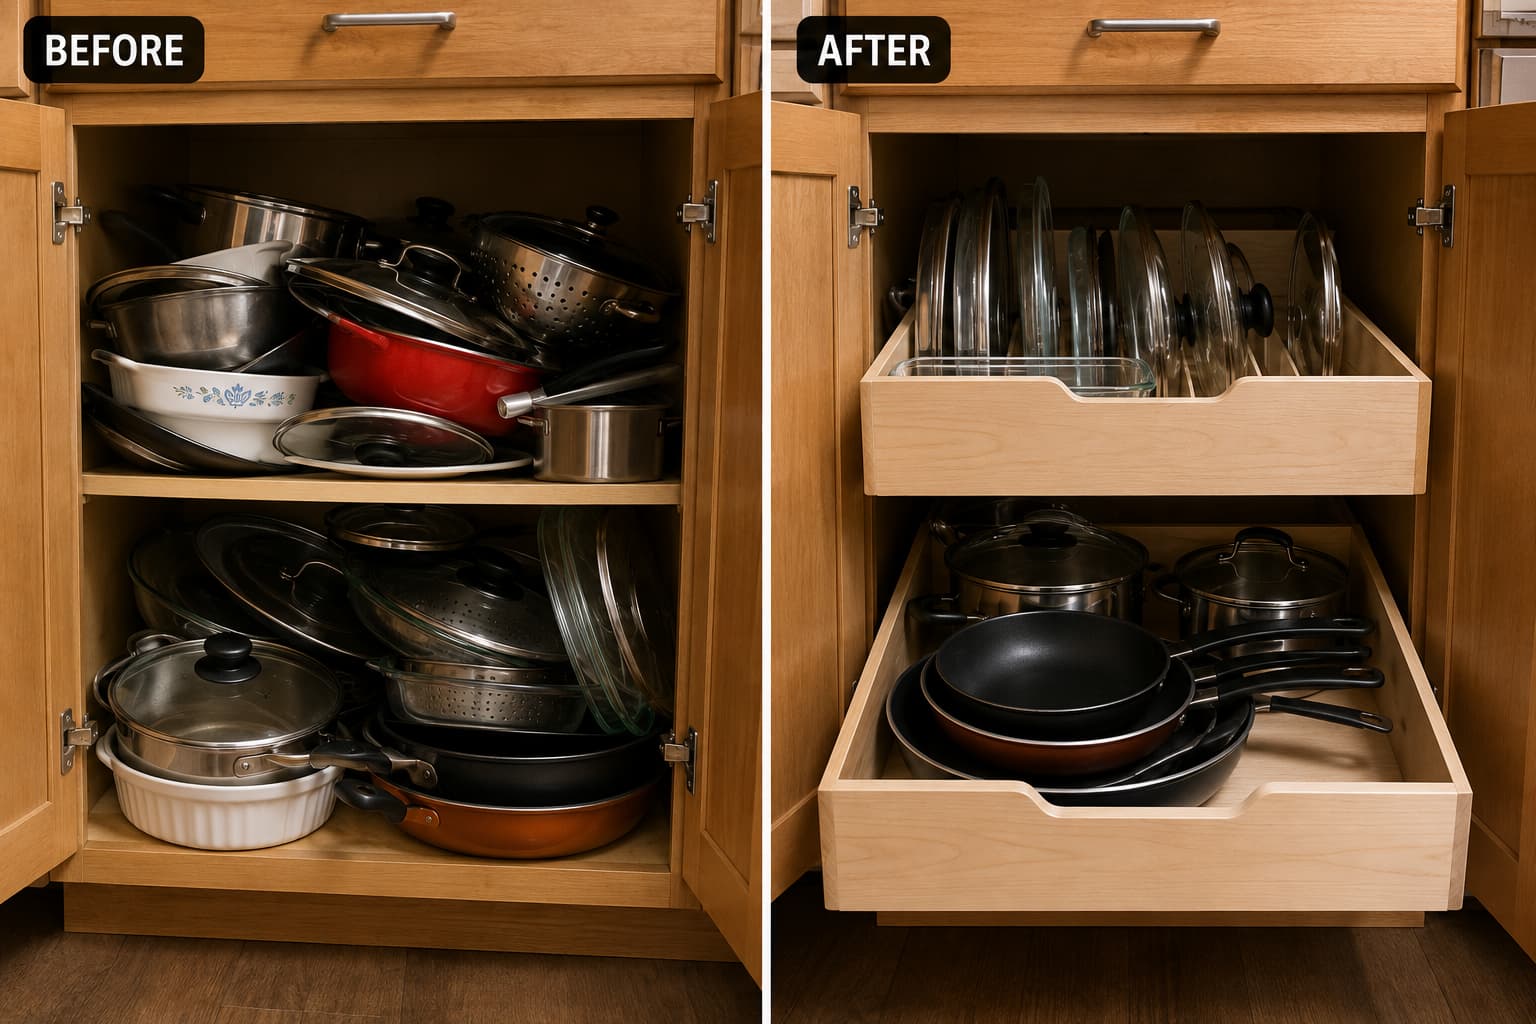
Picture this: a cabinet so cluttered you need both hands and a small prayer to find the lid that matches your pot. Now picture that same cabinet with a smooth pull-out drawer, everything lined up and visible the second you open it.
That contrast — chaos to order in one photo — is exactly what makes DIY storage projects go viral on Pinterest. People don’t save pins because a project looks complicated; they save them because the transformation is satisfying to look at.
Think about the last home-organization post you actually stopped scrolling for. Odds are it wasn’t a fancy renovation — it was a simple before-and-after that made you think “I could actually do that.” That’s the energy you want to capture with this build.
If you’re documenting your build, snap a quick “before” photo of the cluttered cabinet before you start. You’ll want it later, both for the bragging rights and for the pin.
Cost Breakdown
Let’s talk numbers, because “DIY” only counts as a win if it actually saves you money.
- Wood – low cost, especially if you use plywood scraps or off-cuts from a hardware store. A single drawer box typically uses less than half a sheet of plywood.
- Drawer slides – your biggest investment; budget more here since this is the part that determines how well your drawer performs long-term. Decent soft-close slides cost more than the bargain bin option, but they’re worth every extra dollar.
- Screws, glue, and tools – mostly reusable across future projects, so the cost spreads out over time. Once you own a drill and a square, you’re set for every future build too.
Compare that to custom cabinet inserts from a kitchen company, which often run hundreds of dollars per drawer once installation fees get added in. A contractor-installed pull-out shelf can easily cost three to five times what you’d spend building the same thing yourself on a Saturday afternoon.
Building it yourself for a fraction of that cost? That’s a pretty easy call. And the skills carry over — once you’ve built one drawer, every future cabinet project gets faster and cheaper.
Who This Project Is Perfect For
This isn’t a project reserved for woodworking veterans. It’s genuinely beginner-friendly, and here’s who gets the most out of it:
- Beginner woodworkers looking for a practical first project with real-world payoff
- Home organizers who want function without a full renovation
- Small kitchen owners trying to squeeze every inch of value out of limited cabinet space
- DIY enthusiasts who enjoy a satisfying weekend project
- People renovating on a budget who want custom features without custom-cabinet pricing
Final Thoughts
A simple drawer system can completely change how your kitchen works every single day. It’s not flashy, it’s not expensive, and it doesn’t require tearing anything apart. It just makes the space you already have actually usable.
Once you build your first one, you’ll probably start eyeing every other cabinet in the house, wondering what else could use this treatment. That’s not a bad thing. That’s just what happens once you realize how much wasted space was hiding in plain sight the whole time.
Will your first drawer be perfectly square and flawless? Maybe not. Mine wasn’t. But it still works better than the empty shelf it replaced, and that’s really the whole point.
Ready for Your Next Build?
If you enjoyed this project, you’re probably realizing something important — once you start improving storage in your home, there are endless possibilities. From kitchen organizers to custom cabinets and furniture builds, DIY woodworking can quickly turn into a powerful skill that saves money and transforms your space.
The only challenge? Finding clear, step-by-step plans that actually make projects easy to follow, instead of guessing your way through every cut and joint.
That’s exactly why many DIY builders turn to proven woodworking plan collections that remove the guesswork and give you ready-to-build projects, complete with measurements, materials lists, and diagrams.
👉 Check out Ted’s Woodworking Plans here — thousands of step-by-step project plans that take the guesswork out of your next build.