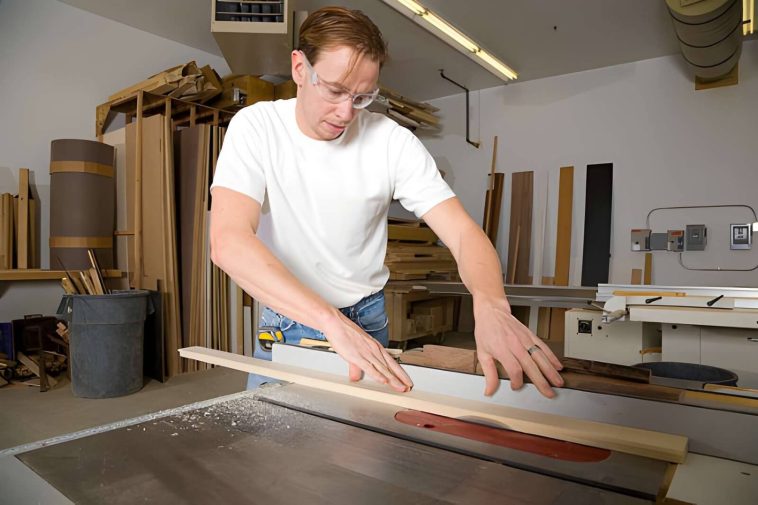
If you’ve ever tried making a precise crosscut with just a miter gauge, you already know the frustration — slight wobble, inconsistent angles, and the constant, nagging risk of a kickback. Sound familiar? A crosscut sled fixes all of that in one afternoon build.
Honestly, if I had to pick one jig that changed how I work in the shop, this would be it — no contest. And the best part? You don’t need a fancy setup or a big budget to pull it off. Here’s what you’re getting today:
✅ Perfectly square cuts every time
✅ Costs under $20 in materials
✅ Beginner-friendly build — done in under 2 hours
✅ Works on any table saw
Stick with me, and by the end of this guide you’ll have a link to free plans and a complete step-by-step walkthrough. Let’s get into it.
Think of a crosscut sled as a flat platform — usually made from plywood — that rides along your table saw’s miter slots. You place your workpiece on it, push the whole thing through the blade, and get a cut that’s dead square every single time. Simple concept, game-changing results.
Now, I know what some of you are thinking: “I’ve got a miter gauge, isn’t that enough?” Short answer — not really. A miter gauge only contacts one slot, which means there’s inherent flex and wobble in every cut. A crosscut sled uses both miter slots, making it dramatically more stable and accurate. It’s like the difference between riding a bicycle and a tricycle — one is just more planted.
Here’s why both beginners and seasoned woodworkers swear by it:
Accuracy — calibrated once to a perfect 90°, it holds that setting cut after cut
Repeatability — add a stop block and you can cut 50 identical pieces without measuring once
Safety — your hands stay on the sled, far away from the blade
Zero tearout — the zero-clearance kerf supports the wood fibers right at the cut
Good news: this build uses materials you might already have in your shop. And if you don’t, the whole shopping list won’t break the bank.
Materials List
Material
Size
Approx. Cost
¾” Baltic Birch Plywood (base)
24″ × 30″
~$8
¾” Baltic Birch Plywood (fences)
2 pieces, 3″ × 30″
~$5
Miter bar runners
¾” × ⅜” × 17″
~$5–15
Wood screws (1¼”)
—
~$3
Wood glue
—
~$4
Total: Under $25. Not bad for a jig you’ll use on literally every project from here on out.
Recommended Tools & Hardware (Amazon Picks)
Here’s what I recommend grabbing to make this build smooth and accurate:
Advertisement
POWERTEC Crosscut Sled Miter Bar 4-Pack — These HDPE bars slide like butter in standard miter slots and they don’t swell with humidity the way wooden runners do. IMO, this is the most important part of the whole build.
Fulton DIY Table Saw Crosscut Sled Kit — If you’d rather skip the parts-sourcing altogether, this kit comes with UHMW bars, aluminum T-tracks, and a star knob. Great for first-timers.
MICROJIG GRR-RIPPER Push Block — Not for the sled itself, but essential for safe table saw work in general. Three-directional grip = much safer cuts.
Digital Angle Gauge — For squaring the sled in Step 6. Far more reliable than eyeballing it with a speed square.
💡 Quick tip: Don’t want to source parts separately? The Fulton DIY Sled Kit has everything bundled in one package and takes a lot of the guesswork out of the build.
Free Crosscut Sled Plans
Before you cut a single piece of wood, get your hands on a solid set of plans. I’ll be straight with you — rather than pointing you to some vague PDF, I want to send you somewhere genuinely useful. The team over at Instructables put together one of the best free crosscut sled guides I’ve come across. It’s completely free, loaded with real photos for every stage of the build, and laid out in plain language anyone can follow.
It walks you through 11 steps with pictures — a perfect visual companion to the build instructions below. Bookmark it, print it out, or pin it to your shop wall before you start. Whatever works for you.
Use the Instructables plans as your dimensional reference, and use this guide as your step-by-step coach. Together, you’ve got everything you need.
Alright, here’s where the fun begins. Take your time with each step — rushing this build is how you end up with a slightly-off-square sled that drives you crazy for years. Ask me how I know 🙂
Step 1: Cut Your Base to Size
Start by cutting your ¾” Baltic birch plywood to 24″ wide × 18″ deep. Why Baltic birch specifically? It’s flat, stable, and virtually void-free — meaning it won’t warp or cup on you six months down the line. MDF can work for the base in a pinch, but I’d avoid it for the fences (more on that later).
Make sure your base has two clean, parallel edges. This is your foundation — if it’s off, everything else will be too.
Step 2: Install the Miter Bar Runners
This is the step most beginners rush, and it’s the one that matters most. Place the POWERTEC miter bars into your saw’s miter slots and set them just slightly below the table surface — you don’t want them dragging against the plywood as you slide.
Lay the plywood base on top of the runners, mark their position, and secure them from underneath with screws. Before you do anything else, wax the runners with paste wax. This single habit will make your sled glide like it’s on ice. Seriously, don’t skip the wax.
Step 3: Build & Attach the Rear Fence
The rear fence is the most critical part of this entire build. It’s your reference edge — the thing that determines whether your cuts come out square or slightly off. Use a thick, straight piece of hardwood or doubled-up ¾” plywood.
Glue and screw it — don’t rely on glue alone. And don’t attach it permanently yet. You’ll need to fine-tune its position in Step 6 before you lock it in for good.
Step 4: Build & Attach the Front Fence
The front fence is less critical for squareness — its main job is to add rigidity and give you something to grip as you push the sled through. Cut it to the same width as your base and attach it to the front edge with glue and screws.
One thing worth doing: cut a small notch or relief where the blade passes. This acts as a basic blade guard and keeps debris from building up in the kerf zone.
Step 5: Cut the Blade Kerf
With the sled assembled (but before you finalize the rear fence position), make your first slow, careful pass through the blade. Push the sled all the way through until the blade exits the back fence.
This creates your zero-clearance kerf — the slot that supports the wood fibers on either side of the cut and prevents tearout. Every workpiece you cut from here on will get that clean, chip-free edge. It’s one of those small details that makes a huge difference in the quality of your finished projects.
Step 6: Square the Sled Using the 5-Cut Method
Here’s the part where you separate a good sled from a great one. The 5-cut method is hands down the most accurate way to verify and dial in your sled’s squareness — more accurate than any square you own, including expensive machinist squares.
Here’s how it works:
Take a square piece of plywood (around 12″ × 12″)
Make cut #1 on one edge, rotate the board 90°
Make cut #2, rotate again
Repeat for cuts #3 and #4
Make cut #5 — then measure the resulting offcut
If the offcut is perfectly parallel (same thickness top and bottom), your sled is square. If it tapers, you need to adjust your rear fence slightly and repeat. Use your digital angle gauge to help fine-tune — it’ll save you a lot of back-and-forth.
Once you’re satisfied, permanently lock down the rear fence. This is it. This is the calibration you’ll trust for years.
Step 7: Add a Stop Block (Optional but Highly Recommended)
Want to cut 20 shelf pieces all exactly the same length without measuring a single one? Add a T-track and stop block to your sled’s fence. The POWERTEC 48″ T-Track installs cleanly into a routed slot on your fence face, and a simple stop block slides and locks anywhere along it.
This upgrade takes about 30 minutes and makes repetitive cuts effortless. FYI — once you use a stop block, you’ll wonder how you ever worked without one.
You’ve got a working sled — now let’s make it exceptional. These are the small details that separate a basic shop build from one you’ll actually enjoy using every day.
Wax your runners every few months — a quick coat of paste wax keeps the glide smooth and prevents the runners from binding as the seasons change
Stick 80-grit sandpaper to the fence face — this grips your workpiece and stops it from creeping forward mid-cut (a simple fix that makes a real difference)
Build two sleds — a 12″ version for small parts, a 24″+ version for wider boards; you’ll thank yourself later
Write the calibration date on the sled — humidity and seasonal wood movement can shift things over time; plan to re-check squareness every 6 months
Add a scrap-wood blade guard behind the rear fence — it blocks the exposed blade at the back of the kerf and keeps chips from flying at your face
Common Crosscut Sled Mistakes to Avoid
Let’s save you some frustration. These are the mistakes I see beginners (and honestly, some experienced woodworkers) make all the time.
Skipping the 5-cut method — the single biggest mistake. “Looks square” is not the same as is square
Using softwood for runners — pine and other softwoods expand and contract with humidity, causing the sled to bind or wobble; stick with HDPE or aluminum
Building the sled too large — a massive sled on a small contractor saw is awkward and unsafe; match the sled to your saw’s table size
Not waxing the runners before first use — an unwaxed sled drags, which makes you push harder, which makes cuts less controlled
Rushing the fence glue-up — let the glue cure fully before you cut the kerf or run the 5-cut test; an hour of impatience can ruin the whole calibration
Crosscut Sled FAQs
Q: What size should my crosscut sled be? For most home workshops, 24″ wide × 18″ deep handles the vast majority of cuts comfortably. Build a smaller 12″ version if you frequently cut small parts or work on a compact jobsite saw.
Q: Can I use MDF instead of Baltic birch? MDF works fine for the base — it’s flat and stable. But avoid MDF for the fences — it doesn’t grip screws reliably over time and can sag under its own weight on longer builds. Stick with hardwood or Baltic birch for anything structural.
Q: Do I need a kit, or can I build it completely from scratch? Both approaches work great. Building from scratch costs around $15–20 and gives you full control over dimensions. A kit like the Fulton Sled Kit saves time and eliminates the guesswork of finding compatible runners and tracks — worth it if you want to get cutting faster.
Q: How do I know if my sled is actually square? Don’t trust your eyes, and honestly don’t fully trust your square either. Use the 5-cut method described in Step 6 — it will reveal errors as small as a few thousandths of an inch that no hand tool can catch.
Wrapping It Up
Here’s the thing — out of every jig you could build for your shop, the crosscut sled delivers the most immediate, noticeable improvement to your work. Better accuracy, safer cuts, cleaner edges, and repeatable results on every project. It’s not glamorous, but it’s genuinely one of the best afternoons you’ll ever spend in the shop.
To recap what you just learned:
Build a stable plywood base with properly fitted runners
Attach front and rear fences — precision matters on the rear
Cut your kerf, then square everything with the 5-cut method
Add a stop block when you’re ready to level up
→ Grab the free plans on Instructables and build this weekend. Your future self — the one making perfectly square cuts without fussing — will be very grateful.