
Let me paint you a picture. It’s Sunday morning, you reach into your fridge for eggs, and two of them roll off the shelf and crack on the floor. You clean up the mess, make do with what’s left, and quietly vow to fix the problem. Then you forget about it until the following Sunday when it happens again.
Sound familiar? A wooden egg holder fixes this permanently — and you can build one this weekend with a few scraps of wood, a drill press, and a couple of hours. It’s the kind of project that makes you wonder why you didn’t build it sooner.
Why a Wooden Egg Holder? Seriously, Why Not Just Buy One?
Fair question. Plastic egg trays exist. Wire racks exist. So why bother building one from wood?
Here’s the thing — a handmade wooden egg holder isn’t just functional, it’s a conversation piece. It sits on your counter or in your fridge and every single person who visits your kitchen notices it. It says “someone made this,” and that carries a warmth that no injection-molded plastic tray ever will.
Beyond aesthetics, a wooden egg holder is:
- Durable — won’t crack, warp, or melt in warm conditions
- Customizable — build it to hold exactly as many eggs as you use
- Completely natural — no plastics touching your food
- A genuine heirloom piece — finished well, it’ll last for decades
And honestly? It makes your kitchen look like the kind of place where someone actually cooks. If you’re working toward that fully intentional kitchen setup, this pairs perfectly with the ideas in 12 Must-Have Features in Our Dream Kitchen You’ll Wish You Had Sooner!
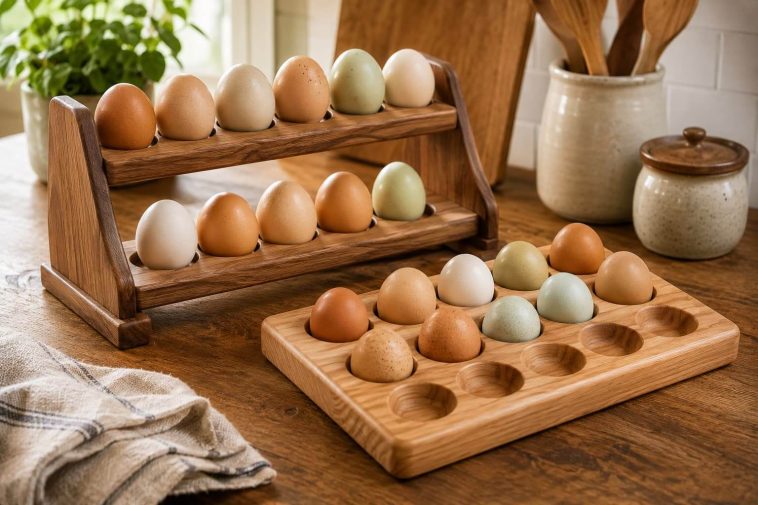
Two Styles to Choose From
Before you start cutting wood, decide which style you want to build. Both are approachable for beginners, but they look quite different and suit different kitchens.
Style 1: The Countertop Display Holder
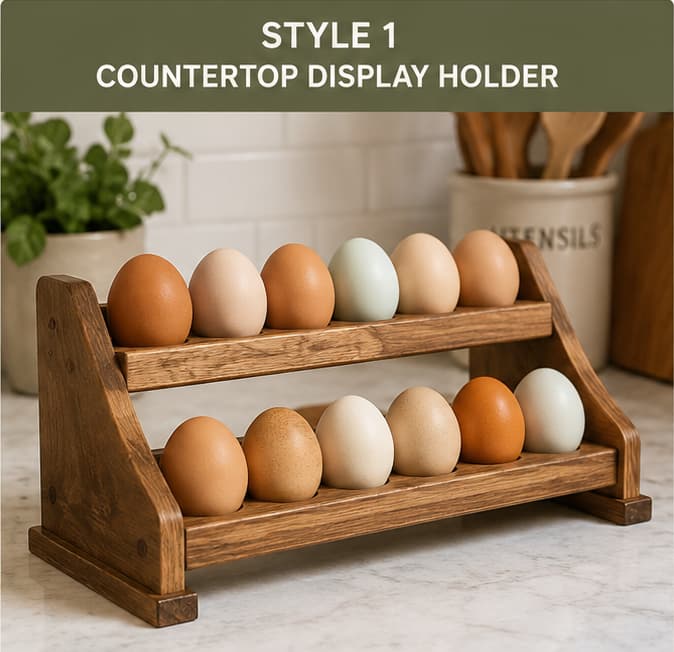
This is a freestanding rack that sits on your kitchen counter and holds eggs at a slight forward tilt so you always grab the oldest ones first (FIFO — first in, first out). It usually holds between 12 and 24 eggs in a tiered or single-row design.
Best for:
Advertisement
- People who buy eggs from local farms or farmers markets and want them on display
- Kitchens with counter space to spare
- Those who don’t refrigerate their fresh eggs (yes, this is fine with unwashed farm eggs)
It functions beautifully as a decorative element too — a natural wood egg holder on a farmhouse kitchen counter looks absolutely stunning.
Style 2: The Refrigerator Tray
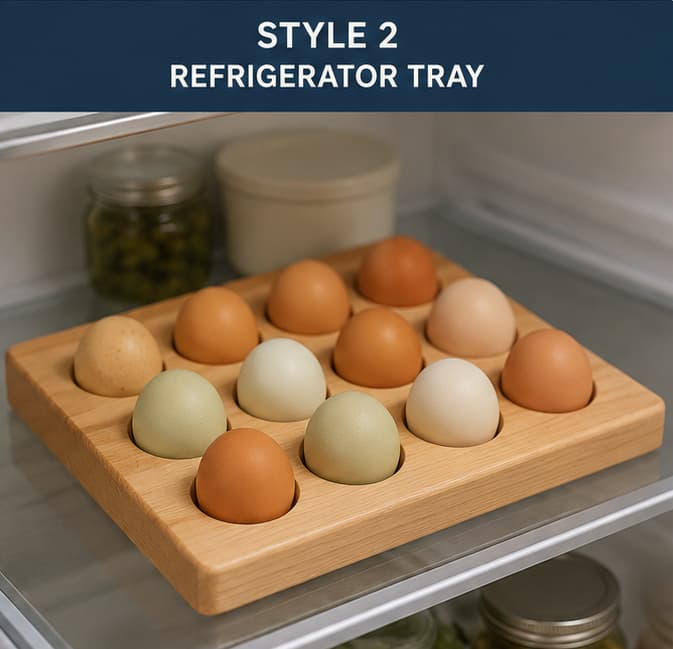
A flat tray with evenly spaced hemispherical recesses that holds eggs securely in the fridge. Think of it as a refined, wooden version of the plastic tray that came with your fridge — except it actually fits properly and doesn’t look terrible.
Best for:
- Standard store-bought eggs that need refrigeration
- People who want to maximize fridge shelf space
- A cleaner, more minimal aesthetic
For this article, we’ll cover both designs — because you might want one for the counter and one for the fridge, and honestly, once you build the first one you’ll want to build the second immediately.
Tools You’ll Need
One of the best things about this project is how minimal the tool requirements are. This is genuinely achievable for someone just starting out.
Essential tools:
- Drill press — The non-negotiable tool for this project. It gives you clean, consistent, perfectly vertical holes. A handheld drill works in a pinch, but a drill press is far superior.
- Forstner bit (1½-inch for most egg sizes) — Creates flat-bottomed, clean-edged holes. This is what makes the project look professional rather than hacked together.
- Miter saw or table saw — For cutting your blanks to size
- Router with roundover bit — To soften all the edges (optional but makes a huge difference)
- Sandpaper — 80 through 220 grit
- Clamps — At least two
If you’re building out your first shop, our 16 Best Woodworking Tools for Beginners guide helps you figure out exactly what to prioritize and what can wait. A drill press is genuinely one of the best early investments you can make — it opens up a huge range of projects beyond just egg holders.
Wood Selection: What Works Best
For an egg holder, you want a tight-grained, stable hardwood that machines cleanly and takes a smooth finish. Here are the best options:
- Maple — Hard, tight-grained, resists dents and scratches. Top choice for a fridge tray.
- Cherry — Beautiful warm color, smooth to machine. Gets more gorgeous with age and use.
- Walnut — Rich and dark. IMO one of the most impressive-looking options for a countertop display.
- Beech — Affordable, very hard, extremely popular for kitchen items in Europe for good reason.
- Pine — Budget-friendly and easy to work. Softer, so it dents more easily, but perfectly fine for a display piece.
For a fridge tray, stick with harder species — maple or beech especially. For a countertop display, the aesthetic matters more, so cherry or walnut are worth the premium.
Wood thickness: Use ¾-inch stock for a fridge tray (gives enough material to drill deep enough recesses without going all the way through). For a countertop display rack, the vertical pieces can be thicker depending on your design.
Build Plan: The Refrigerator Egg Tray (12 Eggs)
Let’s walk through the fridge tray first — it’s the simpler build and a great starting project.
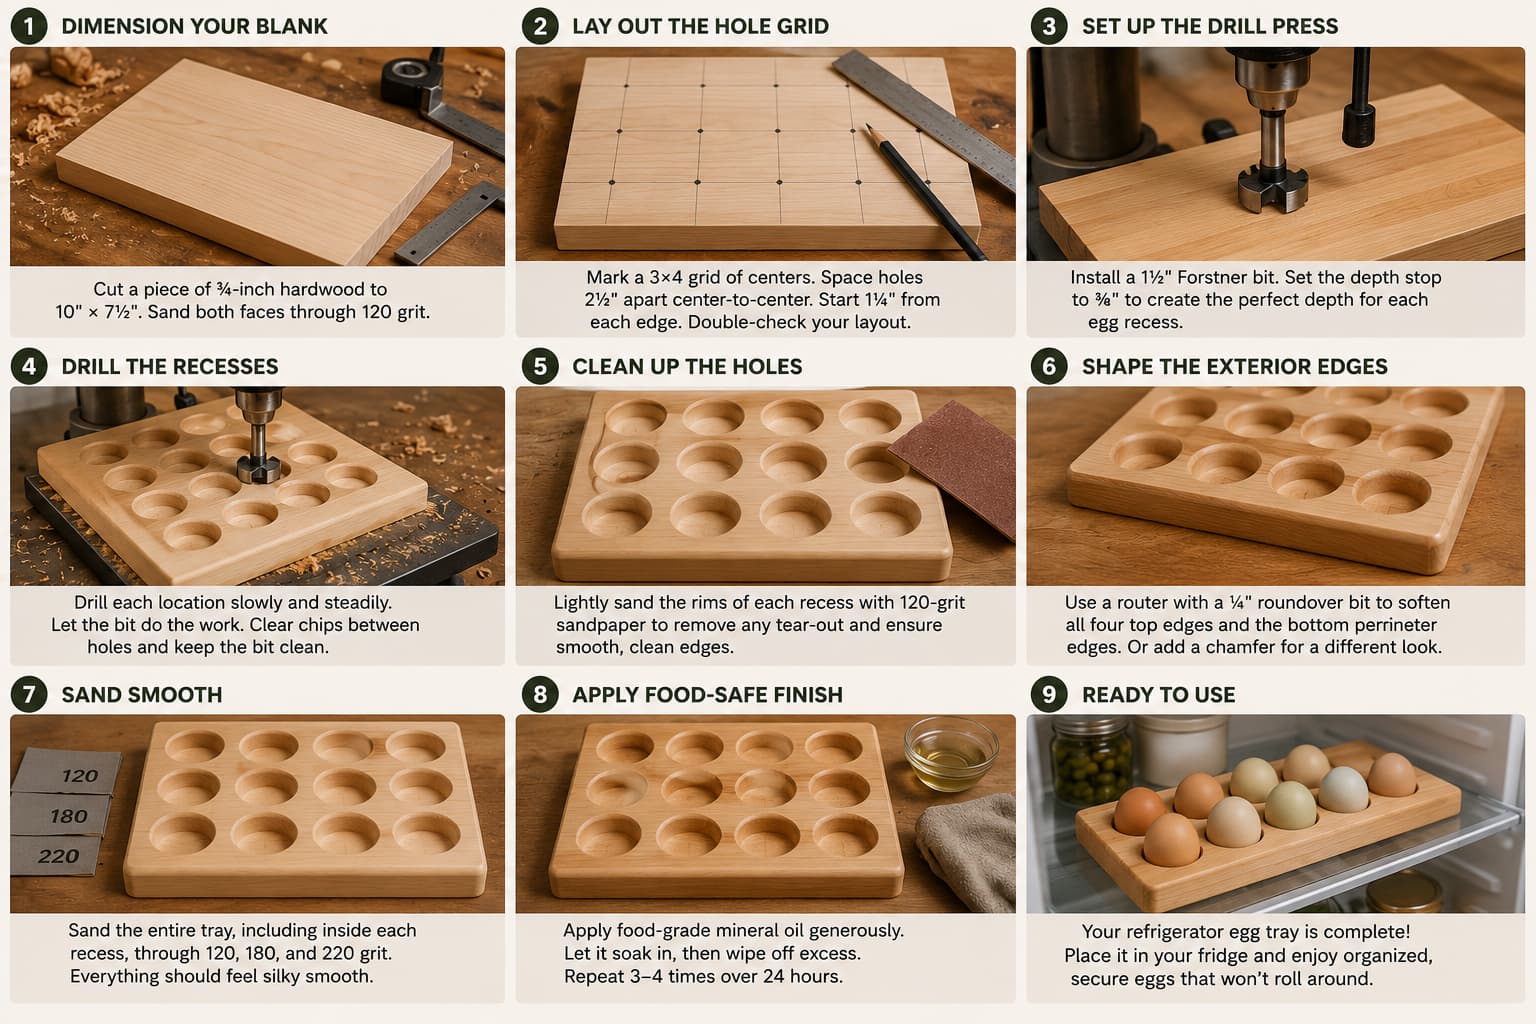
Step 1: Dimension Your Blank
Cut a piece of ¾-inch hardwood to 10 inches × 7½ inches. This gives you a 3×4 grid of eggs with comfortable spacing between holes.
Sand both faces through 120 grit before drilling. It’s much easier to sand a flat blank than to sand around a bunch of recesses later.
Step 2: Lay Out the Hole Grid
Mark your hole centers with a pencil and a combination square. For a 3×4 grid:
- Spacing: 2½ inches center-to-center in both directions
- First row: 1¼ inches from each edge
- Mark all 12 centers clearly before touching the drill press
Double-check your layout by holding a carton of eggs over it — your centers should roughly match up. Eggs aren’t perfectly uniform, but they’re close enough that 2½-inch spacing works reliably.
Step 3: Drill the Recesses
Set up your drill press with a 1½-inch Forstner bit. Set the depth stop to ⅜ inch — deep enough to cradle the egg securely, but leaving plenty of material at the bottom of the tray.
Drill each hole slowly and consistently. Let the Forstner bit do the work — don’t force it. Clear chips between holes to keep the bit running cool and clean.
After drilling, you’ll likely have some tear-out at the rim of some holes. A quick pass with 120-grit sandpaper wrapped around your finger cleans this up nicely.
Step 4: Shape the Exterior
Now profile the outside of the tray. Options:
- Roundover — Run a ¼-inch roundover bit along all four top edges and the bottom perimeter edges. Soft and clean.
- Chamfer — A 45-degree chamfer gives a more angular, modern look.
- Leave square — Perfectly valid. Sometimes clean and simple is the right call.
If you don’t have a router, a sharp hand plane or sandpaper wrapped around a block works fine for light chamfering.
Step 5: Sand and Finish
Sand through the grits — 120, 180, 220. Pay extra attention to the inside of each recess and the flat top surface between holes. Everything needs to be smooth and splinter-free.
Finish options for a food-contact surface:
- Food-grade mineral oil — Apply liberally, let it soak in, wipe off excess. Repeat 3–4 times over 24 hours. Simple and effective.
- Beeswax + mineral oil paste — Wipe on, buff off. Adds a soft sheen and extra water resistance.
- Pure tung oil (not “tung oil finish”) — More durable than mineral oil. Food-safe once fully cured.
Avoid polyurethane, lacquer, and most film finishes on any surface that contacts food directly.
Build Plan: The Countertop Display Rack (12 Eggs in 2 Rows)
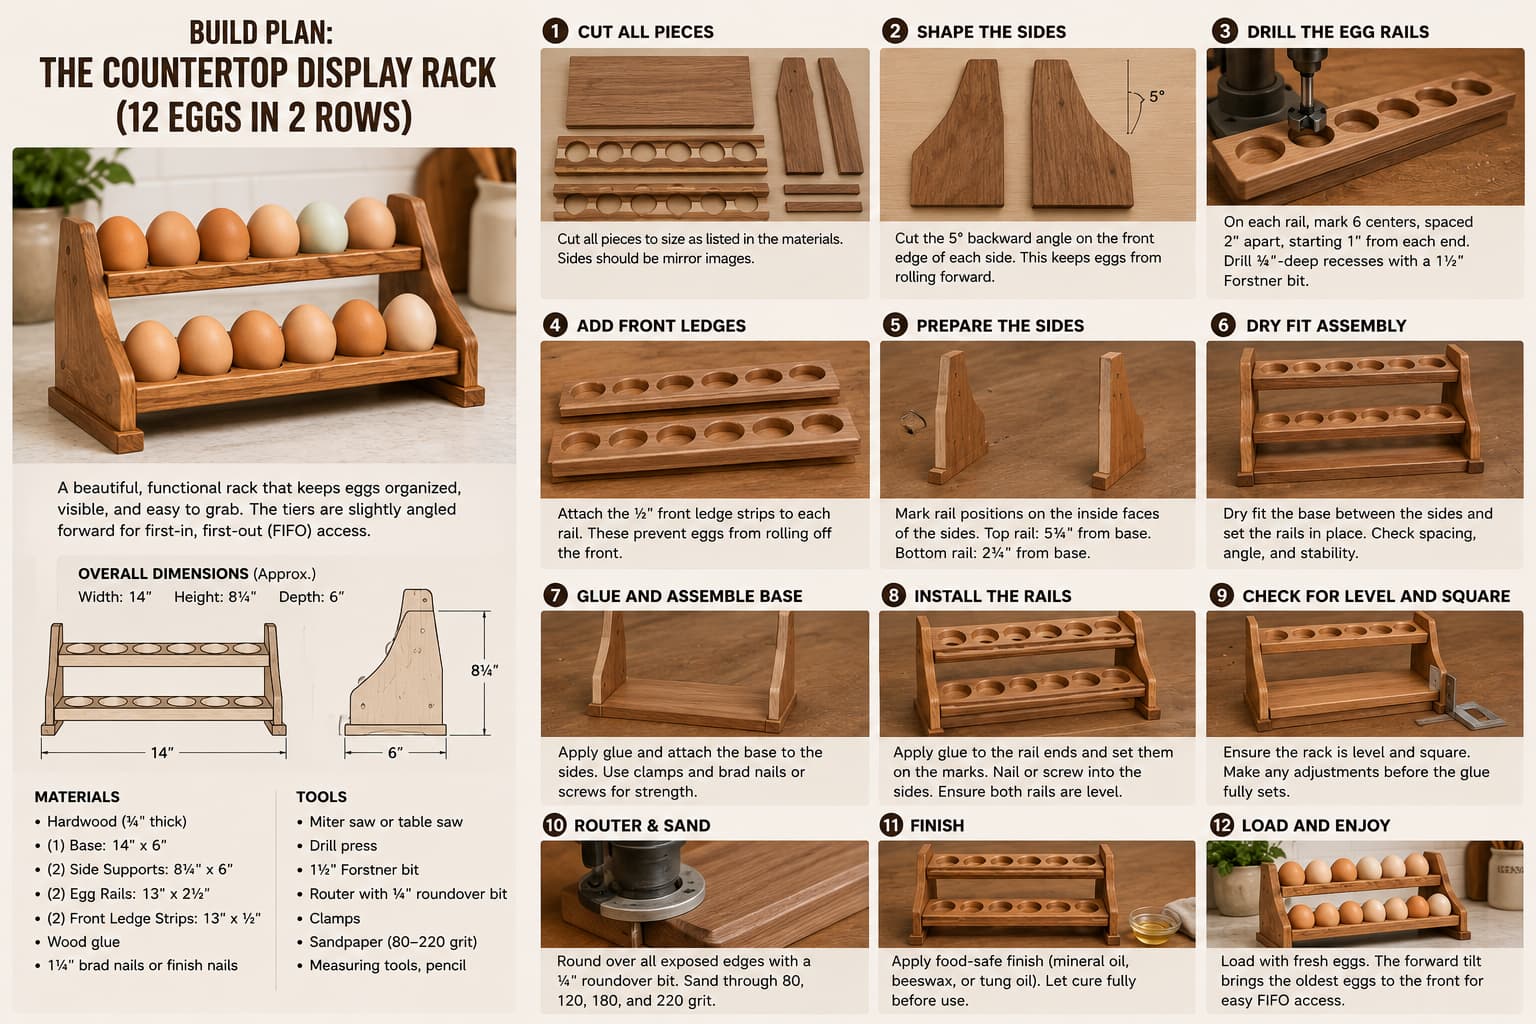
This design is slightly more involved but produces a more impressive result — a tiered display that shows off your eggs and makes grabbing them effortless.
The Basic Structure
The countertop rack consists of:
- A base — Wide enough to hold the rack stable, typically ¾ inch thick
- Two angled side supports — Cut at a slight backward tilt (about 5 degrees) to keep eggs from rolling forward
- Two horizontal rails with egg recesses — These hold the eggs at a slight downward angle toward the front for easy access
The tilt is important. Without it, eggs rest flat and roll unpredictably. A 5-degree backward lean keeps everything secure while still allowing easy grab-and-go access.
Drilling the Rails
The rails work the same way as the fridge tray — 1½-inch Forstner bit, ⅜-inch depth — but here you’re drilling into narrower stock. Each rail holds one row of 6 eggs, and they’re spaced about 6–7 inches apart vertically.
Use a scrap piece of plywood as a drilling support when working on narrow stock — it prevents the rail from tipping under the drill press.
Assembly
Glue and pin the side supports to the base. Then attach the rails to the side supports at your chosen spacing. Dry-fit everything first to confirm the angle and spacing work with actual eggs before committing to glue.
Add a small ledge or lip at the bottom front of each rail — just a strip of ⅛-inch wood — to prevent eggs from rolling off. It’s a small detail, but without it you’ll have rolling egg problems every time someone bumps the counter. Learn from my mistakes 🙂
This Project Has Real Selling Potential
Here’s something worth thinking about: wooden egg holders sell extremely well at craft fairs, farmers markets, and on Etsy. Especially when your local market sells farm-fresh eggs — the people buying those eggs often want a beautiful way to store them.
A maple or walnut egg holder, finished in mineral oil, priced at $35–$60 depending on size and wood species? It moves. Consistently. And since the material cost runs under $10 per tray, the margins are genuinely solid.
If you’re interested in building things to sell, this project fits perfectly into the kind of inventory covered in 25 Small Wood Projects You Can Sell as a Beginner — low material cost, fast to build in batches, and with strong appeal to the food-and-kitchen niche. One of the more practical manuals available is 32 Profitable Woodworking Projects to Build & Sell from Your Home Workshop, which takes a deeper look at which projects create the most consistent money.
Level Up Your Projects With Better Plans
One egg holder turns into two. Two turns into a small batch for a market. Then someone asks if you make bread boxes (funny you should ask — yes), and before you know it you have a legitimate side hustle running out of your garage on weekends.
But to scale up your builds — and to keep the quality consistent — you need reliable plans to work from. That’s exactly where Ted’s Woodworking Plans earns its place in your shop. With over 16,000 project plans covering everything from simple kitchen items like this one to complex furniture builds, each plan gives you a complete cut list, step-by-step instructions, materials list, and clear diagrams.
The egg holder and bread box plans alone will pay for the resource many times over once you start selling. And you’ll find dozens of other kitchen, home, and garden projects in there that are equally fast to build and equally appealing to buyers. If you’ve been thinking about turning your woodworking hobby into something more — this is the resource that makes it practical rather than just aspirational.
Variations Worth Building
Once you’ve made your first egg holder, here are a few variations that take the project further:
- Personalized egg tray — Add initials or a simple design with a wood burner or router carving
- Two-tone tray — Use contrasting wood species for the top surface and base
- Wall-mounted egg rack — Add a French cleat mount to the back for a space-saving wall display
- Combination holder — A rack that holds eggs on top and has a small drawer underneath for other small kitchen items
- Jumbo egg holder — Sized for duck or goose eggs from a local farm
Each of these starts with the same basic skills you just learned. FYI — that’s how woodworking always works. You learn one project and it branches into five more.
The Bottom Line: Build It This Weekend
The wooden egg holder is genuinely the perfect beginner project. It’s quick, cheap, practical, and impressive. You’ll finish it in a weekend, use it every single day, and get compliments every time someone opens your fridge or spots it on your counter.
Here’s the quick recap:
- Choose your style — countertop display or fridge tray (or build both)
- Use a drill press — it’s the key to clean, consistent holes
- Go with hardwood — maple or cherry for the fridge, walnut or cherry for the counter
- Finish food-safe — mineral oil and beeswax is all you need
- Consider selling — the margins are good and the demand is real
Stop letting your eggs roll around in a cardboard carton. Build the holder, enjoy the upgrade, and then build a dozen more to sell. You’ve got this.