
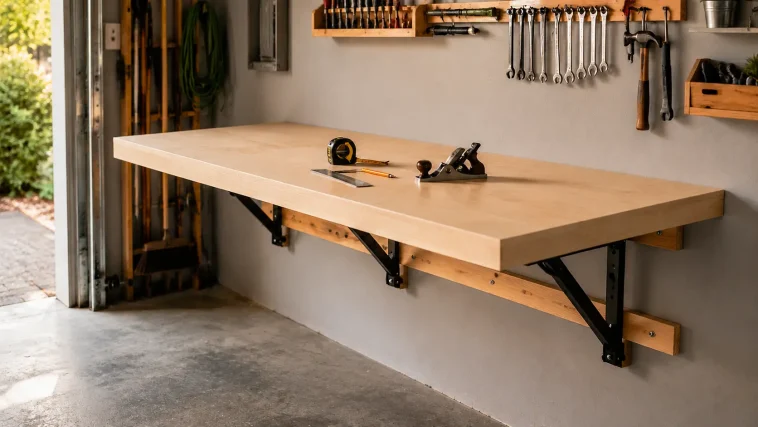
A useful workbench has an annoying habit of occupying the exact floor space where the car, lawn mower, bicycles and three mysterious storage boxes also want to live. This DIY folding wall-mounted workbench solves that argument with a full 60 × 24-inch work surface that folds down against the wall when you are finished.
The design uses a laminated double-plywood top, solid wood edging, two wall ledgers and locking folding brackets. Open it for measuring, sanding, assembly and light repair work. Clear the surface, release the supports and fold it away to recover almost all the floor space. If you are comparing several bench styles first, browse these free DIY workbench plans before buying lumber.
This is a complete, original plan rather than a roundup of other projects. Below you will find the finished dimensions, shopping list, exact cut list, one-sheet plywood layout, wall-mounting procedure, ten construction steps, four measurement diagrams and practical safety checks.
Folding Workbench Plan at a Glance
- Work surface: 60 in. wide × 24 in. deep
- Working height: 36 in.
- Top thickness: 1 1/2 in.
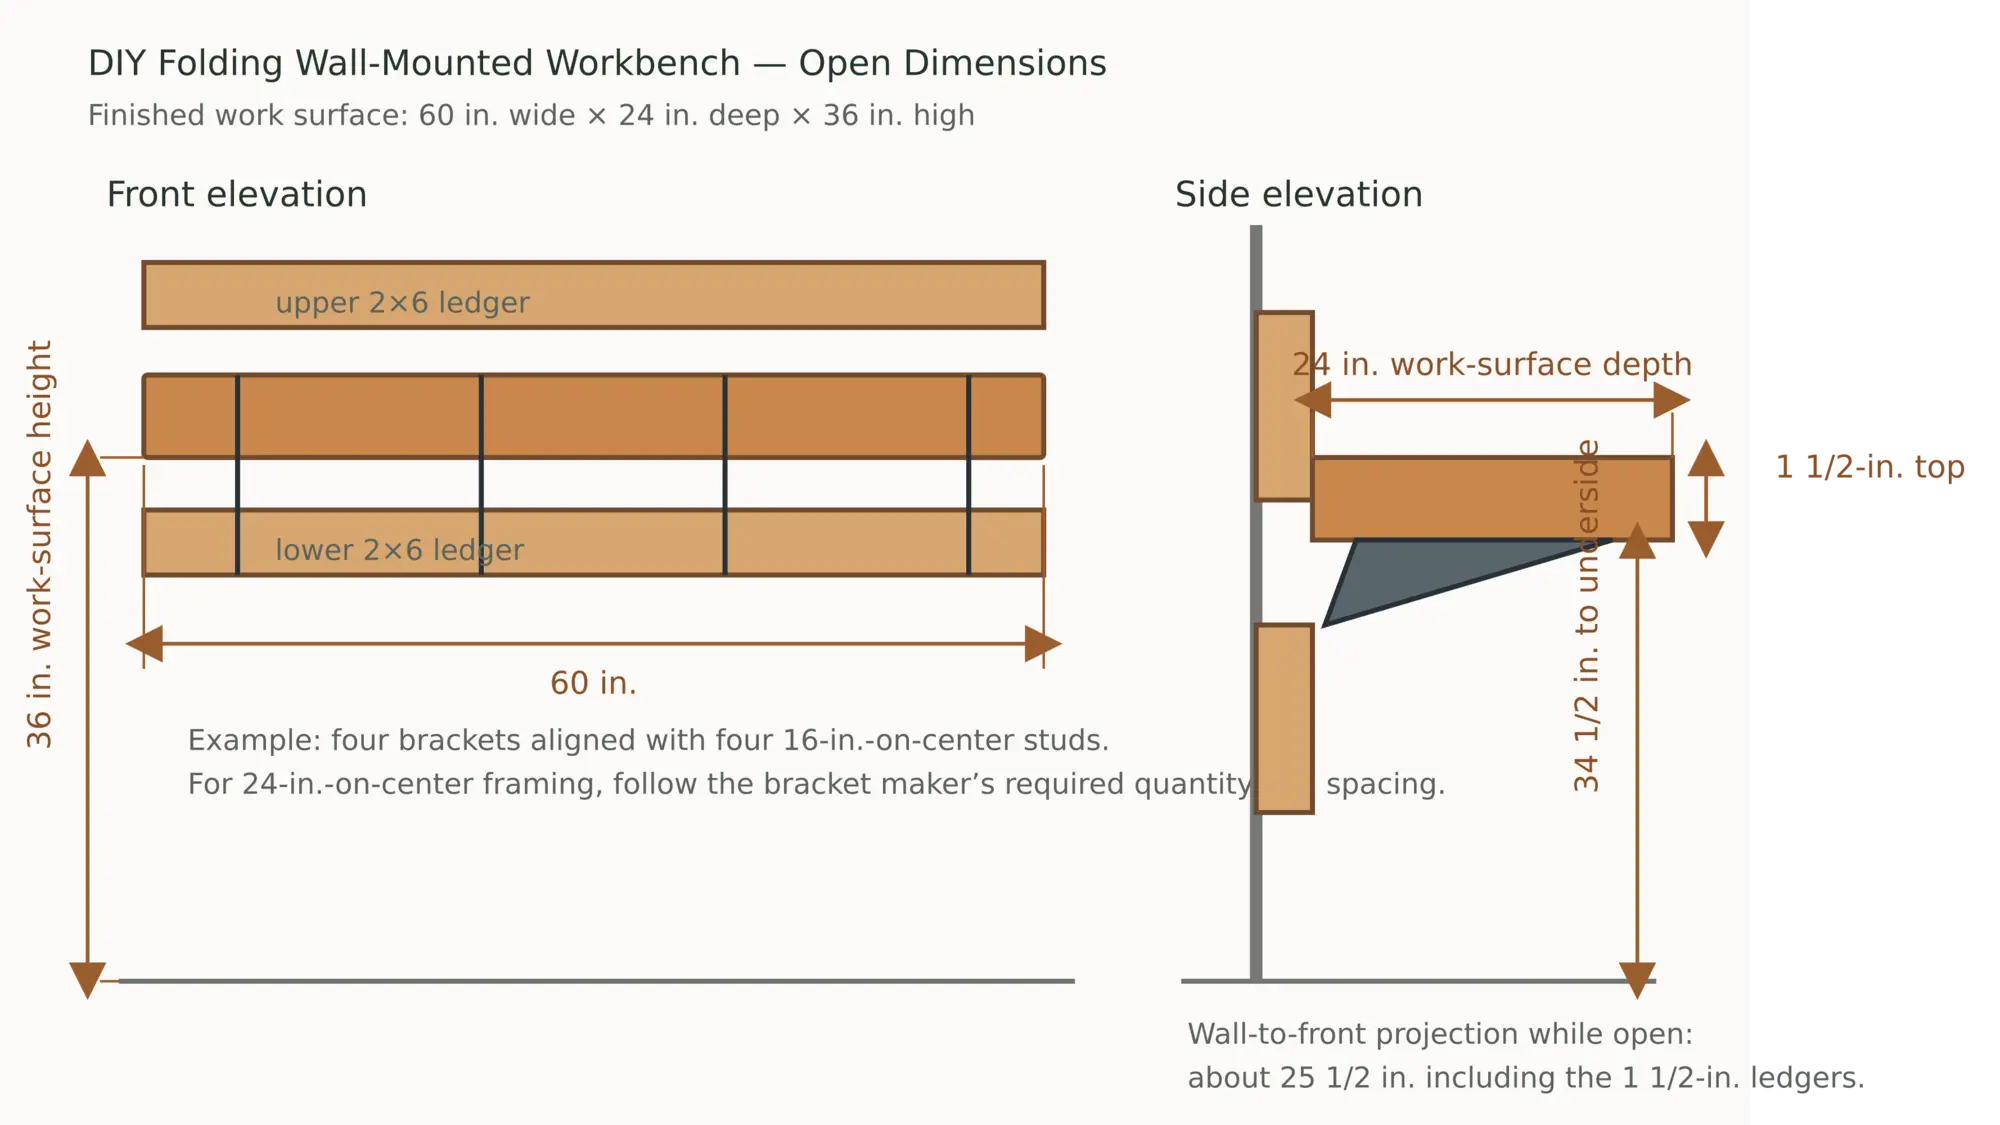
- Wall-to-front depth when open: approximately 25 1/2 in., including the ledgers
- Projection when closed: approximately 3–4 in., depending on bracket and latch hardware
- Approximate lower-edge clearance when closed: 10 1/2 in.; verify with the actual brackets
- Difficulty: confident beginner to intermediate
- Build time: one weekend, plus finish-curing time
- Best use: assembly, sanding, layout and light bench work in a small garage or shop
Why This Folding Workbench Design Works
The laminated top is the heart of the plan. Two 3/4-inch plywood panels are glued face to face, producing a flat 1 1/2-inch slab without a deep 2×4 frame underneath. That matters because a shallow top sits closer to the wall when folded and works more naturally with common locking workbench brackets.
A 1×2 border hides the plywood layers and protects the exposed edges. The finished top remains exactly 60 × 24 inches because the plywood cores are cut smaller—58 1/2 × 22 1/2 inches—before the 3/4-inch-thick edging is added around them.
Two 2×6 ledgers spread the bracket loads across several studs and provide solid wood behind the hardware. The upper ledger also establishes the working height. Because the top is 1 1/2 inches thick, its underside must finish at 34 1/2 inches to place the work surface at 36 inches.
This bench is particularly useful in a garage that must change jobs during the week. Pair it with the layout ideas in the small woodworking shop guide, and you can keep cutting and assembly near the bench while moving storage onto the wall.
Before Buying Hardware: Inspect the Wall
Do not start with the plywood. Start with the wall. A perfect top cannot rescue weak framing, damaged masonry or fasteners driven beside the studs instead of into them.
- Confirm the wall is structurally sound and belongs to you.
- Find the actual centers of the studs with a suitable detector and confirm them with a second method where safe.
- Check both sides of the wall for plumbing, electrical equipment or other reasons not to drill.
- Measure baseboards, outlets, doors, garage tracks, parked vehicles and anything that could block the top as it folds.
- Choose locking folding brackets intended for workbench or heavy shelf use, with horizontal arms at least 18 inches long.
- Read the bracket instructions before deciding the ledger spacing, screw diameter or number of supports.
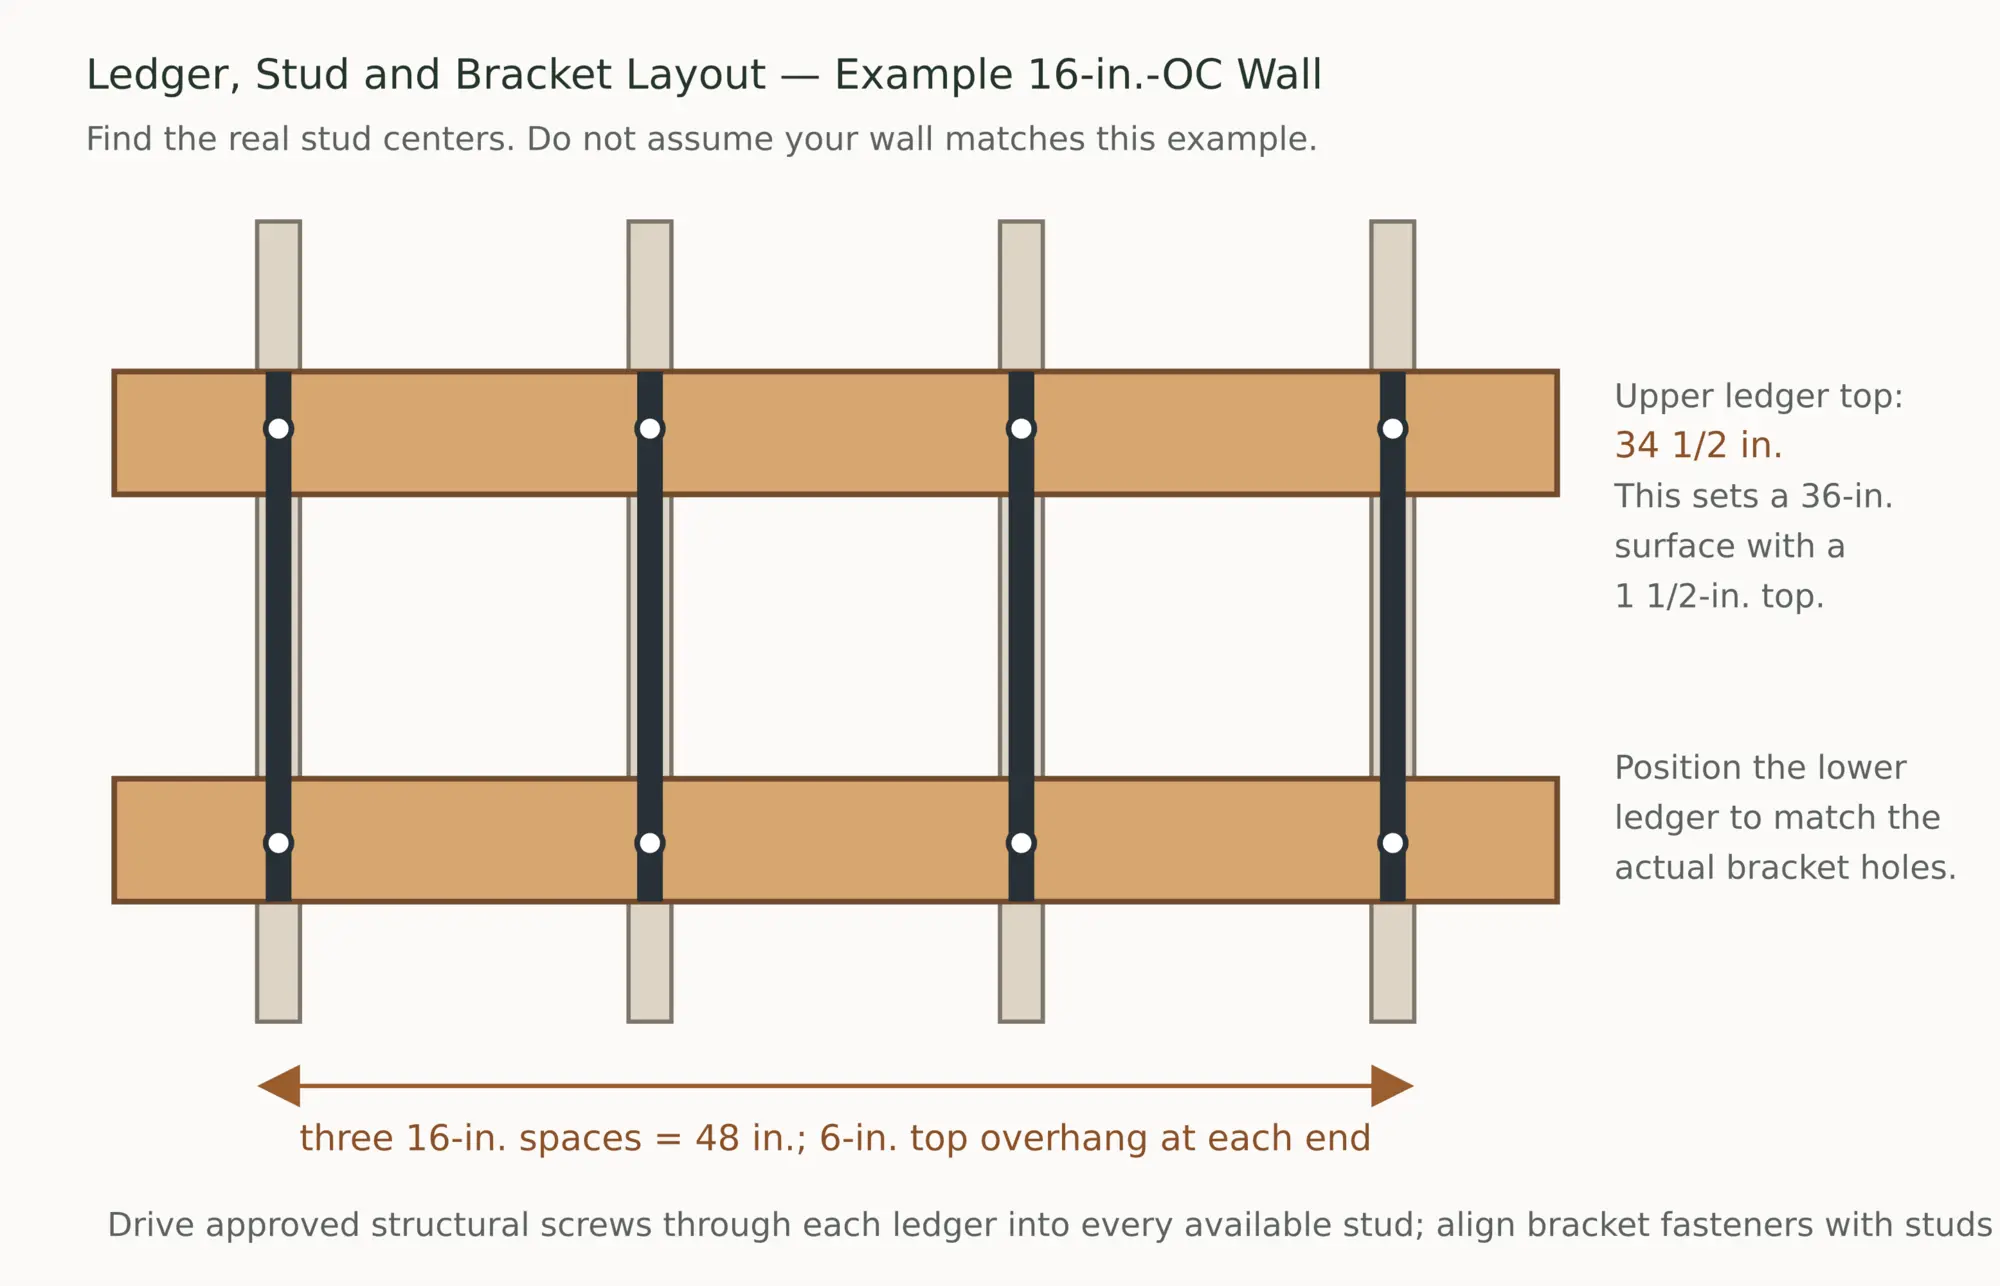
The front-view diagram shows four brackets on an example wall with studs 16 inches on center. Your wall may use different spacing. Use every bracket the manufacturer requires and align bracket fasteners with studs whenever possible. If the framing is irregular, the wall is masonry, or you are unsure what is hidden behind the surface, stop and ask a qualified contractor to specify the mounting system.
Materials and Hardware
Lumber and sheet goods
- One sheet of 3/4-in. plywood, 4 × 8 ft
- Two straight 1×2×8 boards for the top edging
- Two straight 2×6×8 boards for the wall ledgers
Hardware and supplies
- Three or four heavy-duty locking folding workbench brackets with horizontal arms at least 18 in. long; quantity must follow the manufacturer’s requirements and your stud layout
- Manufacturer-approved structural screws or lag screws for fastening both ledgers to the wall framing
- Manufacturer-approved bracket-to-ledger and bracket-to-top fasteners
- Approximately twenty-four #8 × 1 1/4-in. wood screws for laminating and edging the top
- Quality wood glue suitable for plywood and the expected workshop conditions
- Two positive mechanical safety latches to secure the closed top
- 80-, 120- and 180-grit sandpaper
- Paint, polyurethane or another finish appropriate for the shop
- Optional hardwood edge banding instead of 1×2 edging
Do not use drywall screws as structural wall fasteners. The correct screw length depends on ledger thickness, wall finish, bracket holes and required stud embedment, so select it from the bracket and structural-screw instructions rather than guessing from a generic shopping list.
Tools You Will Need
- Stud finder appropriate for the wall
- Tape measure, pencil and 4-ft level
- Circular saw with a straight guide, track saw or table saw
- Miter saw or circular saw for the ledgers and edging
- Drill/driver and an impact driver if approved for the chosen structural screws
- Bits sized for the structural fasteners and pilot holes
- Countersink bit
- At least eight clamps, or a combination of clamps and evenly distributed weights for laminating
- Random-orbit sander or sanding block
- Eye and hearing protection plus suitable dust protection
If you are building your first tool kit, this guide to essential woodworking tools for beginners explains which purchases are useful beyond this single project.
Complete Cut List
| Label | Part | Material | Qty. | Cut size | Purpose |
|---|---|---|---|---|---|
| A | Upper top core | 3/4-in. plywood | 1 | 58 1/2 × 22 1/2 in. | Upper layer of laminated work surface |
| B | Lower top core | 3/4-in. plywood | 1 | 58 1/2 × 22 1/2 in. | Lower layer of laminated work surface |
| C | Front and rear edging | 1×2 | 2 | 60 in. | Creates the finished 60-in. width |
| D | Side edging | 1×2 | 2 | 22 1/2 in. | Fits between the front and rear edging |
| E | Upper wall ledger | 2×6 | 1 | 60 in. | Establishes height and supports upper bracket fasteners |
| F | Lower wall ledger | 2×6 | 1 | 60 in. | Supports lower bracket fasteners |
Board-yield check
| Material | Cutting plan | Result |
|---|---|---|
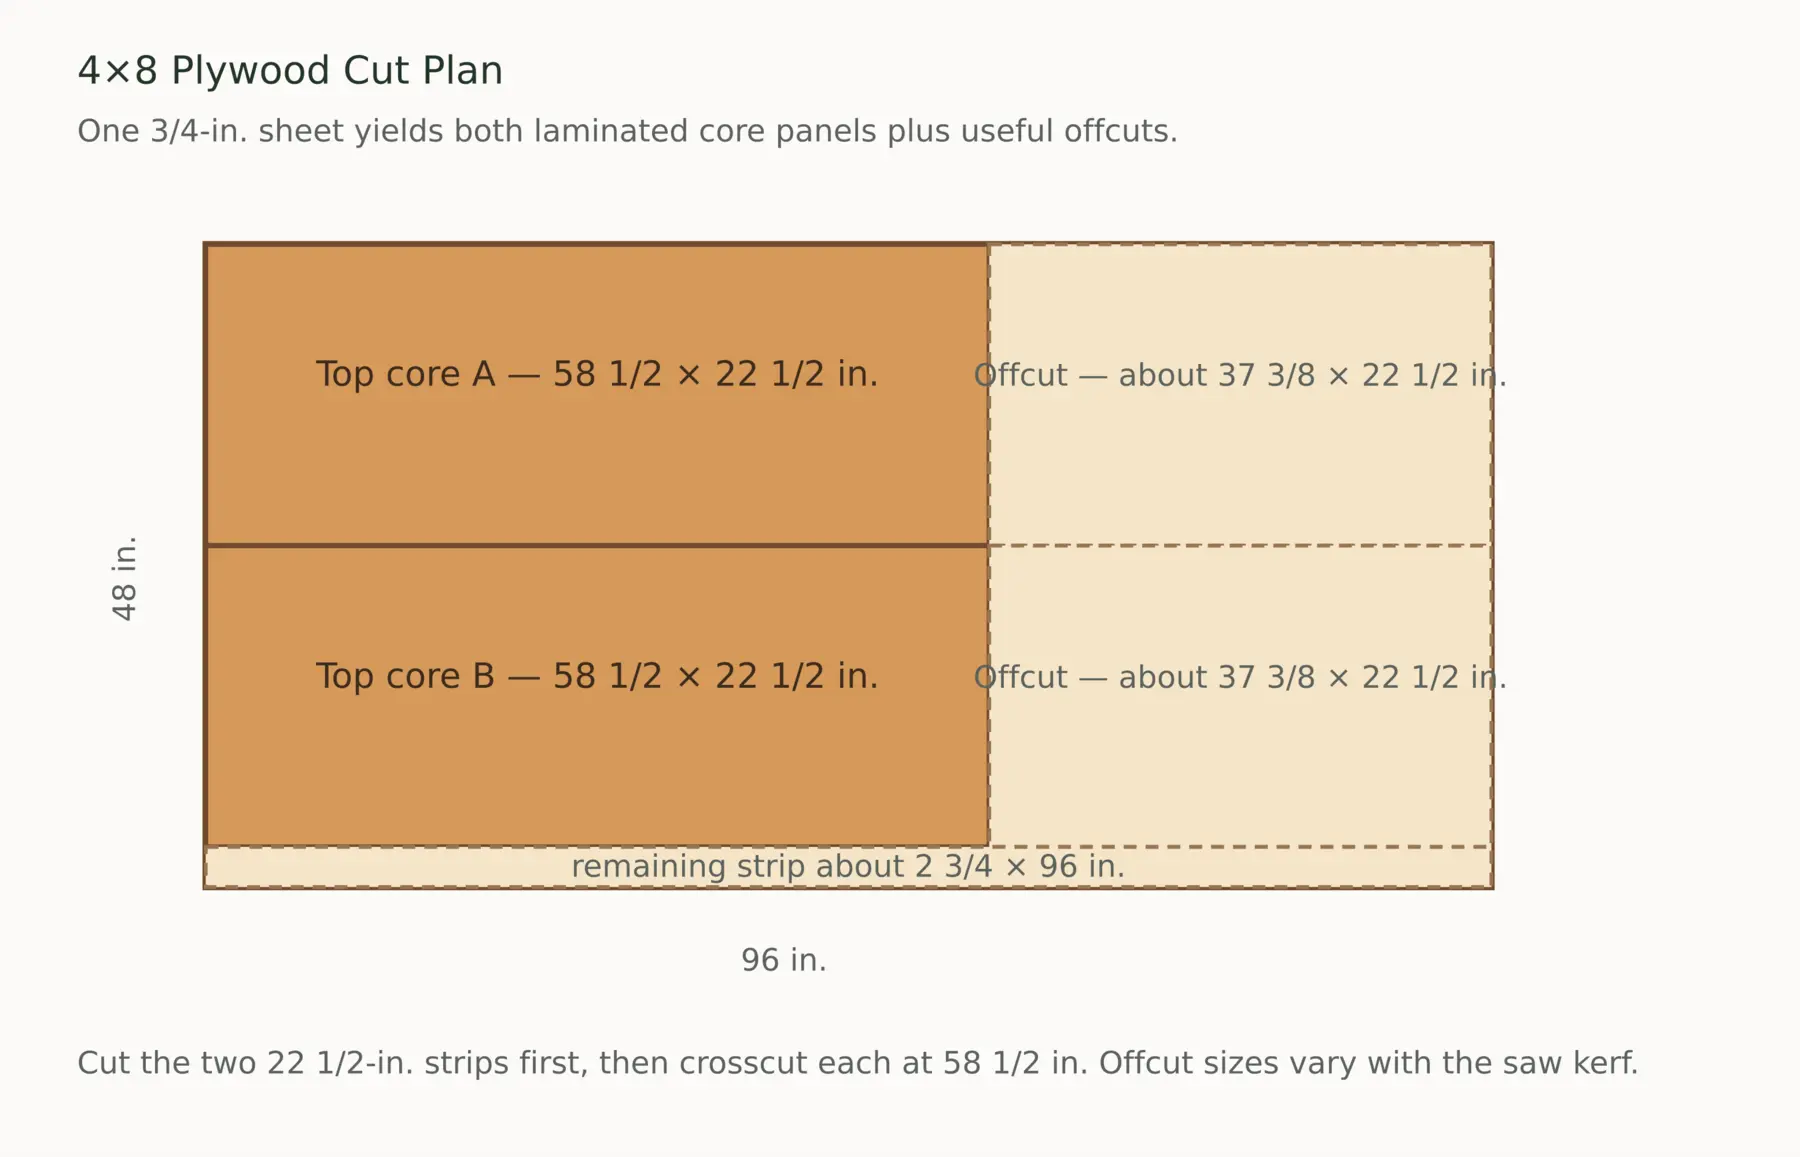
| One 4×8 plywood sheet | Rip two 22 1/2 × 96-in. strips; crosscut each at 58 1/2 in. | Two top cores, two offcuts about 37 3/8 × 22 1/2 in. and a remaining strip about 2 3/4 × 96 in.; actual offcuts depend on saw kerf |
| 1×2 board #1 | 60 + 22 1/2 in. | 82 1/2 in. before saw kerfs |
| 1×2 board #2 | 60 + 22 1/2 in. | 82 1/2 in. before saw kerfs |
| 2×6 board #1 | 60 in. | Upper ledger plus offcut |
| 2×6 board #2 | 60 in. | Lower ledger plus offcut |
How to Build the DIY Folding Wall-Mounted Workbench
Step 1: Choose the location and map the studs
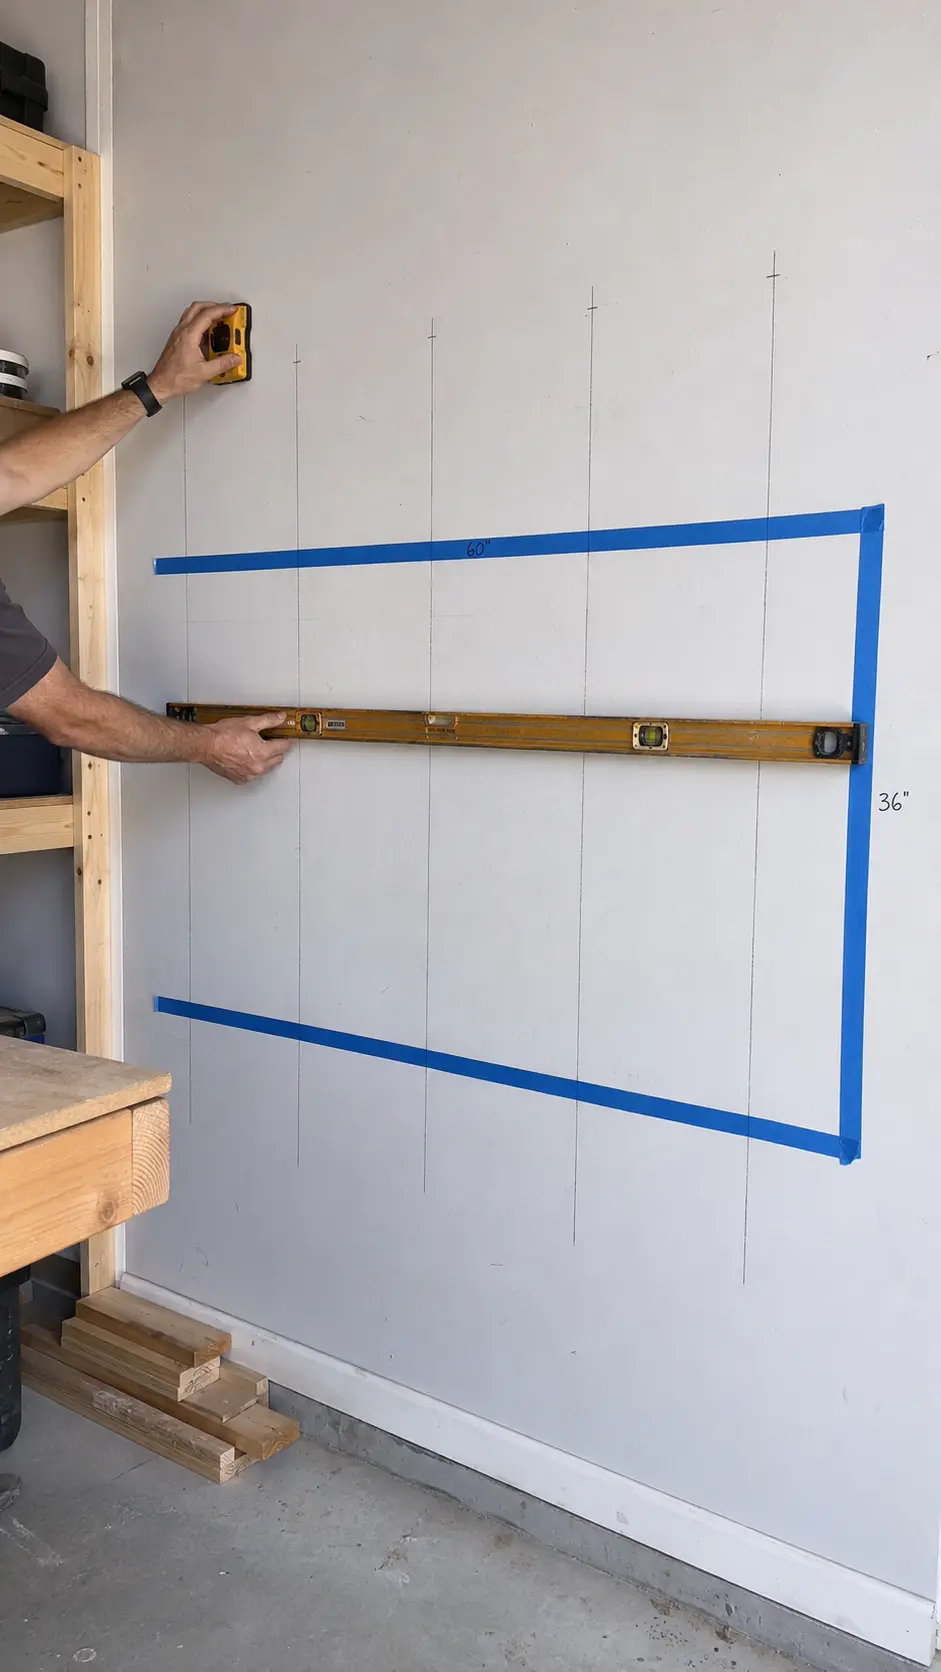
Clear the entire wall and sweep the floor so the level and measurements are not fighting storage bins. Mark the planned 60-inch bench width with painter’s tape. Open nearby doors, park the vehicle in its normal position and imagine the 24-inch top moving through its full arc.
Locate every stud that falls behind the bench. Mark the center of each stud at several heights and connect the marks with a light vertical line. Confirm suspicious readings with a second method that is appropriate for the wall. Do not drill merely because the detector beeped once.
Mark a level line at 36 inches for the finished work surface. Then mark a second line at 34 1/2 inches; this is the target underside of the 1 1/2-inch top when open. Keep these two lines visible until the upper ledger and brackets are fixed.
Step 2: Cut the two plywood top panels
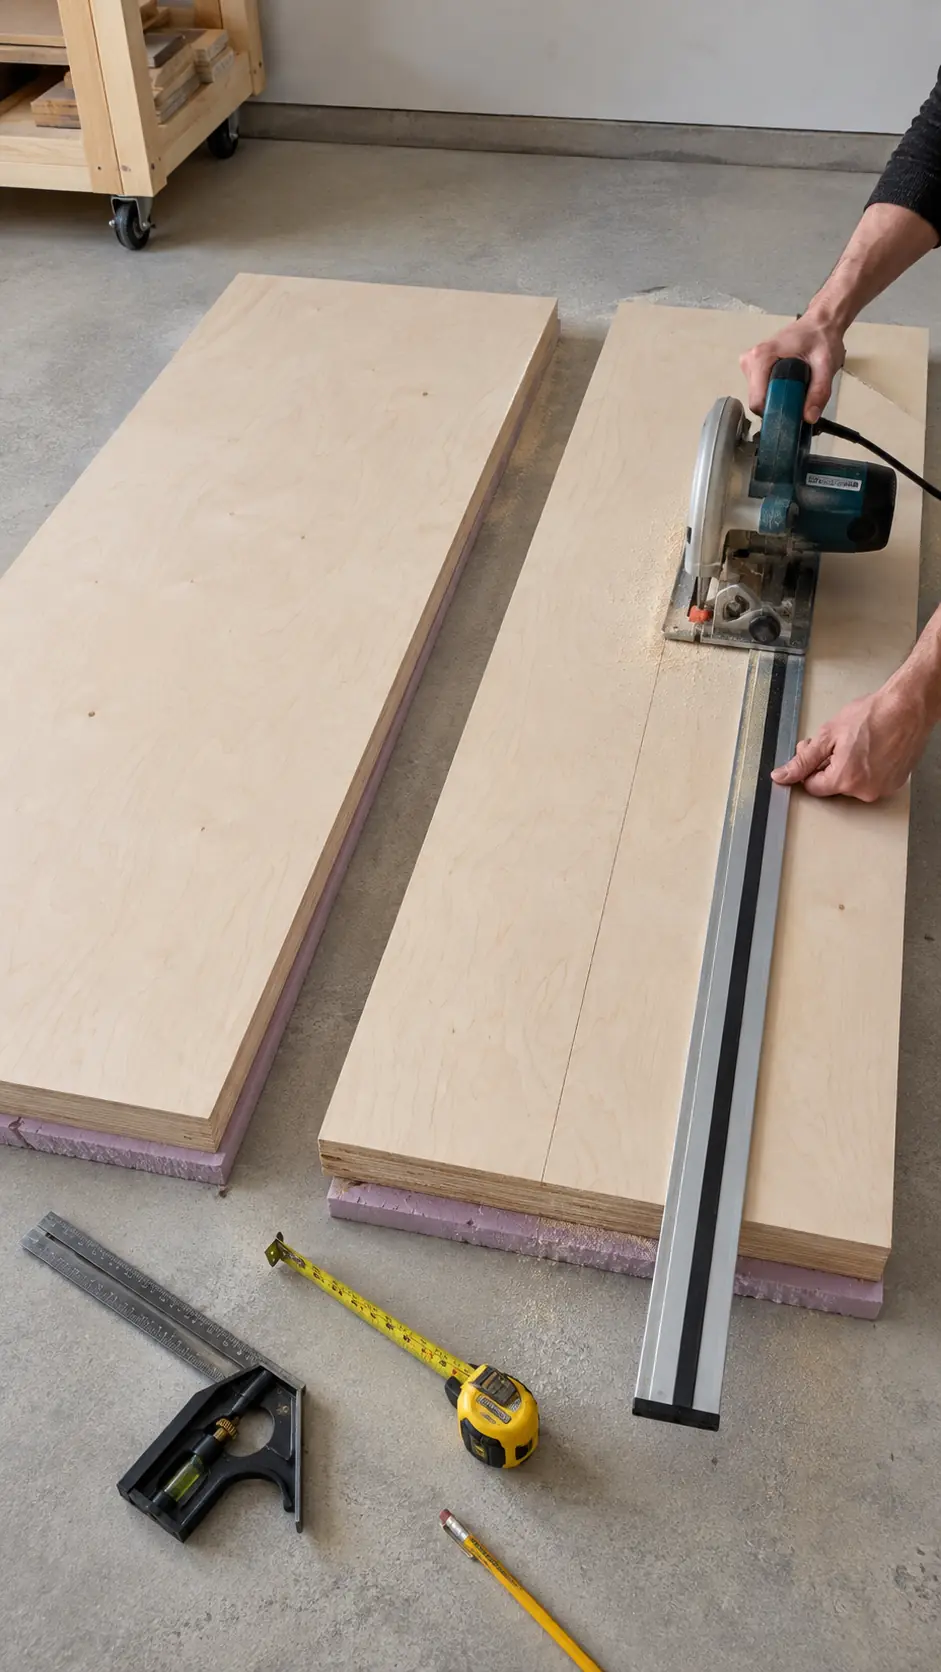
Support the full sheet on foam insulation or a cutting grid. Rip two strips at 22 1/2 inches wide, then crosscut each strip at 58 1/2 inches. Use the same straightedge setup whenever possible so the panels match.
Stack the panels and compare all four edges. If one is slightly oversized, trim or sand it now. The pair does not need to agree with the tape measure to a microscopic degree, but their edges must align cleanly when laminated. Mark the best face of one panel as the finished top and the cleanest face of the other as the exposed underside.
Step 3: Laminate the workbench top
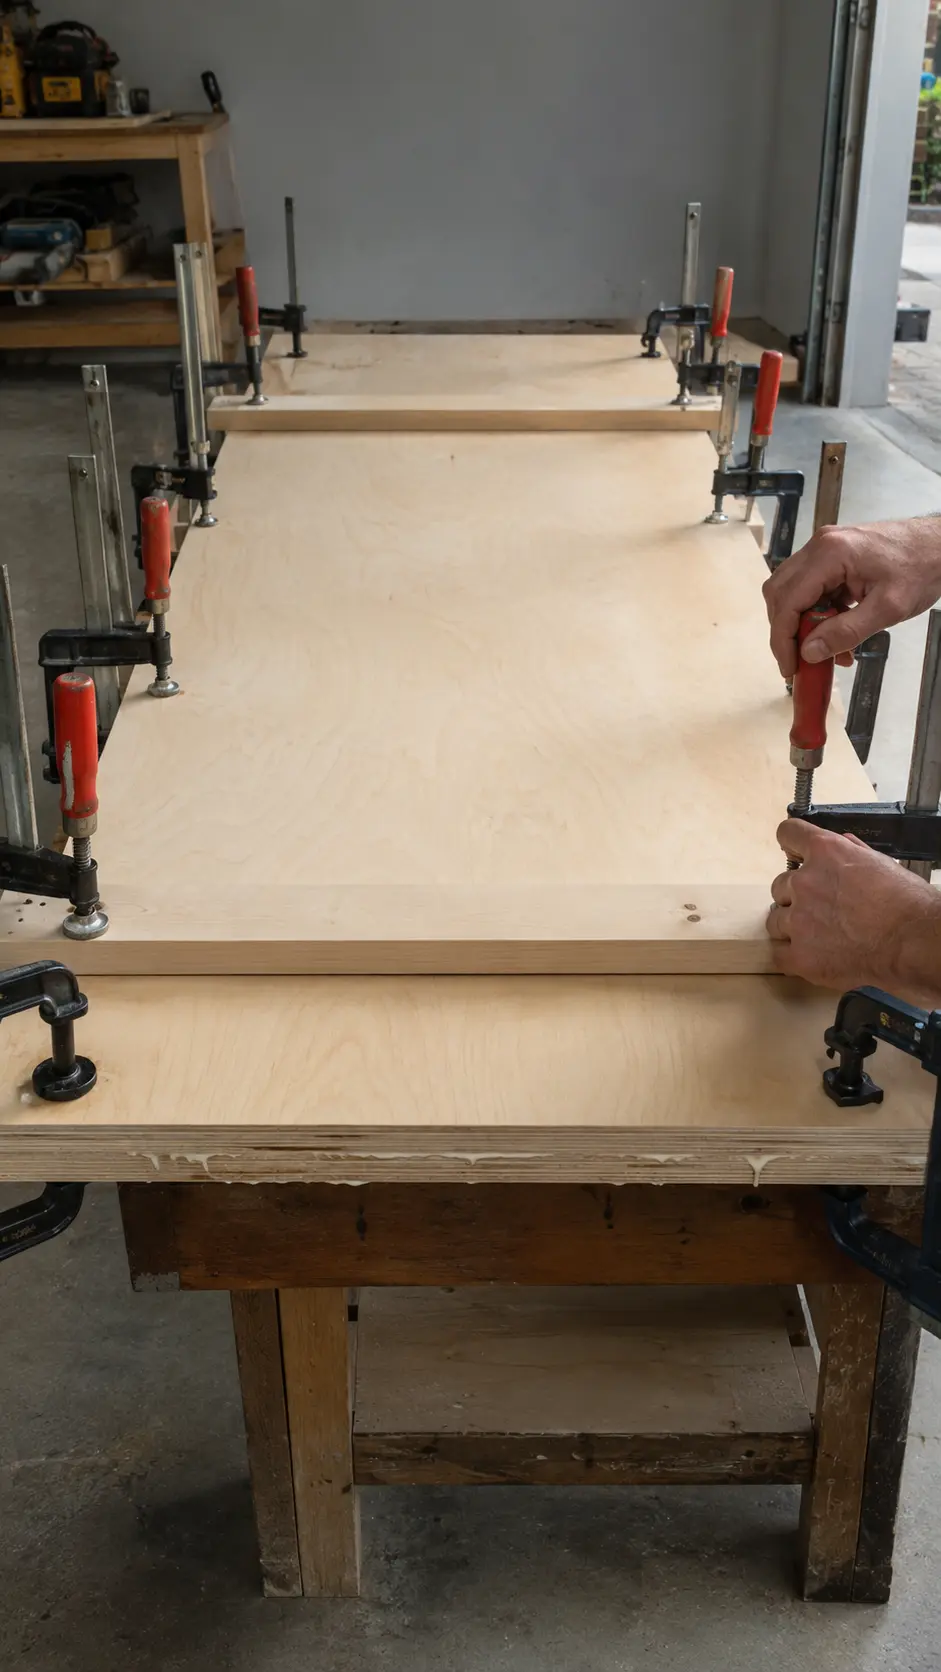
Place the lower panel face down on a flat surface. Spread a thin, even layer of wood glue across it, reaching the corners without leaving thick puddles. Lower the upper panel into place and align the edges.
Clamp around the perimeter and add evenly distributed weight or cauls across the middle. Predrill and drive 1 1/4-inch screws from the underside in a loose grid if you want mechanical clamping while the glue cures. Keep every screw far enough from future bracket holes and at least 2 inches from the edges. The 1 1/4-inch length should remain safely below the finished surface, but verify your actual plywood thickness before driving anything.
Check the assembly diagonally and along both edges before the glue begins to grab. Wipe away squeeze-out and let the panel cure flat for the full time specified by the glue manufacturer.
Step 4: Add the 1×2 edging
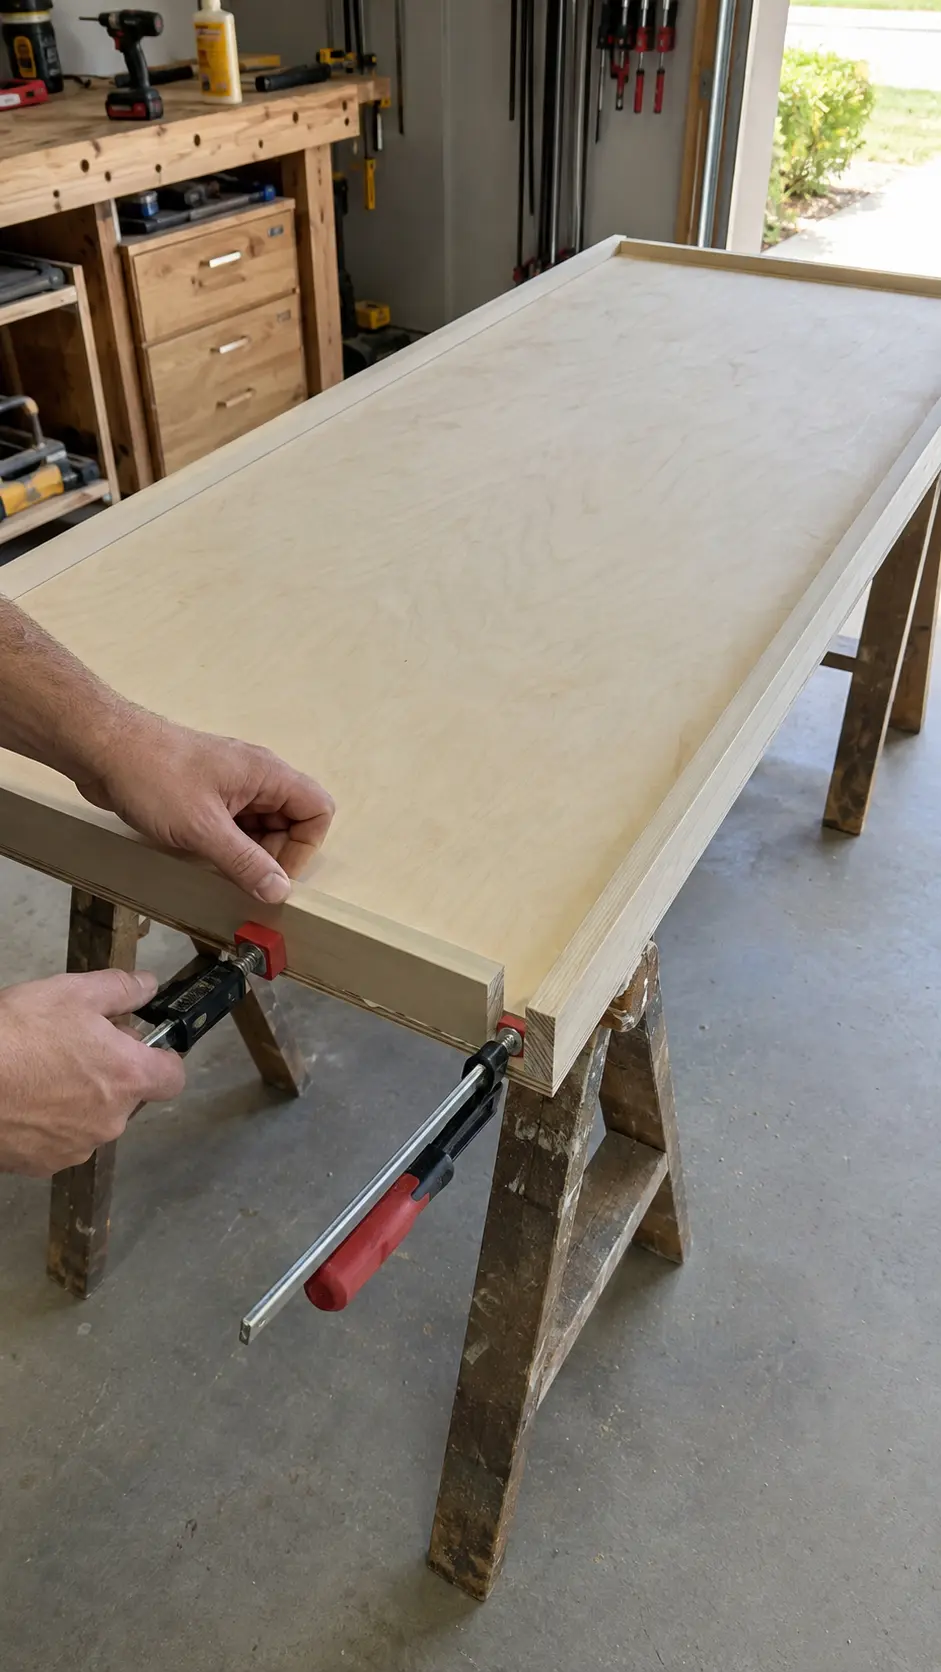
Cut two 1×2 pieces at 60 inches and two at 22 1/2 inches. Dry-fit the front and rear pieces first. Their 1 1/2-inch faces should cover the full plywood thickness, and their ends should extend 3/4 inch beyond the plywood core at both sides.
Glue and clamp the 60-inch pieces flush with the top face. Predrill and countersink 1 1/4-inch screws from the edging into the plywood if desired, taking care not to split the narrow stock. Fit the two 22 1/2-inch side pieces between them and attach the same way.
The completed top should now measure 60 × 24 × 1 1/2 inches. Measure both diagonals. A small discrepancy can often be corrected while the edging glue is still workable; a large discrepancy means the core was not square and should be corrected before wall installation.
Step 5: Sand and finish the top and ledgers
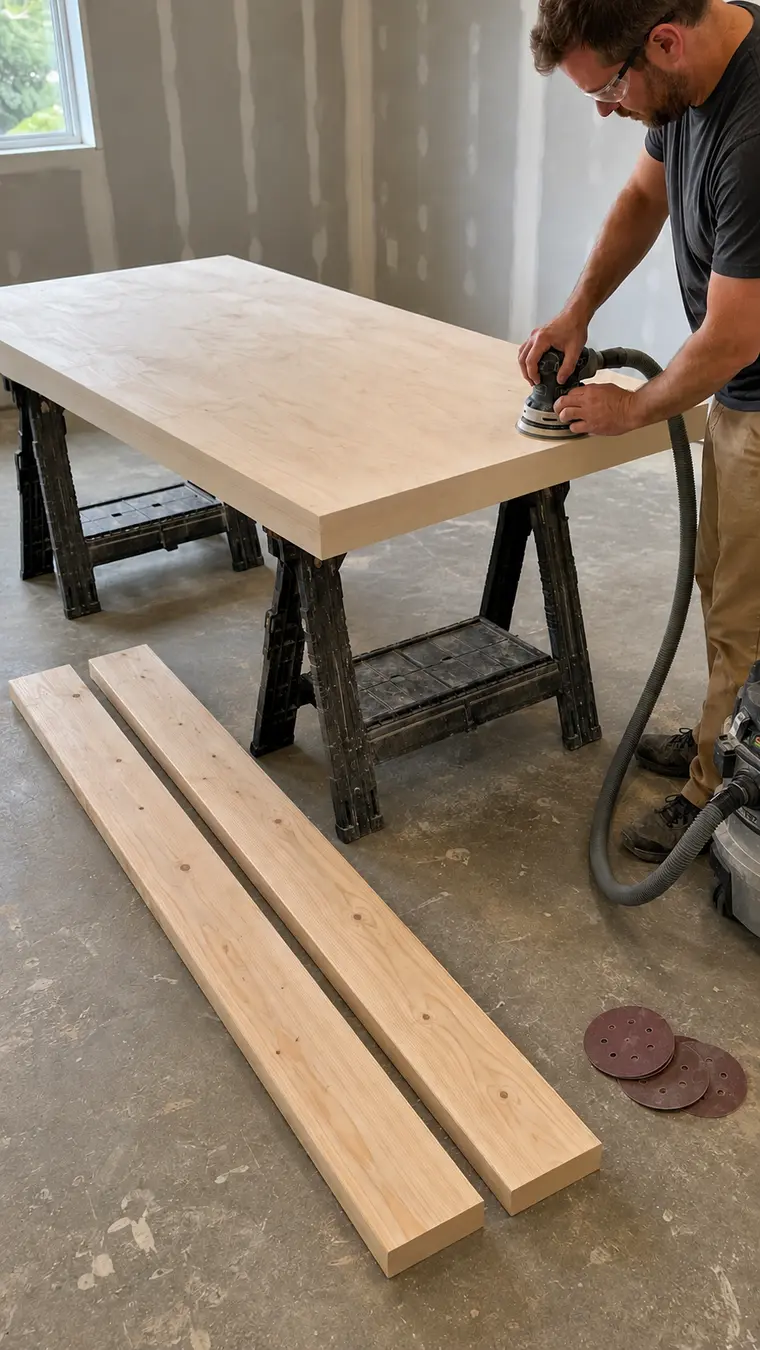
Level the edging with the plywood using a sander, hand plane or careful flush-trim routing. Ease the corners so sleeves and hands do not catch on sharp edges. Sand through 120 grit; move to 180 grit on the work surface if the chosen finish recommends it.
Cut both 2×6 ledgers to 60 inches and reject any board with major splits, decay or a severe twist. Sand the faces that will remain visible. Apply paint or a durable clear finish to the top and ledgers, but keep heavy finish out of the bracket contact areas and pilot holes. Allow it to cure before hardware installation.
If the rest of the wall is already crowded, plan future storage now. The bench works well below these tool wall storage ideas, while bulky clamps can move to a dedicated solution from the DIY clamp rack guide.
Step 6: Mount the upper ledger
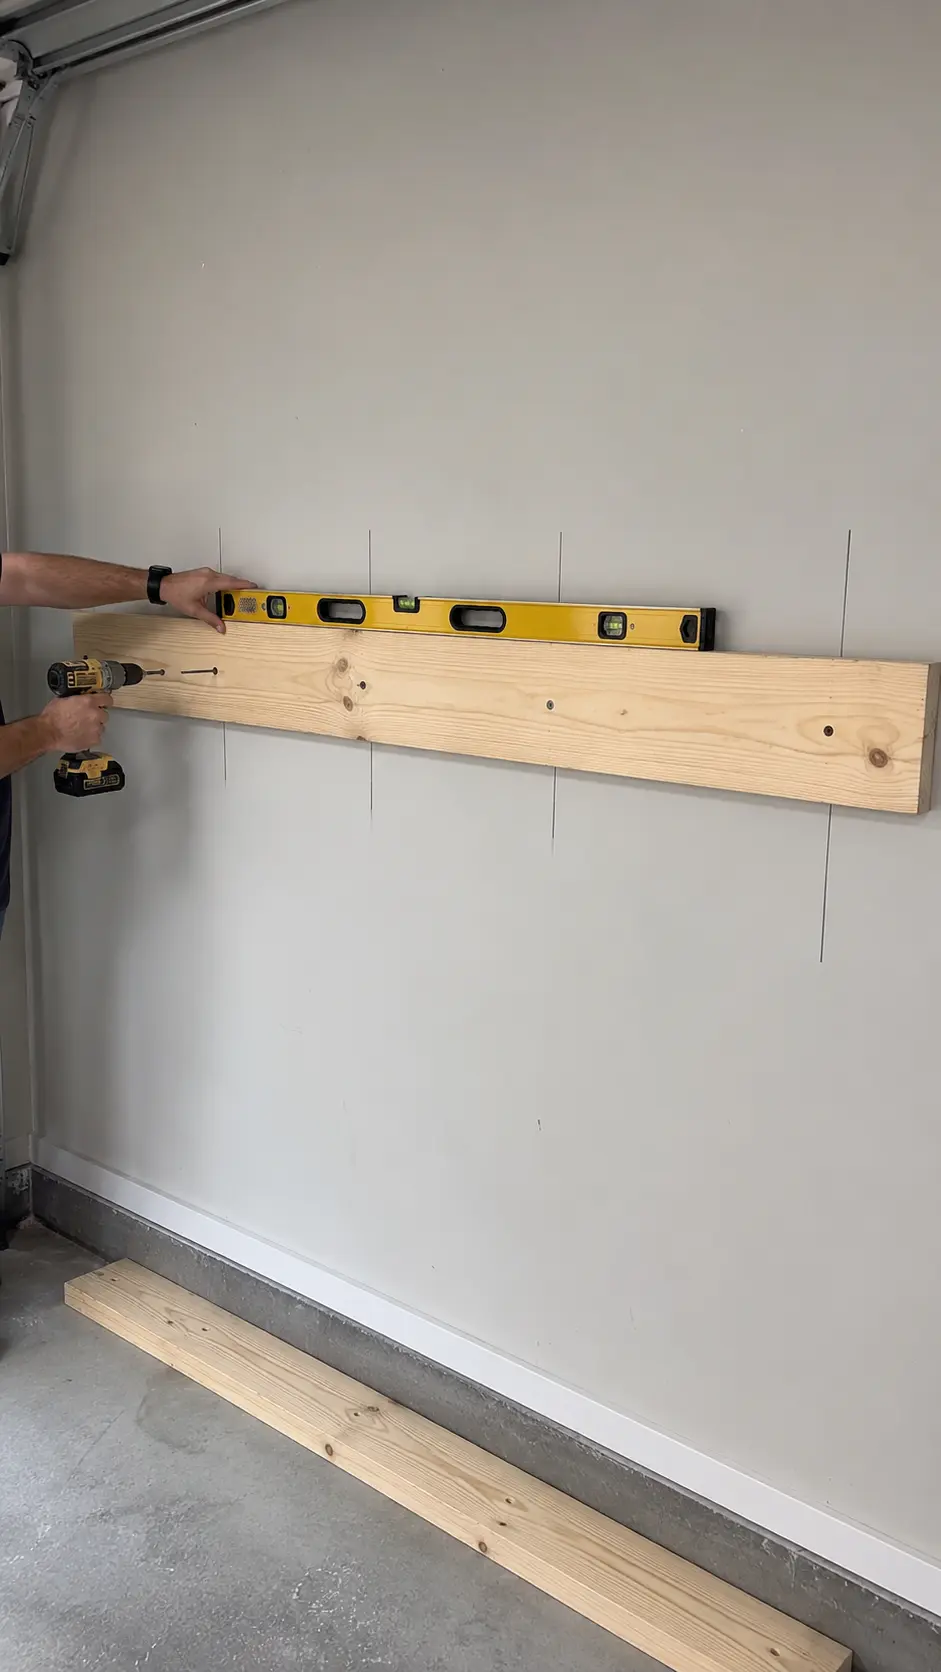
Place the upper 2×6 so its top edge aligns with the 34 1/2-inch underside line, unless the bracket instructions require a different relationship. Clamp or temporarily support it, then check level across the full 60 inches.
Transfer every stud center to the ledger. Predrill the ledger and framing with the bit size required for the chosen structural screws. Drive the approved fasteners through the ledger and wall finish into the center of each stud. Use the number and spacing required by the fastener and bracket manufacturers. Do not overdrive screws until they crush the wood fibers.
Recheck level after the first two fasteners and again when the ledger is complete. If the ledger is not flat because the wall bows, use proper solid shims or ask a contractor for a suitable correction; do not pull a twisted wall flat by overtightening one screw.
Step 7: Position the lower ledger and install the brackets
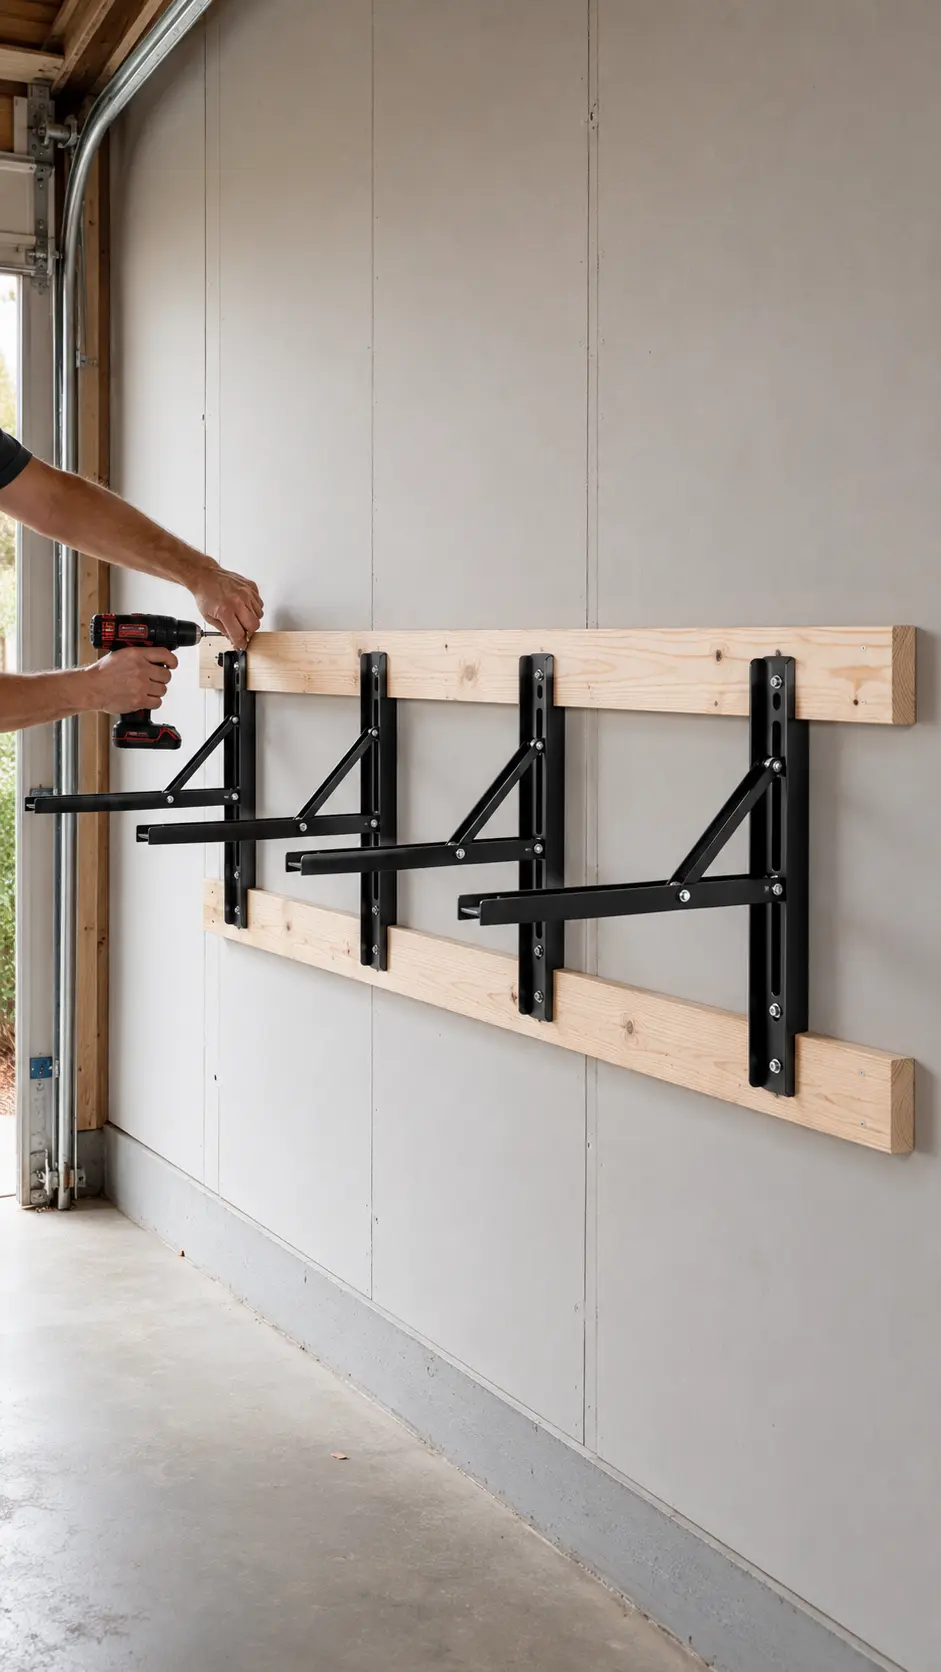
Lock one bracket open and hold its horizontal arm at the planned underside height. Mark the lower mounting holes on the wall. Those marks determine the lower-ledger position; do not copy a generic vertical spacing from another bracket.
Mount the lower ledger level and into the same studs using the approved structural screws. Then place all brackets at their final horizontal positions. On a typical 16-inch-on-center example, four bracket centerlines can sit 6, 22, 38 and 54 inches from one end of the top. That leaves about 6 inches of top beyond each outer support. Treat this as an example only.
Fasten the bracket vertical arms according to their instructions, preferably through the ledgers and into studs wherever the hole pattern allows. Open and close each bracket without the top attached. The locks should engage fully, the release mechanisms should remain reachable and no bracket should bind against the wall.
Step 8: Attach the top to the folding brackets
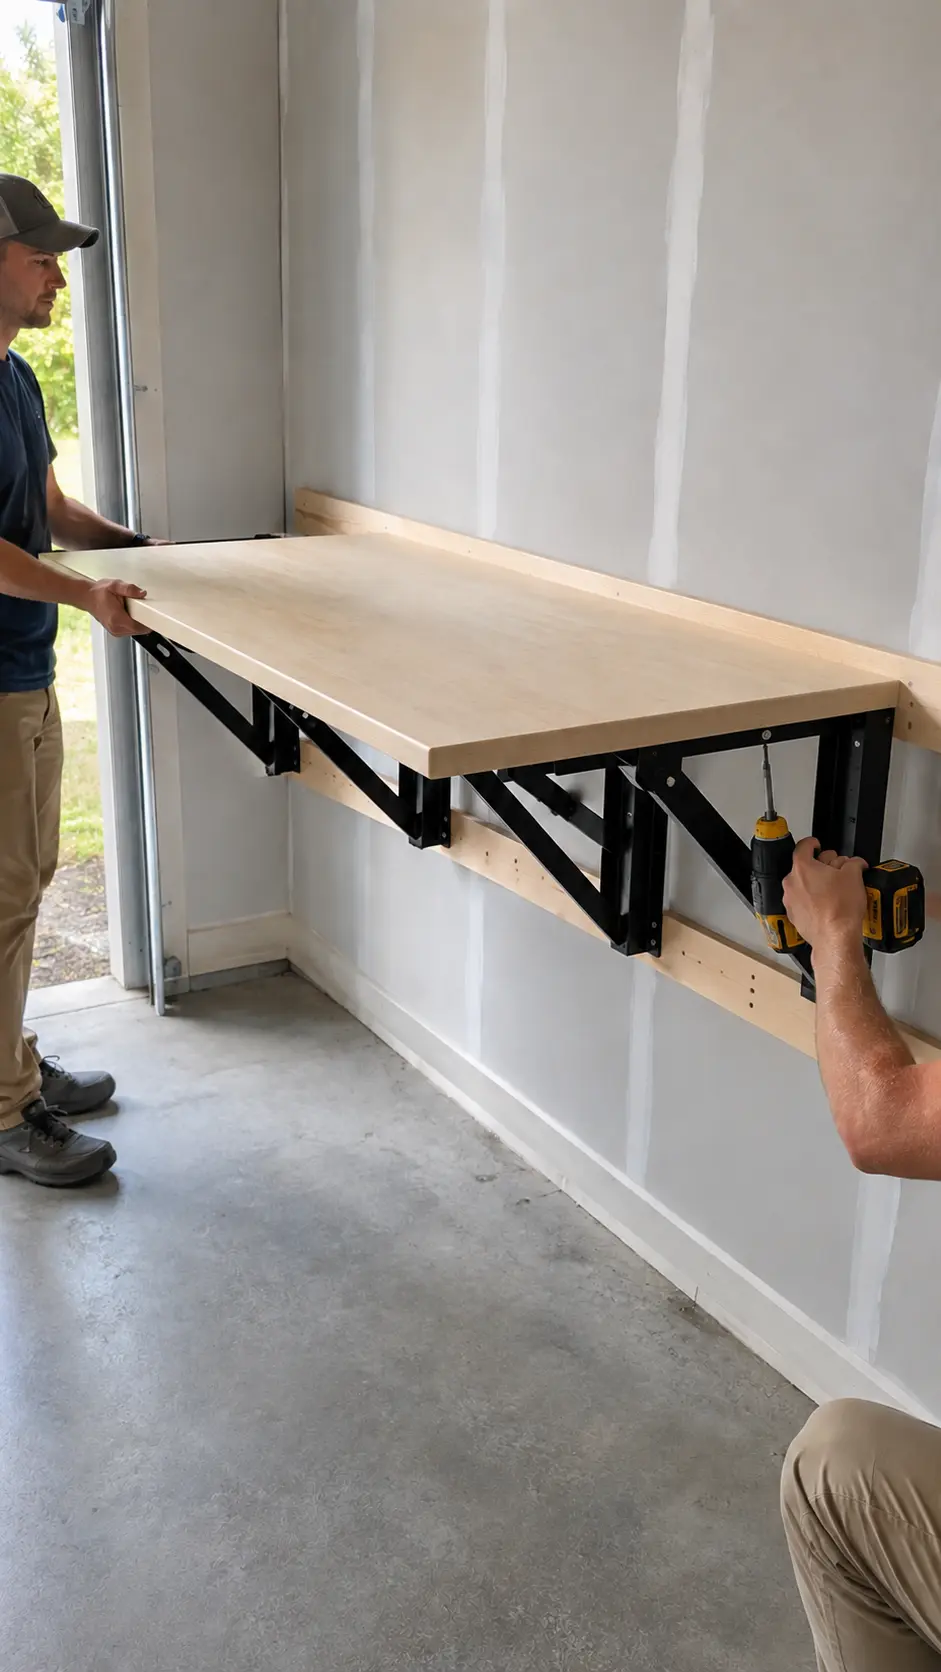
Ask another adult to help lift and support the top. Lock every bracket open. Place the top on the horizontal arms with its rear edge parallel to the wall. Center it left to right, leaving equal overhang beyond the outside brackets.
Check that the front edge sits approximately 25 1/2 inches from the wall and that the surface is level front to back. Some brackets require a small rear clearance to fold correctly; follow the hardware template rather than forcing the top against the wall.
Clamp the top to the bracket arms. Mark the mounting holes, remove the top if the instructions require it, and predrill carefully. Use fasteners approved for the brackets that cannot pierce the 1 1/2-inch work surface. Tighten them evenly, then verify that every bracket remains square to the wall.
Step 9: Add the closed-position safety latches
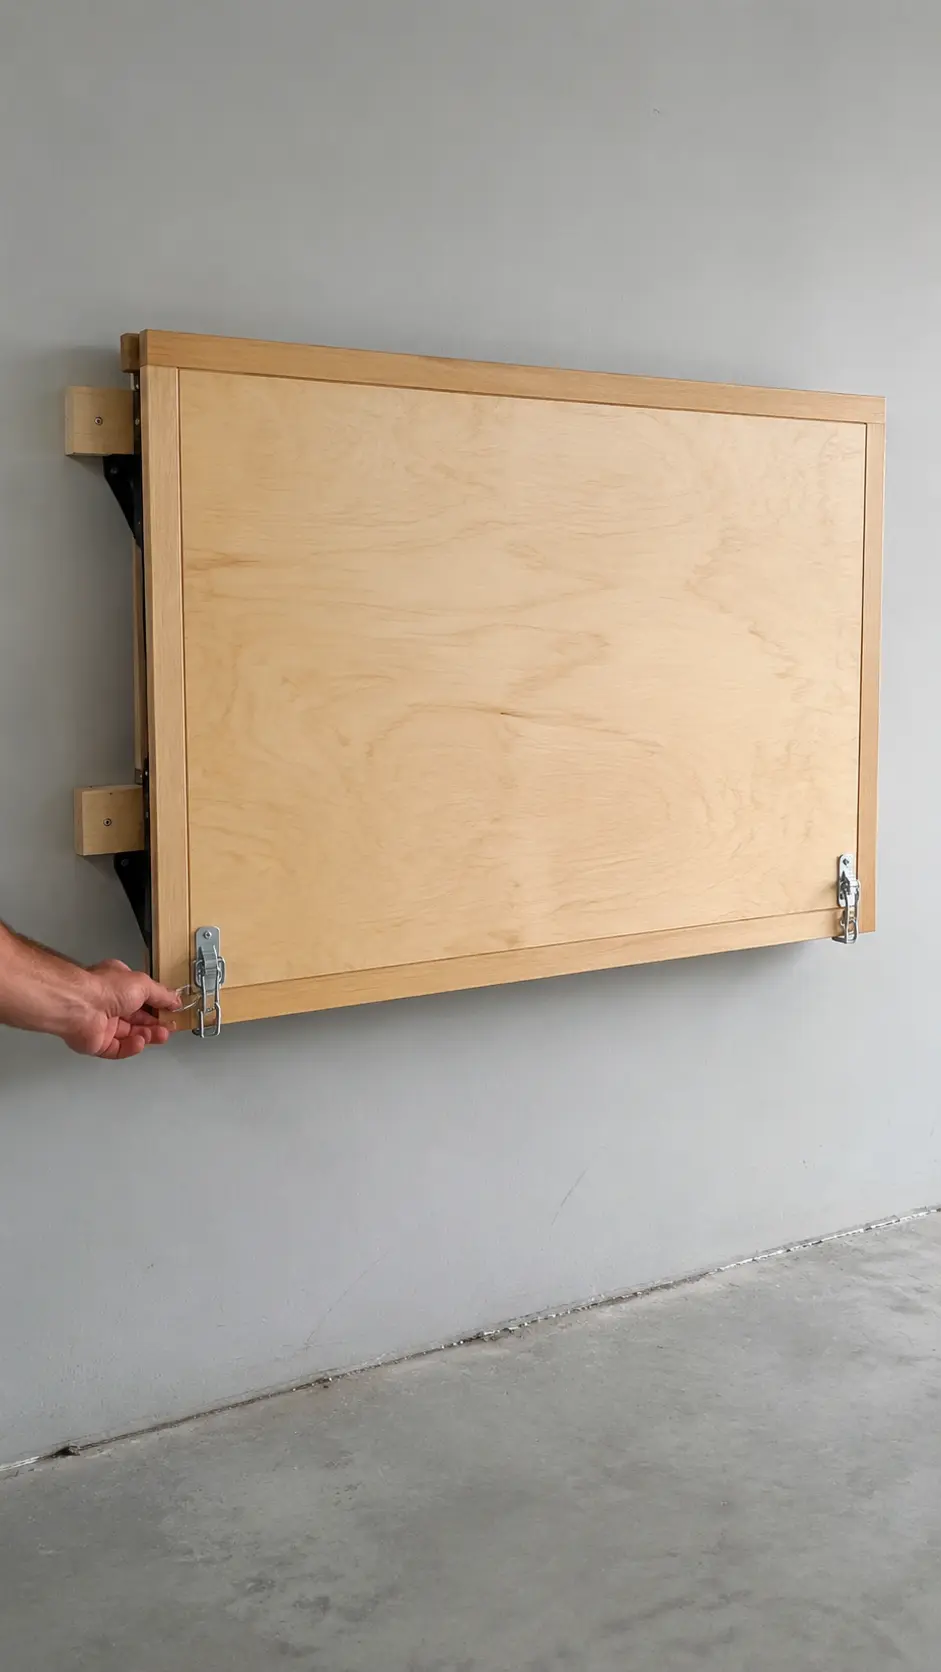
Clear the top completely. With a helper supporting the front edge, release the brackets and lower the top slowly into its vertical position. Watch every hinge and pivot. If the edging or top contacts a ledger, wall trim or bracket before reaching vertical, stop and correct the clearance.
Install two positive mechanical latches near the lower left and right corners of the folded top. Use hardware intended to retain the top’s weight, not decorative magnetic catches. Both latches should be easy for an adult to operate but resistant to accidental release.
If children can enter the shop, choose lockable or child-resistant latches and control access to the entire work area. A folded workbench is not a toy, climbing panel or indoor basketball backboard, no matter how persuasive the young inspector may be.
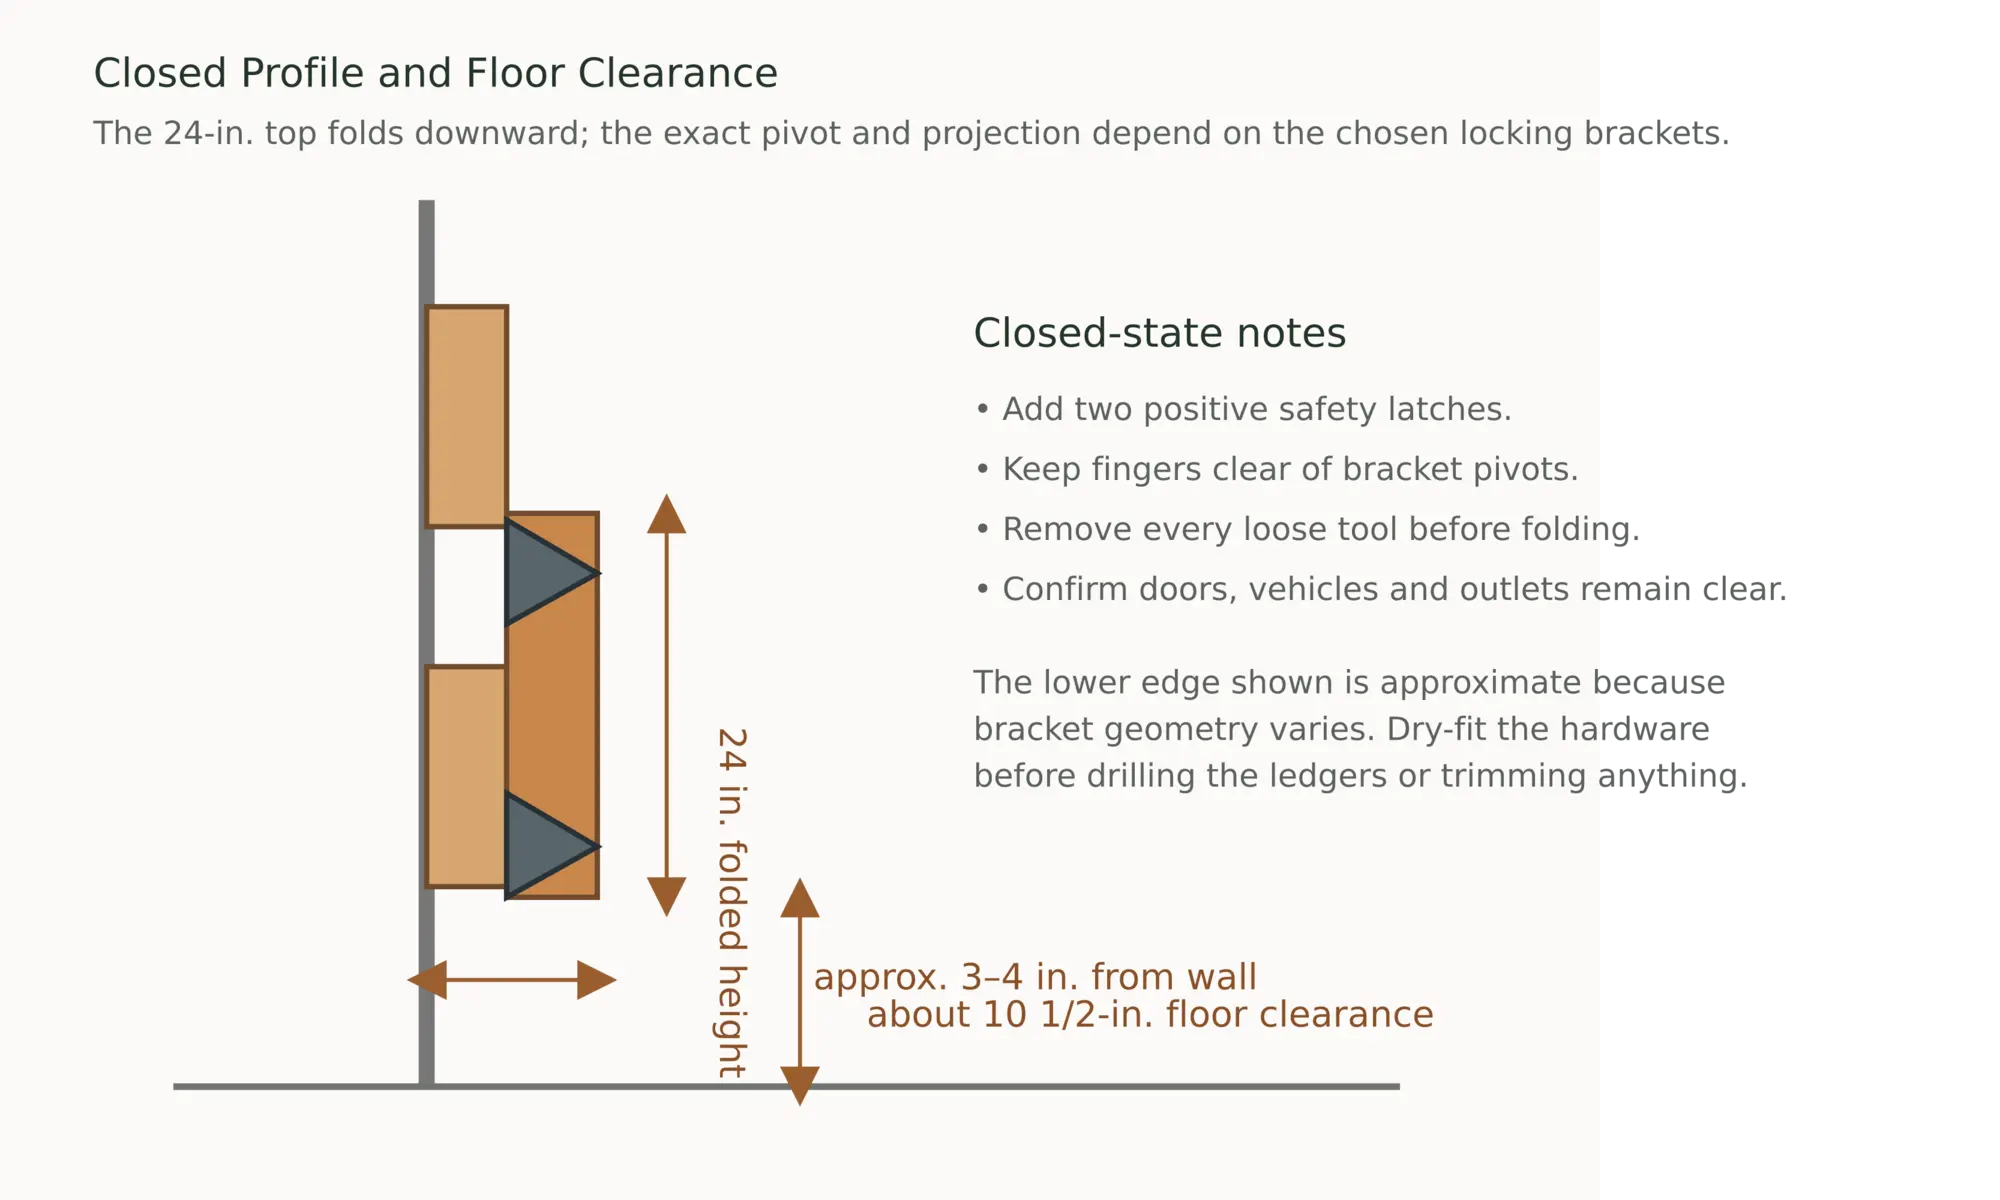
Step 10: Test the action and commission the bench gradually
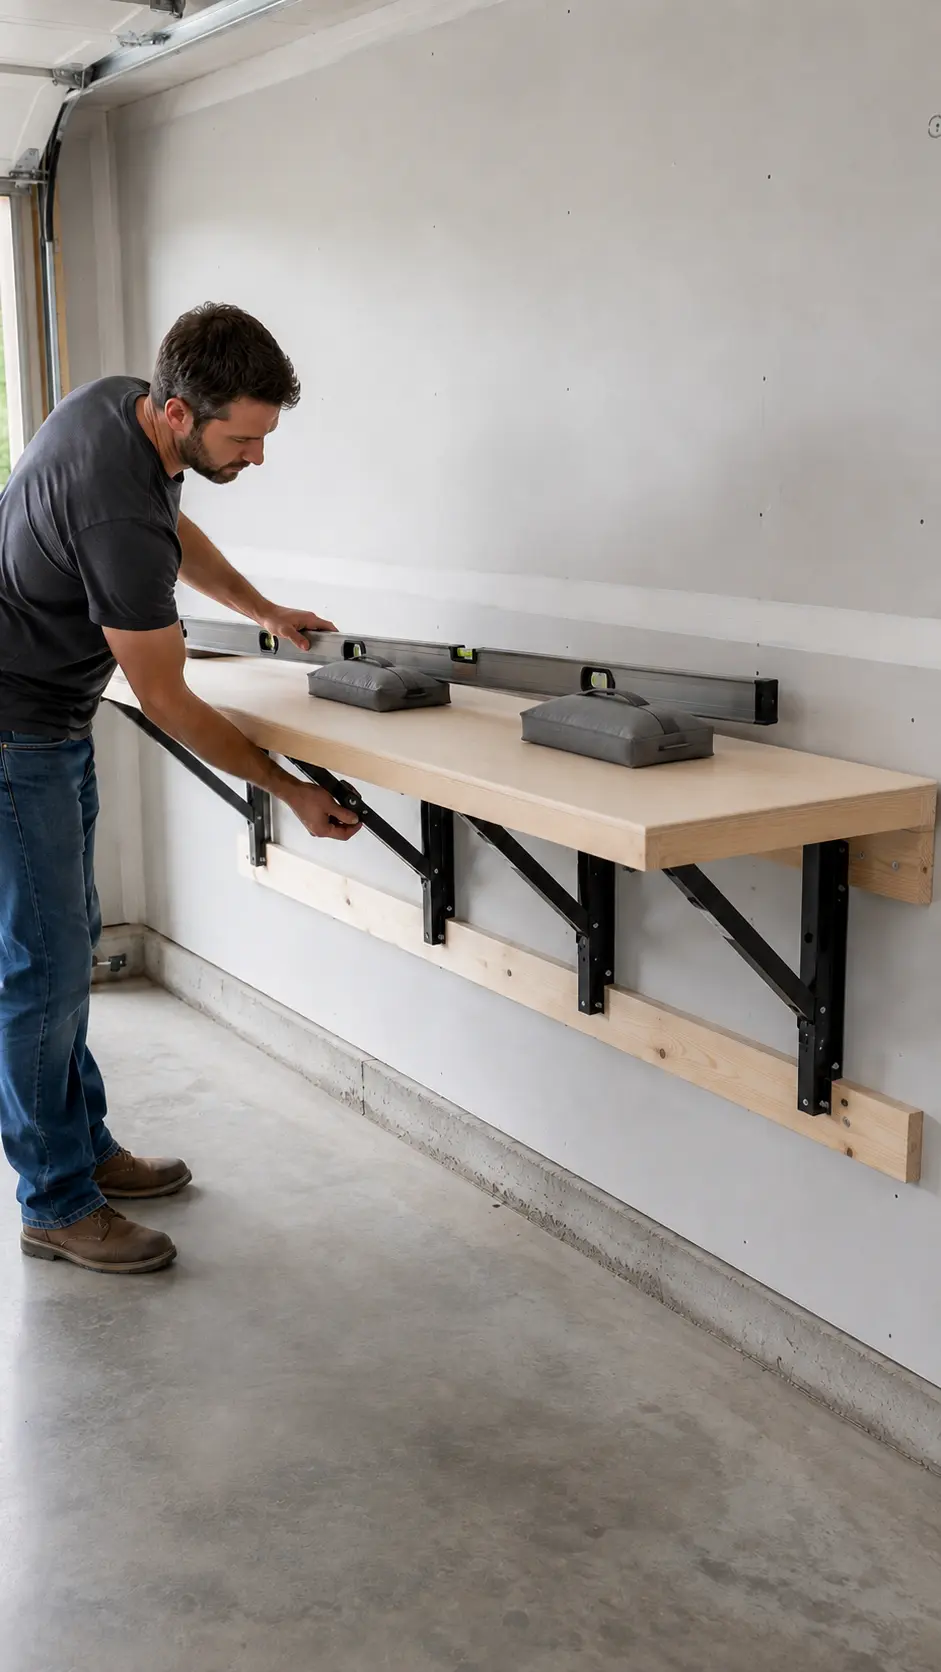
Operate the bench through several empty cycles. Confirm that all brackets lock audibly or visibly, both safety latches hold the closed top, and fingers can stay clear of every pinch point. Inspect the ledgers for movement and check each screw head for seating.
Apply a modest, evenly distributed test load and inspect the entire system. Increase gradually only within the hardware manufacturer’s limits and only if no movement, cracking, loosening or wall damage appears. Never test by jumping, sitting or placing your full body weight on one corner.
Mark a reminder under the front edge: clear top, support front, release brackets together. That three-part routine prevents most folding-day surprises.
How to Use the Bench Safely
- Confirm every bracket is fully locked before placing anything on the top.
- Keep loads distributed rather than concentrating them at the front corners.
- Do not install a vise, anvil, benchtop planer or other high-leverage machine unless the complete mounting system has been specifically reviewed for it.
- Do not use the bench as table-saw outfeed unless its height, stability and clearances are appropriate for that exact setup.
- Remove all tools, cords, clamps and scraps before folding.
- Support the front edge while operating bracket releases.
- Keep hands away from pivots and keep other people clear of the swing path.
- Inspect the ledgers, brackets, latches and wall surface regularly.
- Stop using the bench immediately if a screw loosens, a bracket deforms, the wall cracks or the top no longer sits level.
Useful Customizations
Add replaceable hardboard to the top
A 1/4-inch hardboard skin protects the plywood from glue, paint and enthusiastic drilling. Cut it slightly smaller than the top and secure it with a few countersunk screws rather than permanent glue. Remember that the added thickness changes the finished height.
Add bench-dog holes cautiously
Dog holes can improve clamping, but lay them out only after marking every bracket and fastener below. Drilling blindly through the top is an efficient way to discover a steel bracket with a Forstner bit.
Create storage beside—not on—the folding path
Keep cabinets, clamps and chargers outside the 24-inch vertical swing zone. A nearby power tool organizer with charging station keeps drills ready without leaving chargers or cords on the bench. For larger supplies, these DIY garage shelf plans can use the next section of wall.
Adapt the width
You can shorten the top, but choose the bracket quantity and spacing from the revised span and real stud locations. Avoid making the bench deeper than the bracket manufacturer permits. For a longer top, do not simply stretch the plywood and hope the outer brackets feel generous—add supports and have the mounting system reviewed.
Common Folding Workbench Mistakes
Mounting into drywall instead of framing
Drywall hides the wall; it does not become the structure. Lightweight anchors are inappropriate for a bench that creates leverage several feet from the wall.
Copying someone else’s bracket spacing
Different brackets have different hole patterns, arm lengths and locking mechanisms. Use the product template in your hands.
Forgetting the folding arc
A water heater, outlet, baseboard, cabinet handle or parked vehicle can interfere even when it does not touch the open bench. Tape a 24-inch cardboard strip to the planned pivot line and swing it through the path before drilling.
Using a single thin plywood layer
A 3/4-inch top may feel flexible across a 60-inch span and gives bracket screws less material. The laminated 1 1/2-inch slab is stiffer, flatter and more forgiving.
Folding the bench with objects still on it
This sounds too obvious to mention until the pencil cup, drill bit and tape measure all reach the floor together. Make “clear the top” the first step every time.
Claiming a capacity from the brackets alone
A bracket rating applies only under the conditions stated by its manufacturer. It does not certify unknown wall framing, generic screws, plywood, workmanship or impact loading.
Frequently Asked Questions
What is a good height for a folding workbench?
Thirty-six inches is a practical general-purpose height for many adults. A shorter person may prefer 34 inches, while detailed standing work may feel better at 38 inches. To customize this plan, choose the finished surface height first and subtract the actual 1 1/2-inch top thickness to locate the bracket support plane.
How deep should a wall-mounted workbench be?
Twenty-four inches provides useful assembly space without reaching too far across the top. It also matches common plywood cutting layouts and many 18- to 24-inch folding brackets. Never make the top deeper than the selected brackets allow.
Can I mount the bench with drywall anchors?
No. Fasten the ledgers and brackets to sound structural framing or use a professionally specified masonry system. Drywall anchors are not an acceptable substitute.
How much weight will this workbench hold?
There is no honest universal number. Capacity depends on the wall, studs, bracket model, fastener system, spacing, plywood and workmanship. Follow all hardware instructions, test a physical prototype gradually and avoid body-weight or impact loads.
Can I install a bench vise?
Not by default. A vise applies concentrated and sometimes twisting forces near the edge. Add one only after a qualified person confirms that the top, supports, wall and fasteners can handle the intended work.
Can the top fold upward instead of downward?
Yes, but that requires different hinge, support and latch geometry. Do not reverse these brackets unless their manufacturer specifically allows it. This plan is written for a top that folds downward.
What should I store underneath?
Keep the folding path completely clear. Put mobile bins beside the bench or use wall storage outside the swing zone. Long stock is better handled by one of these DIY lumber storage rack plans.
Final Thoughts
A 60-inch folding workbench will not turn a one-car garage into a commercial cabinet shop. It does something more useful: it creates a real place to build without permanently surrendering the room.
Take your time with the wall inspection and hardware. Cut the two top panels accurately, laminate them flat, mount the ledgers into framing, let the actual bracket template control the installation and test the finished bench gradually. Once those fundamentals are right, folding the shop away takes less time than finding the tape measure you left on the top.