
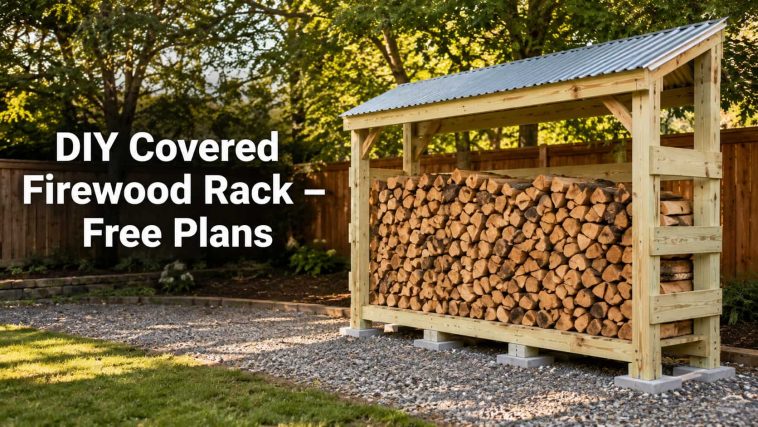
If your firewood pile currently lives under a flapping tarp—or directly on the ground soaking up moisture—this covered firewood rack is a practical weekend upgrade. The finished covered firewood rack keeps logs elevated, allows air to move around the stack and uses a sloped metal roof to shed rain and snow.
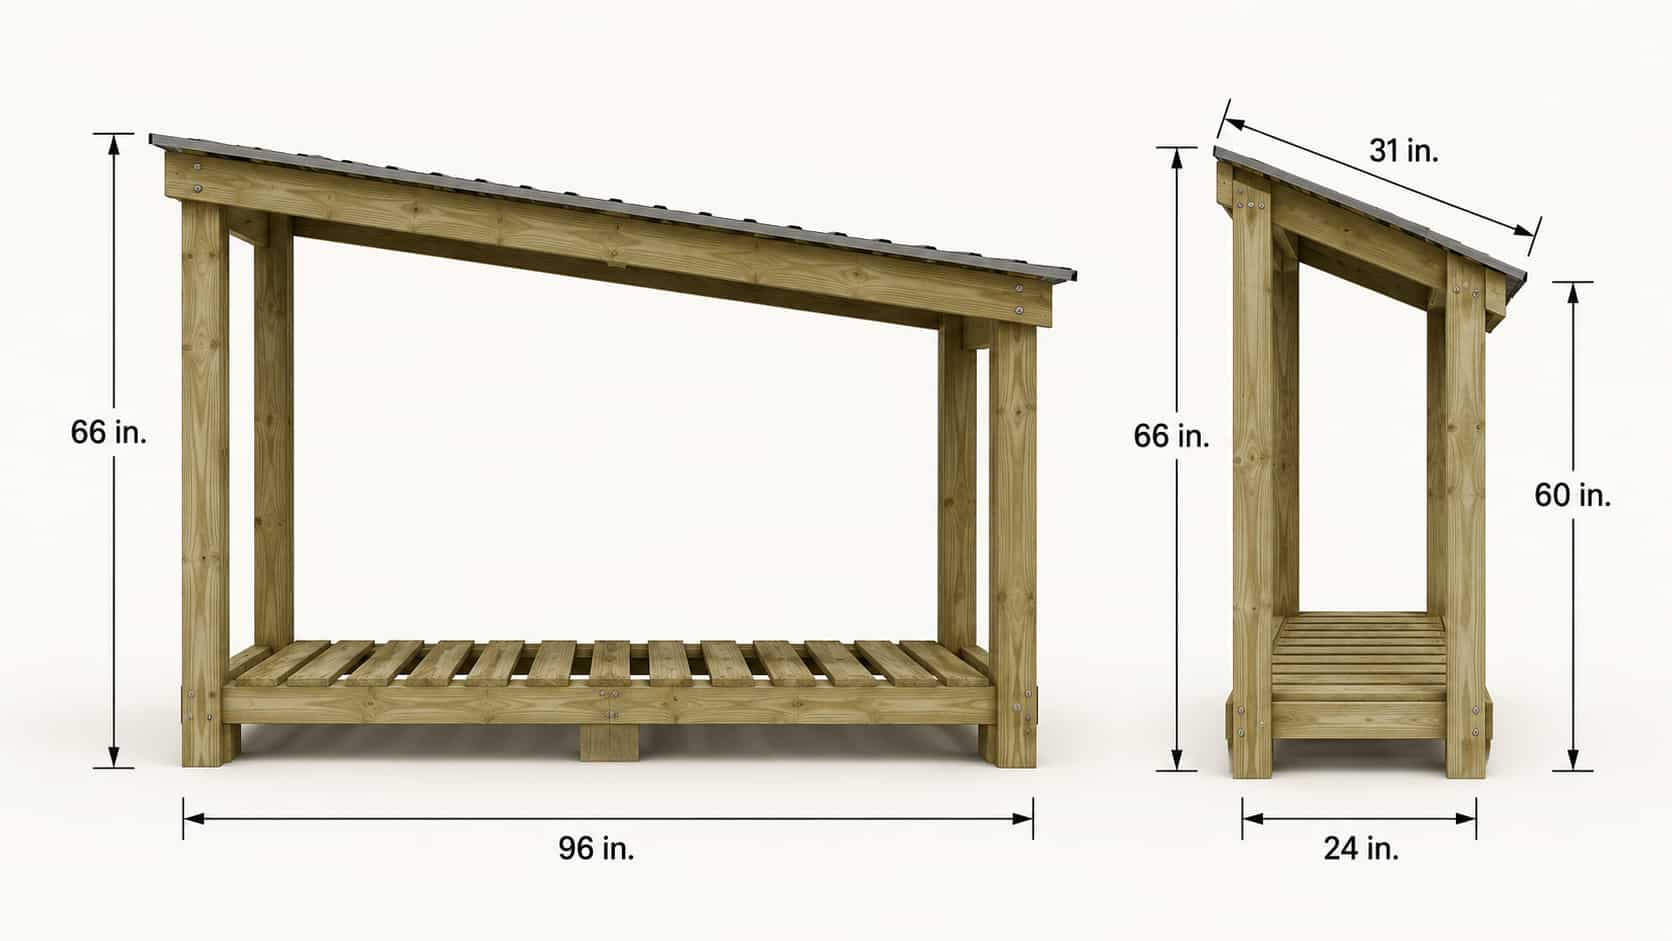
This beginner-friendly plan builds an outdoor rack approximately 8 feet wide, 2 feet deep and 6 feet high at the front once the roof framing is installed. It holds roughly one-third of a full cord of split firewood, depending on log length, stacking height and how tightly you stack it.
You will find the complete dimensions, materials list, cut list and step-by-step building instructions below. Measure your own lumber before cutting, confirm that the design suits your location, and adapt the anchoring and roof framing for local wind and snow conditions.
This covered firewood rack design is perfect for anyone wanting to upgrade their outdoor storage and protect their firewood from the elements.
Important safety note: This is a general DIY plan for storing split firewood—not an engineered structure. Building requirements vary by location. If the rack will be exposed to strong wind, heavy snow, unstable soil or other demanding conditions, ask a qualified local professional to review the foundation, anchoring and roof framing before you build.
Covered Firewood Rack Plan at a Glance
| Detail | Plan specification |
|---|---|
| Finished footprint | Approximately 96 in. wide × 24 in. deep |
| Post height | 66 in. at front and 60 in. at rear |
| Approximate finished height | About 72 in. at front and 66 in. at rear, depending on roofing assembly |
| Roof size | Approximately 102 in. wide × 31 in. deep |
| Estimated capacity | Roughly one-third cord, depending on stacking |
| Difficulty | Beginner to intermediate |
| Build time | One full weekend, plus drying time for finish |
| Recommended lumber | Ground-contact or exterior-rated pressure-treated lumber where appropriate |
| Roof | Corrugated metal or another manufacturer-approved exterior roofing system |
| Best location | Level, well-drained outdoor area with open airflow |
This design is intentionally narrow enough for common 16-inch split logs while remaining wide enough to organize a useful seasonal supply. If you would rather begin with a smaller project before tackling outdoor storage, browse these free woodworking plans for beginners first.
Why a Covered Firewood Rack Works Better Than a Tarp
The covered firewood rack offers excellent protection while allowing airflow, making it an ideal solution for your firewood storage needs.
Seasoned firewood stays in better condition when it is protected from precipitation without being sealed inside a damp enclosure. A good rack solves three common storage problems:
Building a covered firewood rack ensures your logs are kept dry and ready for use, setting the stage for a great fire on those chilly nights.
- Ground moisture: Raising the first row prevents logs from sitting directly on wet soil.
- Poor airflow: Open sides allow air to circulate through and around the stack.
- Rain and snow: A sloped roof shields the top without wrapping the entire pile in plastic.
A tarp can help in an emergency, but covering the sides too tightly may trap moisture. This rack protects the top while leaving the front, back and most of the sides open. The modest roof overhang also helps direct runoff away from the stack.
The U.S. Environmental Protection Agency recommends protecting firewood with an overhanging roof. That is the principle behind this design: cover the top, elevate the base and keep the sides ventilated.
Before You Build: Choose the Right Location
Do not build the rack first and then wander around the yard carrying it like a very large wooden suitcase. Choose and prepare the location before assembly.
Look for a spot that is:
- Level and well drained
- Convenient to reach in winter
- Open enough for airflow and sunlight
- Away from roof runoff, sprinklers and low areas where water pools
- A safe distance from heat, flames and ignition sources
- Positioned according to local fire-safety and pest-management guidance
Avoid attaching the rack directly to your house unless the design and attachment method have been approved for that location. Firewood can shelter insects and hold moisture, so long-term storage is generally better in a separate outdoor rack than against siding or a foundation.
Set the structure on compacted gravel and concrete pavers rather than directly on soil. The pavers spread the load, while the gravel encourages drainage and makes it easier to level the rack.
Materials and Hardware
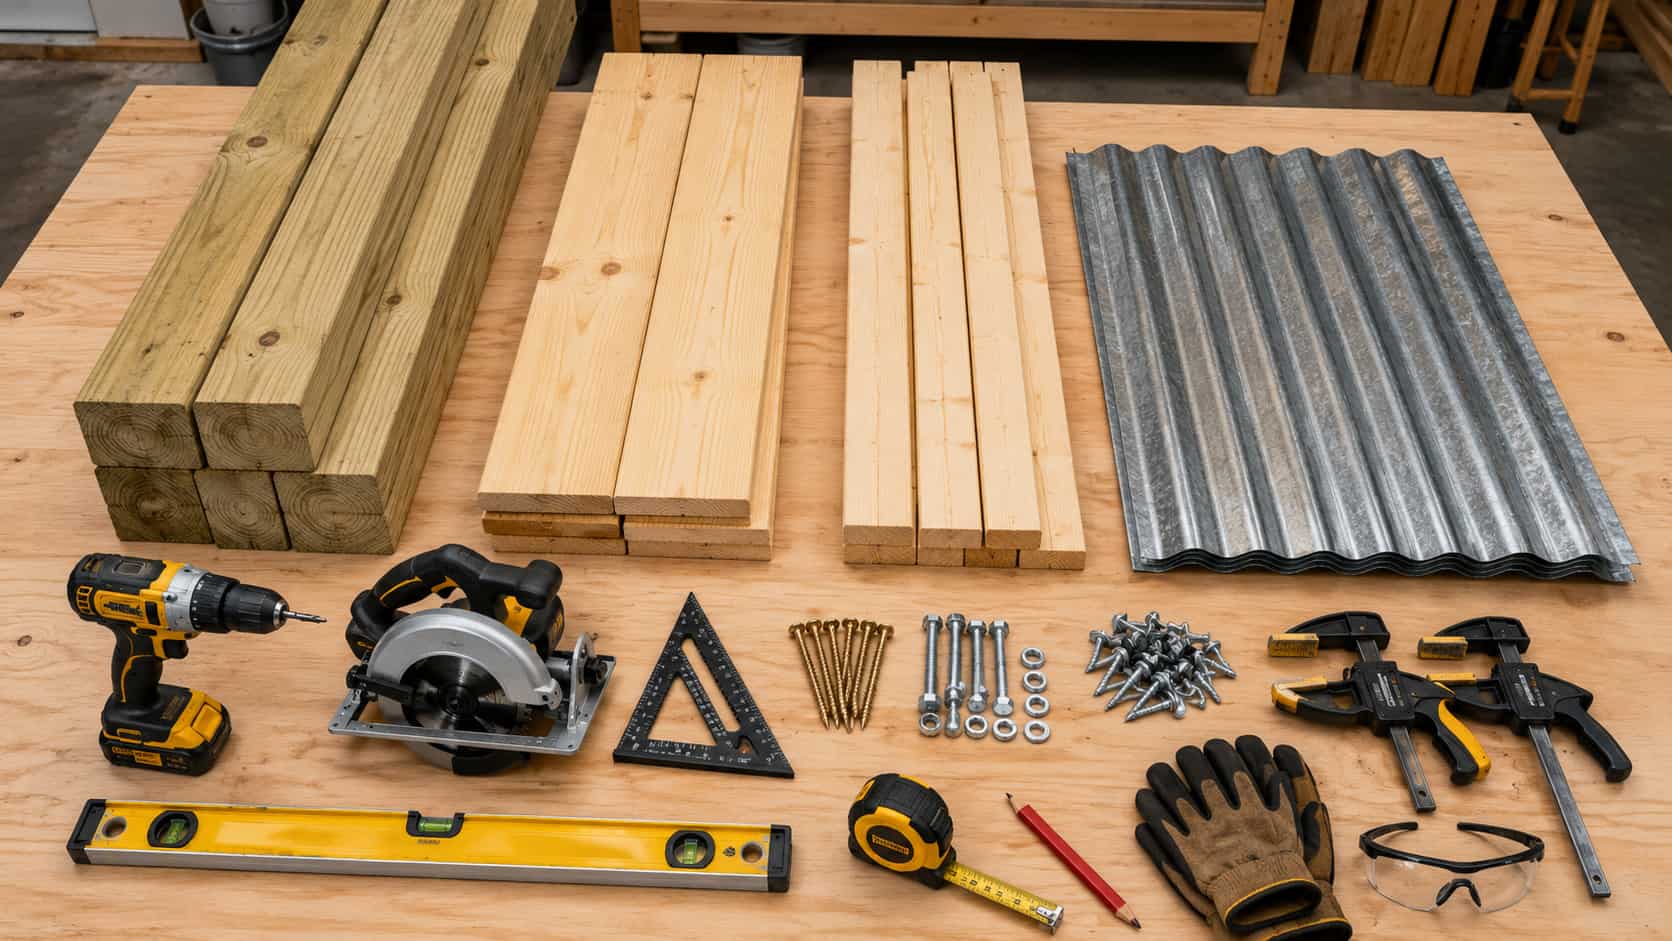
The quantities below are based on the 96-inch-wide version of the plan. Nominal lumber sizes are used in the shopping list; actual dimensions will be smaller.
Lumber
- 4 pressure-treated 4×4×8 boards for the four vertical posts
- 2 pressure-treated 2×6×8 boards for the front and rear base rails
- Approximately 14 pressure-treated or exterior-rated 2×4×8 boards for the base crossmembers, floor slats, upper headers, roof rafters, side retainers and braces
- 3 exterior-rated 2×4×10 boards for the roof purlins
- Additional blocking or trim as required by your chosen roofing system
Buy a little extra lumber if possible. Boards split, cuts wander and the one perfectly straight 2×4 in the pile has a mysterious habit of disappearing when you need it.
Roofing and hardware
- Corrugated metal roofing sufficient to cover approximately 102 × 31 inches, allowing the manufacturer’s required panel overlaps
- Manufacturer-approved roofing screws with sealing washers
- 8 hot-dipped galvanized or exterior structural through-bolts, 3/8 inch diameter, with washers and nuts; select length after measuring the assembled joint
- Exterior-rated structural screws in lengths appropriate for the connections, commonly 3 and 4 inches
- Exterior deck screws for non-structural slats and light blocking
- 6 to 9 concrete pavers, depending on soil and support layout
- Crushed gravel for a level drainage pad
- Exterior wood preservative or penetrating finish compatible with pressure-treated lumber
- Galvanized post bases, ground anchors or another locally appropriate anchoring system if required
Use fasteners specifically rated for exterior use and compatible with pressure-treated lumber. Ordinary interior screws can corrode, and drywall screws are not structural fasteners.
Tools You Will Need
- Tape measure
- Carpenter’s pencil
- Speed square or framing square
- 4-foot level
- Circular saw or miter saw
- Drill/driver and suitable bits
- Wrenches or socket set
- Clamps
- Shovel and hand tamper
- Tin snips or roofing-cutting tool approved by the panel manufacturer
- Eye protection and hearing protection
- Work gloves for handling metal roofing
- Stable stepladder, if needed
Follow every tool manufacturer’s instructions. Support lumber securely before cutting, keep hands out of the blade path and have another adult help when positioning long roof pieces or metal panels.
Complete Cut List
Cut and label each part before assembly. Because actual lumber and roofing profiles vary, verify the measurements against your materials before making the entire batch of cuts.
| Part | Material | Quantity | Cut length | Purpose |
| Front posts | 4×4 | 2 | 66 in. | High side of roof |
| Rear posts | 4×4 | 2 | 60 in. | Low side of roof |
| Base rails | 2×6 | 2 | 96 in. | Front and rear base |
| Base crossmembers | 2×4 | 5 | 21 in. | Join front and rear rails |
| Floor slats | 2×4 | 5 | 96 in. | Elevated log platform |
| Upper headers | 2×4 | 2 | 96 in. | Front and rear roof support |
| Roof rafters | 2×4 | 5 | Cut to fit, about 31 in. | Support sloped roof |
| Roof purlins | 2×4 | 3 | 102 in. | Carry corrugated panels |
| Side retaining rails | 2×4 | 2 | Cut to fit, about 21 in. | Keep end logs contained |
| Diagonal braces | 2×4 | 8 | Cut to fit, about 18–24 in. | Resist racking |
A note about the roof-rafter measurement
The design of the covered firewood rack allows you to maintain an organized supply of firewood while safeguarding it from adverse weather conditions.
The front posts are 6 inches taller than the rear posts, creating a slope across the rack’s 24-inch depth. That is close to a 3:12 pitch. The exact rafter length and end cuts depend on how you position the headers, how much front and rear overhang you want and the requirements of your roofing product.
Instead of blindly cutting all five rafters to an internet measurement, start with a blank about 31 inches long, clamp it in place, mark it directly from the assembled frame and confirm the fit. Use that first rafter as the template for the remaining four. Aim for roughly 3 inches of horizontal overhang at the front and rear; the finished sloped depth will be close to 31 inches.
How to Build a Covered Firewood Rack Step by Step
Step 1: Prepare a level gravel base
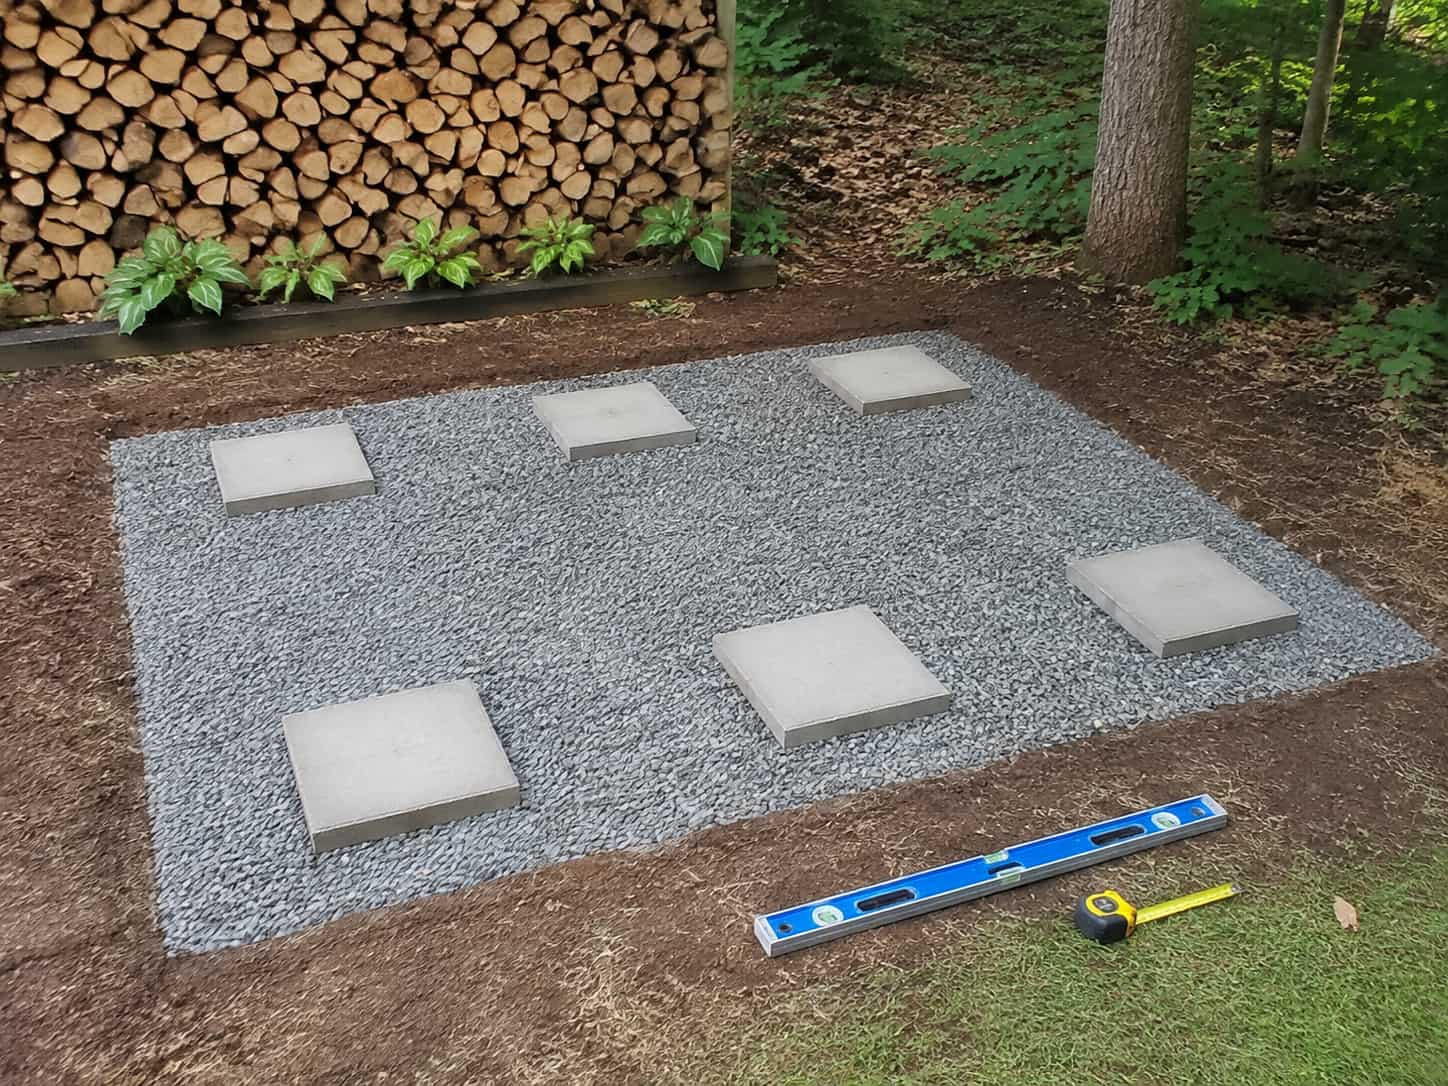
Mark an area slightly larger than the 96 × 24-inch rack. Remove vegetation and loose topsoil, then add a compacted layer of crushed gravel. The pad should drain away from buildings rather than funneling water toward them.
Arrange concrete pavers beneath the main load points: at both ends and near the center of the front and rear base rails. Check the pavers from left to right and front to back with a long level. Take time here. A rack built on a twisted base will fight you during every later step.
Do not bury untreated lumber or allow wood to rest directly on soil. If frost movement is significant in your area, ask a local professional whether a deeper footing is needed.
Step 2: Build the rectangular base frame
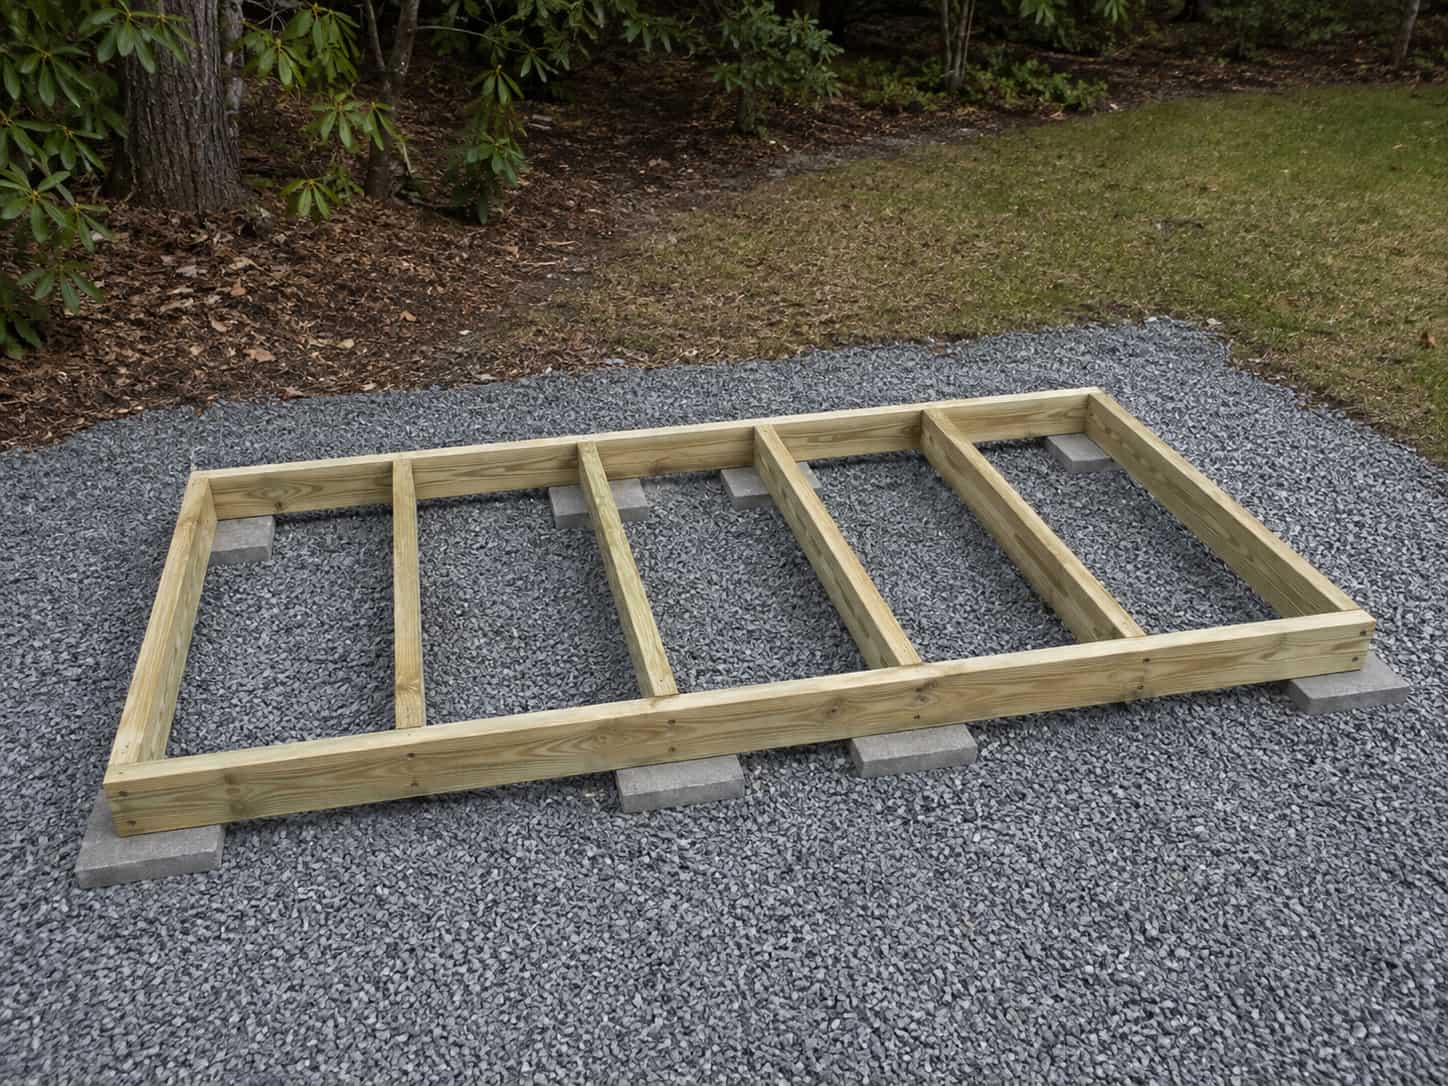
Lay the two 96-inch 2×6 rails parallel on a flat surface, with 21 inches between their inside faces. Position one 21-inch crossmember at each end and space the remaining three evenly through the middle.
Check the frame for square by measuring both diagonals. When the measurements match, clamp the parts and fasten each crossmember through the 2×6 rails using exterior structural screws appropriate for the joint.
Move the assembled base onto the prepared pavers and check it again for level and square.
Step 3: Attach the four posts
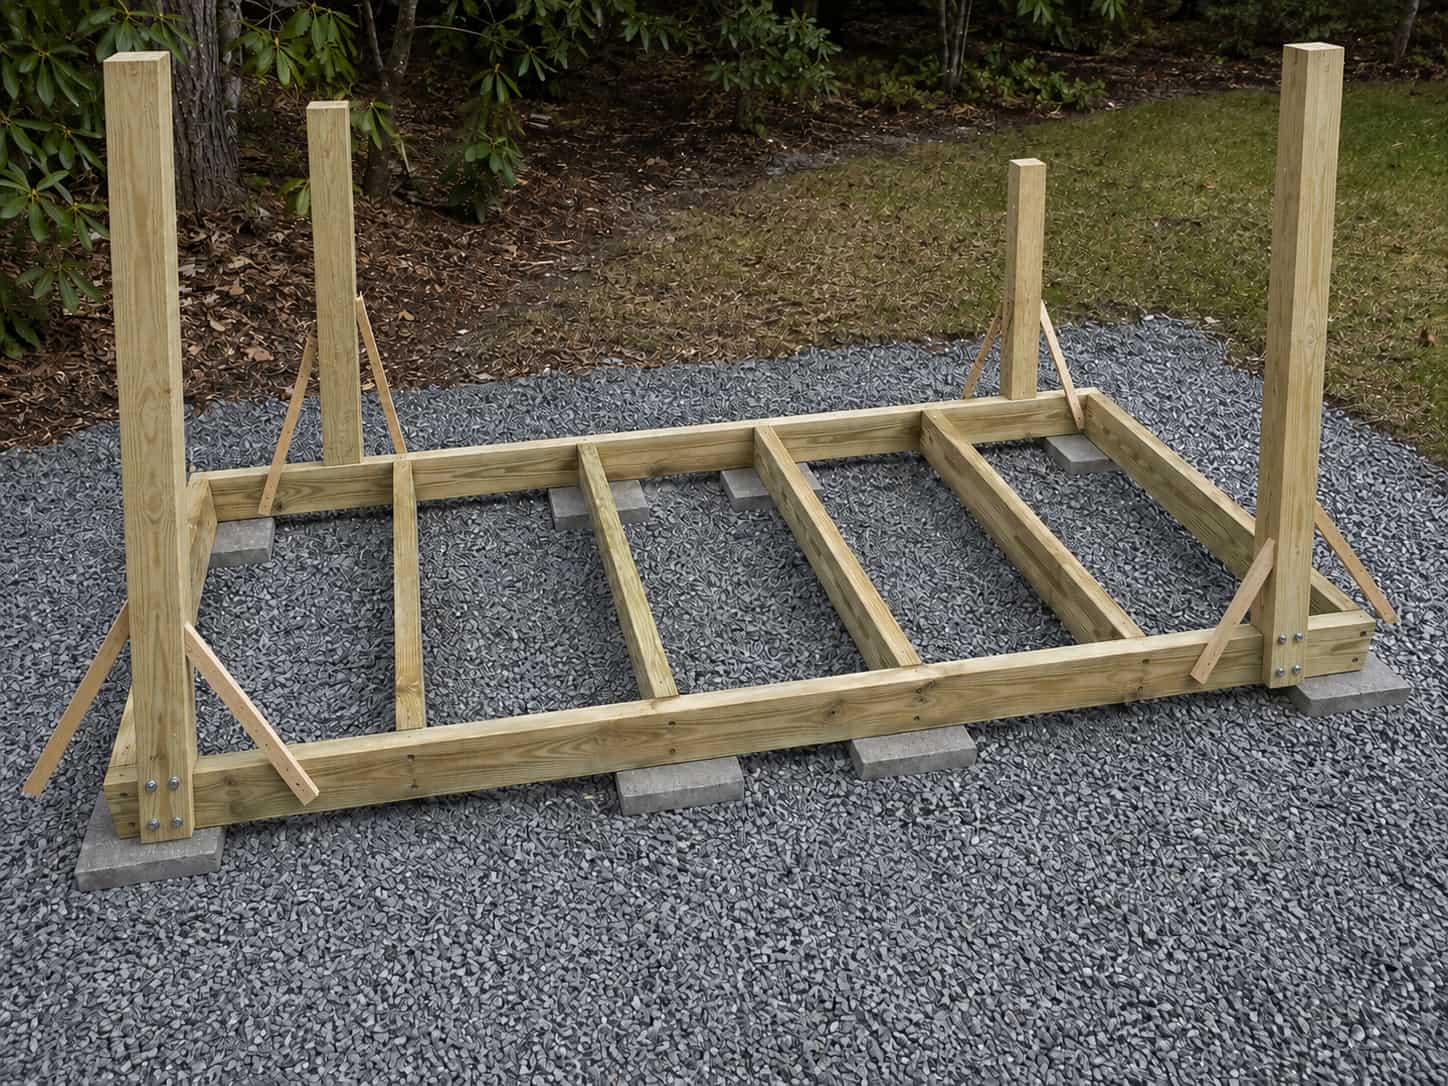
Position the two 66-inch posts at the front corners and the two 60-inch posts at the rear corners. Keep each post plumb in both directions and clamp it securely to the inside face of the base rail.
Drill two staggered bolt holes through each post-and-rail connection. Install exterior-rated through-bolts with washers on both sides and tighten the nuts until the joint is snug. Do not crush the wood fibers by overtightening.
Temporary diagonal scraps can hold the posts plumb until the permanent headers and braces are installed. Recheck the front posts against each other and do the same at the rear; mismatched heights will telegraph directly into the roof.
Step 4: Install the elevated floor slats
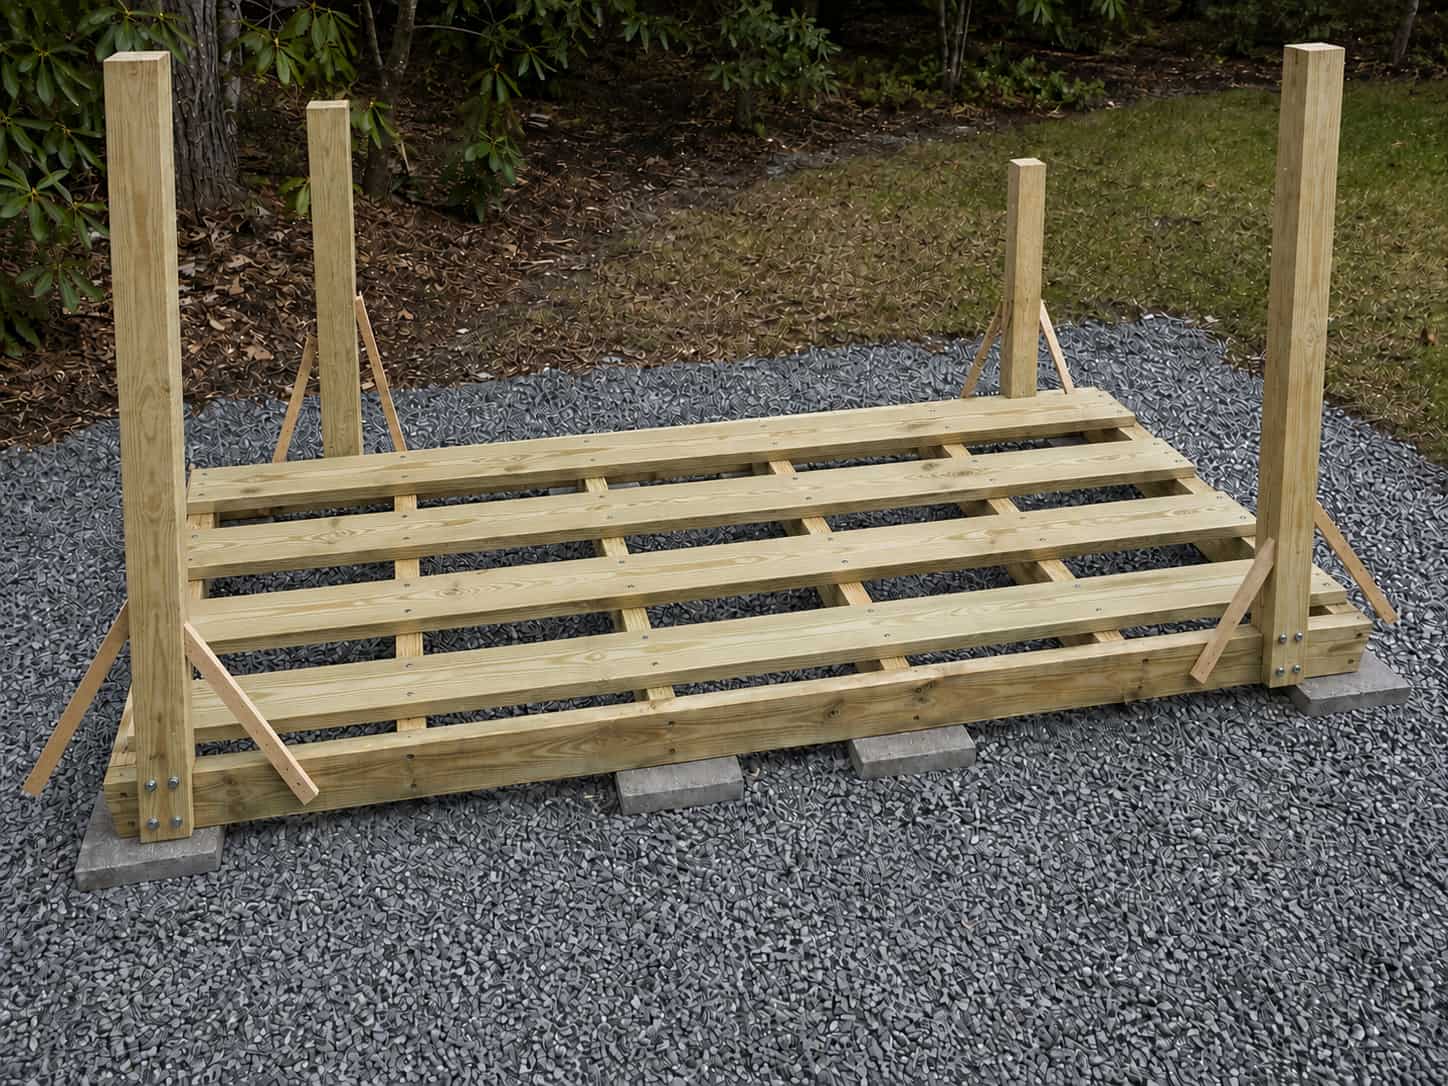
Place the five 96-inch 2×4 floor slats flat across the base crossmembers. Space them evenly from front to back, leaving narrow gaps for drainage and airflow. Keep the first and last slats slightly inside the outer edges so they do not trap water against the base rails.
Fasten each slat into every crossmember using exterior deck or structural screws appropriate for the connection. The logs will run roughly front to back across these widthwise slats, so each piece of firewood is supported at several points.
If your logs are substantially shorter than 16 inches, reduce the rack depth or adjust the floor-slat layout so the pieces cannot fall through the front or rear.
Step 5: Add the upper front and rear headers
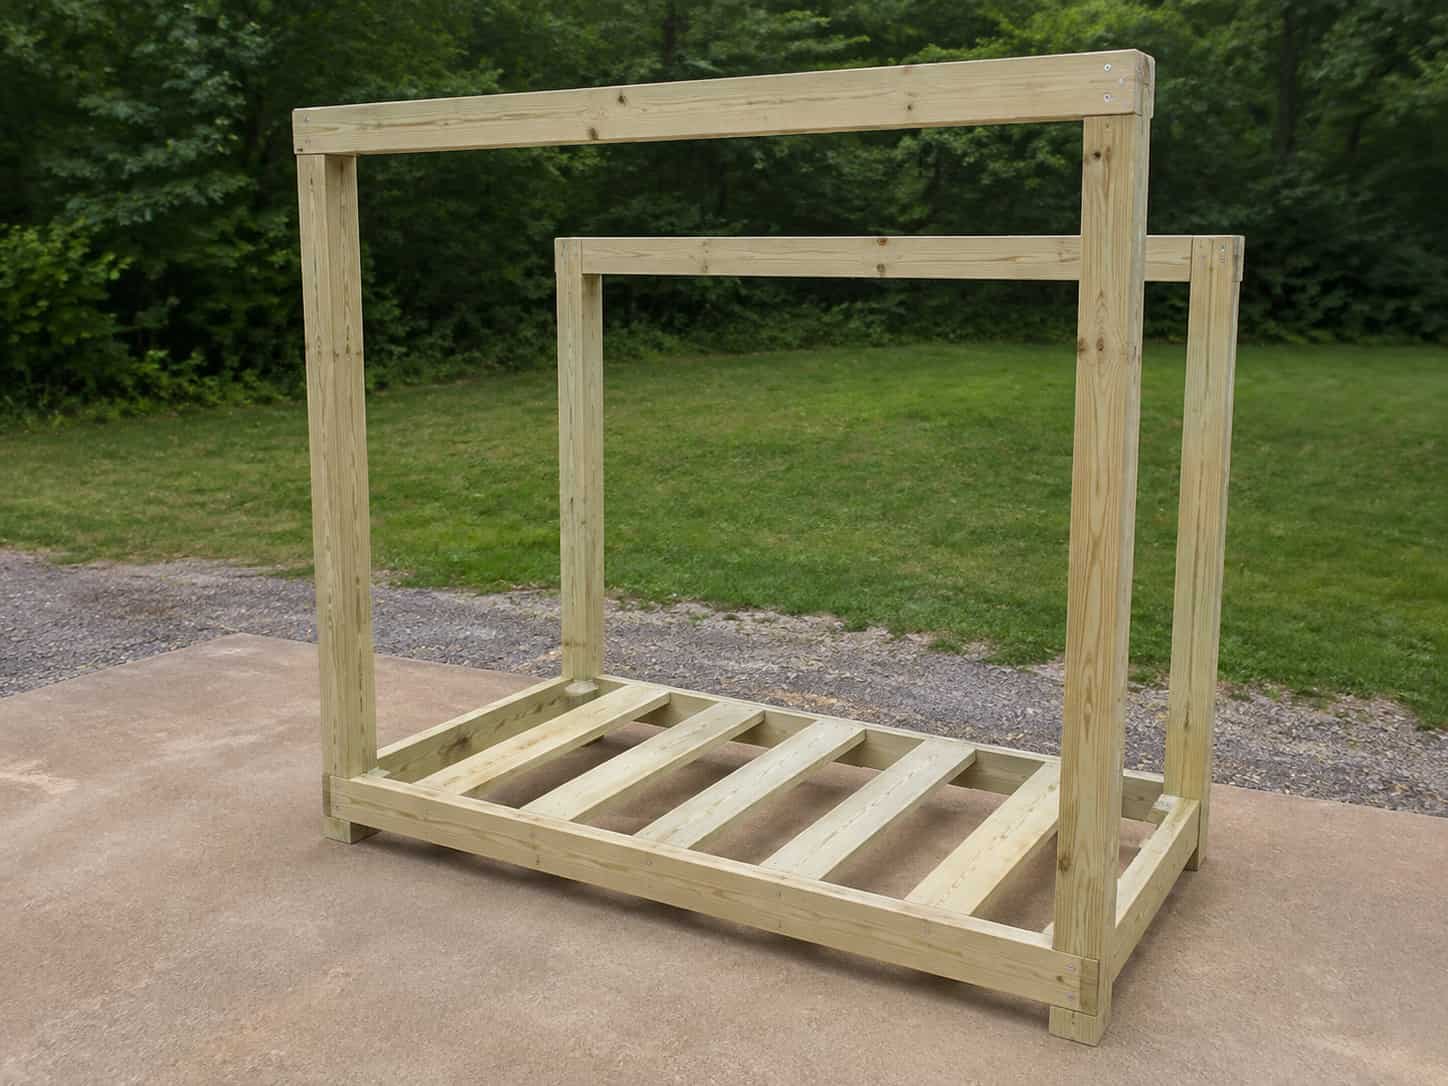
Clamp one 96-inch 2×4 header across the outside faces of the two front posts, flush with their tops. Level it and secure it using exterior structural screws or through-bolts suitable for the joint. Repeat with the rear header.
The 6-inch difference between the front and rear post heights establishes the roof slope. Before moving on, verify that:
- Both headers are level from left to right
- Every post remains plumb
- The frame is still square
- The roof will drain toward the intended side
Direct the lower edge away from paths, doors and neighboring property. Add a gutter if runoff would otherwise cause erosion or create an icy walking area.
Step 6: Fit the roof rafters
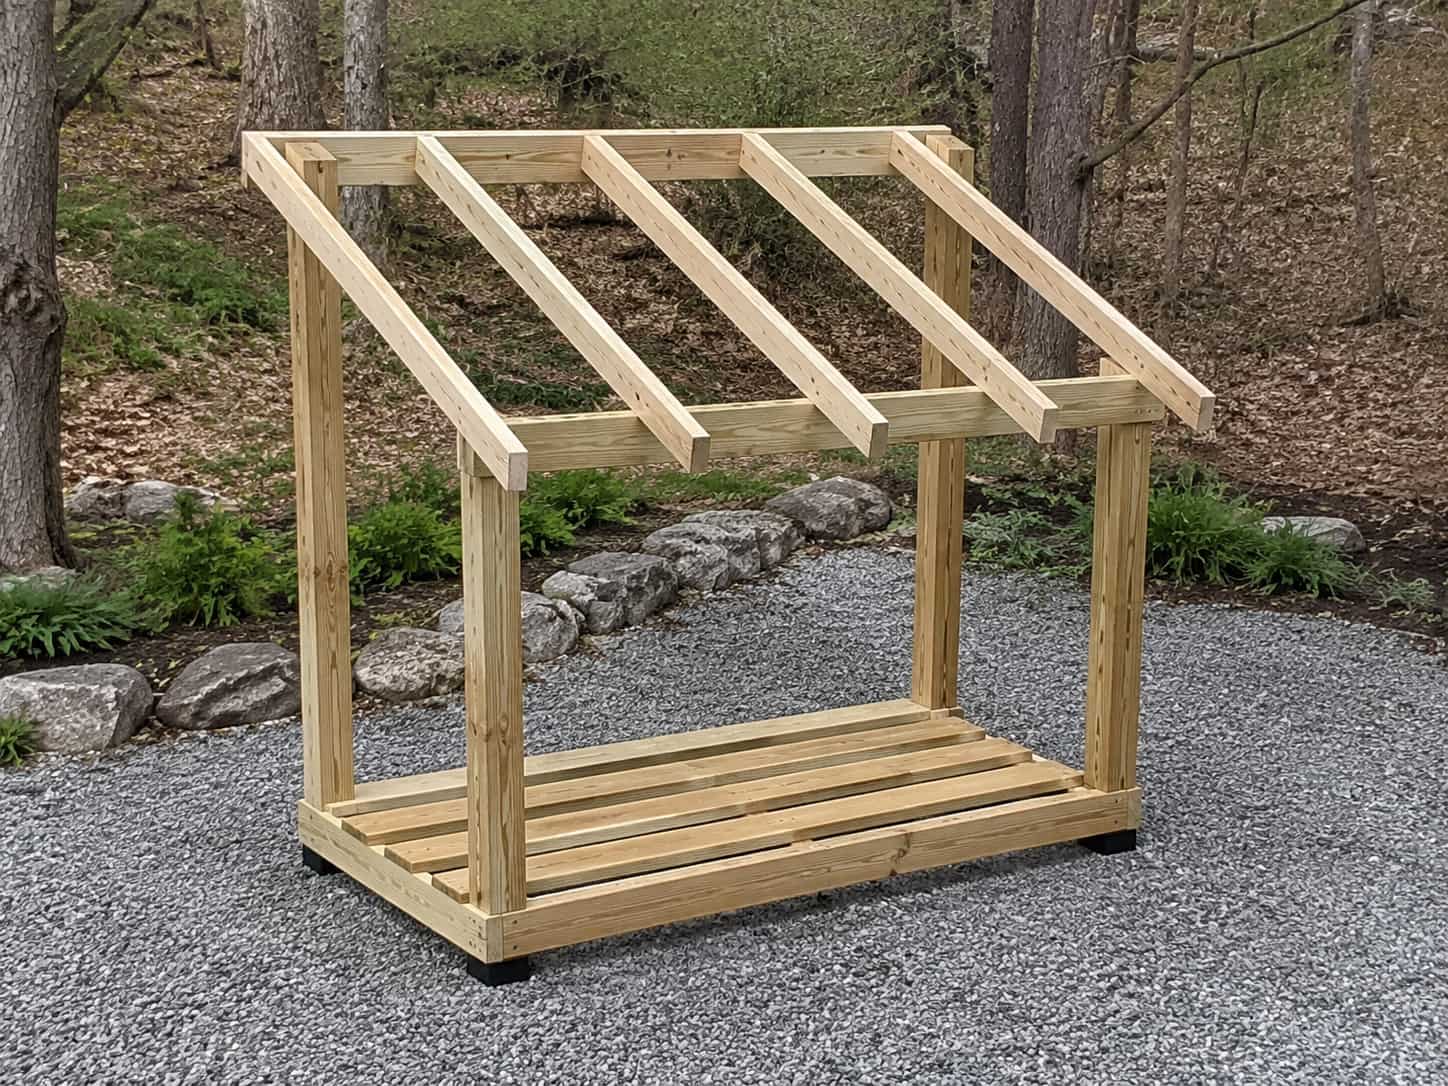
Clamp the first 2×4 rafter across the front and rear headers. Center it over an end post pair and mark the actual cuts directly from the frame. Cut it, test the fit and make small adjustments if needed.
Once the template fits correctly, duplicate it to make five rafters. Place one near each end, one at the center and the remaining two evenly between them. Fasten each rafter to both headers with approved exterior structural connectors or screws.
Roof framing requirements depend heavily on snow, wind and roofing material. Five rafters are a practical layout for mild conditions, but they are not a universal structural specification. Increase the framing or obtain professional guidance where local loads require it.
Step 7: Install the roof purlins
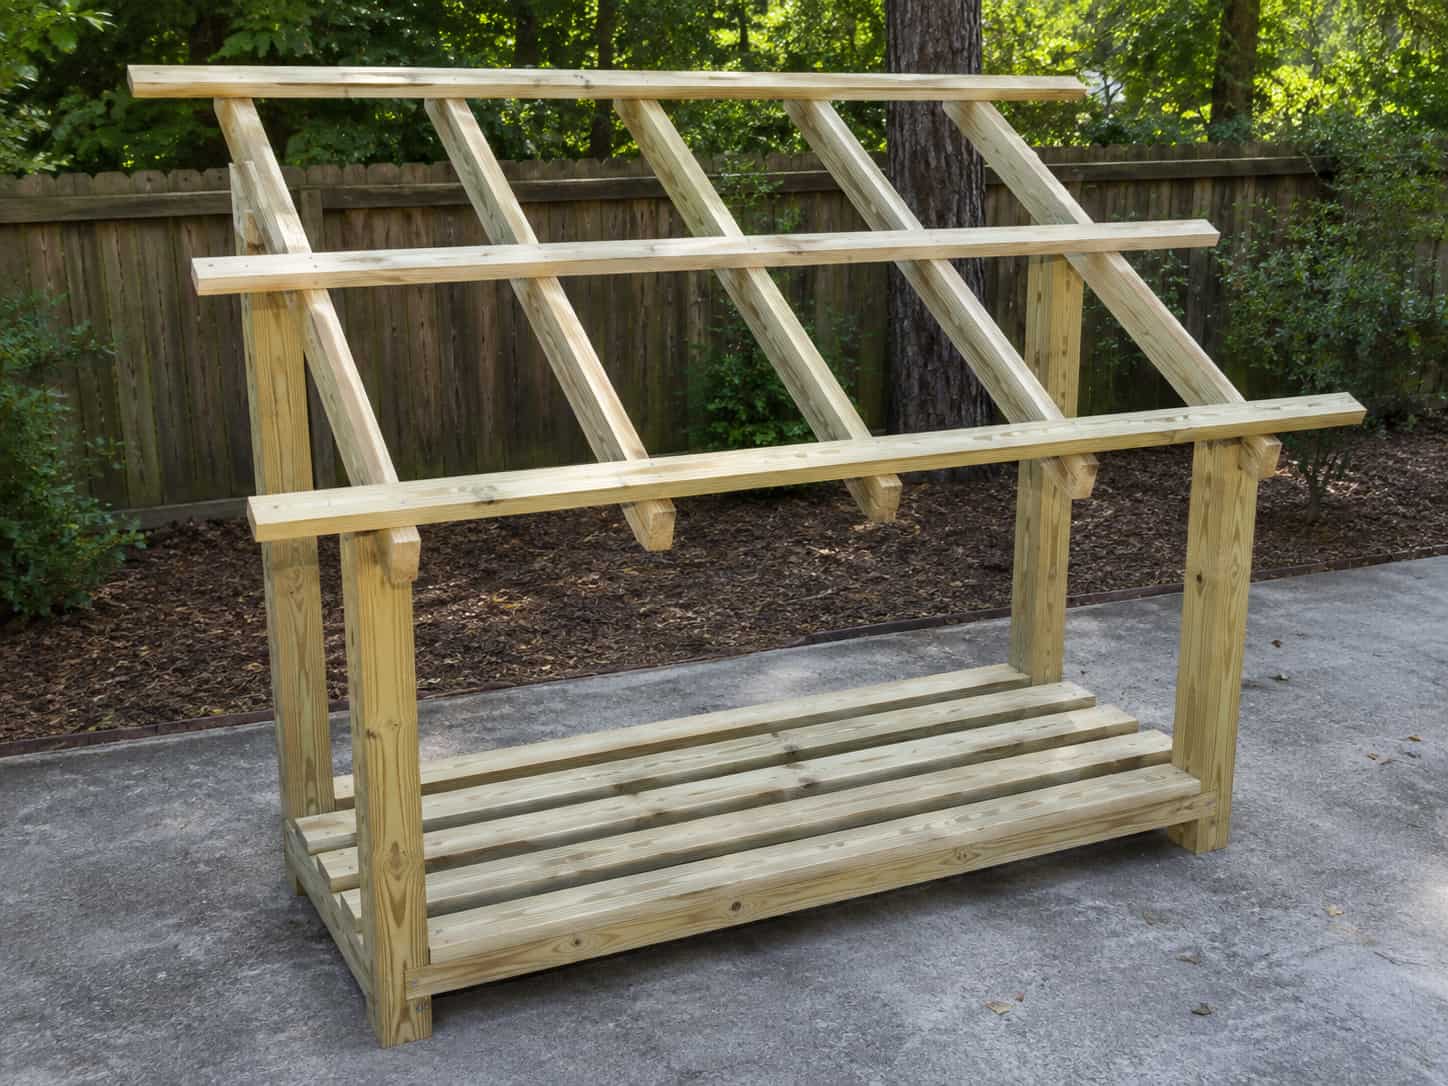
Place the three 102-inch 2×4 purlins across the rafters: one near the high edge, one near the center and one near the low edge. Center them so the roof extends roughly 3 inches beyond each side of the rack.
Keep the purlins parallel, then fasten them into every rafter with exterior structural screws. Check your corrugated roofing instructions before final spacing. Some panels require closer support or specific edge distances, and those manufacturer requirements take priority.
Step 8: Add the corrugated roof
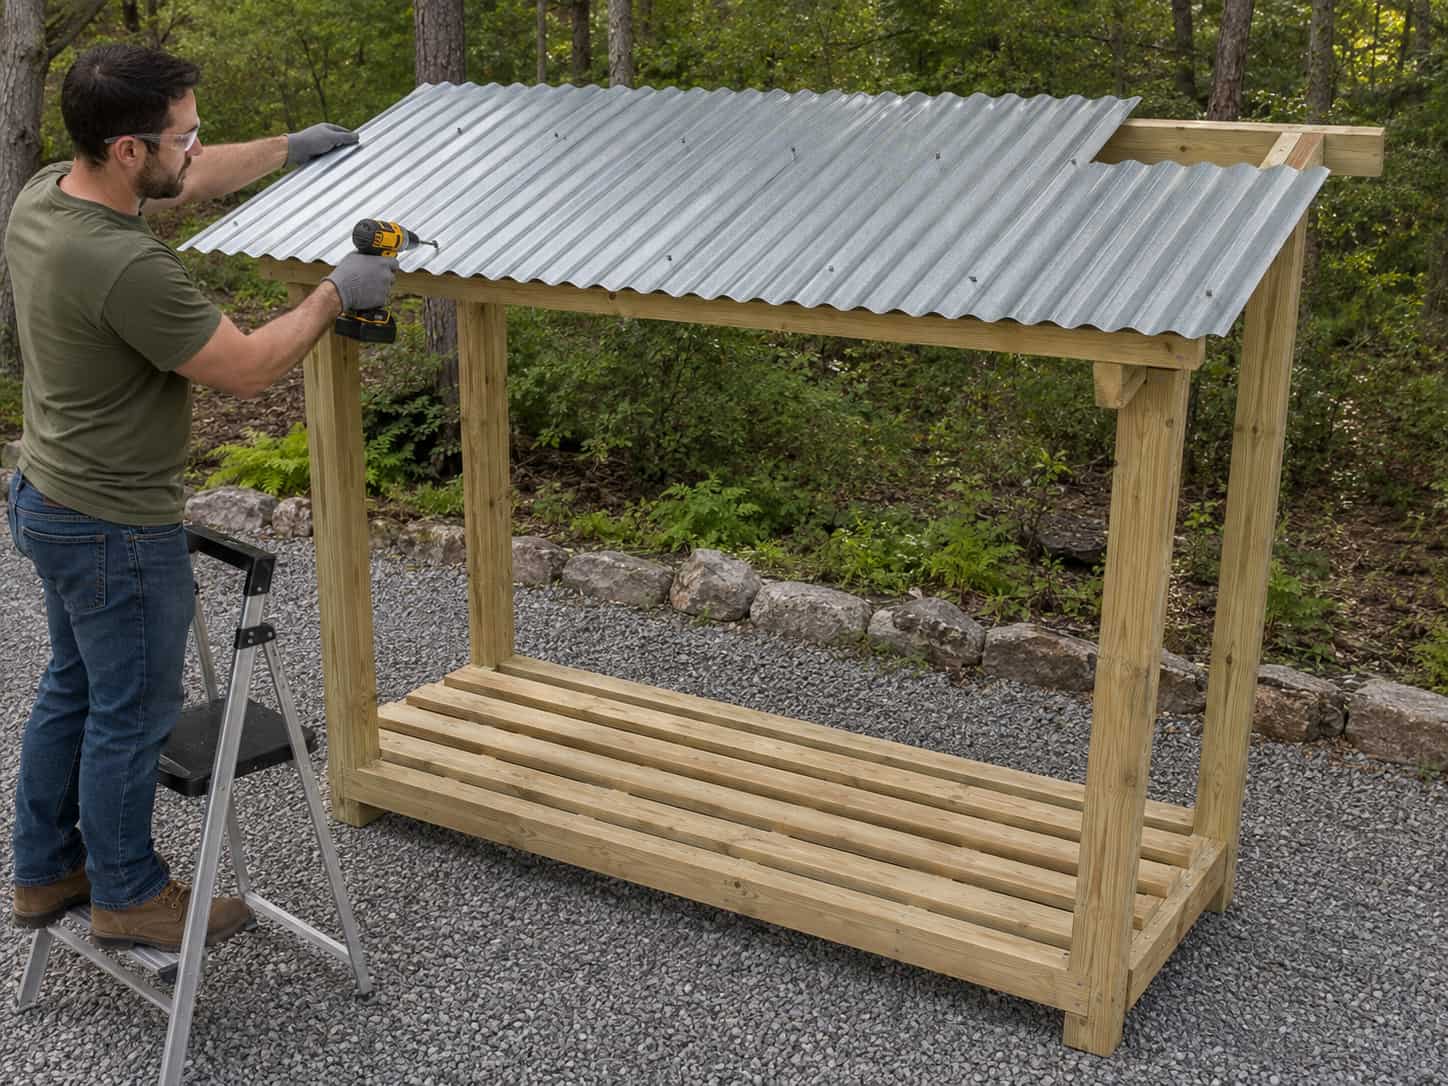
Wearing gloves and eye protection, position the metal panels so the corrugations run down the slope from front to rear. This lets water travel off the low edge rather than becoming trapped across horizontal ribs.
Overlap the panels and place roofing screws exactly as the manufacturer directs. Use the correct screws with sealing washers, keep fasteners straight and avoid overtightening them. A crushed washer may leak just as readily as a loose one.
Do not cut roofing with a tool that the manufacturer prohibits. Remove every metal shaving after installation because small fragments can rust and stain the roof.
Step 9: Install side retainers and diagonal braces
Fit a horizontal 2×4 retaining rail between the front and rear posts at each end of the rack. Position it high enough to contain the stack without blocking most of the airflow. Fasten it with exterior structural screws.
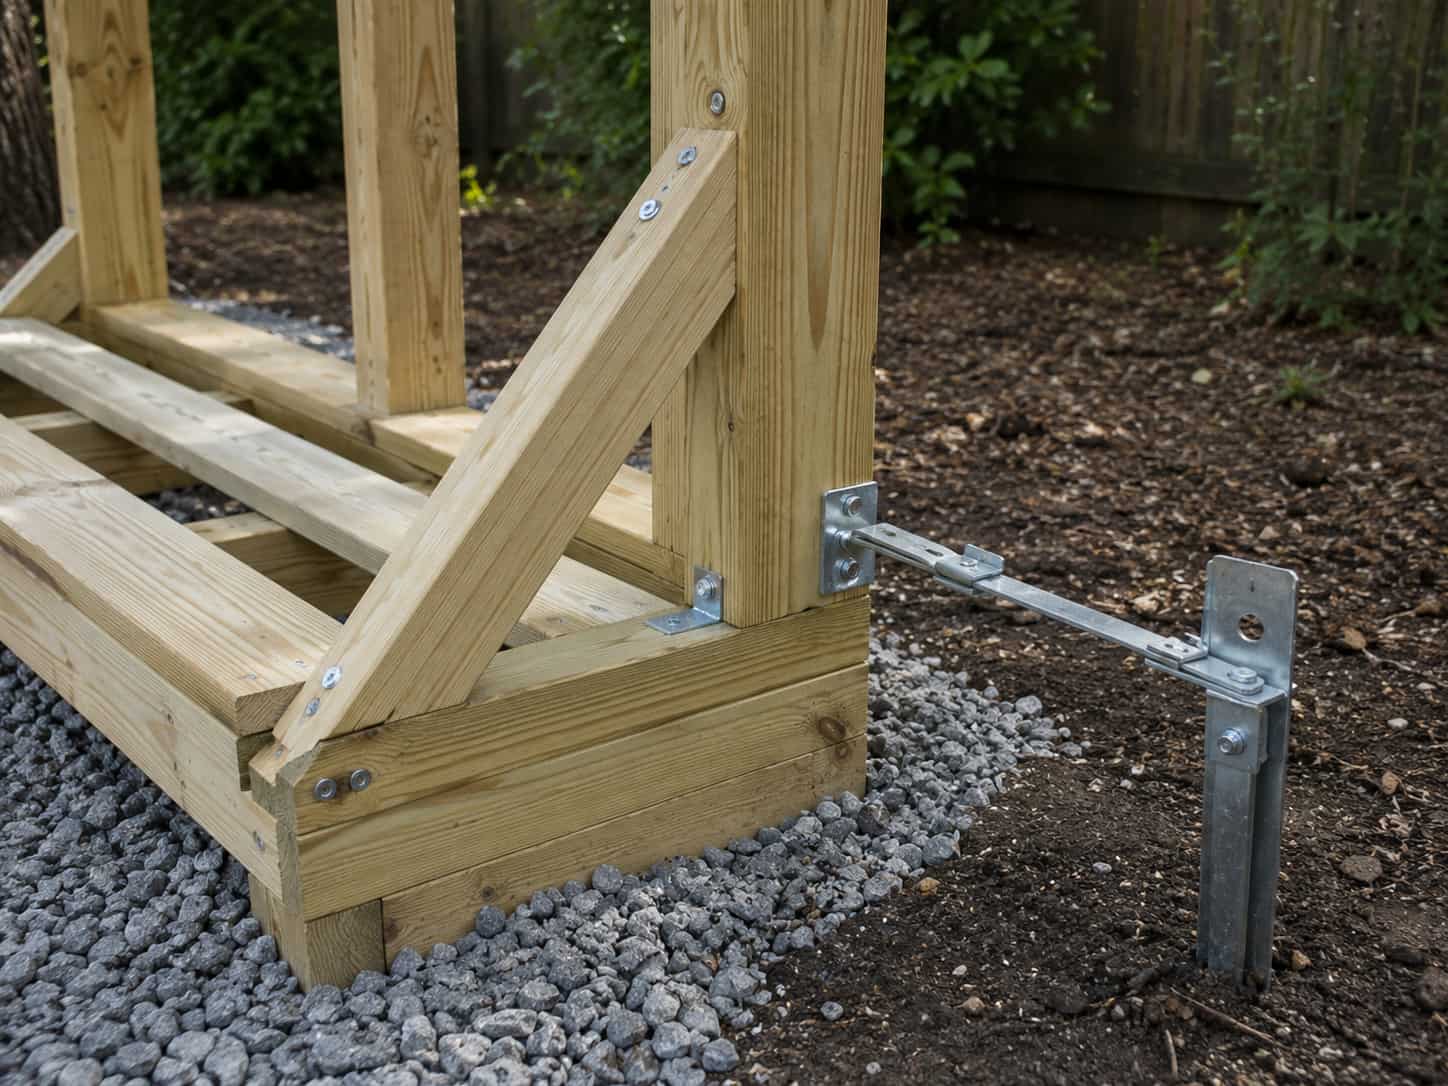
Next, add diagonal braces between the posts, base and upper framing. Cut each brace to fit the actual frame rather than relying on one universal angle. Use pairs of braces where possible so the structure resists movement in both directions.
Push gently against the rack from different sides. If it sways or racks, do not load it yet. Add bracing and improve the anchoring until the structure is stable.
Step 10: Anchor the rack for local conditions
A large roof can catch wind even when the firewood rack feels heavy. Choose an anchoring system suited to your surface and climate. Options may include approved ground anchors, concrete anchors, post bases or a locally engineered footing.
Do not improvise by fastening the rack to siding, a fence or another structure that was not designed to carry the load. If you are uncertain, get local advice. Anchoring is not the glamorous part of the build, but neither is watching your new roof introduce itself to the neighbor’s yard.
Step 11: Finish and inspect the rack
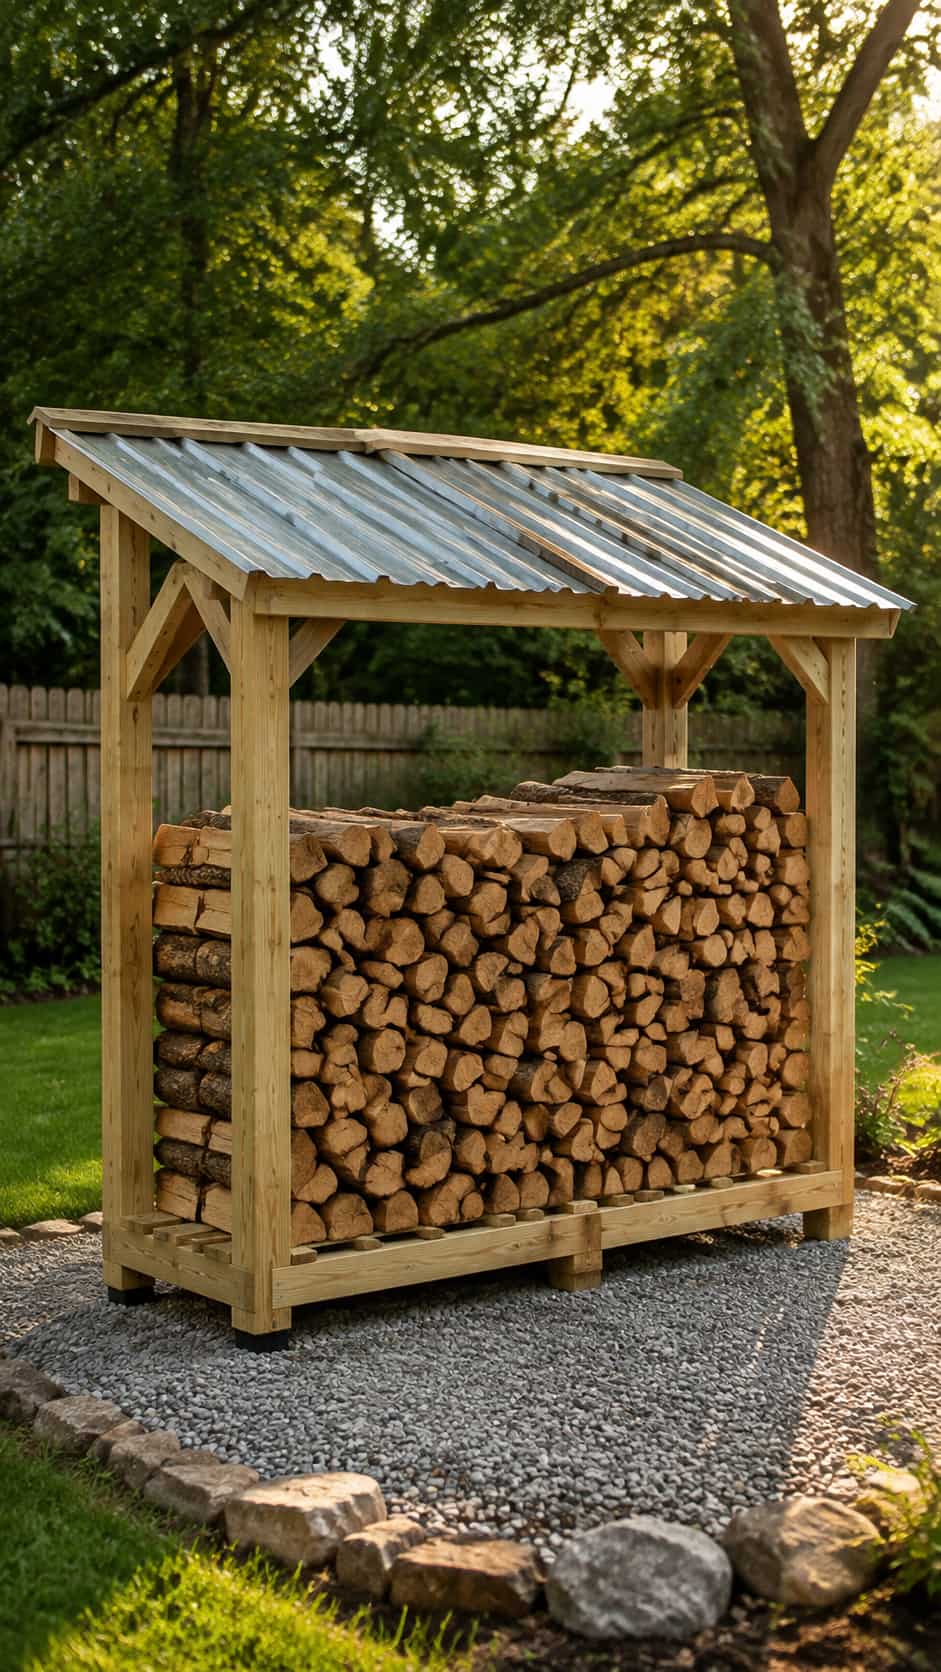
Ease sharp lumber edges and remove splinters. Treat cut ends according to the pressure-treated-lumber manufacturer’s instructions, then apply a compatible exterior finish when the wood is ready to accept it.
Complete a final inspection:
- Base is level and fully supported
- Posts are plumb
- Bolts and structural screws are tight
- Braces prevent side-to-side movement
- Roof fasteners are sealed and secure
- Metal edges are covered or positioned where they cannot be contacted casually
- Runoff drains away from the rack and nearby buildings
Your covered firewood rack is now ready to load.
How to Stack Firewood in the Rack
Stack split logs in stable rows with their cut ends generally facing the open front and rear. Keep the pile below the roof framing and do not lean a tall, unstable stack against the posts.
For better drying and safer storage:
- Place the oldest, driest wood where you can use it first
- Avoid packing irregular pieces so tightly that airflow disappears
- Keep bark, leaves and debris from accumulating beneath the rack
- Do not wrap the open sides in plastic
- Restack any pieces that begin leaning outward
- Keep children from climbing on the rack or woodpile
Firewood seasoning time varies with species, split size, climate and starting moisture. When firewood quality matters, use a moisture meter rather than relying only on appearance.
How Much Firewood Will This Rack Hold?
A full cord is a neatly stacked volume measuring 128 cubic feet. This rack’s usable storage volume is smaller than its outside dimensions because of the open roof space, posts and typical 16-inch log depth.
When stacked to roughly 4 feet high and about 16 inches deep across most of the 8-foot width, the rack holds approximately 43 cubic feet—or close to one-third of a full cord. Treat that as an estimate, not a sales measurement. Actual capacity changes with log length, split shape and stacking density.
If you need significantly more storage, consider building a properly designed woodshed instead of making this rack taller or deeper. A larger structure introduces greater wind, roof and stability loads. This step-by-step guide to building a shed from scratch can help you understand the additional planning involved.
Easy Ways to Customize the Plan
Make a 4-foot version
For a smaller household supply, reduce the long rails, slats, headers and purlins to suit a 48-inch-wide base. Keep adequate bracing and do not simply remove structural members without checking the revised spans.
A smaller covered firewood rack can also be made for compact spaces while still serving the purpose of efficient firewood storage.
Add a center divider
A vertical divider can separate kindling from full-size logs or help organize older and newer firewood. Keep it open rather than covering it with plywood so air can continue moving through the pile.
Add a kindling shelf
Install a small slatted shelf at one end, provided it does not overload the side framing or interfere with bracing. A removable crate is an even easier option.
Match your other outdoor projects
Use a compatible stain color to coordinate the rack with a bench, planter or chair. If you have leftover outdoor-rated lumber, these DIY 2×4 outdoor furniture projects offer plenty of ideas for the remaining boards. You can also use short, clean offcuts for one of these easy 4×4 wood projects.
Common Firewood Rack Mistakes to Avoid
Building directly on soil
Even pressure-treated lumber lasts longer when water can drain and air can circulate. A level gravel-and-paver base also makes the rack more stable.
Covering every side
The goal is to keep rain off the top without trapping moisture around the logs. Solid side walls may reduce ventilation unless the entire structure has been designed around adequate airflow.
Using interior fasteners
Exterior structures require corrosion-resistant hardware compatible with the lumber treatment. Use structural fasteners where the joint carries weight or resists movement.
Forgetting roof runoff
The roof must drain somewhere. Plan the low edge before setting the posts, especially near walkways and doors.
Skipping diagonal bracing
A rectangle can rack into a parallelogram surprisingly easily. Braces are what stop a tall, narrow structure from wobbling sideways.
Assuming one plan fits every climate
Wind and snow loads vary widely. The basic rack may need closer rafter spacing, larger members, stronger connectors or a different foundation in demanding conditions.
Want More Woodworking Plans for Your Next Project?
Disclosure: This section contains an affiliate link. If you purchase through the link, I may earn a commission at no additional cost to you.
Once the firewood rack is finished, there is a good chance you will start looking around the yard for the next thing to build—a storage bench, garden planter, Adirondack chair or maybe a full shed.
If you prefer choosing from a large collection instead of searching for separate tutorials every time, Ted’s Woodworking Plans is one optional resource to explore. The package advertises thousands of plans covering outdoor projects, furniture, workshop storage and smaller beginner builds.
Plan quality and detail can vary in any large collection, so review the dimensions, materials list, diagrams and difficulty before starting. You can read my honest Ted’s Woodworking Plans review first to see what the package includes, where it may help and what to check before buying.
See the current Ted’s Woodworking Plans offer here
If you would rather complete another free measured build first, try this DIY Adirondack chair plan with measurements and a cut list.
With a well-built covered firewood rack, your firewood will be ready for use anytime you need it, free from the worry of rain or snow.
Covered Firewood Rack FAQ
This covered firewood rack FAQ can help answer any lingering questions you might have about maintaining your firewood’s quality.
Should a firewood rack have a roof?
A roof is useful because it protects the top of the stack from precipitation while the open sides continue to provide airflow. Give the roof a clear slope and enough overhang to direct runoff away from the logs.
How far should firewood be raised off the ground?
There is no single dimension for every site, but the wood should be high enough to avoid soil contact, splashback and standing water. In this plan, the base frame, floor slats and paver foundation create a raised, ventilated platform. Adjust the foundation if local drainage or snow depth requires more clearance.
Can I place this firewood rack against my house?
It is generally better to keep long-term wood storage separate from the house because firewood may hold moisture and shelter insects. Follow local fire-safety, pest and property-clearance guidance when selecting the location.
Can I use untreated lumber?
Untreated wood exposed outdoors—especially near the ground—may deteriorate quickly. Use lumber rated for the intended exposure, protect cut ends as directed and choose compatible corrosion-resistant hardware.
Can I use a plywood roof instead of metal?
Yes, but plywood is only the roof deck; it still requires an appropriate underlayment, drip-edge details and finished roofing system. Follow the roofing manufacturer’s instructions rather than leaving plywood exposed.
How do I stop a firewood rack from tipping?
Start with a level base, keep the posts plumb, install diagonal braces and use an anchoring method appropriate for the site. Never rely on the weight of the firewood alone to resist wind acting on the roof.
How much does this rack cost to build?
Cost varies by lumber species, treatment, roofing type, fasteners and local pricing. Make a local shopping list from the materials table and include anchors, gravel, pavers and finish—not just the boards—before estimating the total.
Final Thoughts
A good covered firewood rack does not need solid walls or complicated joinery. It needs a level, elevated base; enough bracing to remain stable; open airflow; and a roof that sends water away from the stack.
Build the base carefully, verify every post before installing the roof, and adapt the anchors to your location. Once the first neat row of split logs is stacked under cover in your covered firewood rack, the old tarp-and-mud system will be very difficult to miss.