
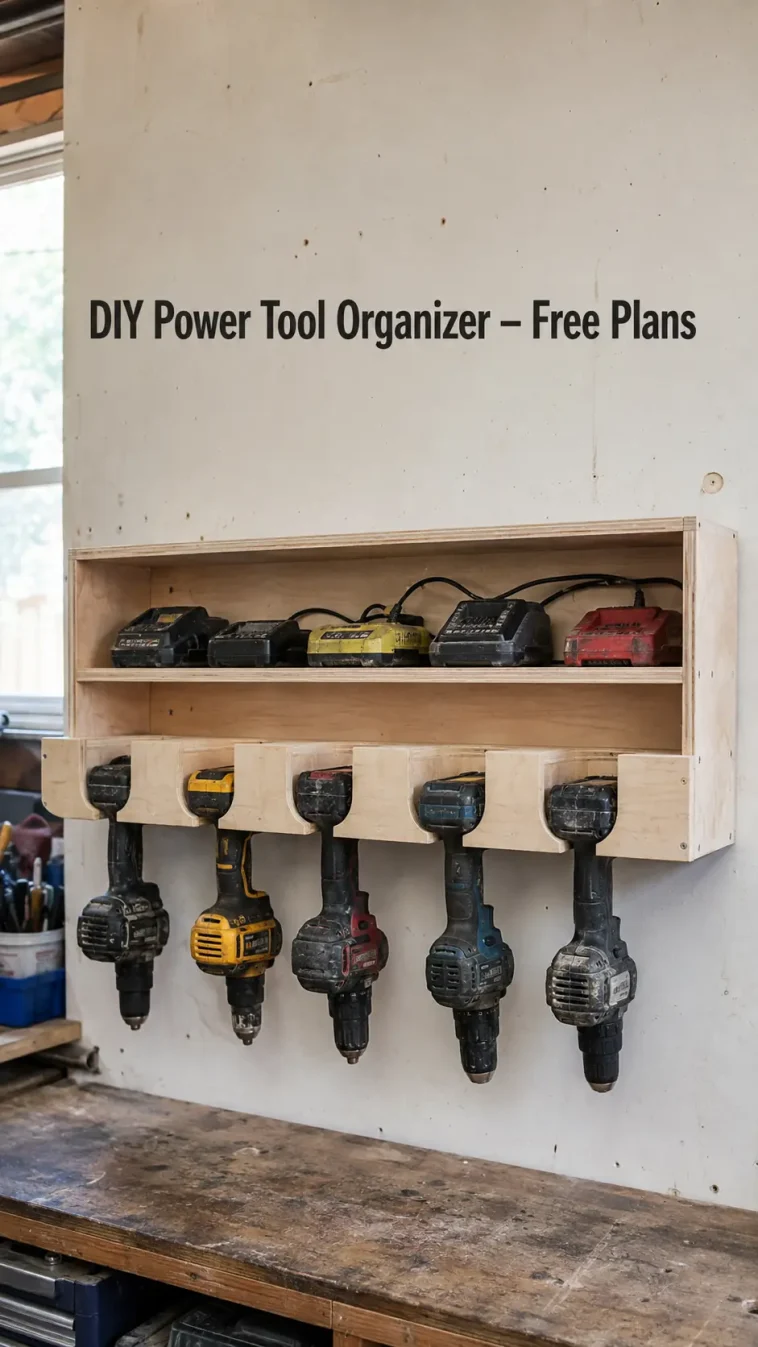
Cordless drills are supposed to make workshop life easier. That promise feels slightly less convincing when the drill is under a pile of clamps, the battery is in a mystery drawer and the charger cord has somehow tied itself around three unrelated tools.
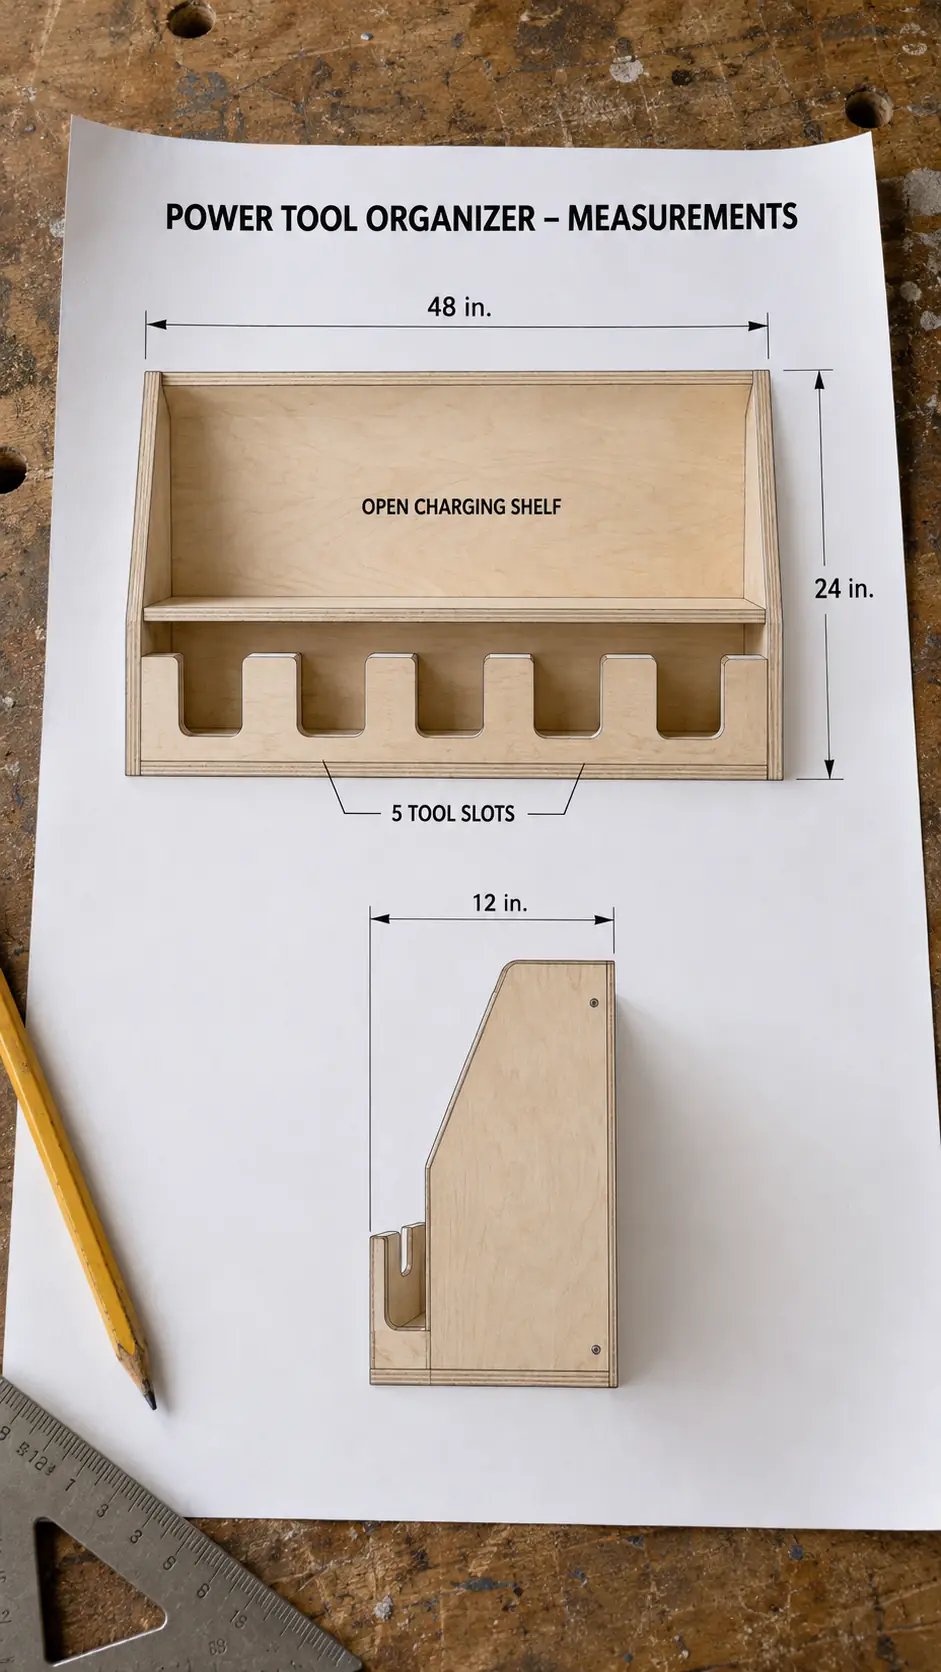
This wall-mounted power tool organizer fixes that problem by giving your drills, impact drivers, batteries and chargers one dedicated home. The finished station is approximately 48 inches wide, 12 inches deep and 24 inches high. It includes five hanging tool slots, an open charging shelf, an upper storage surface and built-in cord-routing holes.
The plan uses one sheet of ¾-inch plywood plus two inexpensive 1×2 boards. The basic cabinet is beginner-friendly, but wall mounting and charger placement require careful planning. Measure your own tools and read every charger manufacturer’s instructions before cutting the slots or choosing shelf clearances.
Important safety note: The wooden organizer is a storage cabinet—not an electrical enclosure. Do not install homemade wiring, receptacles or switches inside it. Use only compatible, manufacturer-approved chargers connected according to their instructions. Any new permanent electrical work should be completed by a qualified electrician and comply with local rules.
Power Tool Organizer Plan at a Glance
| Detail | Plan specification |
|---|---|
| Finished width | Approximately 48 in. |
| Finished height | Approximately 24 in. |
| Finished depth | Approximately 12 in. |
| Tool capacity | Up to 5 drills or impact drivers, after checking fit |
| Main material | One 4×8 sheet of ¾-in. plywood |
| Difficulty | Beginner to intermediate |
| Estimated build time | One weekend, plus finish-drying time |
| Mounting | Structural fasteners into wall framing or an approved masonry system |
| Best location | Dry, ventilated workshop wall near a suitable receptacle |
This station works particularly well beside a workbench or assembly area. If you want to organize the rest of that wall too, these tool wall storage ideas provide useful layouts for hand tools, clamps, bits and small hardware.
What This Charging Station Holds
The plan is sized around a typical collection of cordless workshop tools:
- Five drills, impact drivers or similarly shaped cordless tools
- Two to four battery chargers, depending on their footprints
- Spare battery packs stored with their terminals protected
- Bit cases, manuals and lightweight accessories
- Charging cords routed through the back instead of hanging across the workbench
Five slots do not guarantee that five tools from every brand will fit. Some compact drivers are narrow; large hammer drills and right-angle tools are not. Inventory the exact tools you want to store, measure the neck below each motor housing and adjust the slot width and spacing before cutting.
For a broader system that can grow with your collection, you can mount this organizer beside one of these French cleat tool holders.
Charging Safety Comes Before Cabinet Design
A charging shelf must stay dry, ventilated and reasonably clean. Charger requirements vary, so the instructions supplied with your exact charger take priority over generic woodworking dimensions.
Before choosing a location:
- Keep charger ventilation openings completely unobstructed.
- Do not charge in rain, damp conditions or near standing water.
- Keep chargers away from flammable vapors, heavy dust accumulation and open flames.
- Charge only compatible battery packs approved for the charger.
- Do not charge a cracked, swollen, leaking, overheated or otherwise damaged battery.
- Protect loose battery terminals from screws, nails, keys and other conductive metal objects.
- Inspect cords and plugs regularly; stop using damaged equipment.
- Keep the station away from direct sun and unusually hot areas.
- Make the chargers easy to unplug rather than permanently trapping plugs behind the cabinet.
Milwaukee charger instructions call for clear ventilation and warn against charging around flammable materials or dust. DeWalt battery and charger instructions likewise direct users to read charger warnings and keep foreign conductive material away from charger openings.
Do not assume that a power strip is appropriate simply because it fits on the shelf. If you use one, choose a listed product designed for the environment, follow its mounting instructions and electrical rating, and never daisy-chain power strips or use an extension cord as permanent building wiring. Ask a qualified electrician about receptacle capacity, circuit protection or a new outlet.
Materials and Hardware
Lumber
- 1 sheet of ¾-in. cabinet-grade plywood, 4×8 ft
- 2 straight 1×2×8 boards for shelf cleats and front retaining lips
- Optional hardwood edge banding for visible plywood edges
Assembly and mounting hardware
- Wood glue
- 1¼-in. or 1½-in. cabinet screws for plywood assembly
- 1¼-in. screws for attaching the back where appropriate
- Structural wall screws or masonry anchors selected for your wall construction and expected load
- Fender washers if recommended for the chosen mounting screws
- Cable clips, hook-and-loop straps or another non-damaging cord-management system
- Optional listed, surface-mountable power strip installed strictly according to its manufacturer’s directions
- Primer and paint, or a clear workshop-safe finish
Avoid drywall screws for the cabinet and do not rely on lightweight drywall anchors to hold a station loaded with power tools and batteries.
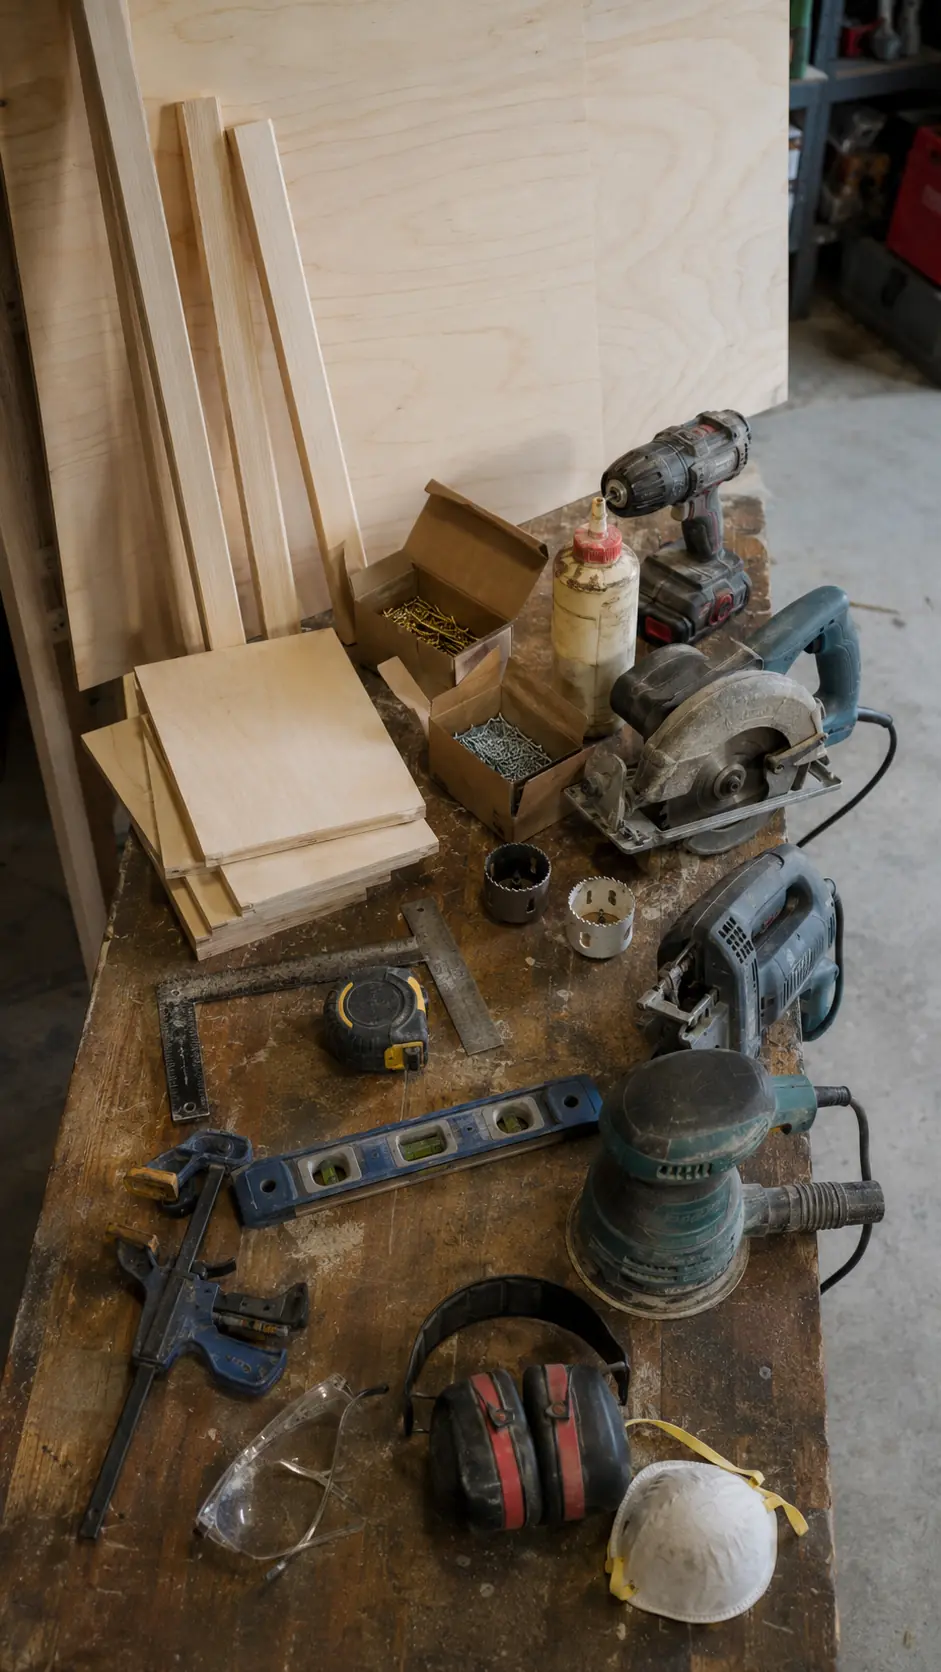
Tools You Will Need
- Tape measure
- Pencil
- Framing square or straightedge
- Circular saw with a guide, track saw or table saw
- Jigsaw
- Drill/driver
- 2-in. hole saw or Forstner bit for the tool-slot ends
- 1½-in. hole saw for cord-routing openings
- Countersink bit
- Clamps
- Stud finder appropriate for your wall
- 4-ft level
- Random-orbit sander or sanding block
- Eye and hearing protection
- Dust mask or suitable respiratory protection when cutting and sanding
Pocket holes are an optional way to hide some cabinet fasteners. If that method is new to you, read this beginner’s guide to using a pocket-hole jig before drilling the finished parts.
Complete Cut List
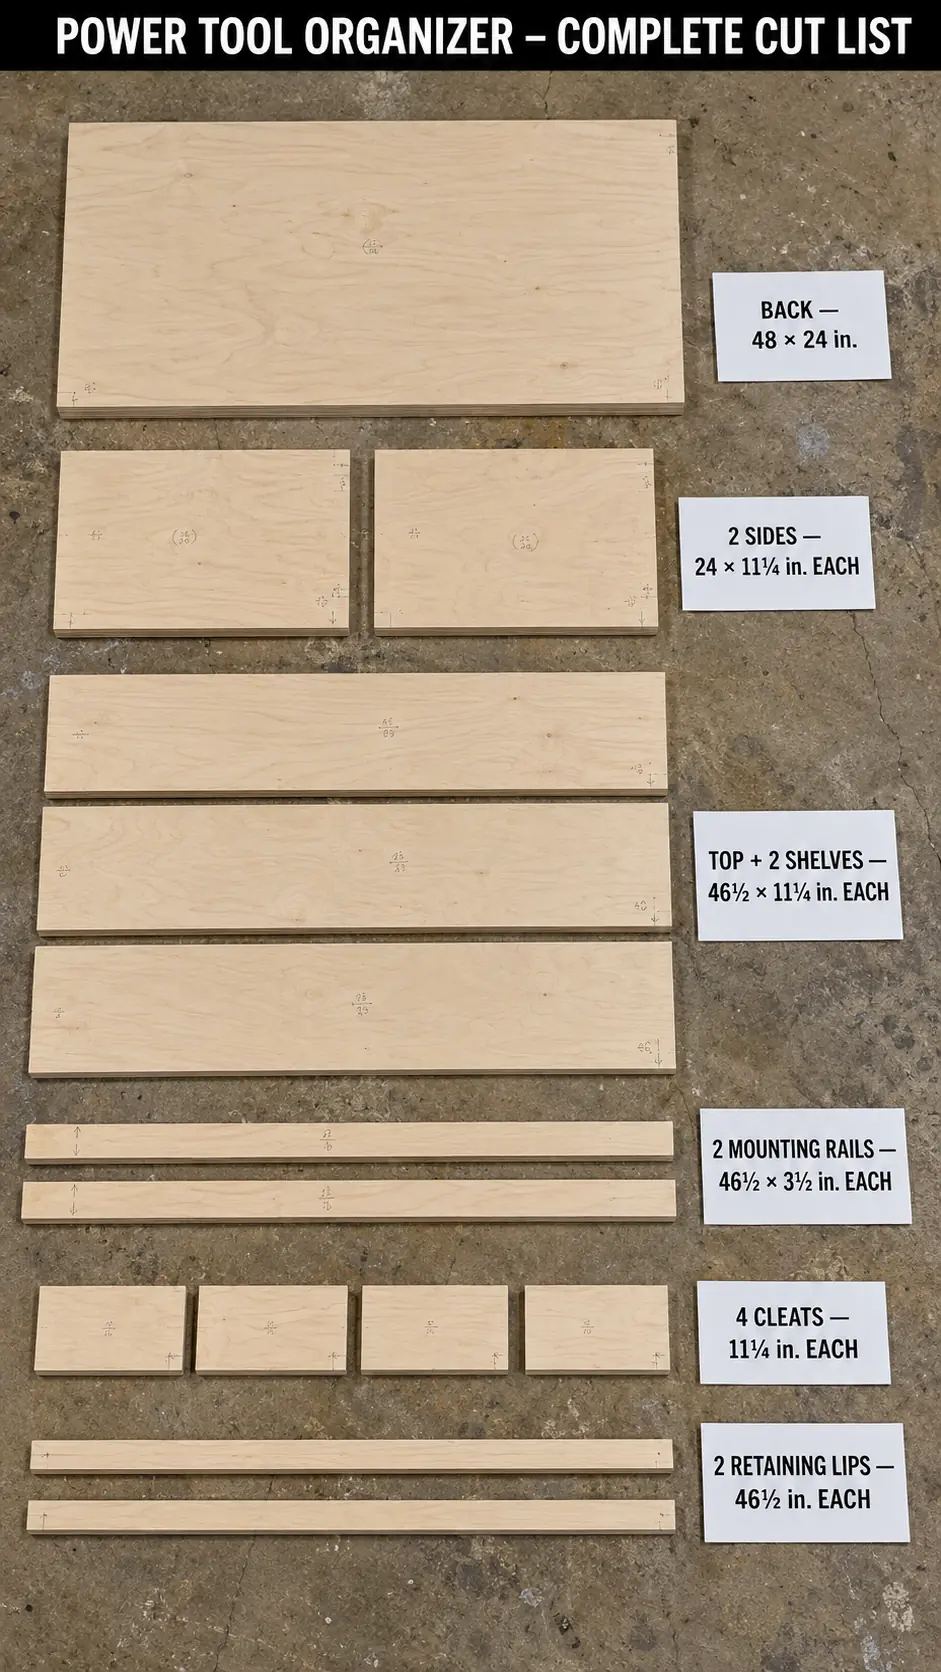
The measurements below assume plywood that is actually ¾ inch thick. Confirm the real thickness of your sheet before cutting the parts that fit between the two sides.
| Part | Material | Quantity | Cut size | Purpose |
| Back panel | ¾-in. plywood | 1 | 48 × 24 in. | Supports and squares cabinet |
| Side panels | ¾-in. plywood | 2 | 24 × 11¼ in. | Cabinet ends |
| Top panel | ¾-in. plywood | 1 | 46½ × 11¼ in. | Upper storage surface |
| Charging shelf | ¾-in. plywood | 1 | 46½ × 11¼ in. | Holds approved chargers |
| Tool-hanger shelf | ¾-in. plywood | 1 | 46½ × 11¼ in. | Holds five slotted tools |
| Upper mounting rail | ¾-in. plywood | 1 | 46½ × 3½ in. | Spreads wall-mounting load |
| Lower mounting rail | ¾-in. plywood | 1 | 46½ × 3½ in. | Prevents cabinet movement |
| Shelf cleats | 1×2 | 4 | 11¼ in. | Support charging and tool shelves |
| Front retaining lips | 1×2 | 2 | 46½ in. | Reduce sliding on upper shelves |
The two long lips and four short cleats require a little more than one 8-foot 1×2 after allowing for saw kerfs, which is why the shopping list includes two boards.
Tool-Slot Layout
The five tool slots are cut into the front edge of the 46½-inch tool-hanger shelf. The example layout uses 2-inch-wide slots that finish approximately 6½ inches deep, with the rounded ends centered 5½ inches back from the front edge. Check that size against your tools before cutting.
For an evenly spaced starting layout, mark slot centerlines at approximately:
- 6¼ in. from the left edge
- 14¾ in. from the left edge
- 23¼ in. from the left edge
- 31¾ in. from the left edge
- 40¼ in. from the left edge
That creates 8½-inch center-to-center spacing. Large batteries, belt clips or unusually wide tool bodies may require more room. Set all five tools on the uncut board first and adjust the marks until neighboring tools can be removed without colliding.
To make each slot, mark a 2-inch circle with its center 5½ inches back from the front edge. Drill the circle, then draw two tangent lines from its sides to the front edge. Cut along those lines with a jigsaw to create a rounded U-shaped opening.
Recommended Shelf Positions
Lay the 48 × 24-inch back panel horizontally on a work surface and use its bottom edge as the reference line.
- Install the tool-hanger shelf with its top face approximately 6 inches above the back-panel bottom.
- Install the charging shelf with its top face approximately 12 inches above the tool shelf.
- Install the top panel flush with the upper ends of the side panels.
These positions leave an open compartment for tool bodies and a generous charger area above. They are starting dimensions, not universal charger clearances. Measure the tallest drill body and every charger before fixing the shelves permanently.
How to Build the Power Tool Organizer Step by Step
Step 1: Inventory and measure your tools
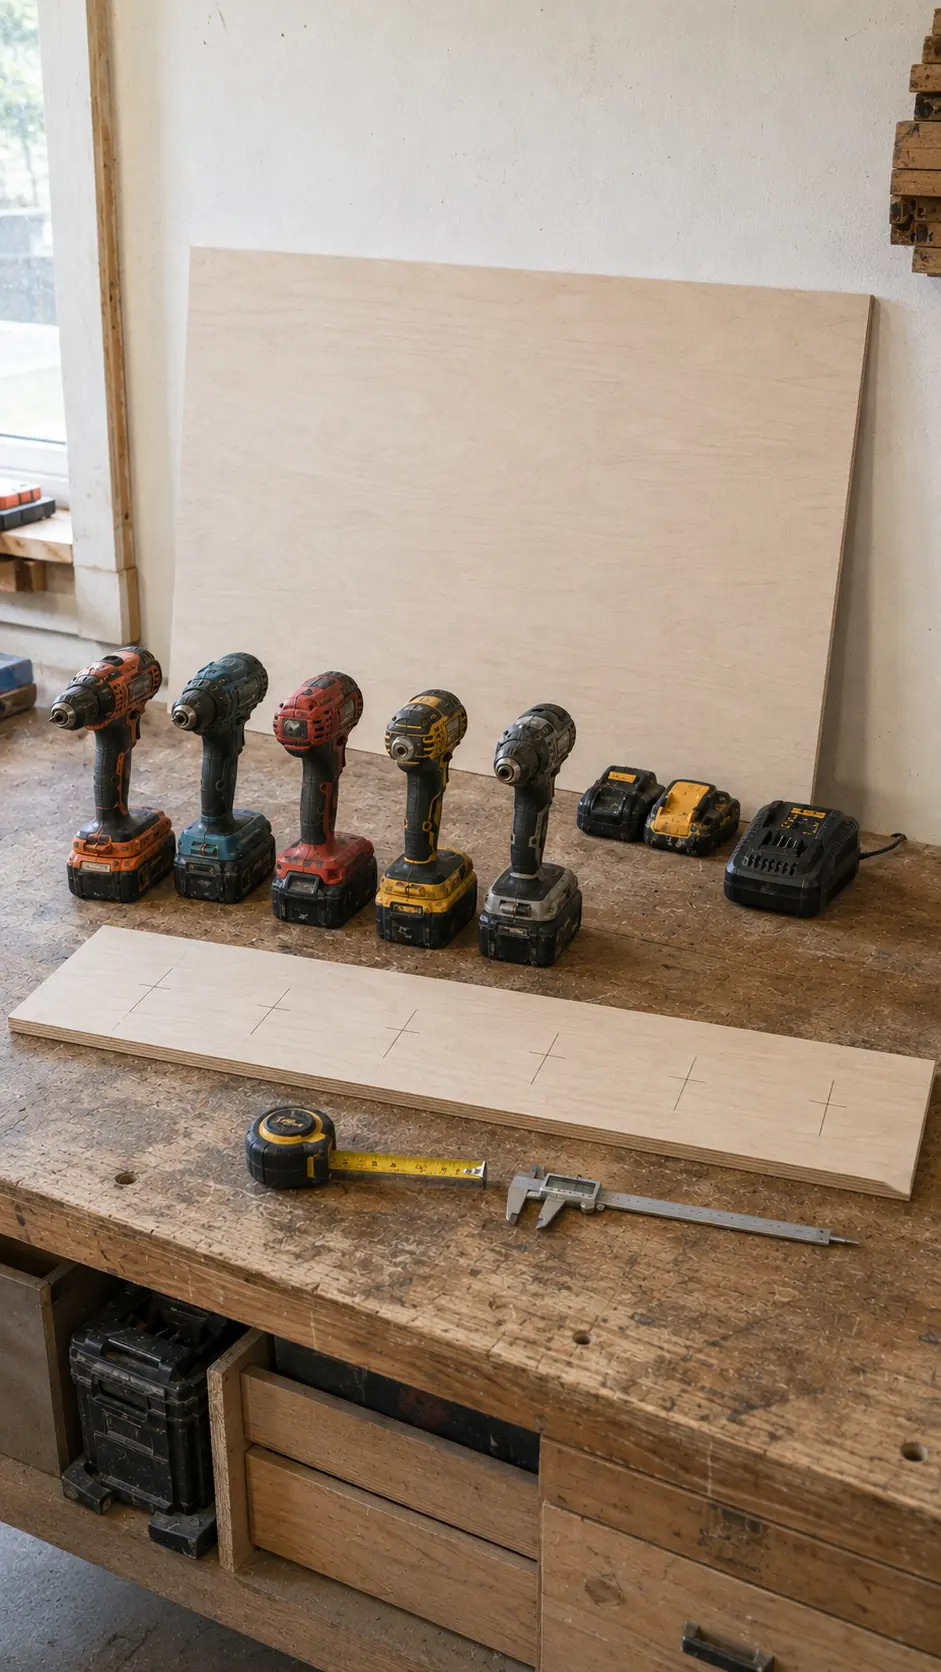
Place every drill, driver, charger and battery on the workbench. Measure:
- Tool-neck widths
- Tool-head widths
- Battery widths
- Total tool height while hanging
- Charger footprints and cord-exit locations
- Required clearance around each charger vent
Also measure the available wall, nearby doors, cabinets, receptacles and bench surface. The station should be easy to reach without putting heavy tools above anyone’s head.
Step 2: Break down the plywood
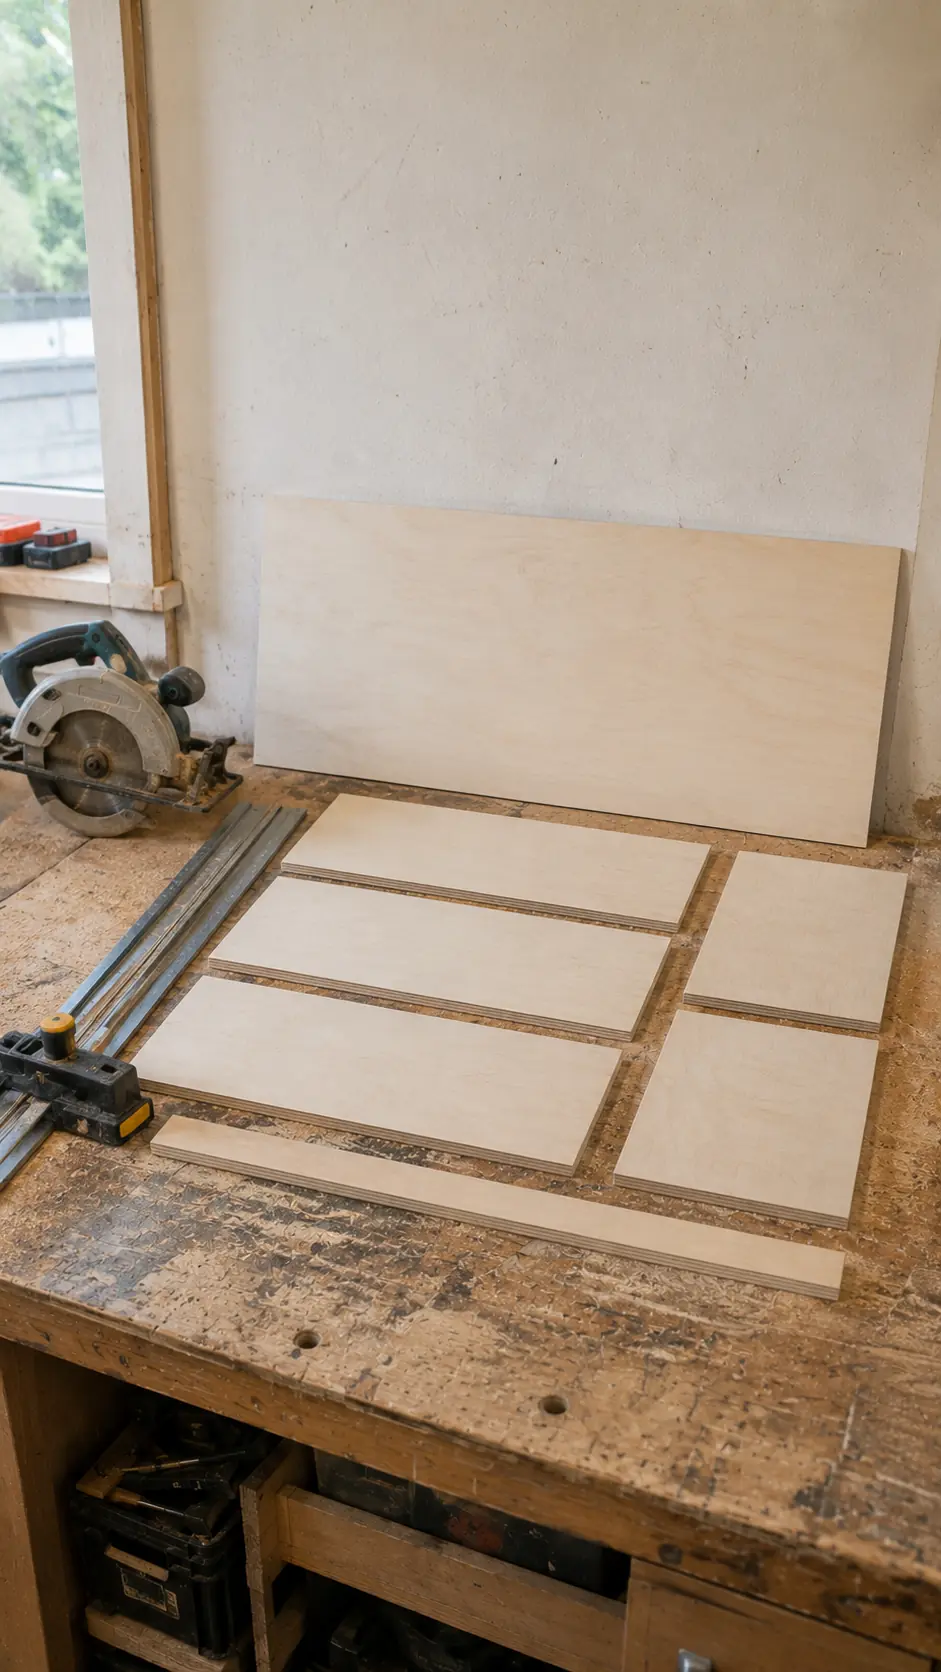
Cut the back, sides, three horizontal panels and two mounting rails according to the cut list. Use a straight guide with a circular saw if you do not have a table saw.
Label every part immediately. Several 46½ × 11¼-inch panels look identical until one has five large slots cut into it.
Check the plywood for square and measure both side panels together. Matching sides matter more than being a tiny fraction of an inch away from the nominal dimension.
Step 3: Mark and cut the five tool slots
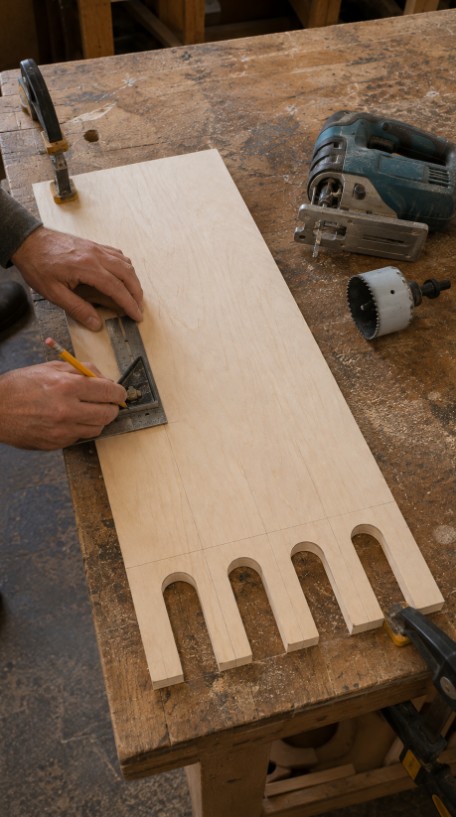
Arrange your actual tools on the tool-hanger shelf and confirm the centerlines. Drill the rounded end of each opening with a 2-inch hole saw, then connect the hole to the front edge with two straight jigsaw cuts.
Smooth every slot with sandpaper. The edges should not scrape tool housings, snag rubber grips or press against triggers. Place each unplugged tool into its assigned opening and confirm that it can be inserted and removed easily.
If one slot is too tight, widen it gradually. A neat extra eighth of an inch is better than forcing an expensive tool into a decorative choke point.
Step 4: Drill the cord-routing holes
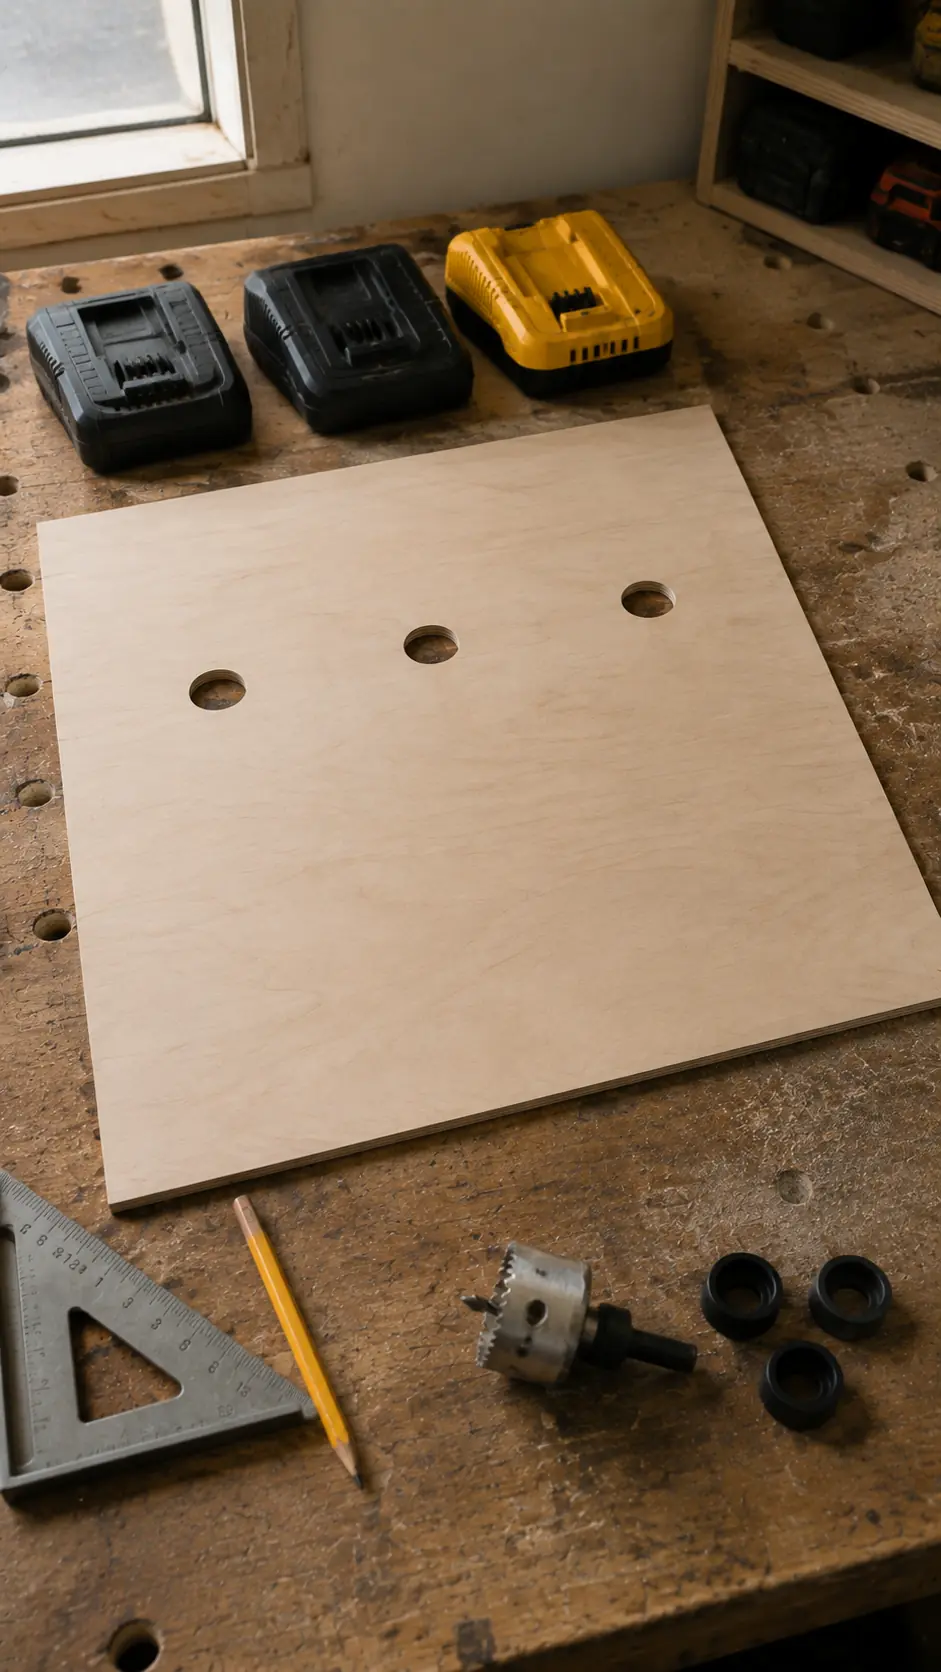
Set the chargers on the unassembled charging shelf and mark where their cords naturally reach the back. Transfer those locations to the back panel.
Drill two or three 1½-inch cord holes behind the charging area. Sand the openings smooth or add plastic grommets so plywood edges cannot rub against the insulation.
Cord holes are only pass-throughs. Do not bury connectors, adapters or coiled excess cord inside a sealed space. Charger plugs should remain accessible.
Step 5: Sand and prepare the parts
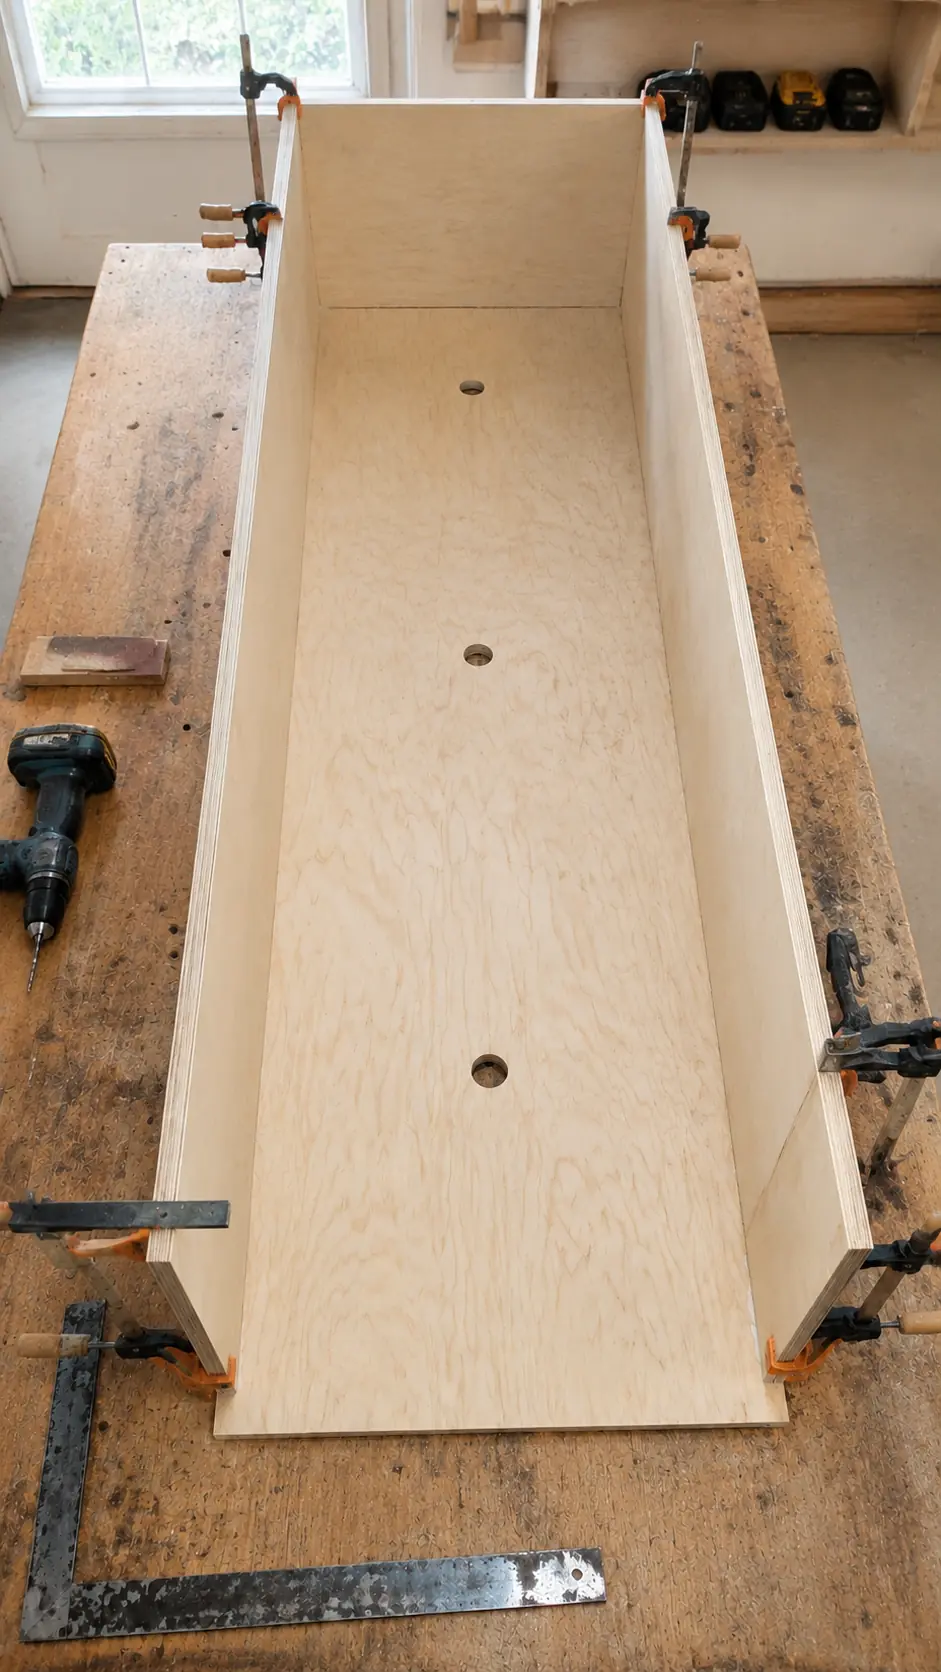
Sand the faces and exposed edges through 120- and 180-grit, taking extra care around the five slots and cord holes. Apply edge banding now if you want the plywood layers hidden.
It is usually easier to prime or apply the first coat of finish before final assembly. Keep finish out of screw locations and allow it to cure according to the product instructions before placing chargers or batteries on the shelves.
Step 6: Attach the sides and top
Lay the back panel flat. Position both 24 × 11¼-inch side panels along its edges, square and flush. Fit the 46½-inch top panel between them.
Use glue and predrilled cabinet screws, pocket screws or another appropriate plywood-joinery method. Check the upper corners for square before tightening everything.
Attach the back panel to the side and top edges with evenly spaced screws after drilling pilot holes. Avoid driving screws too close to plywood edges.
Step 7: Install the charging-shelf cleats
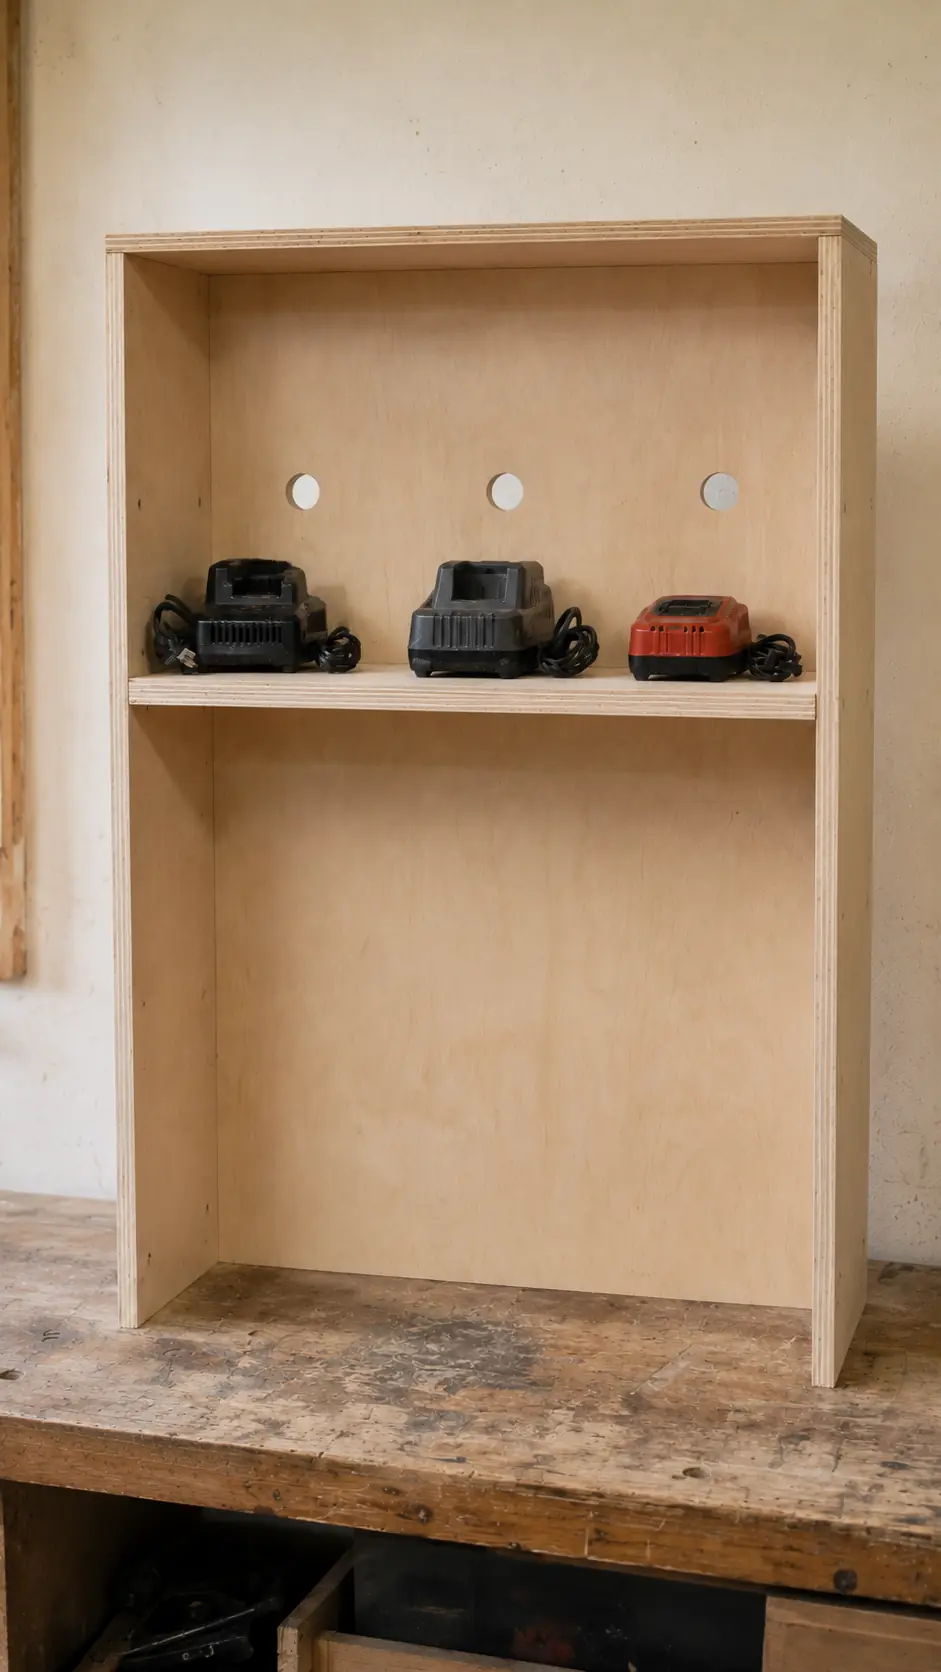
Mark the charging-shelf height on both side panels. Clamp one 11¼-inch 1×2 cleat beneath the mark on each side. Confirm that the cleats are level front-to-back and aligned with one another.
Fasten the cleats with glue and screws selected for the material thickness. Keep all screw tips safely contained inside the wood.
Set the charging shelf onto the cleats, check it for level and fasten it through the shelf into the cleats. The shelf should meet the back cleanly without covering the cord holes.
Step 8: Install the slotted tool shelf
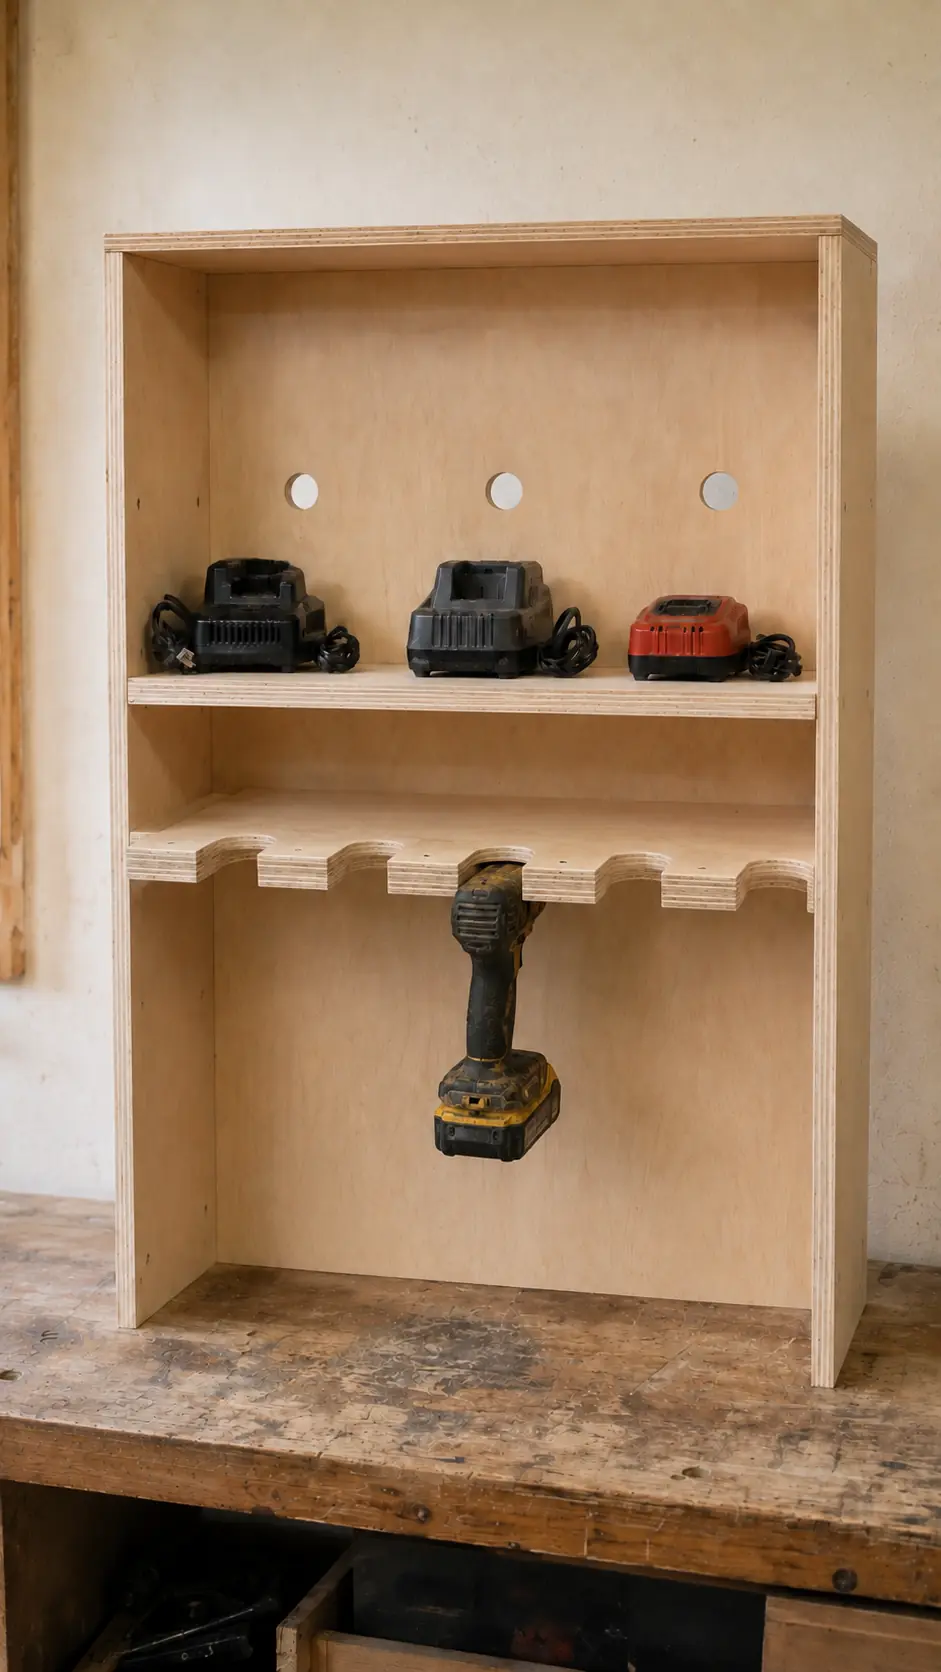
Repeat the cleat process for the tool-hanger shelf, using the planned 6-inch reference height. Keep the slotted edge facing forward.
Before securing it, test the largest tool again. Confirm that its head fits below the charging shelf and that its handle and battery hang freely in front of the lower back panel.
Attach the shelf to its cleats, then add screws through the back panel into the shelf’s rear edge if appropriate for your joinery plan. Do not place screws where they could enter a slot or contact a tool.
Step 9: Add the retaining lips and mounting rails
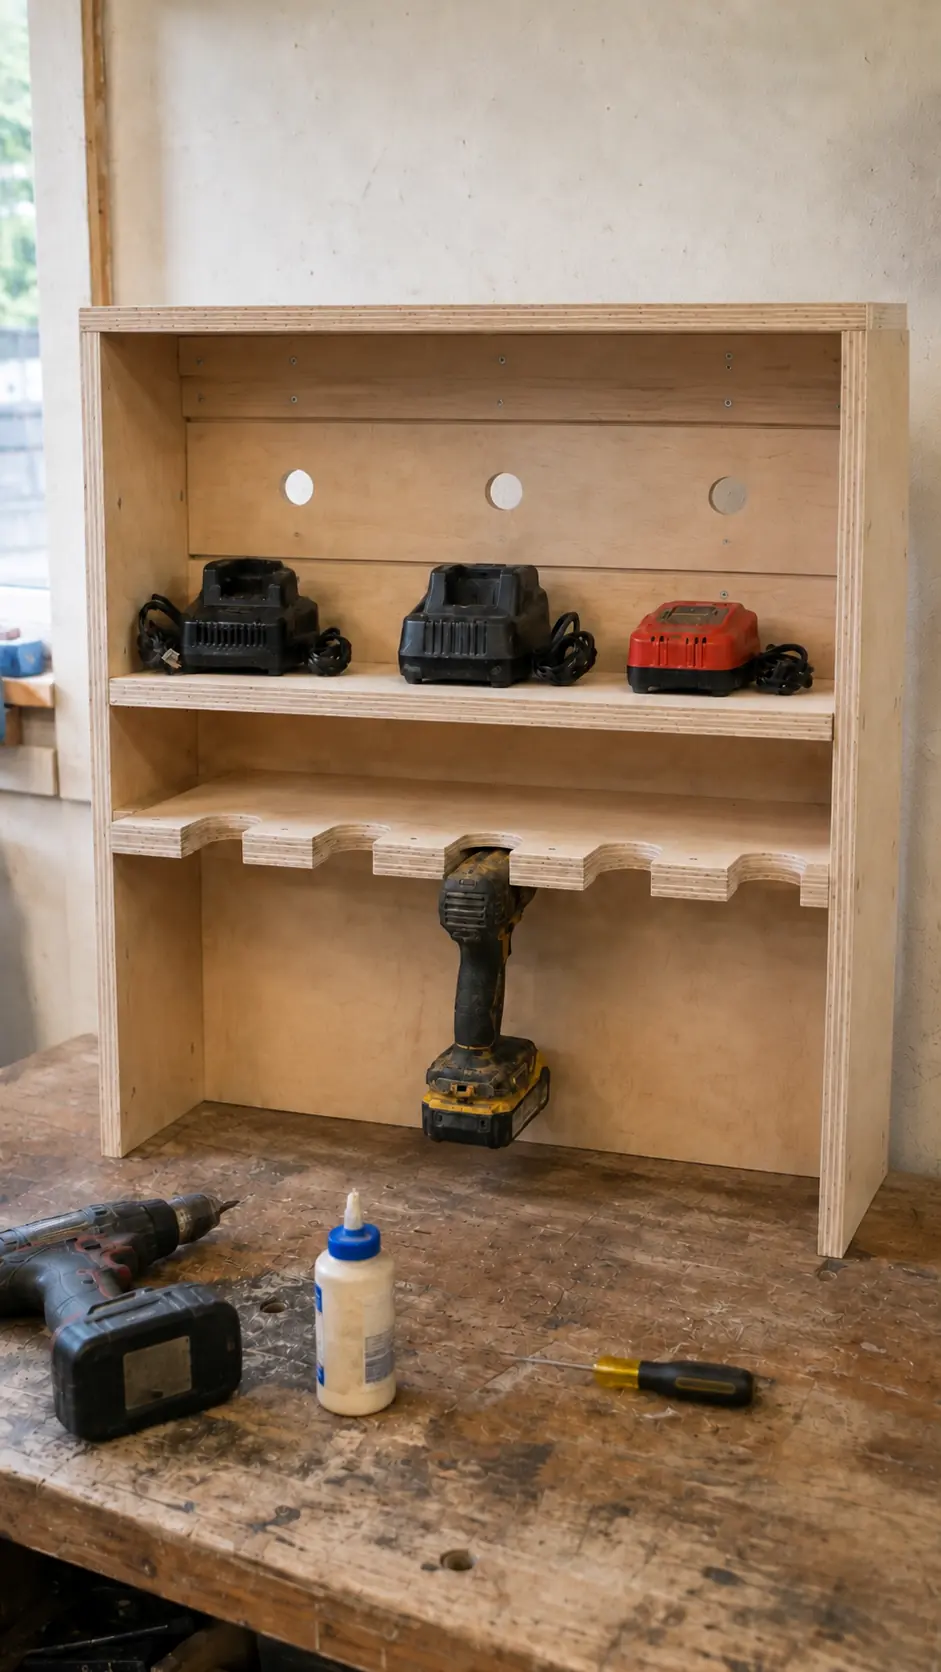
Install one 46½-inch 1×2 retaining lip along the front of the top panel and another along the front of the charging shelf. Keep the charging lip low enough that it does not block charger indicators, airflow or battery removal.
Attach the 46½ × 3½-inch plywood mounting rails horizontally against the inside face of the back panel: one near the top and one above the lower tool area. Glue and screw the rails to the back and side structure. These provide thicker, stronger zones for the wall fasteners.
Step 10: Locate the wall framing
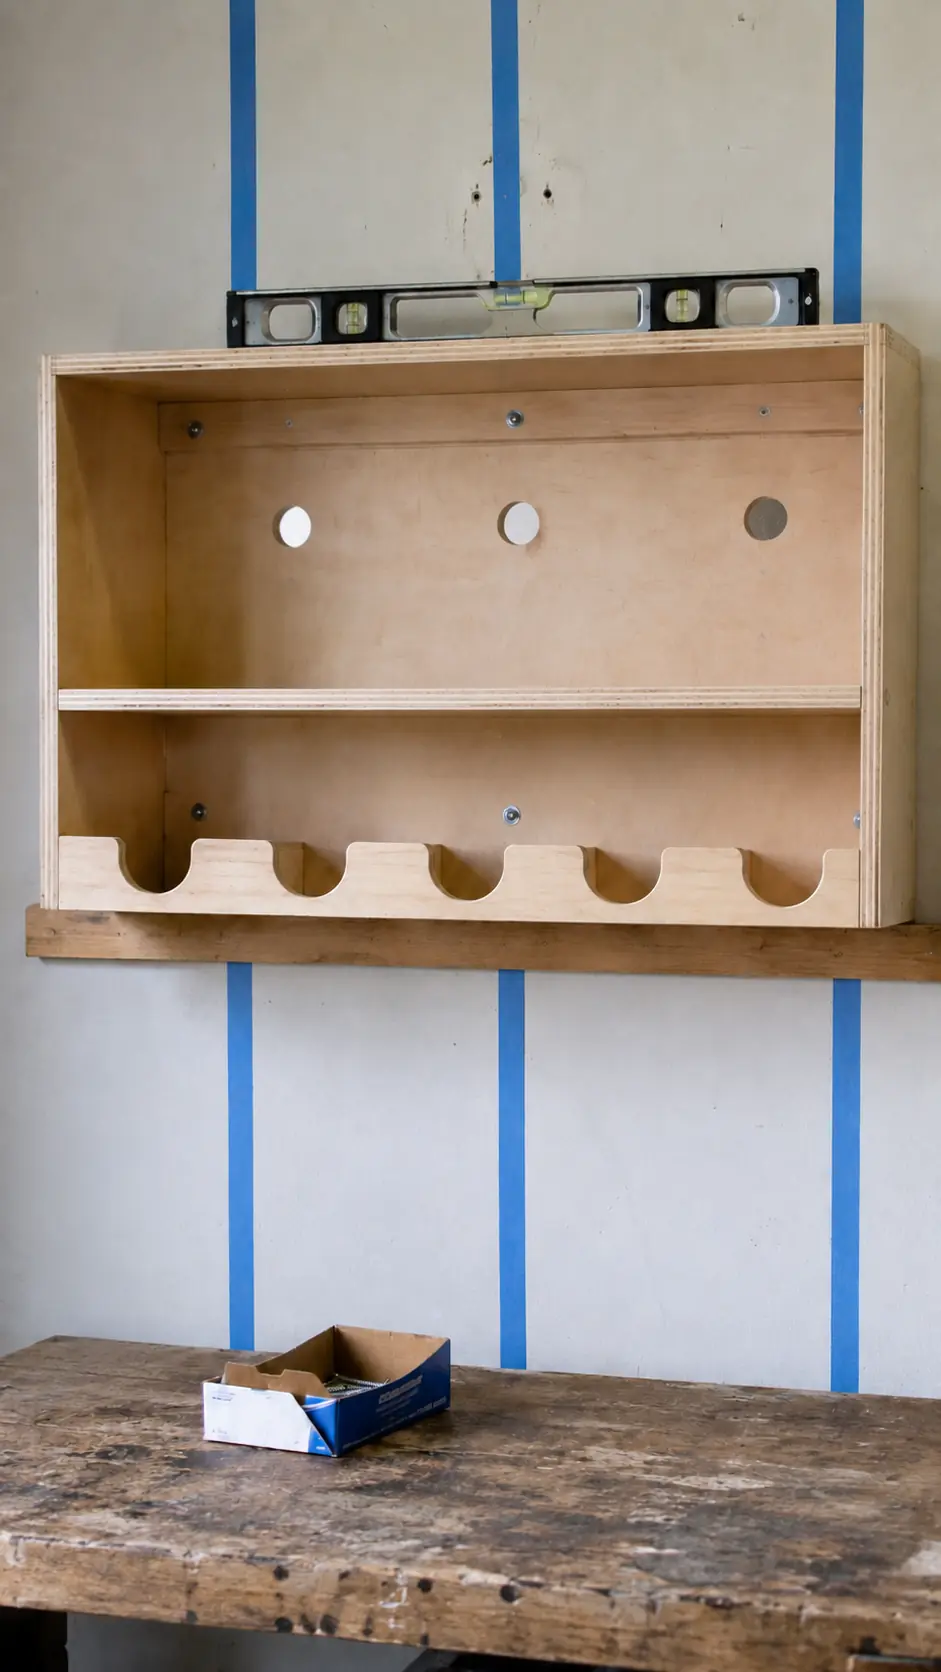
Use an appropriate stud finder and confirm framing locations with more than one method before drilling. Mark every stud that crosses the 48-inch cabinet width.
Hold the empty organizer against the wall with help from another adult. Level it, mark fastener positions through both mounting rails and check for hidden electrical, plumbing or other services before drilling.
Drywall alone is not a dependable structural support for a cabinet loaded with power tools. Fasten the station into multiple studs or use an anchoring system specifically engineered for the wall material and total load. A qualified local professional can specify the fasteners if the framing is unusual or the load is substantial.
Step 11: Mount and load the organizer
Install the structural wall fasteners according to their manufacturer’s instructions. Check the organizer for level and confirm that it sits tight against the wall without rocking.
Load the cabinet gradually:
- Place the empty chargers on the shelf.
- Route cords through the smooth openings without pinching them.
- Add battery packs with their terminals protected from loose metal.
- Hang one tool at a time and watch for movement.
- Recheck the mounting fasteners after the cabinet carries its normal load.
Connect chargers only after the organizer is stable, clean and correctly positioned. Keep all ventilation openings clear and follow each charger’s operating instructions.
Optional Upgrades
Add labels
Label each tool slot and charger position. This makes cleanup faster and prevents the station from becoming a general-purpose shelf with five strangely shaped holes.
Add bit storage
Mount a small removable bit case or shallow bin beside the chargers. Avoid loose metal bits near exposed battery terminals or charger openings.
Use a French cleat mounting system
A properly designed French cleat can make the organizer movable, but the wall cleat still has to be attached securely to structural framing. Account for the weight of the loaded cabinet, not merely the empty plywood box.
Build a narrower version
For three tools, reduce the cabinet width after laying out the actual tools and maintaining safe spacing. Recalculate every between-side measurement rather than simply cutting 12 inches from random parts.
Add compatible battery holders
Commercial passive battery mounts can organize spare packs if they are designed for the exact battery platform and do not short, crush or stress the contacts. Follow the mount and battery manufacturers’ instructions. Do not fabricate an electrical charging interface from wood, metal strips or improvised wiring.
Common Mistakes to Avoid
Cutting slots before measuring the tools
Online dimensions cannot predict every drill body, belt hook or battery shape. Arrange your real tools on the shelf first.
Blocking charger vents
Do not build tight charger cubbies merely because they look tidy. Open space is intentional. Maintain every clearance specified in the charger manual.
Mounting only to drywall
The organizer becomes heavy quickly. Tools, batteries, chargers and plywood all count toward the load. Use structural framing or a suitable engineered wall-mounting system.
Hiding too much cord
Large coils of cable trapped behind a wooden cabinet are harder to inspect and may interfere with mounting. Route cords neatly without crushing, tightly bending or permanently enclosing them.
Placing the station in a dusty finishing area
Keep chargers away from concentrated sawdust, flammable finishing vapors and wet areas. Clean the organizer and charger vents regularly according to the manufacturer’s directions.
Making the top shelf a junk shelf
Avoid piling screws, metal offcuts and liquids above batteries or chargers. Use closed bins for small hardware and keep liquids somewhere else.
Where This Organizer Fits in a Complete Workshop
A drill station handles one high-friction problem: the cordless tools you use constantly finally have obvious homes. It works even better as part of a larger wall-storage plan.
Pair it with:
- A dedicated DIY clamp rack
- Strong garage shelves with free plans
- A compact lumber storage rack
- A properly planned miter saw station
- A broader collection of DIY tool-storage ideas
If the entire room needs attention, start with this beginner’s guide to setting up a small woodworking shop. It helps connect storage, work surfaces, lighting, dust control and safe movement into one usable layout.
Want More Woodworking Plans for Your Shop?
Disclosure: This section contains an affiliate link. If you purchase through the link, I may earn a commission at no additional cost to you.
A power-tool charging station is a satisfying weekend build, and it often leads to the next useful project: a workbench, storage cabinet, lumber rack or mobile tool stand.
If you would like a larger collection of project ideas, Ted’s Woodworking is an optional digital offer that promotes access to woodworking plans across a range of categories. It may be useful when you want inspiration beyond this free organizer plan, especially for future shop-storage and furniture projects.
Review the current sales page, sample material, included files, terms and refund policy for yourself before buying. The goal is not to collect plans you will never use; it is to decide whether the current package matches your skills, tools and project list.
See the current Ted’s Woodworking offer here
Power Tool Organizer FAQ
How wide should drill-holder slots be?
Two inches is a useful starting point for many drills and impact drivers, but there is no universal size. Measure the narrow section below each tool’s motor housing and account for rubber overmolding, belt hooks and controls. Test the layout on cardboard or scrap plywood first.
How much space should I leave around a battery charger?
Follow the manual supplied with the exact charger. Keep every vent clear and do not place chargers in closed wooden cubbies unless the manufacturer specifically permits that installation. More open air is generally better than a tight decorative fit.
Can I mount a power strip inside the organizer?
Only use a listed power strip in a way its manufacturer permits, without covering vents or making plugs inaccessible. Do not daisy-chain strips, modify the cord, remove the grounding pin or treat an extension cord as permanent building wiring. Consult an electrician if you need a new receptacle.
Can the organizer be mounted with drywall anchors?
Light-duty drywall anchors are not appropriate for a cabinet loaded with heavy power tools. Mount into multiple studs or use an anchoring system engineered for the specific wall and expected load.
Can I build it from ½-inch plywood?
The cut list and between-side dimensions are designed for ¾-inch plywood. Thinner material changes the joinery and may flex more under load. Redesign the supports and recalculate dimensions rather than substituting thinner plywood directly.
Where should spare batteries be stored?
Store them in a cool, dry location according to the battery manufacturer’s instructions. Protect the terminals from screws, nails and other conductive objects, and do not store damaged packs with normal batteries.
Should batteries remain on the charger all the time?
Follow the instructions for the specific charger and battery platform. Charging behavior varies, so avoid applying one brand’s guidance to another system.
Final Thoughts
A useful power tool organizer does three things well: it fits the tools you actually own, keeps chargers open and ventilated, and stays securely attached to structural wall support.
Measure before cutting the five slots. Keep the electrical side simple and manufacturer-approved. Mount the empty organizer carefully, then load it one item at a time.
Once the drills, drivers and batteries have obvious homes, the workbench becomes much easier to clear—and much harder to lose under a pile of cordless-tool cases again.